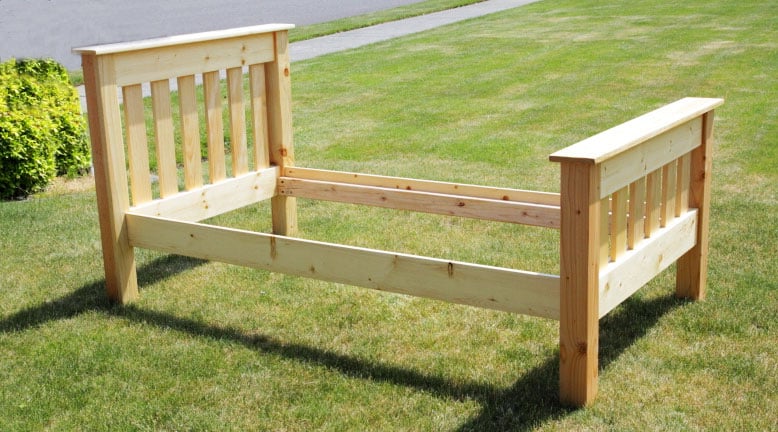


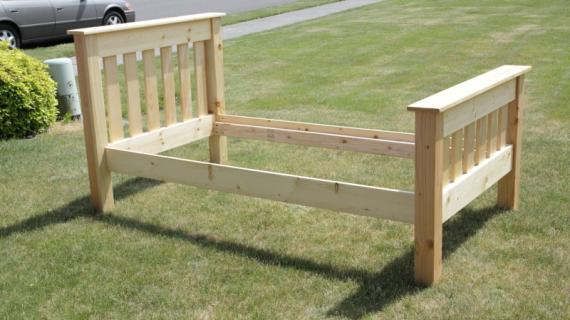
Build your own simple bed frame with our step by step tutorial and off the shelf lumber and minimal tools. We love the classic mission style, the easy construction, and the sturdy final product, sure to last and last. Boxsprings are optional. Free woodworking plans by Ana-White.com
Preparation
3 - 1x6 @ 8 feet long
4 - 1x4 @ 8 feet long
1 - 4x4 @ 8 feet long (for headboard posts)
1 - 4x4 @ 6 feet long (for footboard posts)
4 - 2x6 @ 8 feet long
2 - 2x4 @ 8 feet long
7 - 1x3 @ 8 feet long (or similar for bed slats)
1 - 1/4" long brad nails (a couple hundred)
16 - 5" long self tapping wood screws OR 2-1/2" pocket hole screws if you have a Kreg Jig
40 - 2-1/2" long self tapping wood screws
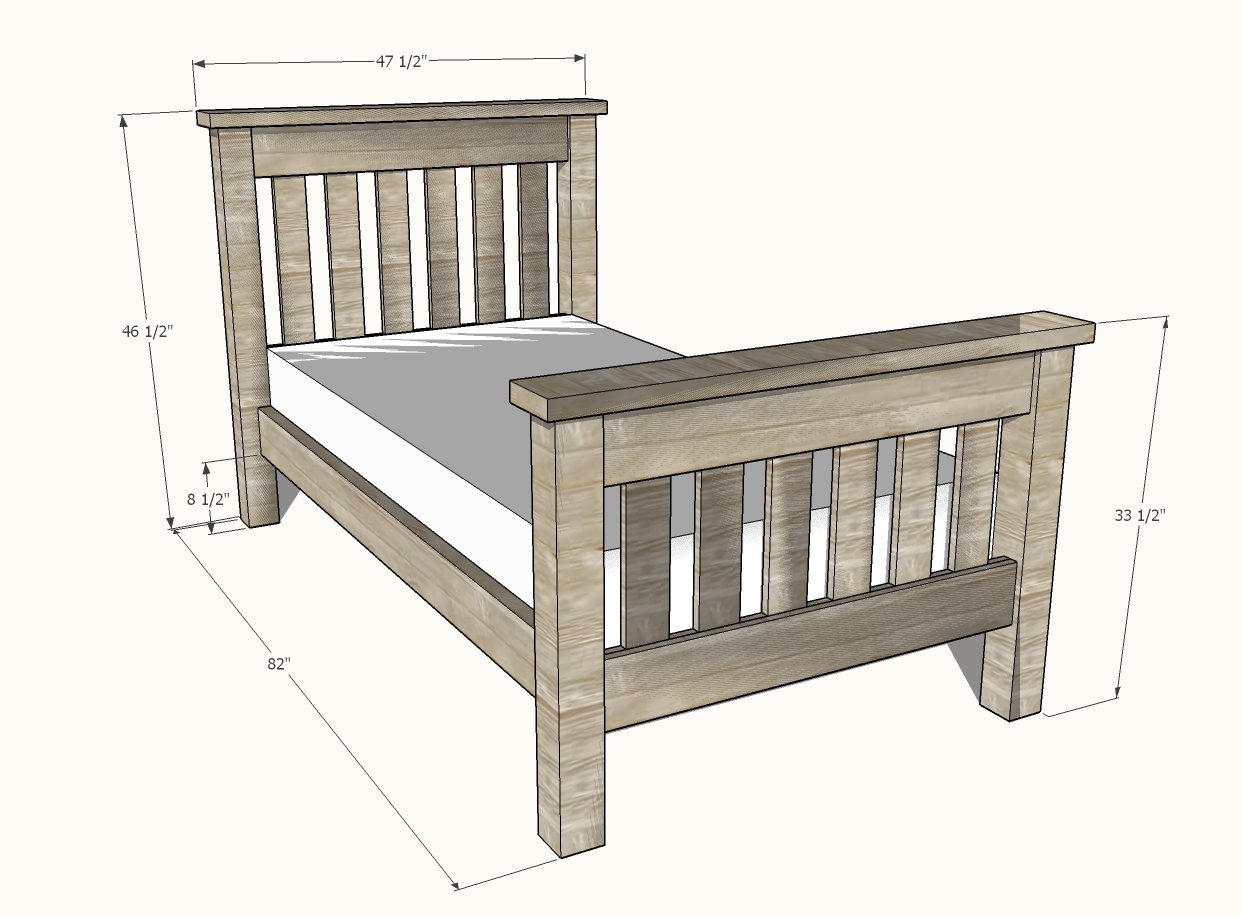
HEADBOARD
- 2 - 1x6 @ 38-1/2"
- 14 - 1x6 @ 2-1/2"
- 6 - 1x4 @ 30"
- 2 - 4x4 @ 45"
- 1 - 2x6 @ 47-1/2"
FOOTBOARD
- 3 - 1x6 @ 38-1/2"
- 14 - 1x6 @ 2-1/2"
- 6 - 1x4 @ 23-1/2"
- 2 - 4x4 @ 32"
- 1 - 2x6 @ 47-1/2"
BED FRAME
- 2 - 2x4 @ 79-3/4"
- 2 - 2x6 @ 75" (cut to fit)
- 14 - 1x3 @ 38-1/2" - slats
Cut boards with a compound miter saw (preferred) or a circular saw with straight edge.
Avoid cutting very small pieces - instead, cut a small piece from a larger piece.


Instructions
Step 1

Headboard Construction
Lay out headboard panel as shown in diagram.
Glue and nail from the back side to hide nail holes.
The final small piece should be cut to fit for a perfect fit.
NOTE: If you plan to join the headboard panel to the legs with pocket holes, carefully place nails at the outer edges of the board to allow room for drilling pocket holes in next step.
Step 2

Headboard Construction
Attach the headboard panel to the legs with either 1-1/2" pocket holes and 2-1/2" pocket hole screws (most recommended since holes will be hidden) or use screws from outside of 4x4 legs drilled into panel (fill with wood filler for final finish).
Step 3

Headboard Construction
Attach top 2x6 to headboad with 2-1/2" self tapping wood screws and glue.
Step 4

Footboard Construction
Build the footboard as you did the headboard, but finish the back side of the top of the footboard with remaining 1x6 as this will be exposed in the final product.
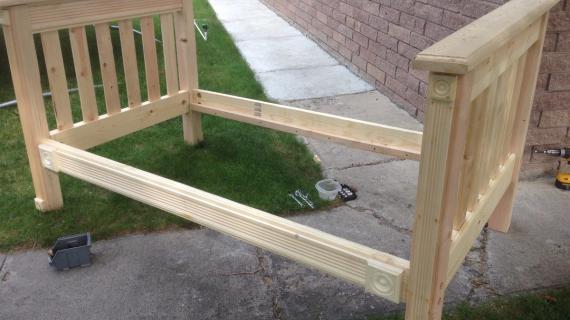
Step 5

Siderail Construction
Attach 2x4 siderail cleats to the 4x4 legs with 2-1/2" screws. The green blocks shown in the diagram can be used to help assemble the bed but are NOT attached to the bed.
Step 6
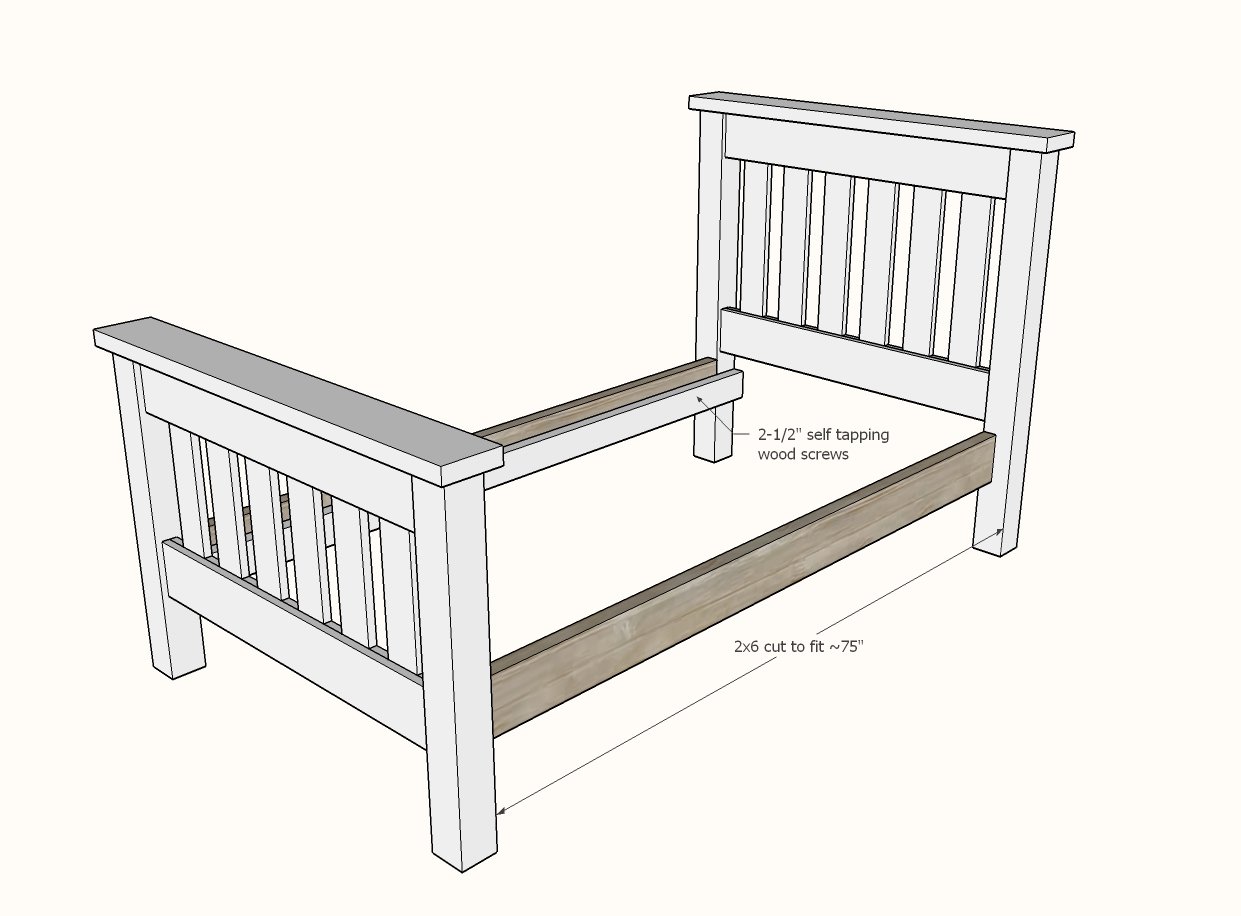
Add the siderails to the cleats to finish the bed.
Step 7
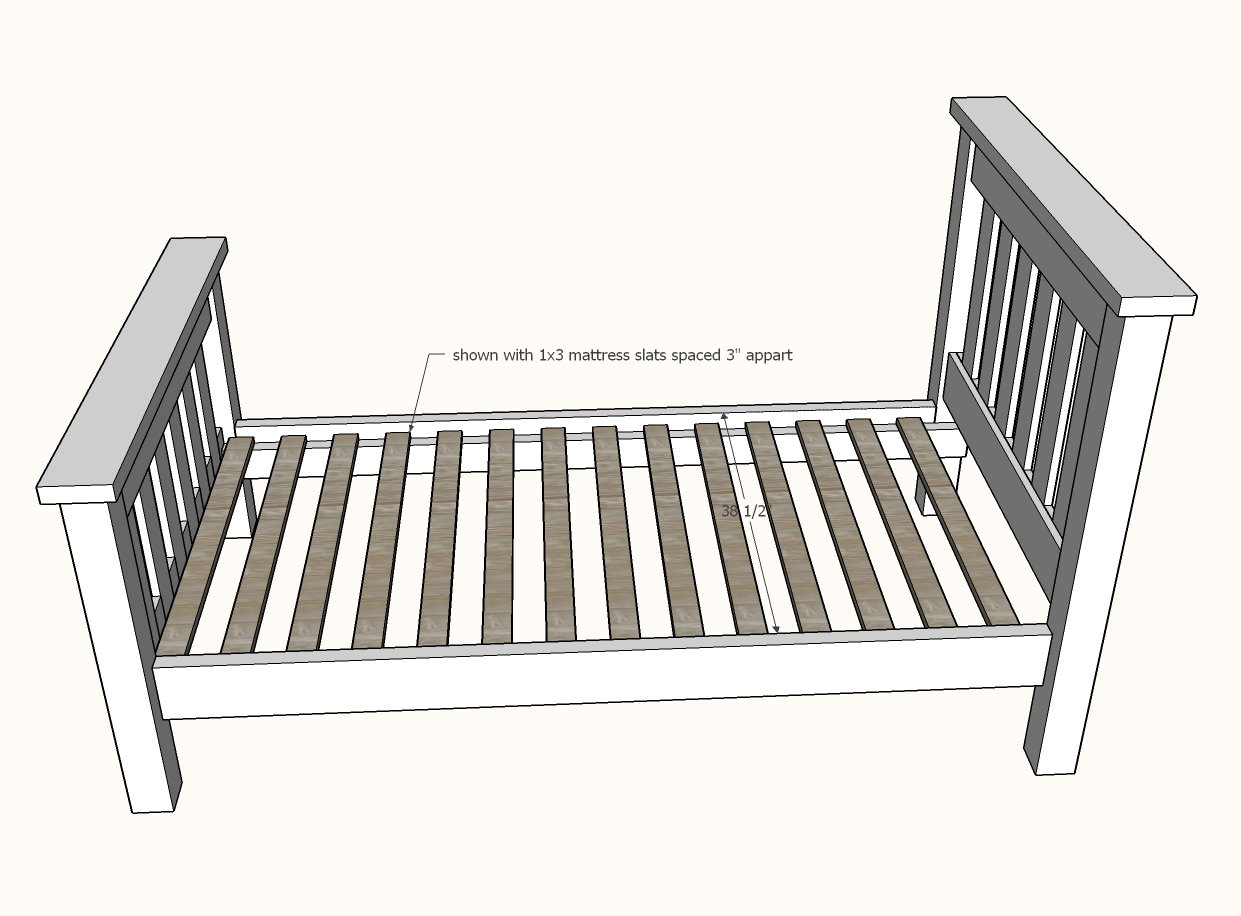
Slats should be per mattress recommendations. You can use scrap wood, plywood or other materials. As shown, we use 1x3s cut to fit.
Step 8
Fill all holes with putty and sand and finish as desired. You can choose to assemble the bed (as in step 6) after the bed is finished and moved into the room. Just make sure you do a test fit first.


Comments
Toni M (not verified)
Tue, 12/29/2009 - 17:47
Hi Ana, I have been looking
Hi Ana, I have been looking over this plan all day today and last pondering this plan. What type of wood would you recommend building it from? I went to Home Depot here in AZ today and found wood to be extremely expensive. Oak was over $4.50 a linear foot for 1x6 and Polar was around $3.50. I was looking at pine as well but they have different types and some of it has lots of knots in it. This is my first wood project and I am not sure exactly what to do and I am somewhat confused on wood choices. I was hoping to make this for around $40-$50 like your post indicated, but I am not what wood you used to get it at that price. I could use some insight as to what to do here. I read your posting today about woods but it still leaves me confused.
Thanks for all the help,
Toni
Ana White (not verified)
Wed, 12/30/2009 - 07:56
Hi Toni,I have been thinking
Hi Toni,
I have been thinking about your comment, and wanted to add that there is a wood in the maple family, called Rubberwood or Parawood, that gaining much poplularity in the furniture making world. It is up to 50% less than maple or other hardwoods, is ecologically friendly (the rubberwood tree produces latex, and is only harvested after latex production diminishes) and becoming more and more available.
We discussed this on the Facebook fan page in a discussion. Perhaps try calling around to see if rubberwood is available in Arizona.
Good Luck!
Ana
Toni M (not verified)
Fri, 01/01/2010 - 20:26
Thanks for the info Ana. We
Thanks for the info Ana. We decided to go with pine and are in the process of building the bed right now. We spent around 75-80 on the wood..so I guess AZ is a little more expensive.
We are having so much fun and love building it. Since this is our first project we are finding out several things. One of them is to measure a little over since the table saw takes out 1/16" so we had to over measure to compensate for it. We also found it is SO much easier to drill pilot holes for the screw on the boards...and also to rough sand the boards before assembling. It was some what difficult to sand some of them when we had it all put together. I am not sure if those are things people should know and we just missed them.
Also, I wanted to let you know that there is a mistake in your wood to buy. You need (2) 2x4's not one. You have to cut two board that are 50 1/2" and there are only 96" in 8'. We also found that you have to screw in the spacers at the end of each side. We just glued them and left them over night and then this morning when we put the posts on and went to pick it up, they came out...oops.
Thanks so much for your plan. We really are having a good time working with it and cant wait to start the 2nd bed. (We have two little boys that both want one).
Romy (not verified)
Mon, 01/18/2010 - 19:32
Hi Ana,I am so inspired by
Hi Ana,
I am so inspired by your talent and your ability to just do it.I never thought I could but your directions look quite simple. I would love to make this bed for my son. The only problem is that I need a double/full bed since he falls off the twin size. I would really appreciate it.
Thank you,
Romy
The Yates Family (not verified)
Fri, 01/22/2010 - 21:38
Love LOve this bed! How would
Love LOve this bed! How would I make it for a full size mattress? Thanks for all the awesome plans!
~Kristi
Tom (not verified)
Sat, 01/30/2010 - 17:37
Ana,Your site is really
Ana,
Your site is really inspiring. We're considering building a bunk bed. Your plan shows 73 1/4" for the length of the twin mattress, however standard twin mattress dimensions on the net are 75" long. Is this a mistake or can a twin actually fit in a 73 1/4" space?
Thank You.
Nancy (not verified)
Mon, 02/01/2010 - 10:31
Hi Ana,I too love the plans
Hi Ana,
I too love the plans and would like the plans for a full size bed.
Nancy
Ana White (not verified)
Mon, 02/01/2010 - 17:05
Hi Tom, I made the changes as
Hi Tom, I made the changes as you stated to better fit a 75" twin. Thanks for noticing this. Ana
Anonymous (not verified)
Sun, 02/14/2010 - 13:51
I am also wondering if we
I am also wondering if we could see plans for a full sized bed??? I LOVE this website :)
Rae (not verified)
Mon, 02/22/2010 - 07:33
HI - LOVE this plan. If we
HI - LOVE this plan. If we wanted to add slats to avoid using a box spring, would we need to use a different sized board for the side rail? Would 2x6 still work or should we use 2x8 (if that exists, I've never seen that size but never actually looked for it).
Grant (not verified)
Sat, 02/27/2010 - 18:31
Ana, I love your blog. I'm
Ana, I love your blog. I'm looking for some additional insight on how to screw the boxspring frame to the headboard/footboard. You say,"Screw into the headboard, and screw at an angle into the four posts." Is all the screwing done from the inside? How long should the screw be? I don't want to end up with a squeaky bed (like my current bed is). Any tips? Have you ever used bedrail hangers or lagbolts?
Ana White (not verified)
Mon, 03/01/2010 - 06:24
Lag bolts would be the way to
Lag bolts would be the way to go. The most important thing to remember here is that the legs support all the weight, which is then carried by the side rails. So you will want to fasten the siderails to the legs, and not just the headboard and footboard (although the headboard and footboard are also fastened to the legs and are very sturdy). The easiest way is to "toenail" your screws from the siderails into the posts, which basically means start by drilling at an angle from the inside of the siderail, drilling into the leg posts.
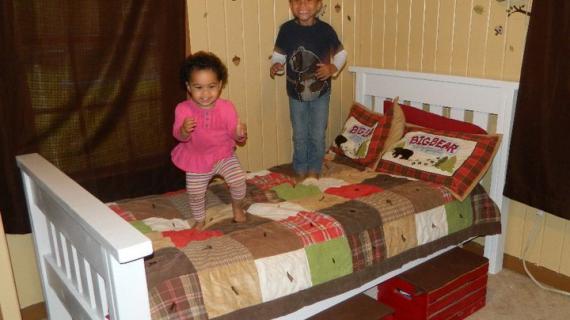
I just want to note that another reader built this bed, sent me photos, and commented that her bed was much stronger than the Pottery Barn bed they just broke. Zero complaints about the sturdiness of this bed.
Hope this help! Ana
Grant (not verified)
Mon, 03/01/2010 - 14:12
Thanks Ana!!
Thanks Ana!!
Toni M (not verified)
Fri, 03/12/2010 - 07:49
Ana, Mikk just finished
Ana, Mikk just finished building our second bed from this plan. We used "L" brackets to hold the 2x6 side rails to the 4x4 posts on the headboard and footboard. The bed does not move a single bit. WE love this bed plan and making it for our boys. I will send you more pictures of the 2nd bed when we have a chance.
Angela (not verified)
Sat, 03/27/2010 - 17:55
My husband and I are so
My husband and I are so excited to get started making our own furniture! Being that we're completely new to the process, we made our first pricing run to Lowe's today and I'm not sure we know how to shop for lumber! The only pine we found was MUCH more expensive than mentioned in a previous comment. The 1x6's alone were $13 EACH, and we didn't even SEE any 4x4's where we were sent to look - Were we looking in the wrong place? The pine we saw didn't have many knots, either - was it the fancy kind? lol - needless to say we felt pretty clueless. Should we be looking for something else or is Lowe's just getting pricey?
Anonymous (not verified)
Mon, 03/29/2010 - 10:53
Angela, are you in the south?
Angela, are you in the south? We're having the SAME problem. We made some benches that called for 2x12's, those babies were $19 each. Only one choice (at Home Depot) and they were pre-sealed. I thought that was fine but turns out the seal gums up my orbital sanding paper almost immediately. It was a disaster. We ended up buying 2x6 instead and spent another $44 on those ($11 each x 4 for two benches). My hubby was a little more than ticked.
I don't think it's your shopping, I think it's just WAY more expensive down here.
In reply to Angela, are you in the south? by Anonymous (not verified)
Jake
Sat, 05/26/2012 - 15:16
Make Your Own Wide Boards
All of us are reeling from price shock for lumber especially as you increase in width. I have taken to using my Kreg Jig to combine smaller width boards to make a larger one. Clamps, a flat surface and sandpaper are a necessity. Then you can rip them to your size or do as I do and just adjust your plans for a slightly wider board. On some projects I can do this and others I have to rip which, unfortunately, I do at my own risk. Then wood filler comes in handy.
Angela (not verified)
Tue, 03/30/2010 - 04:56
We're in OK, so, yes, we're
We're in OK, so, yes, we're south-ish. Aw, that makes me sad! I was really looking forward to building our own, but at rates like these we might be better off financially buying our furniture cheap until we can afford to build something for quality.
Paul (not verified)
Thu, 05/06/2010 - 08:21
Anna (et. all), I love
Anna (et. all), I love Knockoff wood and am building this simple bed for my first project. My father-in-law and I are building it for my 2 yr. old son and are 'stuck' at step 3. In this step, it says to predrill through the 4x4 and use the 4" screws to attach to the headers. My question is should this be counter sunk half way through the 4x4 or just predrilled? The reason I ask is that if you don't counter sink the 4" screw, then it only goes in 1/2 inch into the header. Counter sinking seemed to make more sense, but I wasn't clear from the directions. Thanks in advance for your help and keep up the amazing work.
Thanks,
pauL
llmhogan (not verified)
Sat, 05/08/2010 - 15:12
Hi Ana, I love this bed! Do
Hi Ana, I love this bed! Do you have any suggestions on how to convert to a twin XL bunk bed?
Don (not verified)
Sat, 07/03/2010 - 10:37
For some crazy reason i can
For some crazy reason i can not find 4x4 pine anywhere? I'm in Denver and i swear no-body carry's a 4x4 of any kind unless it's a Douglas-fir at home depot.
Anybody out there in Denver got any ideas where i might find 4x4 pine?
Guest (not verified)
Thu, 05/12/2011 - 10:55
I ran into the same problem
I ran into the same problem at Lowe's in Texas. I asked the lady why I couldn't find pine 4X4s online, and she was looking in the store and said she had a pine 4X4 but it was mislabeled as Douglas Fir. She said it was definitely pine by looking at it, though. Maybe you can double check that the actually wood is pine even if labeled differently.
In reply to For some crazy reason i can by Don (not verified)
claydowling
Thu, 05/12/2011 - 11:16
Douglas Fir is Fine
Douglas Fir is a fine wood for this use. It's a little harder than pine, and a bit more prone to splitting (so pre-drill any screw holes). But it's wonderfully strong and easy to work. I used it to build the legs for my workbench, and it's also made the jaws for a very nice vise using the offcuts from the bench legs.
Kathy (not verified)
Tue, 07/13/2010 - 11:32
Hi, I am making this bed for
Hi, I am making this bed for my daughters. Beds are SO expensive in New Zealand but lumbar is too! So before I went to the timber place, I went and shopped the bed place. MDF beds for $500+! New incentive! Just need to get a nail gun!
Matt (not verified)
Mon, 07/26/2010 - 06:55
Hi Ana. I'm confused a bit
Hi Ana. I'm confused a bit by step 7. I get that we screw into the headboard with 3" screws, but I am confused as to how to toenail also into the posts.
If I use 2 screws screwing F into G, a total of 8(?) for all 4 corners, am I going to have enough room to tonail through that joint into the bed posts?
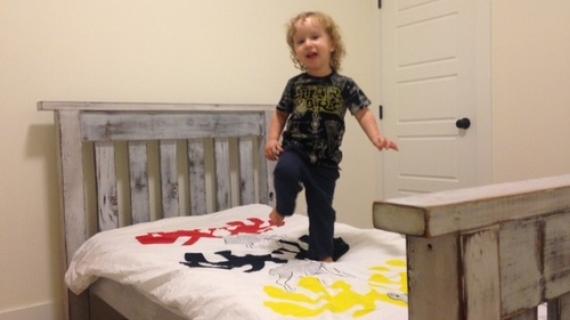
I'm about 30% done with the bed as is, and I'm very excited as this is my first real woodworking project. My son is 2 and really has outgrown his crib, so we are VERY excited to get this bed done and have him settled.
Thanks again for the plans and encouragement that you provide. You have a fantastic site!
Salt City Gradman (not verified)
Tue, 08/10/2010 - 18:08
Ana- I've noticed that you
Ana- I've noticed that you use Google Sketchup. Any reason why you don't post the actual google sketchup files for download? Then we could just click on different parts to get dimensions and change views and everything. Just an idea that might help. Love your site!
Ana White (not verified)
Thu, 09/16/2010 - 14:37
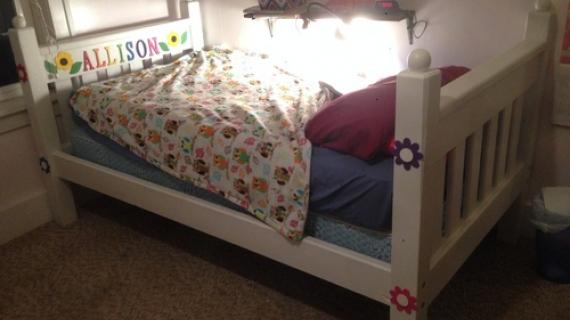
Check out Maureen's Smurf
Check out Maureen's Smurf Blue Bed!
Build a Bed wi… (not verified)
Mon, 09/27/2010 - 07:09
[...] getting cold on the
[...] getting cold on the floor. Time to move him up onto his own bed. I had thought to build him the Simple Bed like this one made by the Sew Much Ado [...]
justin (not verified)
Sat, 11/06/2010 - 09:17
I made two of these for my
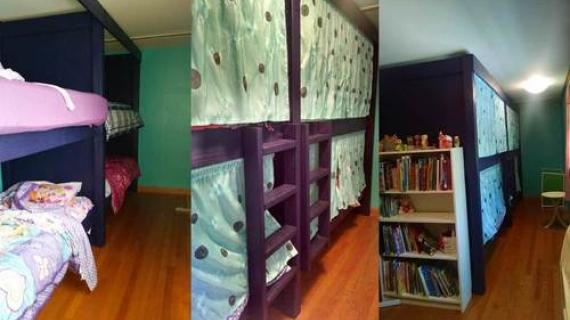
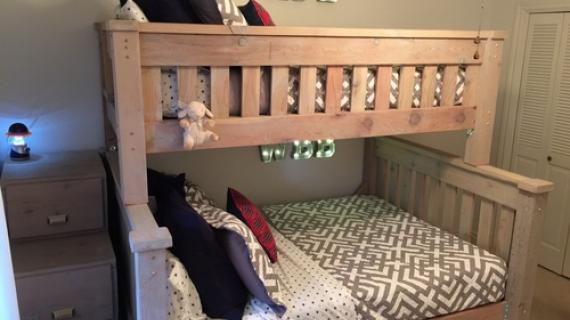
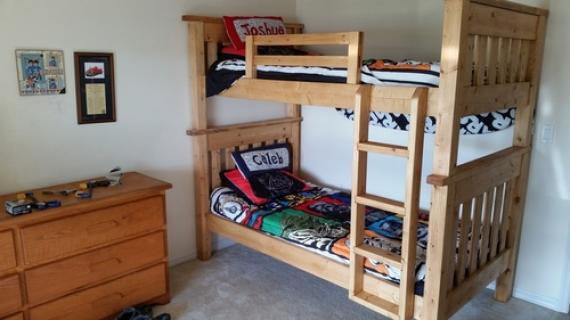
I made two of these for my daughters. Thanks for the plans! I used bed bolts and dowels to fasten the bed rails. that way the head and foot boards would be interchangeable and can be stacked in to bunk beds. love the website
Guest (not verified)
Wed, 08/17/2011 - 21:04
Tell me more about the bolts and dowels.
My husband and I are going to to make two simple beds that will stack into bunks that can be put together or taken apart for a friend who cant find such a thing for less than $400 (mdf junk). We want to be able to do what you described above so we can get the beds up into their 2nd floor (steep narrow staircase).
I've been wracking my brain trying to come up with a way to do this. Tips?
TD (not verified)
Wed, 12/01/2010 - 14:17
I like this one for its
I like this one for its simplicity and I would like to build it. I am really struggling with the 4x4's and 2x4's though. I cannot find these in pine like the rest of the 1x boards. I only have found Doug Fir. This does not seem to be a problem if you are painting the bed. However, I'd like to stain it. I called some lumberyards and they said that 4x4 and 2x4 pine does not exist. Has anyone made this successfully and stained it? Thanks.
jasi (not verified)
Thu, 12/30/2010 - 13:02
I really hope you're able to
I really hope you're able to post the solid wood headboard plans soon! Looking forward to building one for a full sized mattress. Thanks, Ana.
Ebeth (not verified)
Tue, 01/18/2011 - 13:50
Sooooo, this is my first
Sooooo, this is my first "big" project....I'm in the process of buying all of the materials. Can you please tell me exactly what type of screws and nails I need to be buying? We're going to be making two and stacking them into bunk beds but, I'm stuck at this point. Please help me !!
Jarvis (not verified)
Fri, 01/21/2011 - 14:53
I can't find 4x4's either.
I can't find 4x4's either. All I see are pressure treated lumber. They are cheap enough but I am just not sure I should use them to make a bed for my kid if it has chemicals in it and the guy at Home Depot said the boards will warp when dry. Anyone else had this problem? Ana what are your thoughts?
Guest (not verified)
Tue, 04/10/2012 - 07:09
4 x 4
Menards does have 4 X 4s. We did not find them at lowes or home depot but menards had them in at least 3 types of wood that were NOT treated
KJ (not verified)
Sun, 01/30/2011 - 13:29
We found all the proper
We found all the proper lumber, but it cost $100 for just the lumber : } . Husband is building it now!
Linda (not verified)
Tue, 02/08/2011 - 04:05
I love this site. Is there a
I love this site. Is there a way to get the plans for the Simple Bed in a queen?
katnick21
Sat, 04/30/2011 - 17:21
Simple Bed plans for Queen size bed
Would love to see these plans for a queen size bed, thanks!
Guest (not verified)
Mon, 05/16/2011 - 11:26
Douglas Fir is pine.
Douglas Fir is another tree in the evergreen family.
In reply to Douglas Fir is pine. by Guest (not verified)
claydowling
Mon, 05/16/2011 - 11:32
Evergreen != pine
The pines are a specific group of evergreens, and the woods of different evergreens are very different. Their properties are different and they have different suitability for different uses. Take a plane to some spruce and compare your results with southern yellow pine.
Douglas Fir is fine for furniture though. The Japanese use it quite a bit, and I'm very happy with the bench legs I made from it.
Guest (not verified)
Mon, 07/18/2011 - 17:19
Head and foot board size
Hi Ana
I am interested in having my husband make this bed for our 2 year old daughter. I was wanting a day bed but havent been able to find one. Are the head and foot board the same size? They look like they are. That is what I am wanting since I cant find a day bed. Thanks!
Heidi (not verified)
Fri, 09/09/2011 - 22:52
What if I change the 4 -
What if I change the 4 - 1"x6"x8' to 1"x4"x8' ? Would that work? They are way cheaper.
Heidi (not verified)
Fri, 09/09/2011 - 22:54
What if I change the 4 -
What if I change the 4 - 1"x6"x8' to 1"x4"x8' ? Would that work? They are way cheaper.
claydowling
Sat, 09/10/2011 - 20:21
Changing 1x6 for 1x4
You'd have to re-work the slat arrangement for the head and foot boards. Not hard to do at all, but if you're not up for it pay for the 1x6 instead.
laceylmm
Mon, 09/26/2011 - 11:41
Cheaper Version
Just wondered if you have posted the plans for
"I will also be posting a plan with a solid panel for the headboard and footboard, made of hardwood plywood, in a twin sized. This will be more economical." As you mentioned in one of your earlier comments to this post. Thanks.
I actually plan on making the Simple daybed, but would like to use a hardwood plywood to cut down the cost.
jon Schomacker (not verified)
Fri, 11/11/2011 - 10:49
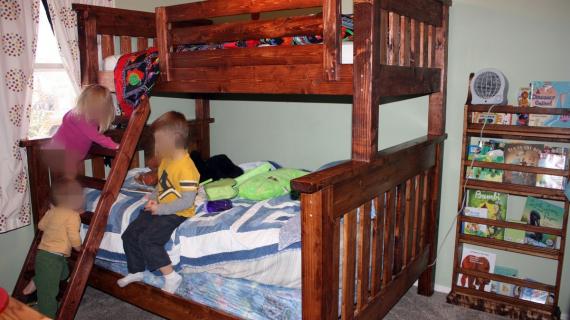
Bunk beds
I am planning on making 2 of these beds and stacking them to make bunk beds. How do I attach them to make them safe. I have 2 boys that play rough.
Jack K. (not verified)
Fri, 01/27/2012 - 08:06
Type of nails (regular or finish)?
Hi Ana! Thanks for the instructions. Quick question though, which type of nails do you use in steps 1 and 2, regular or finish?
UCF99ENG (not verified)
Fri, 02/17/2012 - 11:34
Weekend project
I plan on making this bed this weekend for my daughter. I plan on using my nailgun for the 1.25" and 2" fasteners for the head and footboards. For the remaining screws, I'm going to use some self tapping screws to prevent wood splitting.
I like the pictures that are made in Google Sketchup. I just wished they were bigger because it's hard to see some of the text.
Thanks for making us novice woodworkers seem like professionals.
Guest (not verified)
Tue, 02/28/2012 - 10:56
Is there any way that we can
Is there any way that we can get bigger pictures for the instructions on the simple twin bed.All the pictures remain small even when they are clicked on
PedroAA
Tue, 03/27/2012 - 09:21
Suggestion... Baby crib!
Hi Ana.... It would be fantastic to see some baby crib plans!
A simple one, as well as something with a bit more 'flair'. :)