


This simple plans sits on top of a side base, creating a full media wall. Make it extra fancy with store bought moulding. Use 1x6 boards to create perfect DVD storage.

Preparation
1 - 1x8 @ 10 feet long
1 - 1x10 @ 2 feet long
1 - 1x6 @ 4 feet long
1 - 1x2 @ 8 feet long
Crown Moulding - approximate 3 feet
Beadboard
A) 2 - 1x8 @ 39"
B) 1 - 1x6 @ 16 1/2" (Back bottom hutch support
C) 1 - 1x6 @ 18" (Header)
D) 1 - 1x2 @ 20 3/4" (Back Top)
E) 1 - 1x10 @ 20 3/4" (Front Top)
F) 2 - 1x2 @ 33 1/2" (Front vertical side trim pieces
G) 2 - 1x8 @ 16 1/2" (Shelves)
H) Approximately 3' of Crown Moulding Matching the Base Unit Hutch, plans Here
I) Beadboard at 39 3/4 x 18
Cutting List for 1 Narrow Media Cabinet Hutch
LIST IS FOR 1 HUTCH - DOUBLE TO MAKE 2


Instructions
Step 1

As shown above, start by nailing through the sides of A, the sides, into the edges of B, the back support. Notice how B is inset. The overall width of the cabinet (not including the crown) will be 18"
Step 2

The top header piece, C, will sit on top of the sides, as shown above. Nail through the face of C into the edges of A.
Step 3

Attach D to the top, leaving all of the overhand on one side, alternating sides for the other hutch. Study the finished diagram and notice how both narrow hutches sit flush with the main hutch.
Step 4
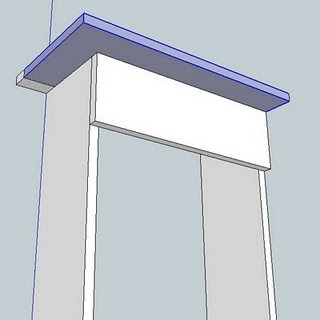
Add E, the large top piece, lining edges up with D from above. Nail into the edges of A and into the header board, C.
Step 5
Step 6
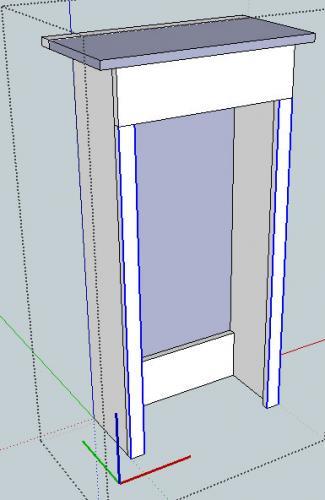
Add the beadboard to the back.
Step 7
Add the crown moulding to the front and the side wher the top overhangs. Keep flush on the opposite side.
When I do crown moulding, I like to start with the front piece, then cut the side pieces long, then trim the square ends of the side pieces down to get a perfect fit.
Step 8
Fill all nail holes with putty, sand and finish all pieces as desired, including the 2 remaining shelves, G. When the piece is finished, add shelf support brackets where you would like the shelves to be placed.
Comments
Julie (not verified)
Thu, 12/31/2009 - 12:02
Thanks for the mention of
Thanks for the mention of PoshTots - my eyes almost bugged out of my head when I started looking at little girl's rooms. Gorgeous!
How about a Coronada or European Enchantment inspired room? *swoon* I believe your daybed plans will be getting a few custom mods before I start cutting.
(Naturally, I'll be making my own furniture and saving thousands.)
Guest (not verified)
Mon, 05/16/2011 - 08:55
tommy media storage wall
I would like to build the entire Tommy media wall for my living room, but I only see the plans for the base and sides, not the top shelf that would go over the TV. I have never built anything this complex before, so I would like to make sure I have all the plans before starting. Thanks for your help, I really love your site.