

Difficulty
Intermediate
| 
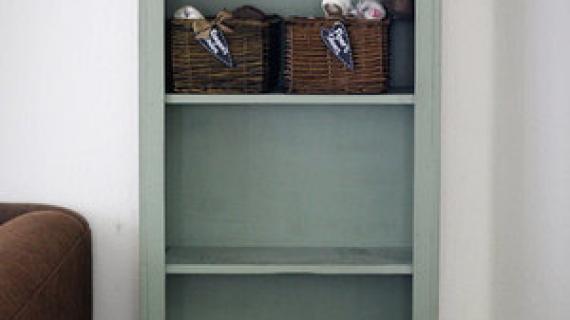
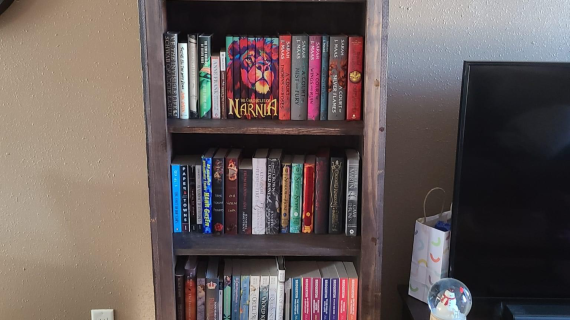
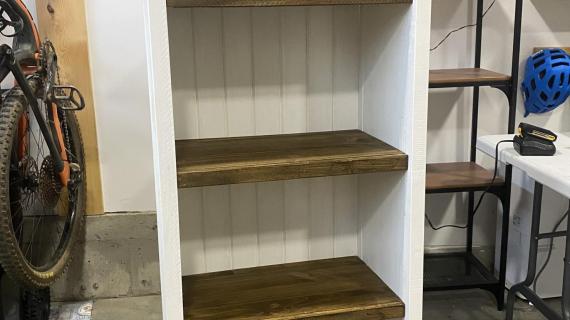
Free plans to build your own tower bookshelves out of 1x common boards. This bookshelf features a nail together design, no pocket holes required. This bookshelf can be painted or stained any color, as it is solid wood.
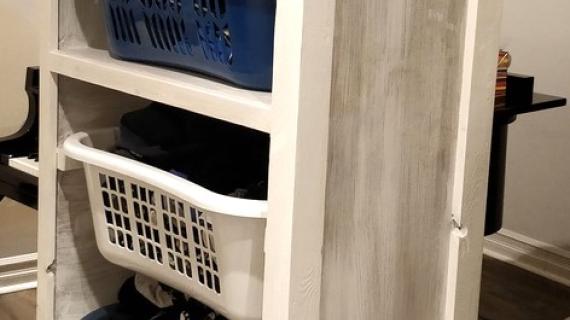
The tall and narrow footprint of the bookshelf makes it perfect for smaller spaces, as a closet tower, in corners, or anywhere you need a beautiful bookshelf and some extra storage or decor space.
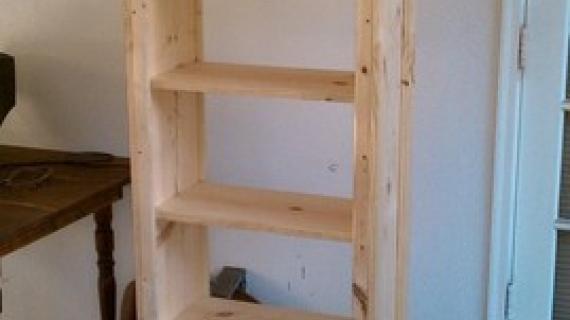
The free plans have step by step diagrams, shopping and cut lists, and reader submitted photos, from Ana-White.com
Dimensions
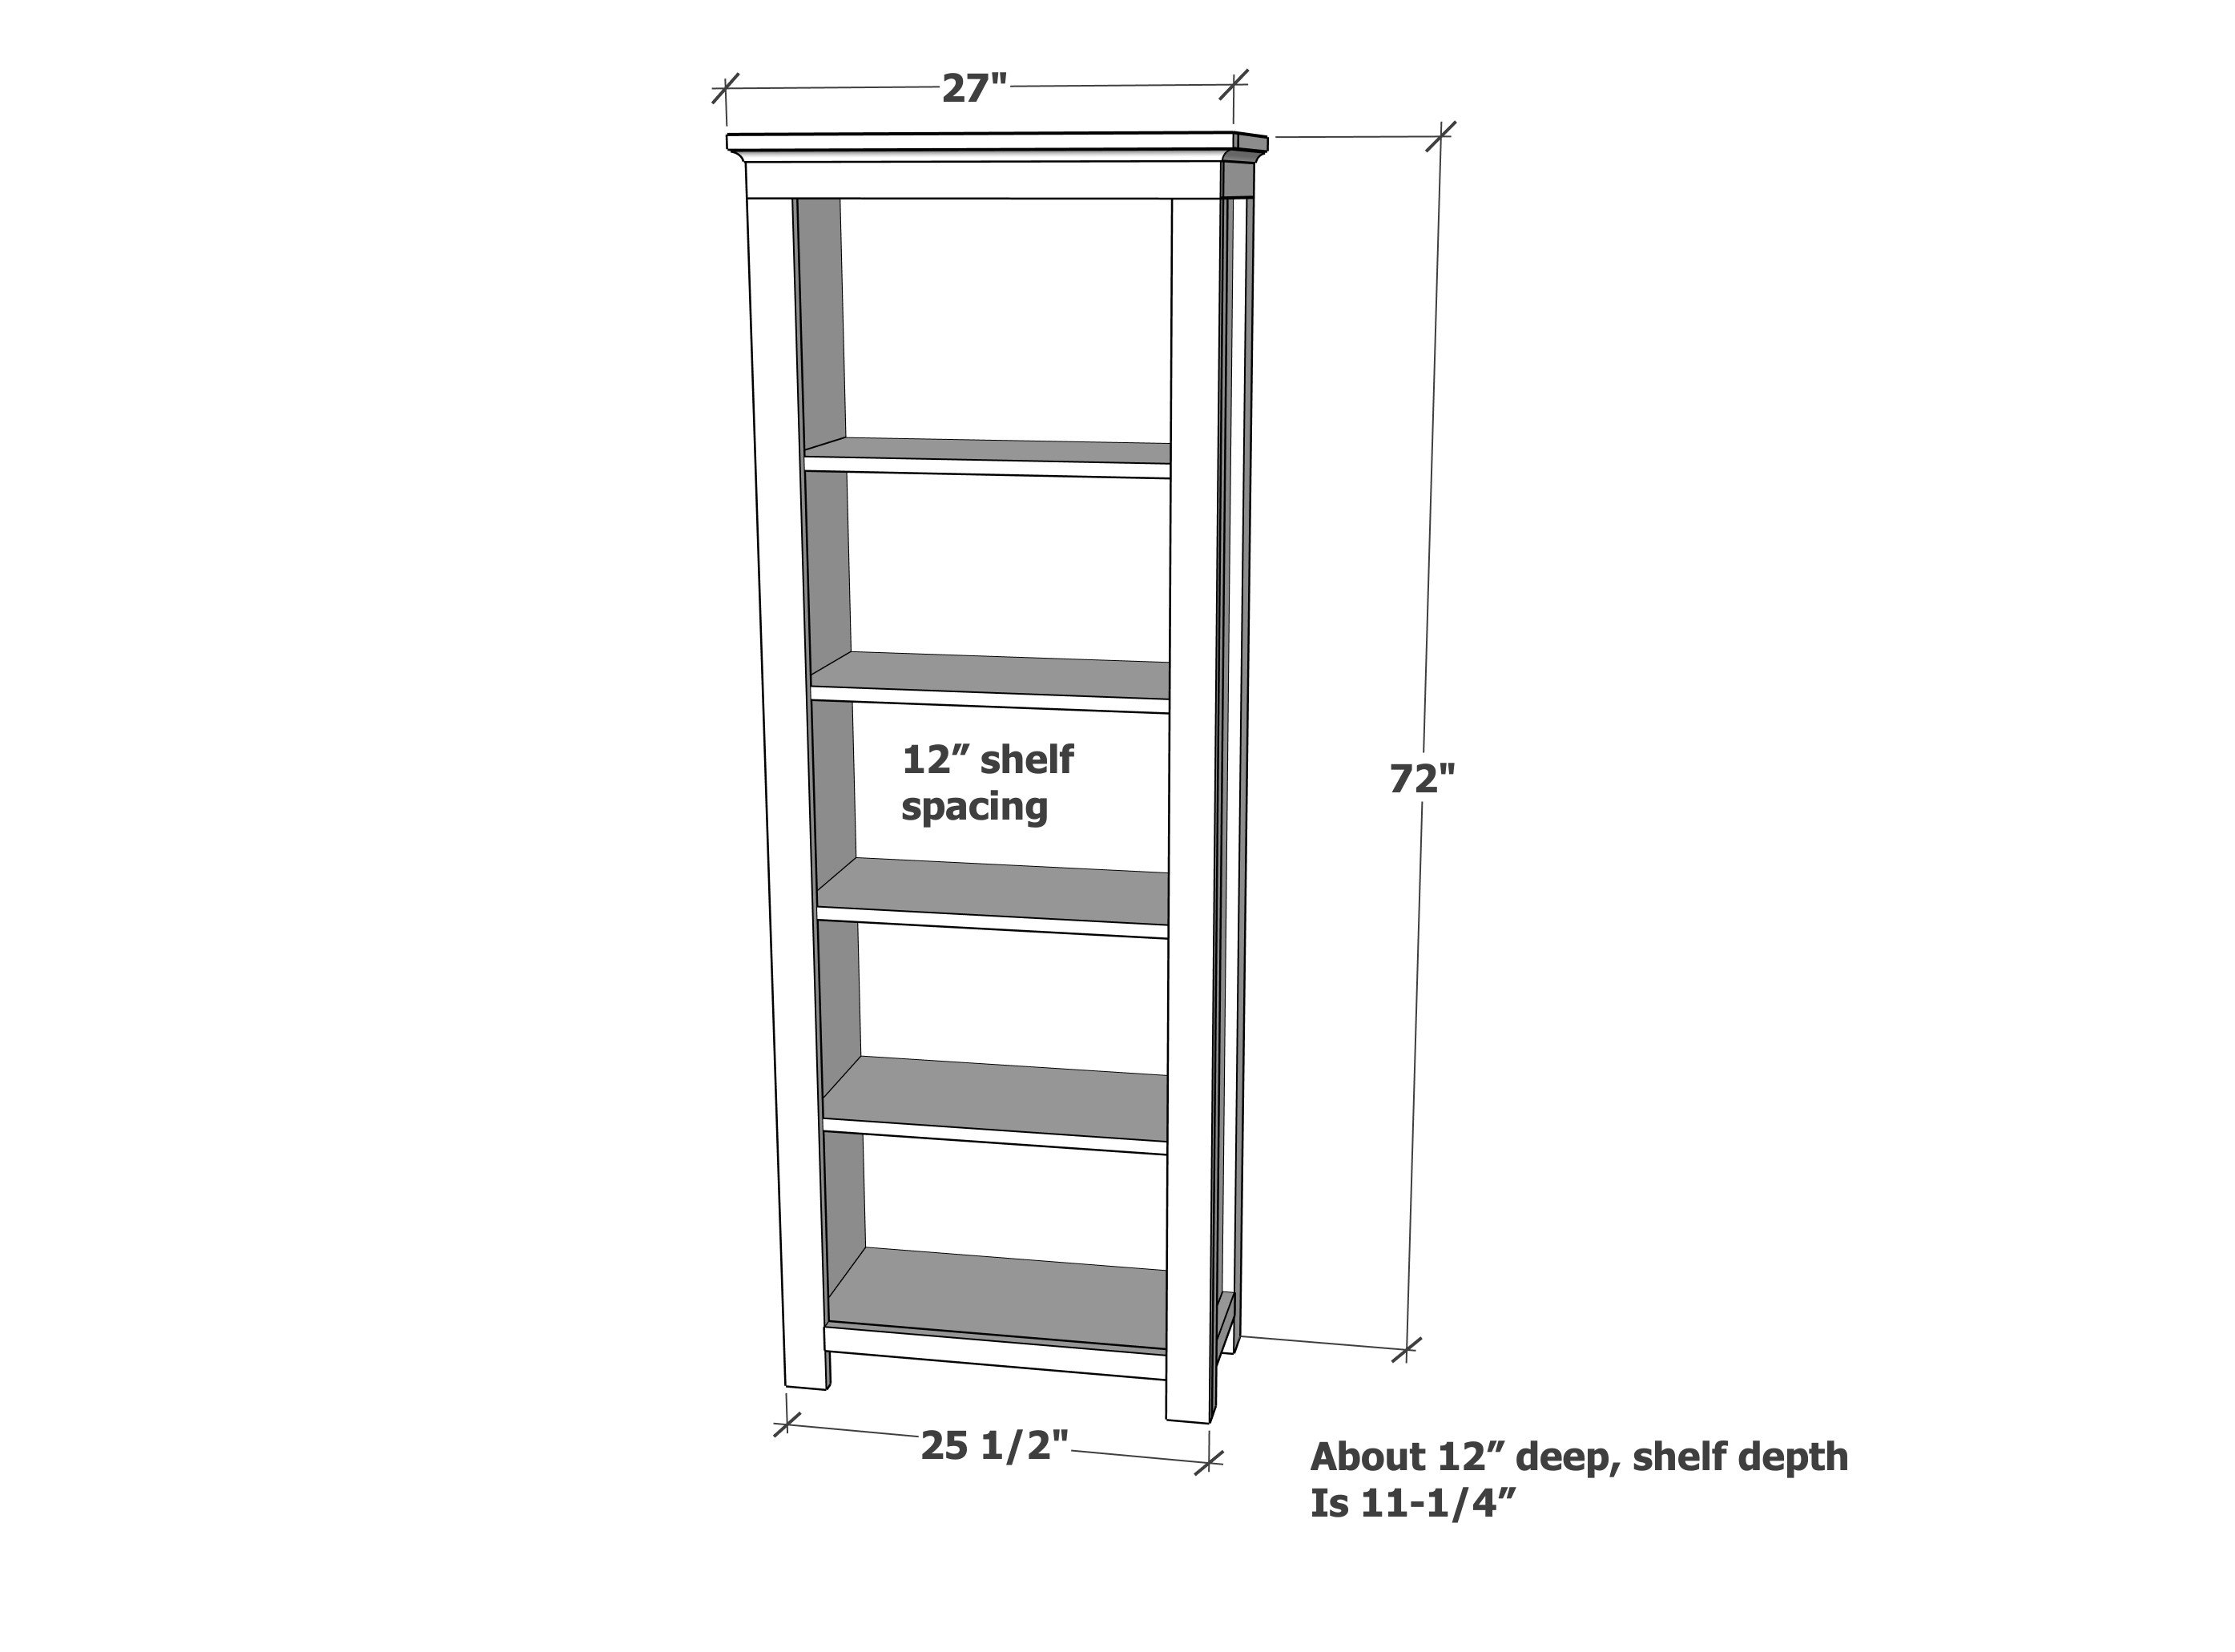
72" tall x 24" wide x 13" deep
Preparation
Shopping List
- 3 - 1x12 Boards 8' Long
- 4 - 1x3 @ 8 feet long
- 3 - 1x2 @ 8 feet long
- 24" x 96" piece of 1/4" plywood for back, can be underlayment or similar
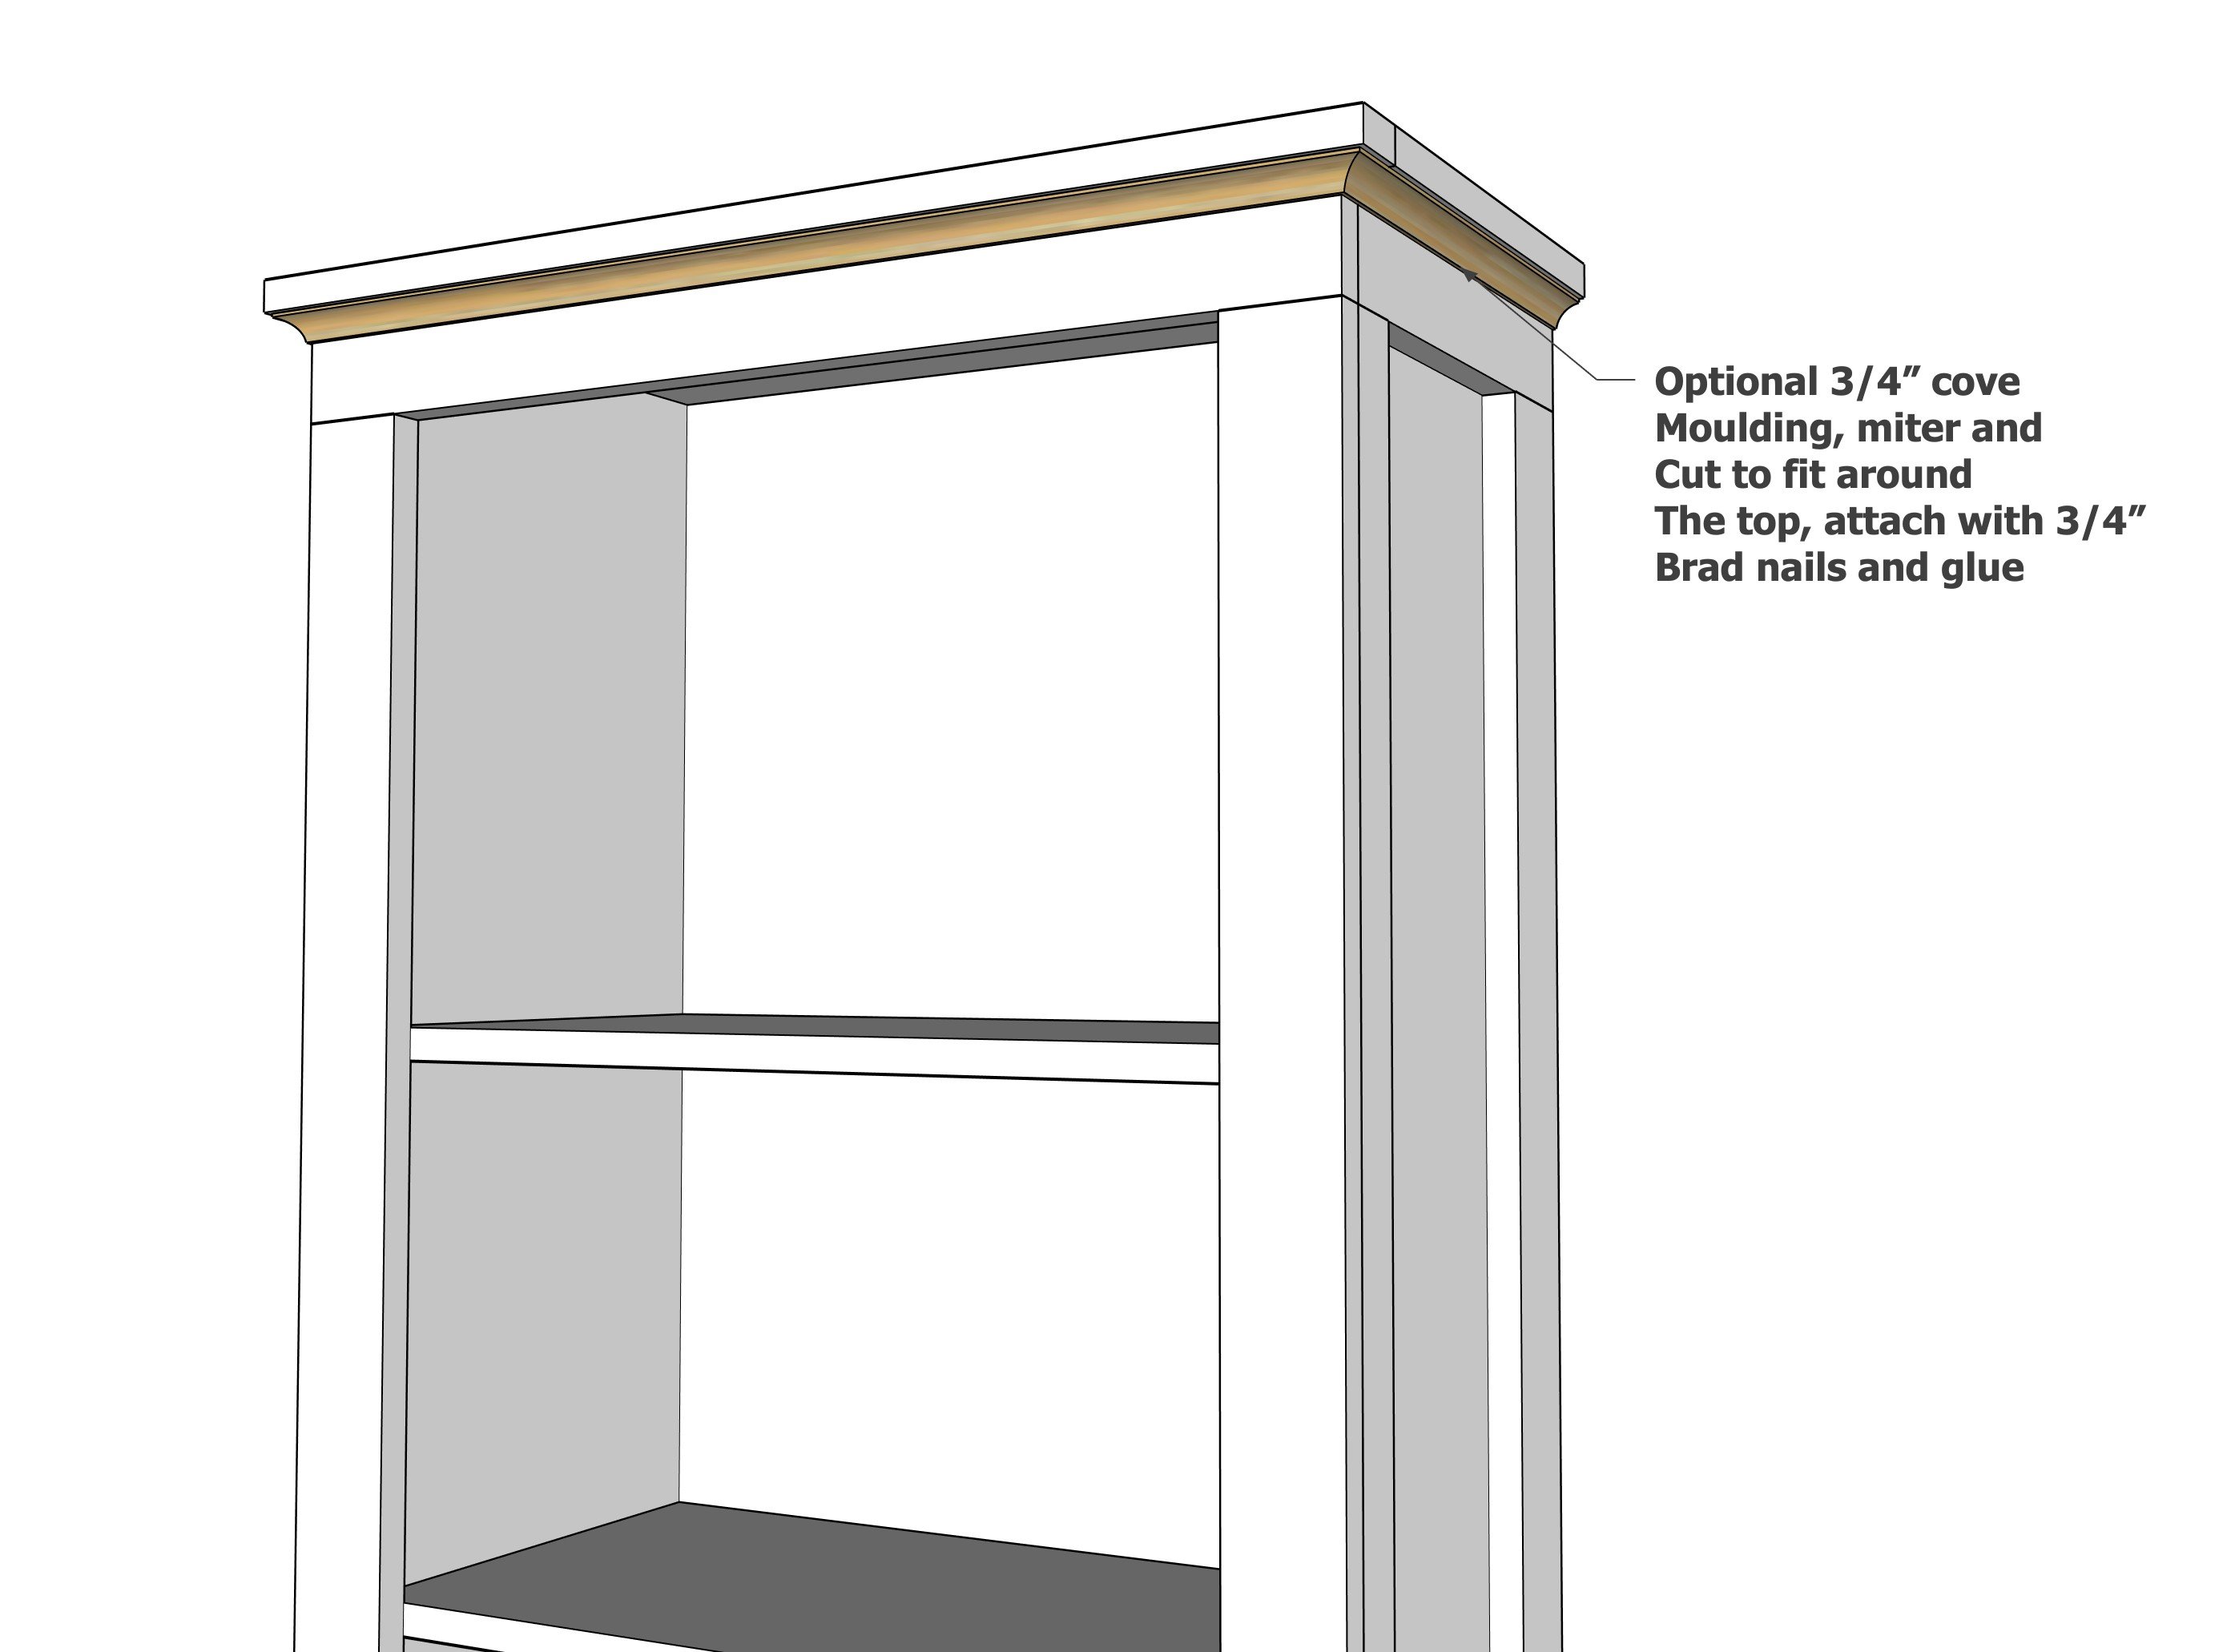
- 4 feet of 3/4" x 3/4" or smaller cove moulding
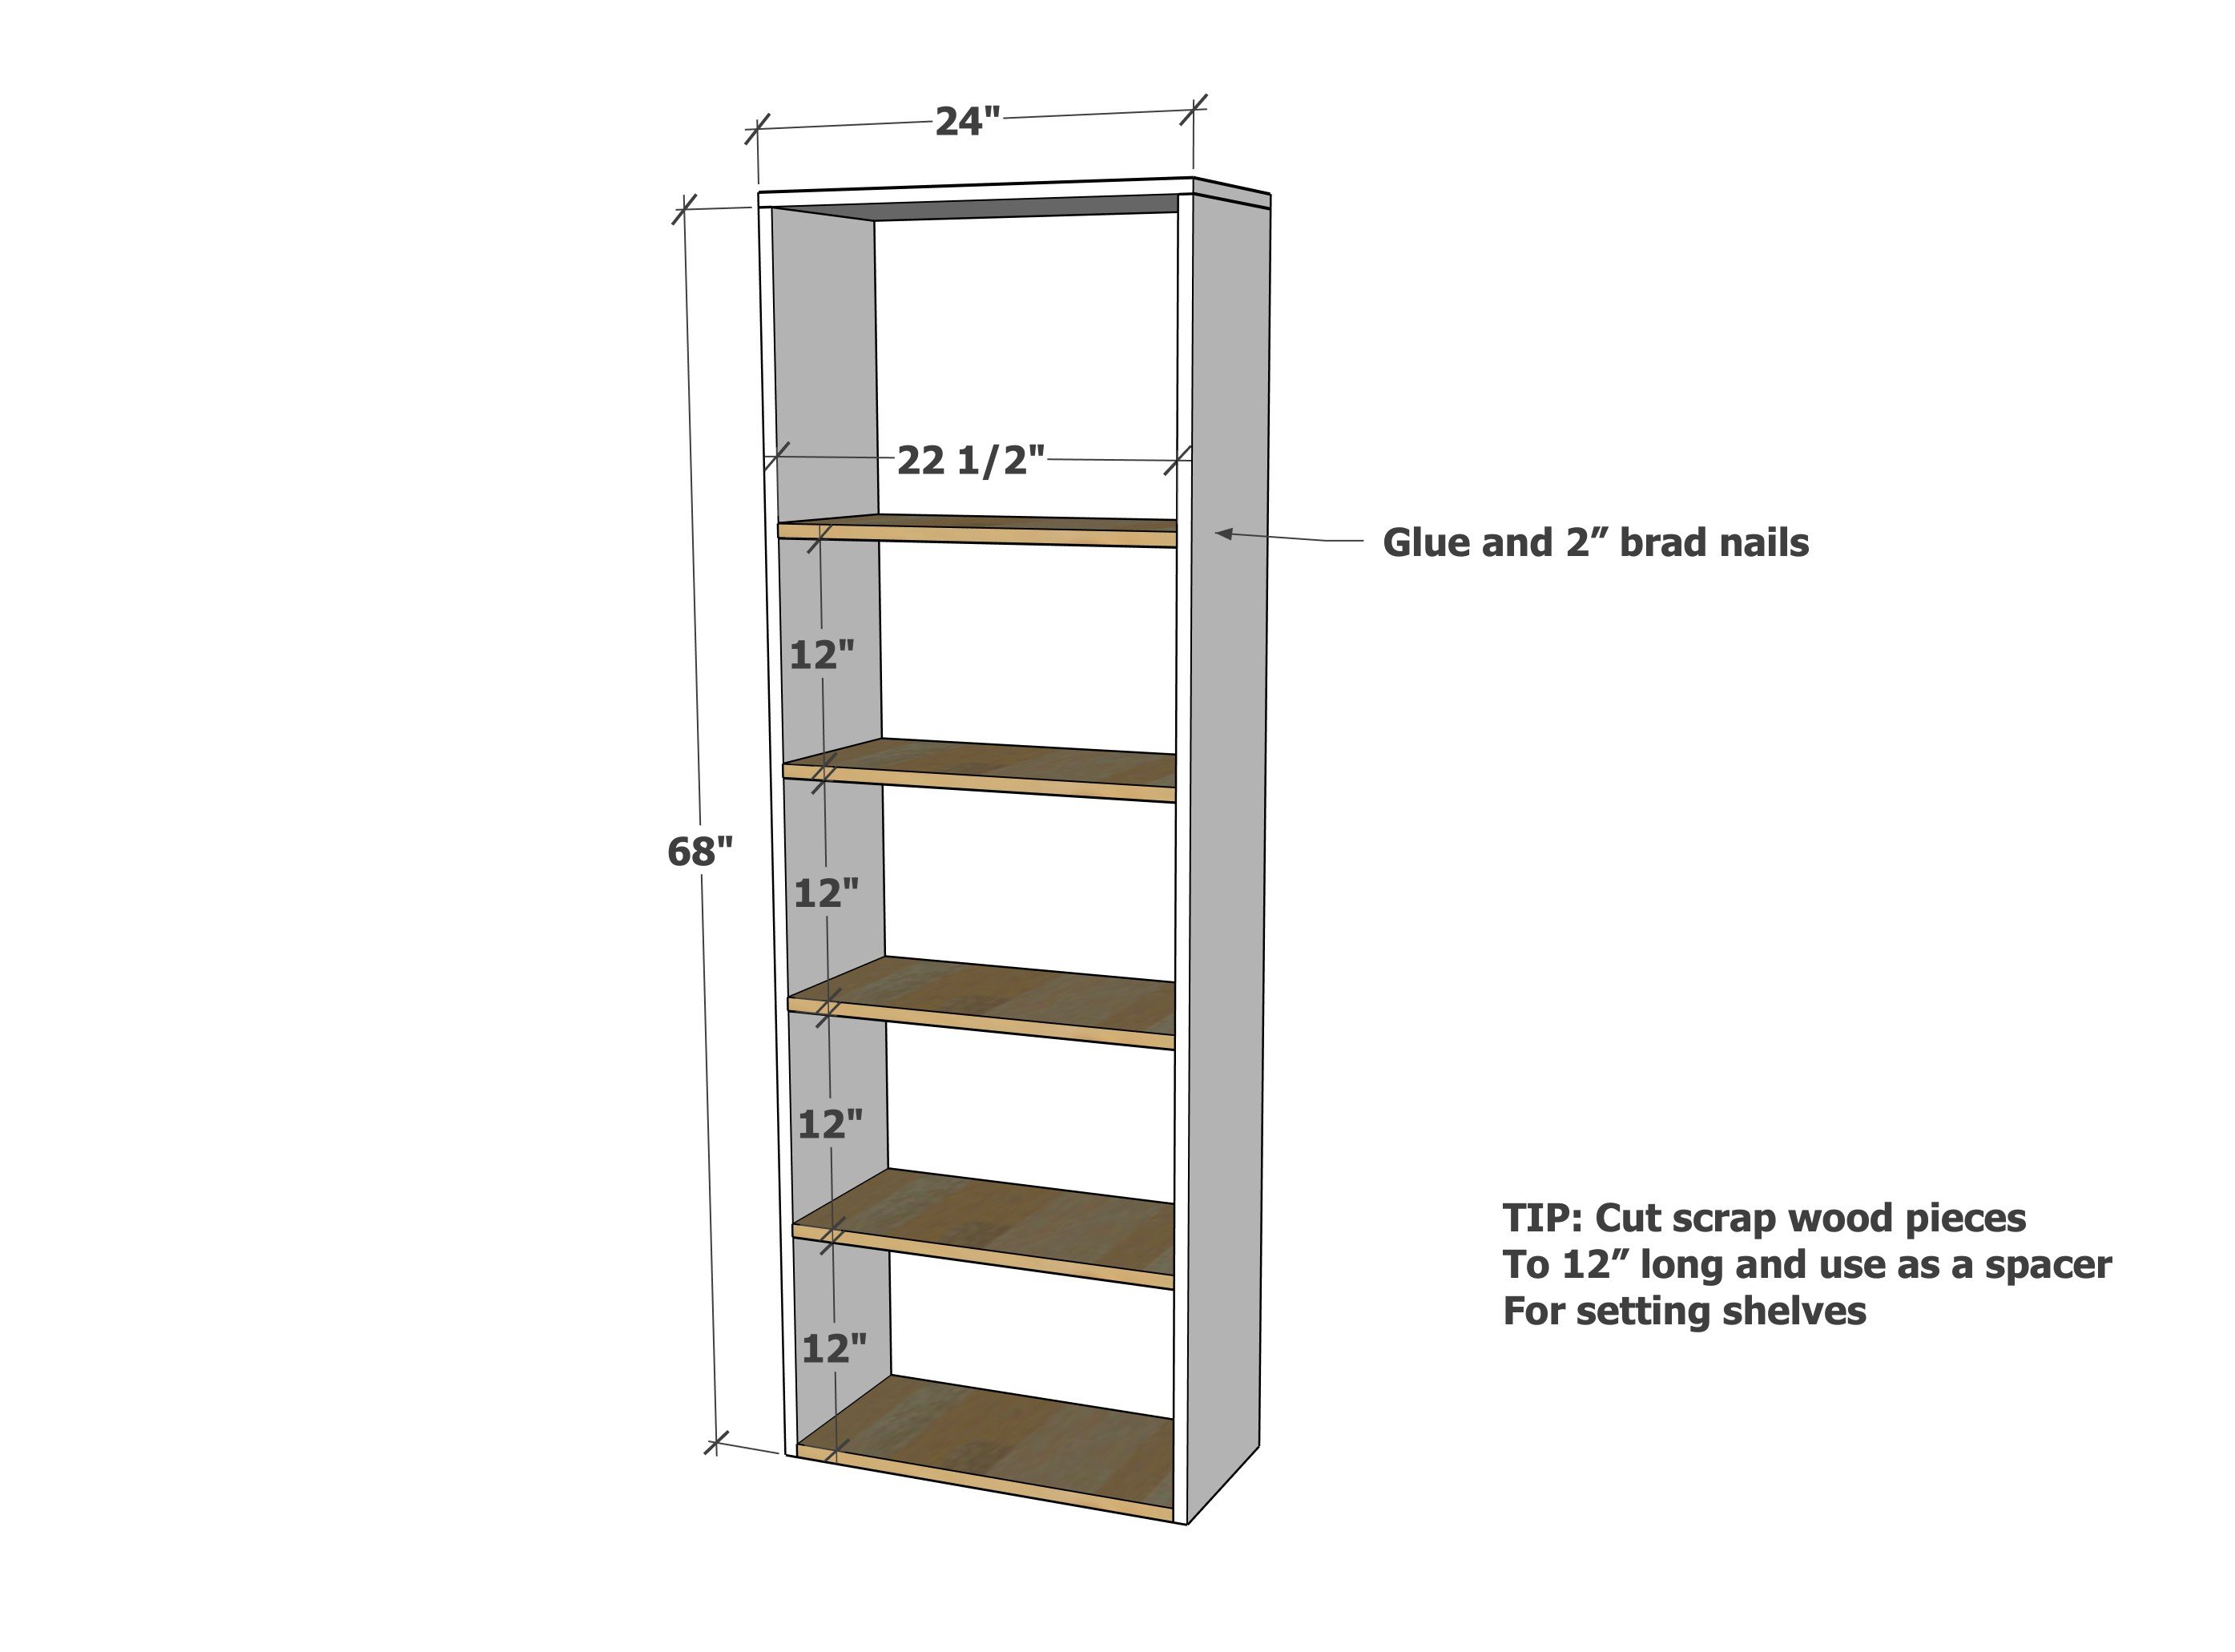
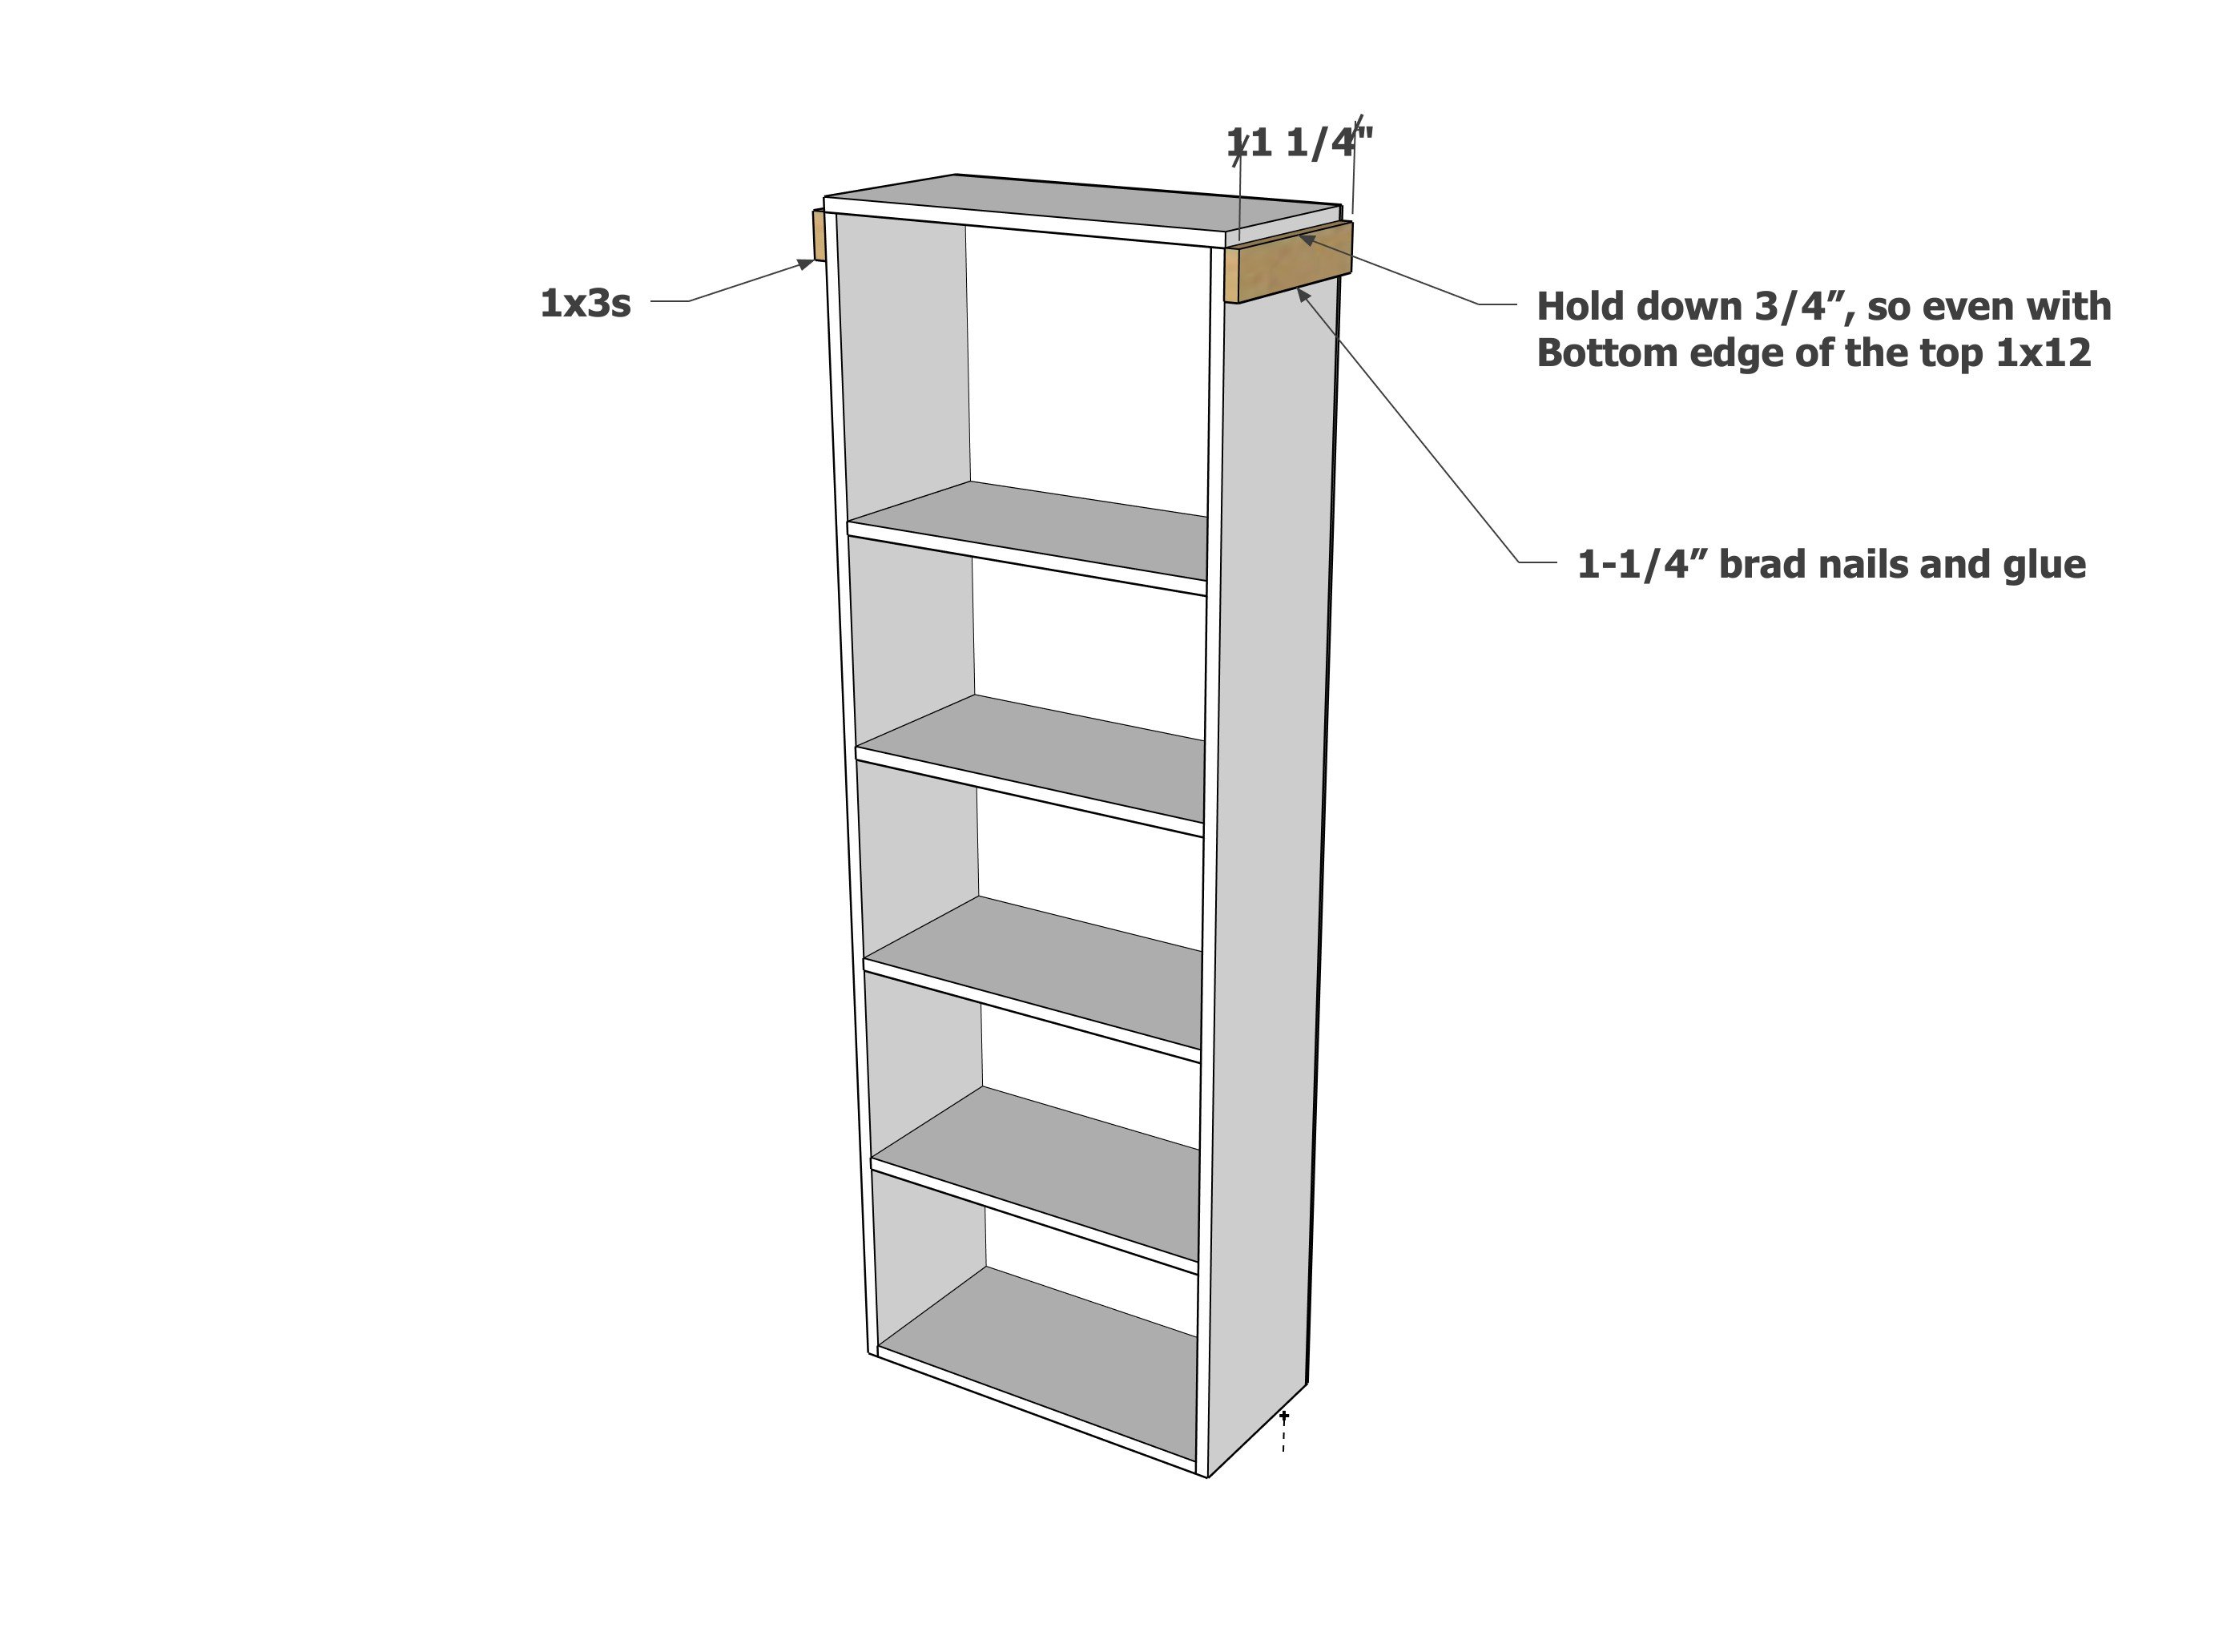
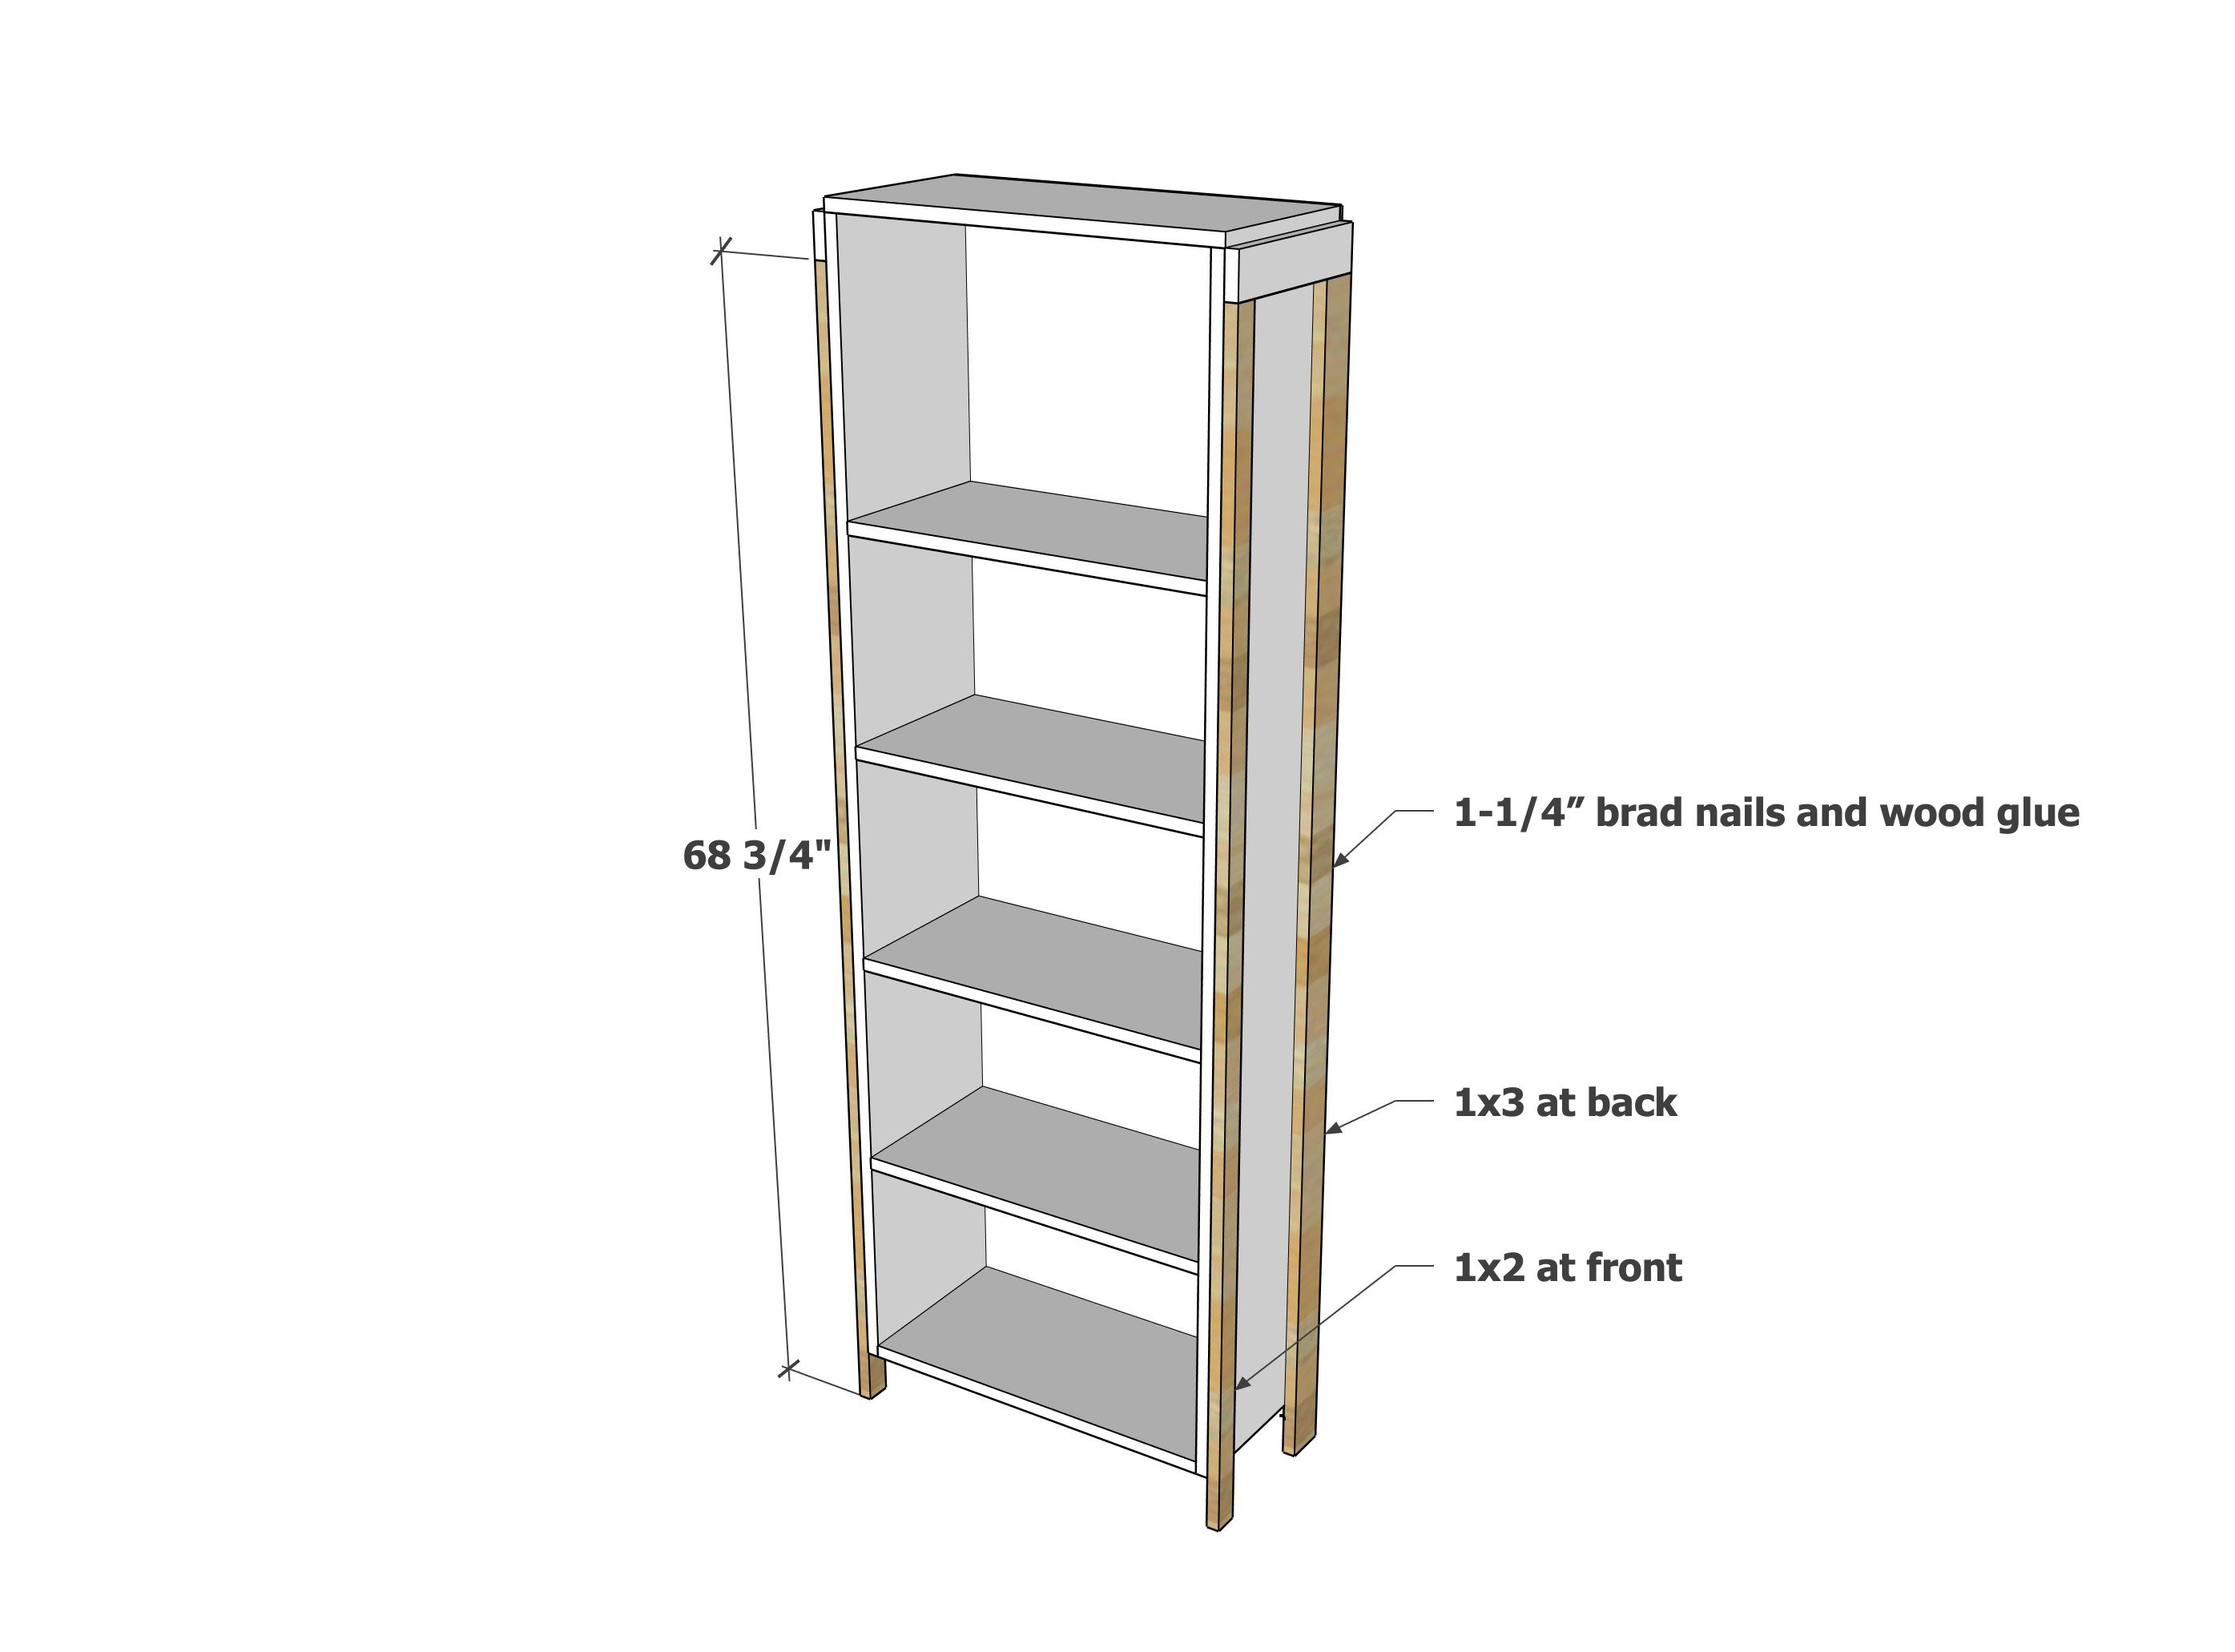
- 3/4", 1-1/4" and 2" brad nails
- wood glue
- wood filler
- medium grit sandpaper
- paint and primer, or interior wood stain
Cut List
- 2 - 1x12 @ 68" (sides)
- 5 - 1x12 @ 22 1/2" (bottom and shelves)
- 1 - 1x12 @ 24" (top)
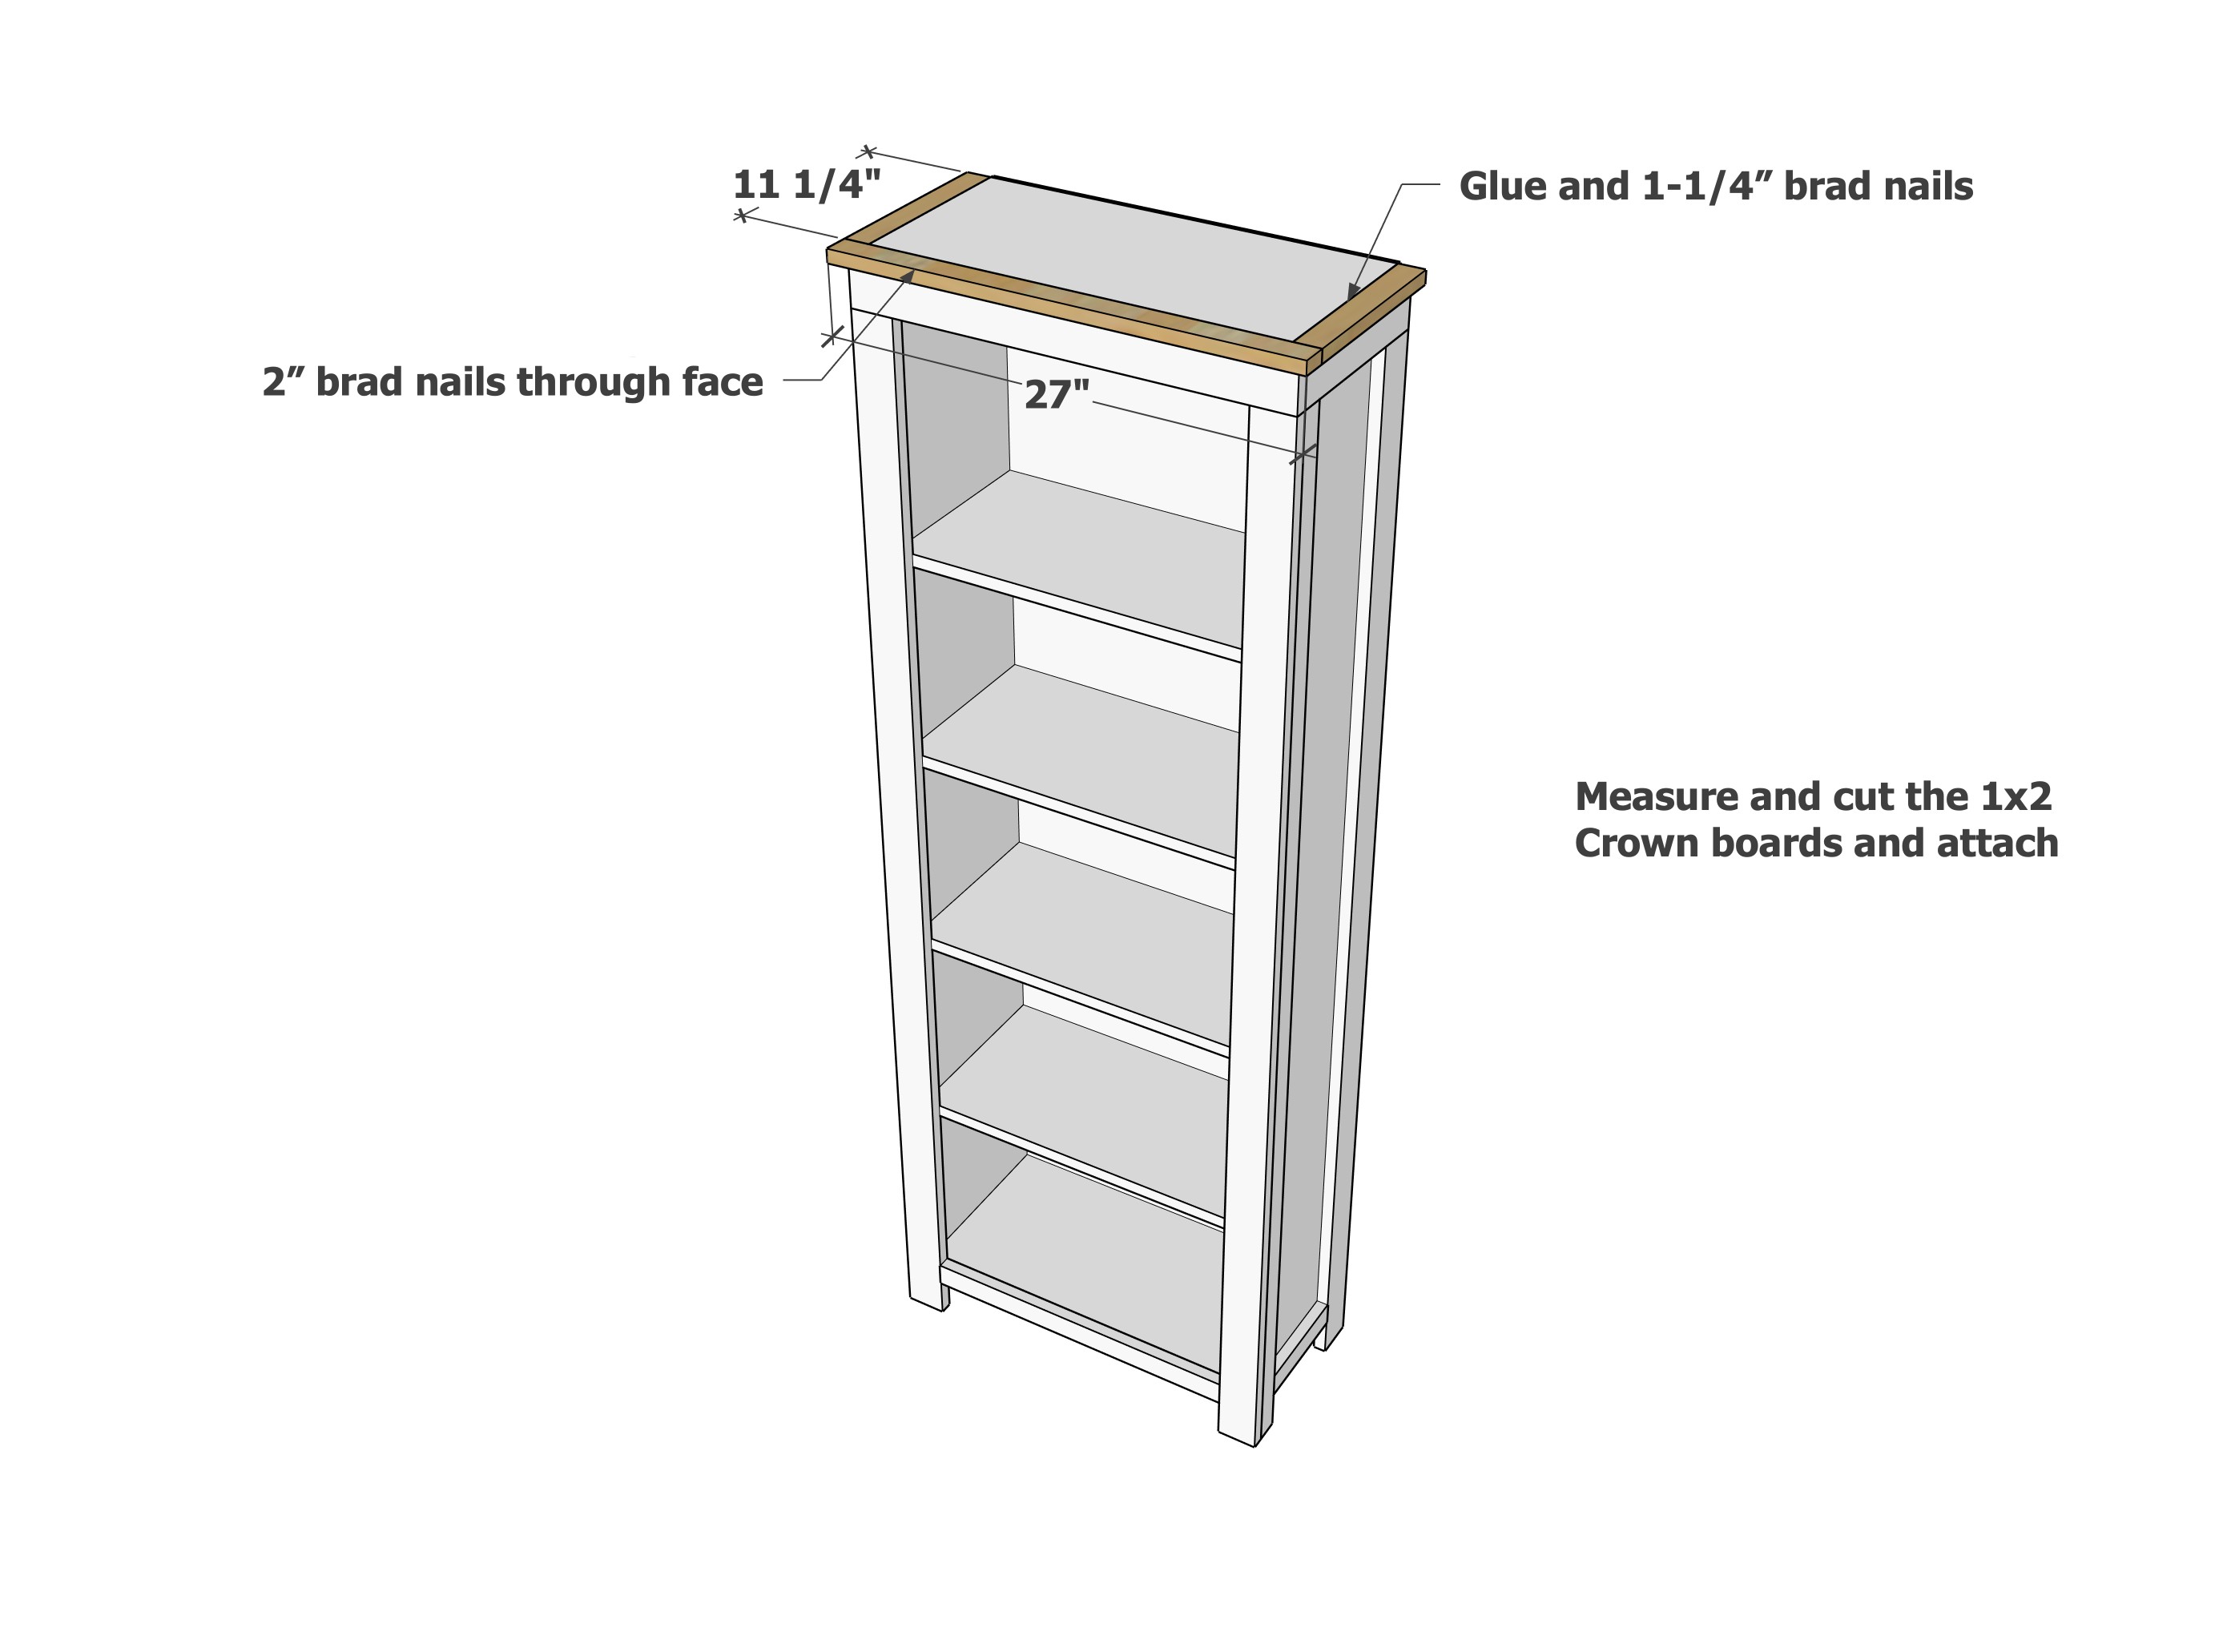
- 2 - 1x3 @ 11-1/4" (sides of header) - measure and cut to fit
- 1 - 1x3 @ 25-1/2" (top header) - measure and cut to fit
- 2 - 1x2 @ 68 3/4" (side legs)
- 4 - 1x3 @ 68-3/4" (side and front legs)
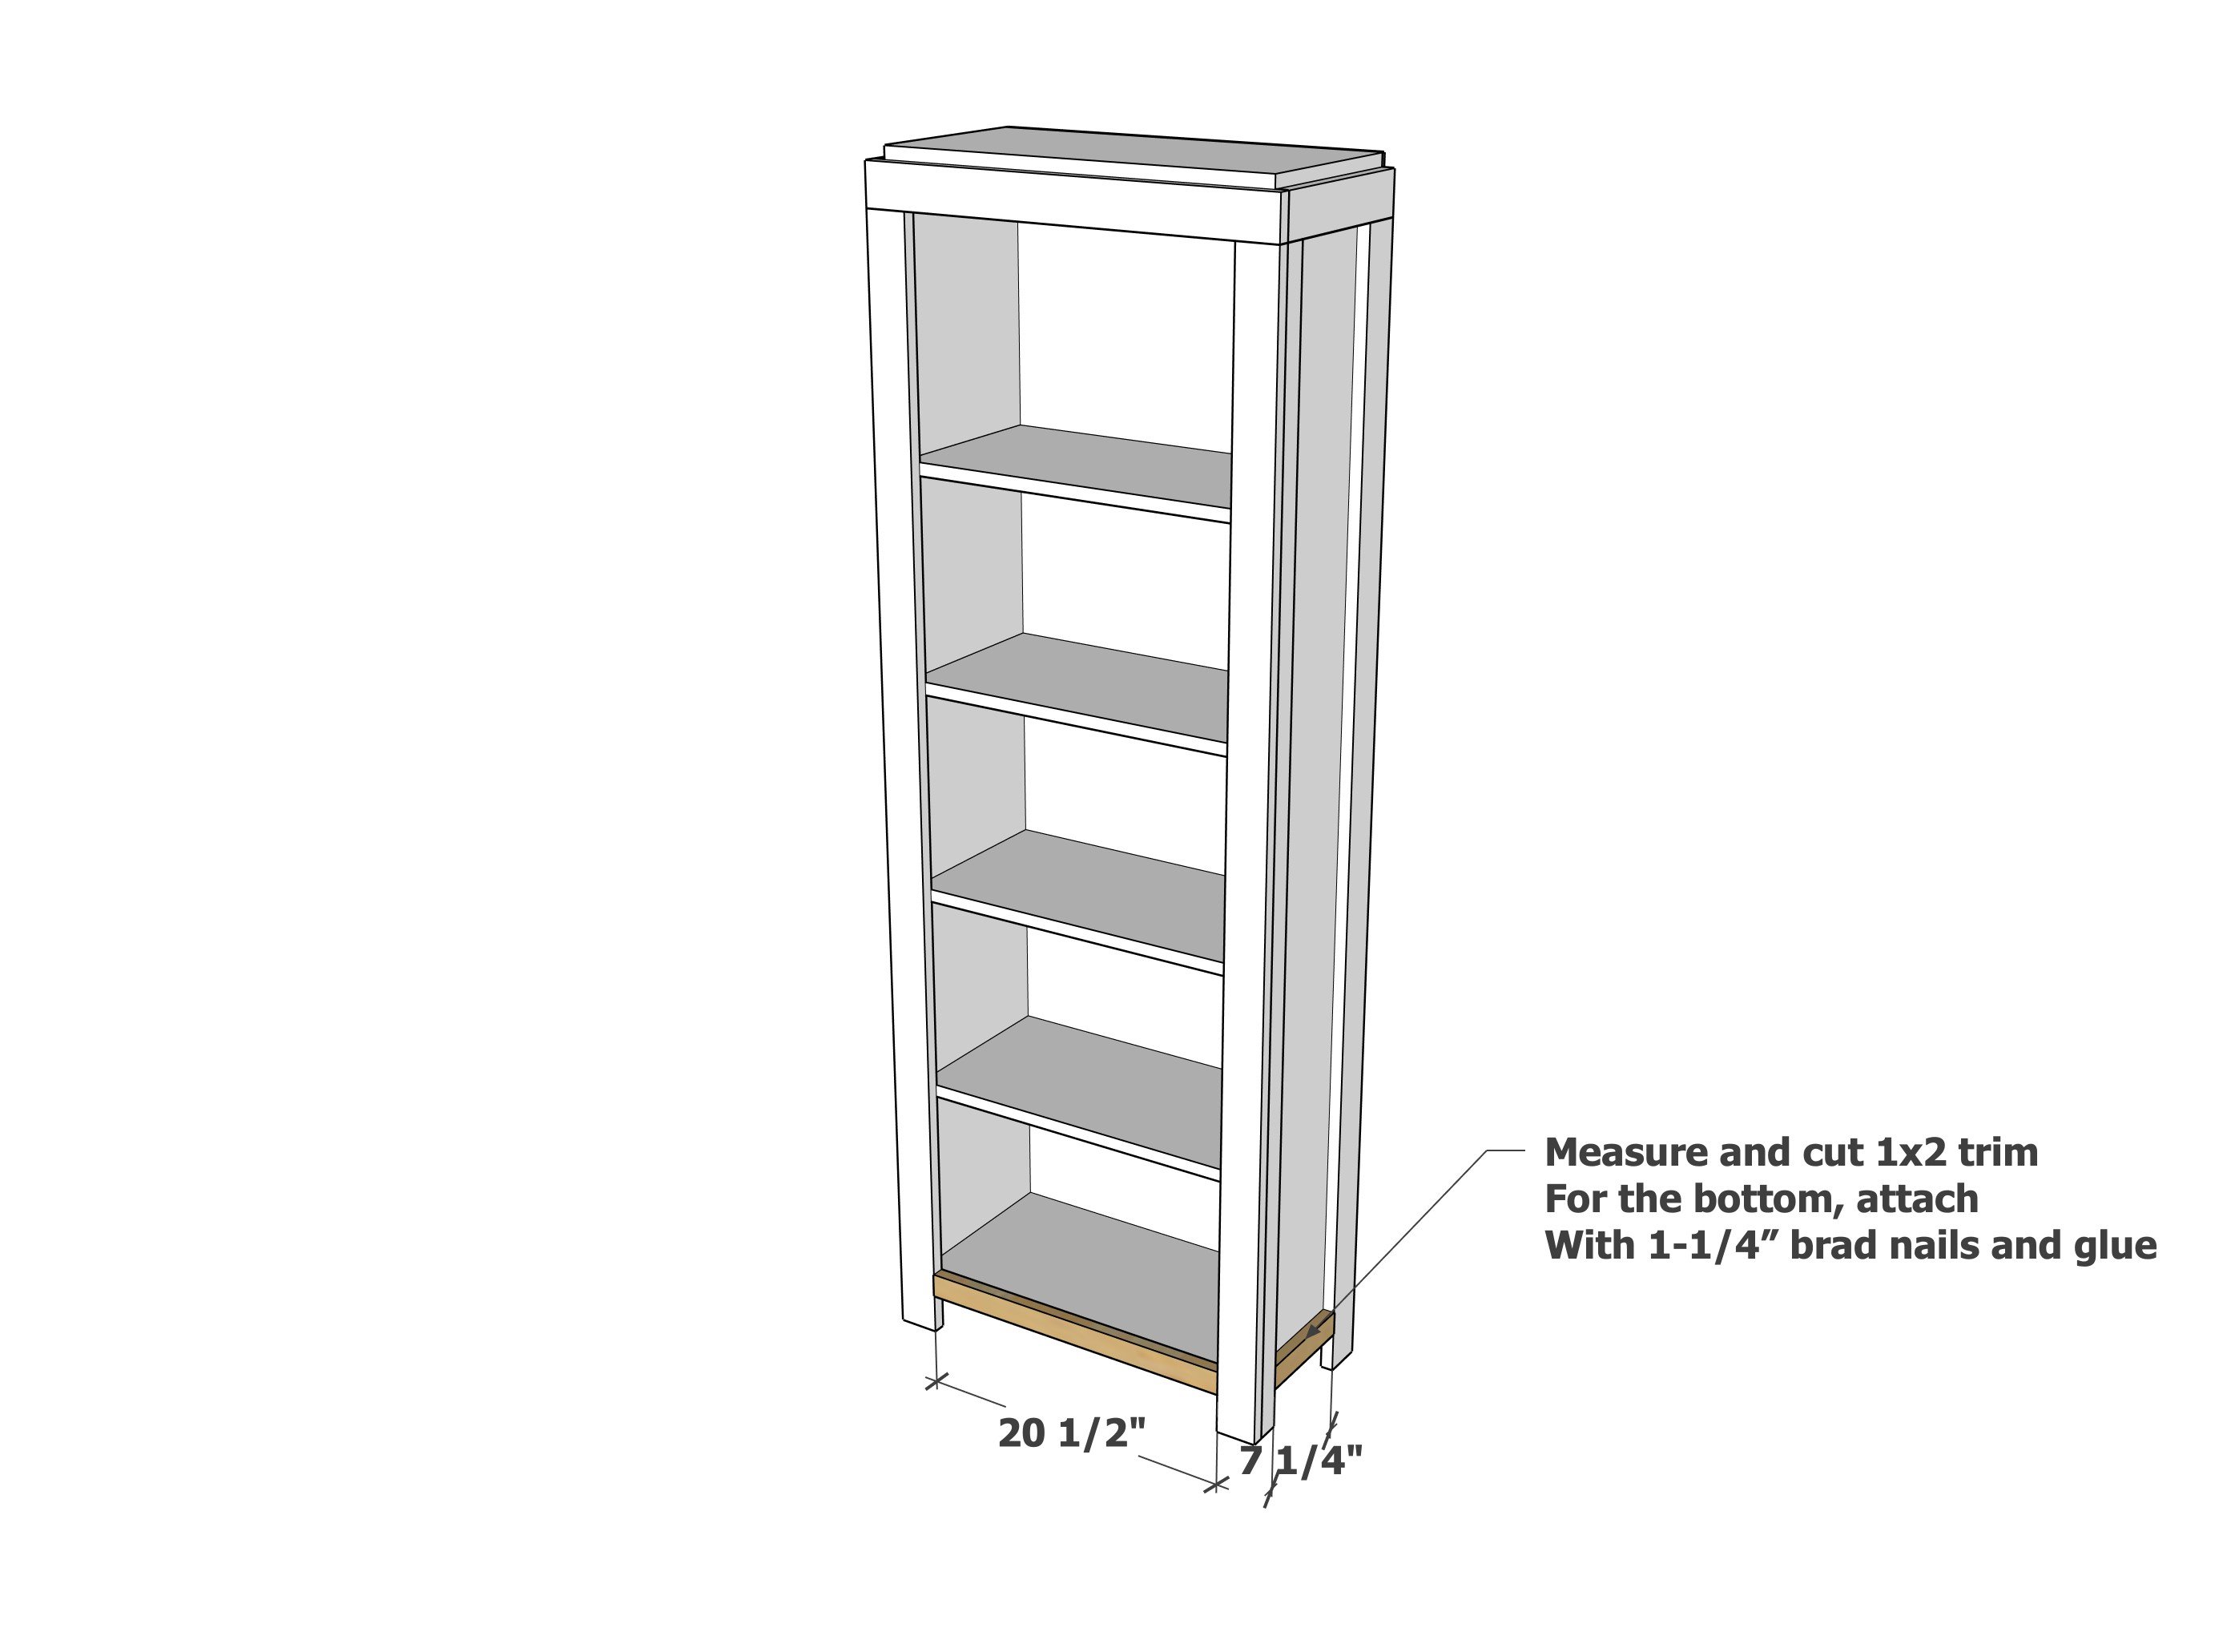
- 2 - 1x2 @ 7 1/4" (side trim for top and bottom) - measure and cut to fit
- 1 - 1x2 @ 20-1/2" (front bottom trim) - measure and cut to fit
- back, optional 1/4" plywood or mdf or other sheet goods, 68-3/4" x 24", measure and cut to fit back.
Crown pieces
- 2 - 1x2 @ 13" (side crown pieces, top and bottom) - measure and cut to fit
- 1 - 1x2 @ 27" (bottom crown piece, front) - measure and cut to fit
- 3/4" cove moulding should be measured and cut to fit
Tools


Instructions
Step 1
Step 2

Step 3
Step 4
Step 5

Step 6
Step 7
Step 8
Finishing Instructions
Finish Used
Finishing. Fill any nail holes with wood filler and sand and finish as desired. Level the bottom legs if necessary. If you choose adjustable shelves, purchase the shelf brackets and install as desired.
Project Type
Comments
Ana White (not verified)
Wed, 11/04/2009 - 22:16
Thank you so much for viewing
Thank you so much for viewing this plan - I am so inspired by everyone's visits, and it's really nice to have a reason to organize and write down all my plans (Before they were just somewhere inside my head). I hope you enjoy this blog as much as I do.
As it seems with every plan I create, I am now inspired to go out to the shop and build it!
jschiffmayer
Thu, 03/21/2013 - 06:14
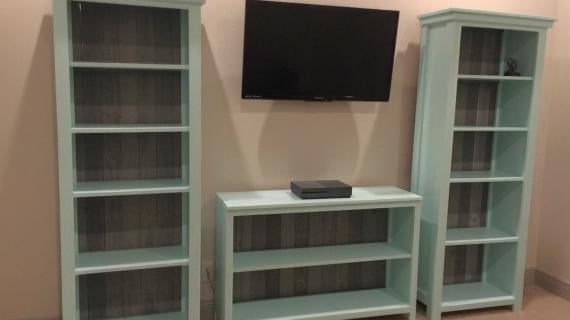
Favorite Bookcase into Bookcase Wall?
Hi Ana- I am going to try this, and haven't built anything before. Could you tell me how you would go about putting 3 of these together? I plan on making them almost to the ceiling to look built in.
Would it work to leave off the bottom, so that kids could kick their shoes underneath? So the "box" would end at the last shelf, but the sides would continue down? Thanks!
Anonymous (not verified)
Thu, 11/05/2009 - 09:38
Thank you! I love it!
Thank you! I love it!
Beth in NY (not verified)
Tue, 02/23/2010 - 18:00
Ok, I've built the box, and
Ok, I've built the box, and cut the shelves-more tomorrow! My question is that you seem to have a back on your shelves. Do I use Luan for this?
Ana White (not verified)
Tue, 02/23/2010 - 18:04
I use beadboard, it should be
I use beadboard, it should be either in the paneling section or the plywood section, about $20 a sheet.
Will be reworking these plans soon!
Beth in NY (not verified)
Wed, 02/24/2010 - 17:15
In your free time, right?
In your free time, right? LOL- Thanks- I'll try the beadboard! Love your site!
lanisanford (not verified)
Wed, 03/03/2010 - 14:17
I JUST finished building
I JUST finished building this! Not painted yet but its FREAKING GORGEOUS! And so easy, I did the whole thing alone, even bought the wood. Usually my hubs helps out when I get stuck on a project, but I finished this in just a couple hours no problem. Now I want to build 40 more! :D
Emily (not verified)
Fri, 03/11/2011 - 10:37
so encouraging!
Thank you for posting this comment...I've been dreaming about building this for a few weeks and I just read your comment and thought "ok, if she can do it, so can I!" Off to buy the wood... :)
Molly (not verified)
Wed, 03/10/2010 - 11:11
thanks for these plans. i am
thanks for these plans. i am making 2 for our recently converted bedroom to our homeschool room. these are exactly what I pictured in my mind.
Hollingsworth Family (not verified)
Wed, 03/10/2010 - 19:30
Thank you so much for the
Thank you so much for the plans. We just finished the bookshelf including painting it. We modiefied a tad so that it sits directly on the floor (didn't want to sweep under it! =)
Blogged about the process at http://haphazardhollingsworth.blogspot.com/2010/02/furniture-building.h….
It cost us a little under $100. I was wondering if you could use MDF for the shelves, sides, top instead of the pine? I do plan on making a least one more.
I love your plans and all the work you have put into your blog. You are an amazingly talented person! Thanks for sharing that talent!
Jolen
Anonymous (not verified)
Fri, 03/19/2010 - 13:52
Do you have instructions on
Do you have instructions on setting in the shelves for non-adjustable?
Sparks Family (not verified)
Thu, 05/13/2010 - 15:52
I don't know if I just missed
I don't know if I just missed them somewhere, but I wanted to know what the dimensions are.
Christa (not verified)
Tue, 05/18/2010 - 10:41
I can't find the overall
I can't find the overall dimensions either. I am assuming it is 72" tall but just wanted to check.
Mardi (not verified)
Fri, 07/30/2010 - 09:54
You are amazing. I've always
You are amazing. I've always want to build things, but my husband has always said it's impossible. Not anymore! :) With plans AND instructions, there is no reason not to. Going to get wood tonight!
Guest (not verified)
Tue, 07/12/2011 - 11:57
Best place to get wood?
Hi! I really want to start building but it seems to be more expensive than I'm expecting. I was pricing out the wood for this project and for pine at Lowes it is going to cost me over $150! Where do you get your wood to make this in less than $50?
Thanks!
Guest (not verified)
Sat, 08/06/2011 - 20:37
question on bookcase
what kind of wood would u use in a bathroom ...... I want this to be a little deeper and wider to hold towels ..... we have a new house with NO linen closet in the master ..... weird HUH ? Plz suggest the best plan for me :) Love ALL of your stuff .
CMA (not verified)
Mon, 01/02/2012 - 03:56
Wobbly bookshelf
Ana,
I love the look and dimensions of the bookshelf, but now that I finished it I have found that it is wobbling like crazy! It's on carpet, and I know that can make it wobble more, but even on a hard floor it wobbles. It seems like it's something in the frame of the bookshelf itself. Is there anything I can do to fix it? I put shims underneath so it's manageable, but it certainly is not solid. Any suggestions?
claydowling
Mon, 01/02/2012 - 05:34
rigid back
A secure rigid back or front frame can stiffen it. If you secure the front frame, make sure that frame is rigid before it goes on the case.
Mary - Scentsy… (not verified)
Mon, 03/26/2012 - 11:59
The plan is different than pictured
I noticed that the plan gives a different result than the first picture at the top of the post. I really like the finished look of the top picture better. Did you miter the edges and have the "seams" on the outside of the bookshelf in that one? I also like that the trim doesn't overlap the inside edge of the shelf on that one. The shelves just sit back in the frame on that one.
Thanks.
Leyla Nisaa (not verified)
Thu, 10/04/2012 - 10:59
Need help?
I'm new to this, how do you add shelves?
Emmy Soren
Wed, 01/11/2017 - 13:13
This vs. Kentwood design???
Hey there - This one says "Favorite" bookshelf. Looks similar to the Kentwood when it's finished, but I see the build is different. I'm looking to build my first ever bookshelf and I want it to be very sturdy. Which one is preferred - the "favorite" or the "kentwood" design???
In reply to This vs. Kentwood design??? by Emmy Soren
Ana White
Fri, 01/13/2017 - 20:30
Do you have a kreg jig? If so
Do you have a kreg jig? If so, I'd recommend the kentwood design:)
Anie8032
Wed, 10/09/2019 - 10:51
Are there more detailed…
Are there more detailed plans that I’m somehow missing? I’m a beginner and need a little more guidance on how to assemble after the cuts. Thank you!