
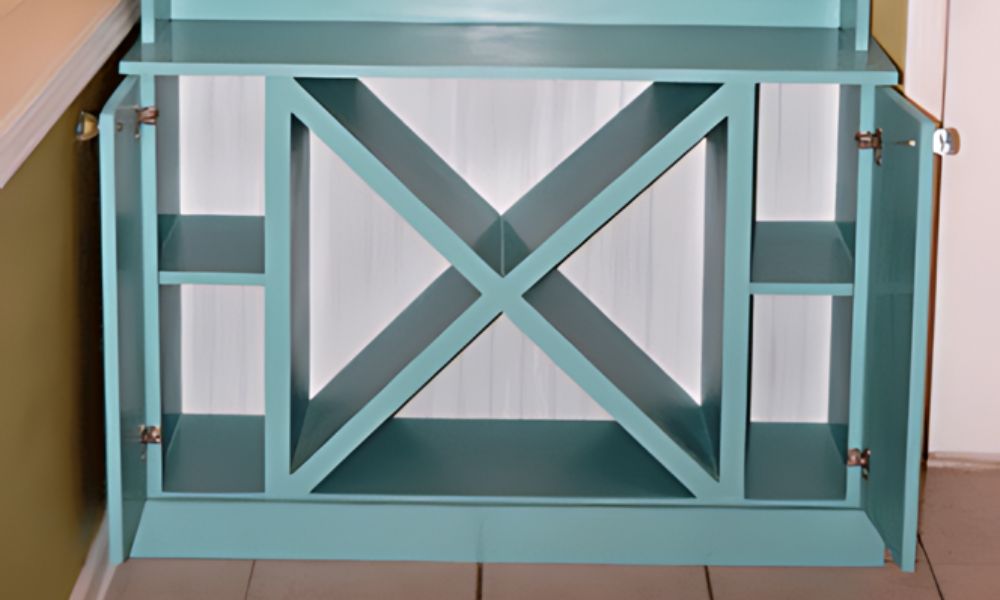

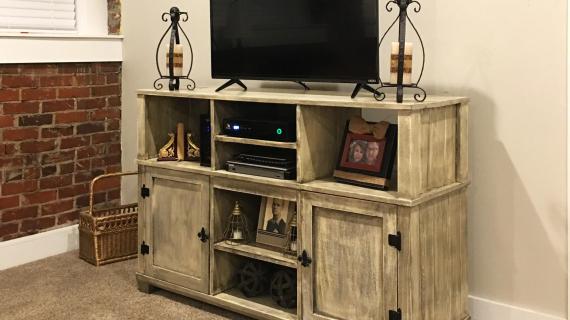
This console table features a large wine grid and space for wine glasses. It's perfect for small spaces. Free woodworking plans with step by step diagrams, shopping and cut list from Ana-White.com


Preparation
- (4) 1x12 8'
- (1) 1x4 8'
- (4) 1x2 8'
- 1 sheet of plywood at least 48" wide and 30" tall
- brad nails for nail gun
- wood filler
- sand paper
- wood glue
- paint or stain
- A) 2 - 1x12 @ 29 1/4" (Sides)
- B) 1 - 1x12 @ 46 1/2" (Bottom Shelf)
- C) 2 - 1x12 @ 25 1/4" (Vertical Dividers)
- D) 2 - 1x12 @ 10" (Side Shelves)
- E) 1 - 1x12 @ 35" (approximate, long side of wine X)
- F) 2 - 1x12 @ 17 1/8" (approximate, short sides of wine X)
- G) 1 - 1x12 @ 49 1/2" (countertop)
- H) 1 - 1x2 @ 49 1/2" (countertop, placed in back)
- I) 1 - 1x2 @ 48" (measure to exact fit, bottom trim)
- J) 4 - 1x2 @ 25" (measure to exact fit, vertical trim for dividers)
- K) 2 - 1x4 @ 12 1/4" (side toekicks)
- L) 1 - 1x4 @ 49 1/2" (front toekick)
- M) Plywood at least 48" wide and 30" tall
Measure and cut as necessary 1x2s to cover the X for the wine rack. Make sure you first nail trim over pieces F and then use 2 pieces of trim to cover piece E. This will hold the X together and trim it out to look nice.


General Instructions. Work on a clean level surface. Measure and mark out joints before attaching. Use necessary safety precautions. Use 2" nails and glue unless otherwise specified. Check for square after each step.
Instructions
Step 1

Build the Box. As usual, start by "building the box." Amazing that most furniture is just a box with trim. Leave 3" from the base of the cabinet to the underside of the bottom shelf. Use boards A to nail B in place.
Step 2
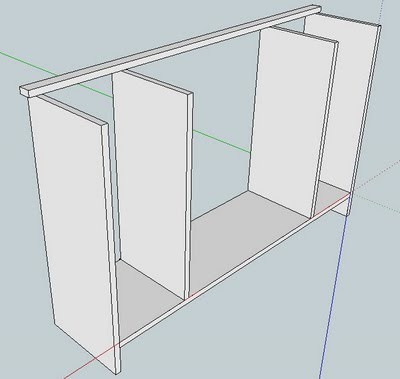
Vertical Dividers. Go ahead and nail boards C (the vertical dividers) to board B (the bottom shelf). Leave 10" or the width of the shelves free between the inside of C and the inside of A. This means that you will need to leave 10" from the inside of the sides and the outer sides of the divider. The best way to do this is mock fit your shelves to get a good idea of how this step works.
Step 3
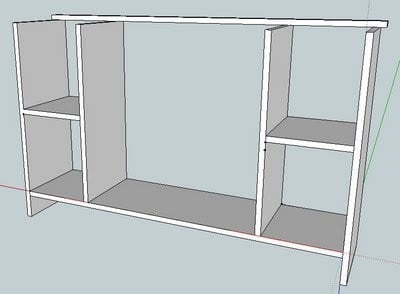
Shelves. Add the shelves at the halfway point. You can adjust the shelves for your needs. Also attatch the 1x2 countertop piece to the top back of the wine cabinet, as shown in the diagram. Leave a 3/4" overhand on the ends, but keep the back of the 1x2 flush with the back of the wine cabinet. This will keep everything straight.
Step 4

Beginning the X. Now things are going to get a little tricky. Take a measurement and cut and place the long part of the center X in place. Trim to fit snug, but not too tight. Nail in place.
Step 5

Step 6
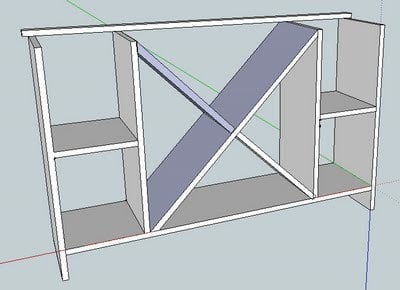
The X is done. A little tricky, but you can manage. Don't worry about the pieces not fitting in the corners - again we will revisit this in the trim section.
Step 7
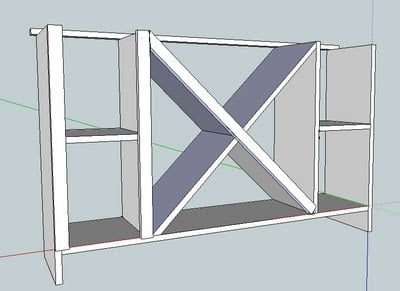
Trim. Begin to add the trim as shown, taking exact measurements to ensure a clean, tight fit. Add the vertical trim, keeping the top flush, and just coming to even to the top of the bottom shelf. Notice how the full piece of trim covers the split part of the X. This adds strength to the X.
Step 8

Trim. Add the first piece of trim to the center X. This will take some figuring. You want this piece to fit flush on all ends. Crisscross the trim so that the full piece patches the 2 piece that made up the center X from steps 4 and 5. This will add strength to the wine cabinet. Take your time here.
Step 9

Trim. In the above diagram, the center X has been trimmed out, and the 1x2 base trim has been added under neath the vertical shelf trim.
Step 10
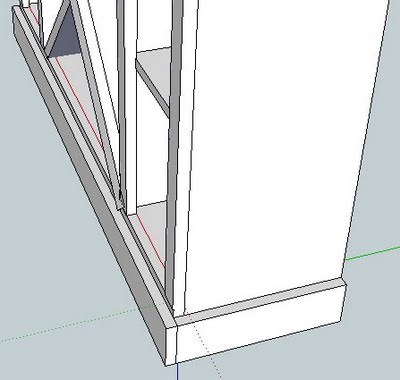
Top, Back. Add pieces K to the bottom sides, keeping the back flush. Footer. Then add the front piece. You can cut the bottom out in an arc is you so choose, as shown in the armoire plan. Top, Front. Finally, at the 1x12 countertop piece, keeping the edges flush. I nail horizontally through the 1x2 into the 1x12 to join the two boards with 2 1/2" nails.
13. Back. Add the plywood to the back of the piece, fill any visible holes with wood filler and sand and finish as desired.

Comments
Ana White (not verified)
Sun, 11/01/2009 - 22:26
I can't wait to post the
I can't wait to post the hutch with built in wine glass holders tommorrow! Check back, I promise, I will post the hutch.
Shannon (not verified)
Tue, 02/16/2010 - 21:39
What is the size of this? I
What is the size of this? I cant find the post with the glass holders. I really want to make this, it is so beautiful!
JMMiller (not verified)
Thu, 02/18/2010 - 20:57
Just came across your site
Just came across your site tonight and I am completely addicted!! I absolutely CANNOT wait to make this! I can't decide if I want to do it with the hutch (which I love love love) or whether I want to the leave the back off, keep it open and use it as a room divider (would be knocking down a half wall that's between our foyer and kitchen). Decisions, decisions...
JMMiller (not verified)
Mon, 02/22/2010 - 18:39
Question - I want to make two
Question - I want to make two cabinet doors for the sides of the base (on either side of the 'X'). What would be the exact dimensions for the two cabinet doors? Thanks!! Can't wait to post pics once we're done!!
Shannon (not verified)
Sun, 03/21/2010 - 21:51
Hi Ana,What is the purpose of
Hi Ana,
What is the purpose of the small strip on the top of this piece towards the back, as apposed to just one large top piece? Is this for support if you are planning to build the hutch portion?
Ana White (not verified)
Mon, 03/22/2010 - 06:07
the purpose of the top back
the purpose of the top back piece is because you cannot ordinarily purchase lumber in widths wider than a 1x12. This piece makes the top the width you need it to be.