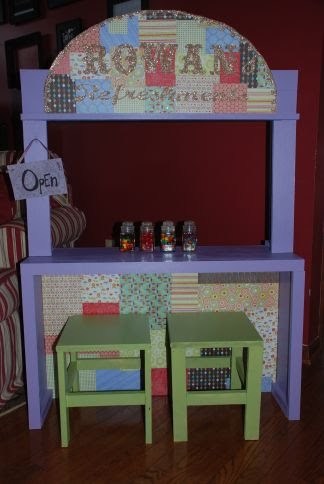


This cute plan works with the wide hutch plans (Grace's Town Collection) to help your little one's in their pretend play. Features a bar and shelving behind the bar, just right height for a cash register, and ample opportunity for creative touches, this lemonade stand is sure to delight little ones.
Photos from Shawn, thank you!


Preparation
1 - 1x12 @ 8 feet long
1 - 1x4 @ 3 feet long
1 - 1x2 @ 8 feet long
1/4" plywood or beadboard (try a wainscot panel) or 1/4 sheet
A) 2 – 1×12 @ 21 1/2″ (Sides)
B) 1 – 1×12 @ 36″ – (Top)
C) 3 – 1×4 @ 34 1/2″ (Shelves)
D) 1 – 1×2 @ 34 1/2″ (Inside, top cleat)
E) 1/4″ plywood or beadboard, 34 1/2″ wide x 21 1/2″ tall (a wainscoat panel would do fine, about $7 at Lowes or Home Depot)
F) 1 – 1×3 @ 36″ (Back Toekick)
G) 2 – 1×2 @ 7 3/4″ (Inside Bottom Front Supports)
H) 1 – 1×2 @ 36″ (Countertop Trim for the Front)
I) 2 – 1×2 @ 20 3/4″ (Front Side Trim)


Start by cutting all your boards. When building, use 2″ nails and glue unless otherwise noted. Always nail into all available joining boards whenever possible. Always predrill before screwing.
Instructions
Step 1
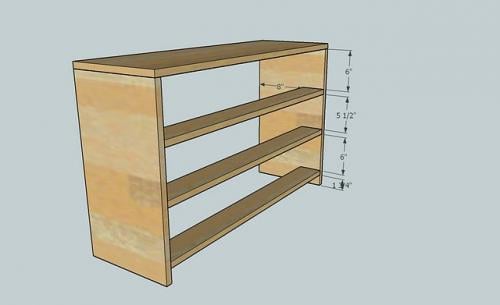
Start by nailing the shelves C to the sides A, as shown above. It is always a good idea to mark your sides first so you know exactly where the shelves will go. Keep the shelves flush with the sides on the back of the base unit, as shown above. After the shelves are in place, nail the countertop, B, to the sides, A.
Step 2

Use 1 1/4″ nails to nail the cleat, D, shown in white, in place as shown above. Also nail through the sides of A into the end edges of D.
Step 3

Mark your plywood according to the measurements in step 1, and then use the 1 1/4″ nails to nail the plywood in place, as shown above. It is always a good idea to check your project for square before adding plywood. If you do not know how to check for square, visit the HOW-TO section.
Step 4

Add the back toekick, F, as shown above to the back of the base unit. Use the 2″ nails, and make sure you nail into both the sides and the bottom shelf.
Step 5

Step 6

Back to the 2″ nails. Nail the countertop trim, H, in place (shown in red above). Keep top and outside edges flush.
Step 7

The final step is to nail the boards I in place, as shown above. The front side trim should be nailed to the sides, the supports, and you shoul also nail through the top of the countertop trim into the end edges of the front side trim pieces, I.

Comments
Anonymous (not verified)
Tue, 01/12/2010 - 03:51
You skilled in, I've been
You skilled in, I've been searching looking for some really intriguing gen about woodworking and topics connected, and I haven't been
adept to find any until now. Much appreciation for editorial such a great article, and I right-minded wanted to globule you a line and cause to you certain that I'll for all
back back again to brake in sight some more of your stuff. I really esteem the info, and the blog is incredibly
entertaining to read. I think that's entire lot! Thanks! Forgive me, my English is not incredibly quality.
john thomas fi… (not verified)
Thu, 01/17/2013 - 06:03
Lemonade Stand for Grace's Town Collection | Ana White
Good post however I was wondering if you could write a litte more
on this subject? I'd be very grateful if you could elaborate a little bit more. Bless you!
BethCupitt (not verified)
Fri, 06/11/2010 - 10:20
i love this one so much. i
i love this one so much. i think i might try this as a starter project (with husband supervision at first, i suppose). i've got lots of neices that might be getting this for christmas. thanks for all you do.
cindyreg (not verified)
Mon, 12/27/2010 - 03:39
Thanks Ana! I was looking for
Thanks Ana! I was looking for a puppet theatre and this will work! I love that we can use this in many different ways. Puppet theatre at noon, burger stand at 1:00 and grocery store at 2:00, with a little tea shop at 3:00.
Thank you :)
petera
Fri, 12/28/2012 - 12:24
Puppet theater
I posted a brag about a puppet theater. I use the lemonade stand plans. Really like how it turned out. Thanks!
http://ana-white.com/2012/12/puppet-theater