


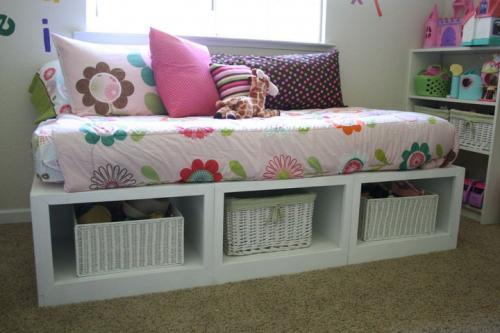
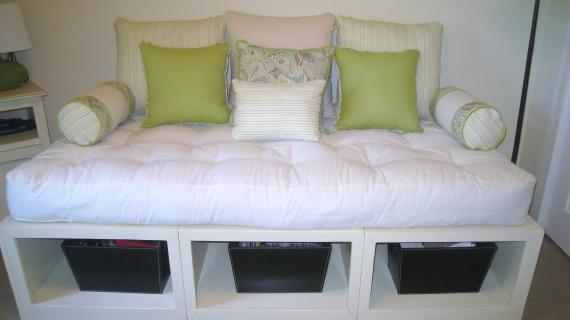
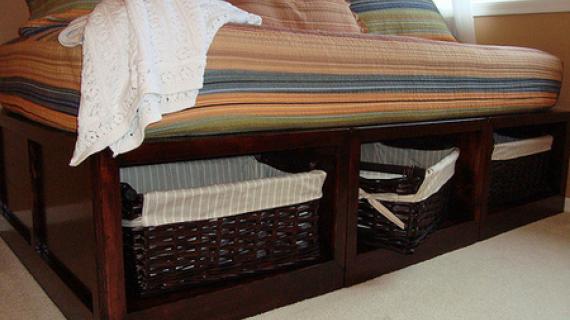
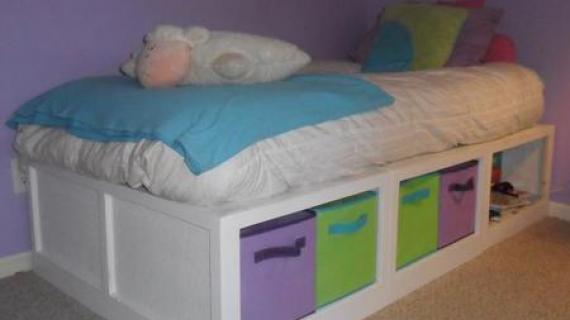
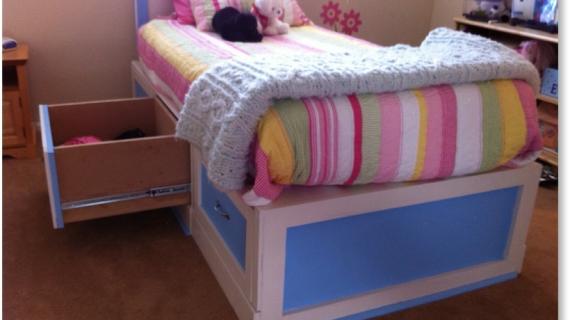
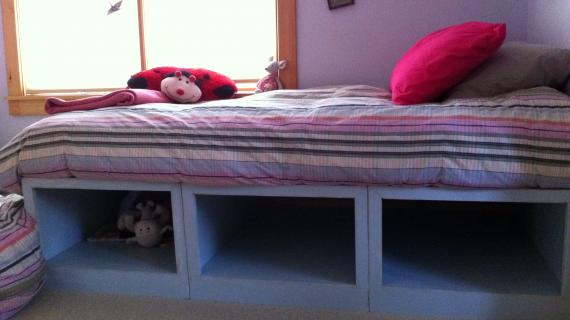
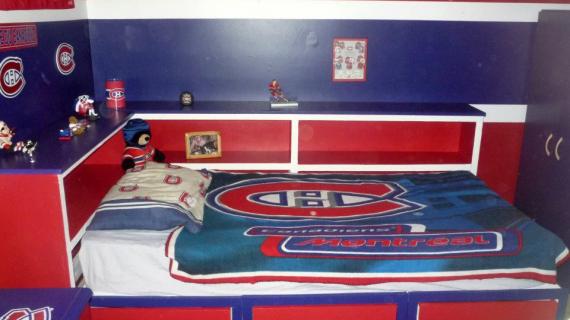
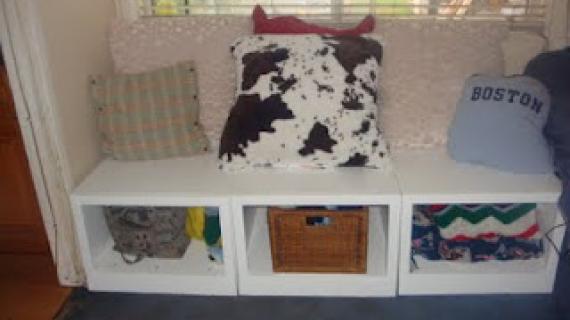
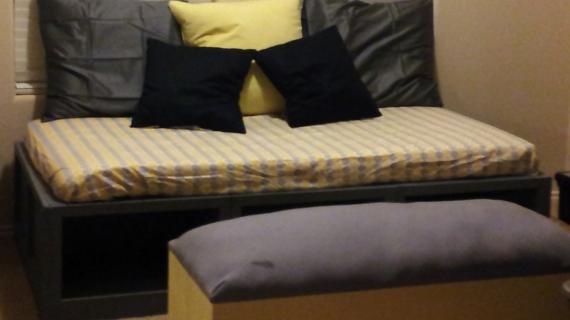
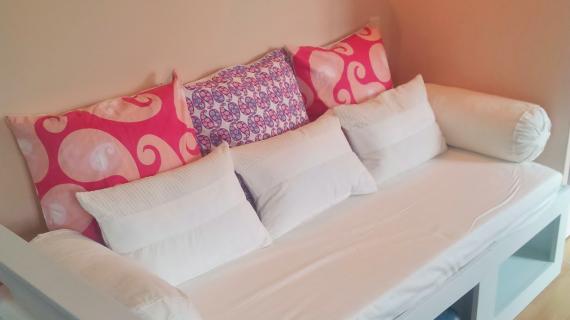
Can you build a box? What about three boxes? Then put some trim on the outside edges? Yes? Then you can build a storage bed like this one. The Storage Daybed is actually made up of three benches, very different benches than the Queen-Sized. These benches are much more simple. Thank you readers for the photos! Special thanks to Kara for sharing her amazing bed.


Preparation
3 sheets of 3/4 inch plywood 3 - 1x4 @ 8 feet 6 - 1x2 @ 8 feet 6 - 1x12 @ 8 feet (optional drawers) 6 sets of side mount drawer slides, 18″ long, designed to fit in a 3/4″ gap (optional drawers)
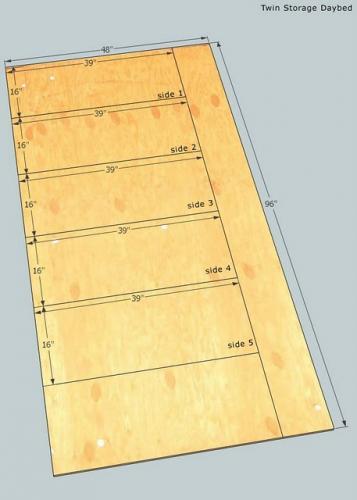
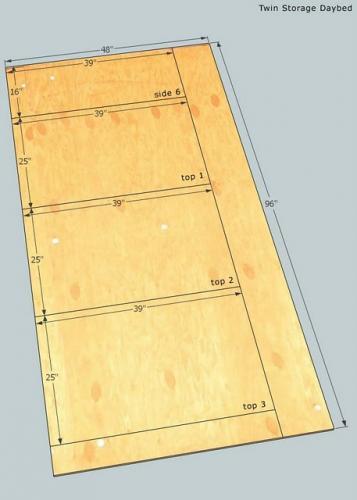
Pieces to Frame 3Benches A) 6 – 3/4″ Plywood cut at 16″ X 39″ (Sides of Benches) B) 3 – 3/4″ Plywood cut at 23 1/2″ X 39″ (Bottoms of Benches) C) 3 – 3/4″ Plywood cut at 23 1/2″ X 12 1/2″ (Center Cubby Dividers) D) 3 – 3/4″ Plywood cut at 25 X 39″ (Top of the Benches) Trim Pieces for all three Benches E) 6 – 1×4 @ 25″ (Bottom Trim, Top 1 1/2″ upper corners mitered off at 45 degrees, see diagrams below) F) 6 – 1×2 @ 25″ (Top Trim, Ends mitered off at 45 degrees, see diagrams) G) 12 – 1×2 @ 14 3/4″ (Side Trim, ends mitered off at 45 degrees, see diagrams) Trim Pieces for the 2 Outer Benches, Exposed Edges H) 2 – 1×4 @ 40 1/2″ (Bottom Trim, top 1 1/2″ upper corners mitered off at 45 degrees, see diagrams) I) 2 – 1×2 @ 40 1/2″ (Top Trim, ends mitered off at 45 degrees, see diagrams) J) 4 – 1×2 @ 14 3/4 (Side Trim, ends mitered off at 45 degrees, see diagrams) K) 2 – 1x2s @ 11 3/4″ (Middle trim for the outside end benches) Optional Drawer Pieces L) 6 – 3/4″ Plywood cut at 20 1/4″ x 18 1/4″ (Drawer Bottoms) M) 6 – 1×12 @ 20 1/4″ (Backs of Drawers) N) 12 – 1×12 @ 19″ Sides of Drawers O) 6 – 1×12 @ 21 3/4″
See more details for cutting diagrams at the bottom of the page in the additional photos. Special thanks to Jen!


Begin by cutting all your boards. Check the diagrams for exact measurements on the trim pieces that need to be mitered out on the corners at 45 degree angles. Use 2″ nails unless otherwise directed. Always use glue. If you expect your bed to take heavy abuse (for example, used daily in a children’s room) you may wish to use screws. Screws will prevent wiggling and make the bed last longer, but are more difficult to build with. For the trim pieces, you may wish to cut as you go to guarantee the most perfect fit. If you are adding drawers, it is crucial that you build a perfectly square box for the drawers. Make certain that you cut the plywood square and that you check for square as you go. Your drawers will not slide properly if your drawers or the drawer box is not square. Learn how to check for square in the HOW-TO section.
Instructions
Step 1
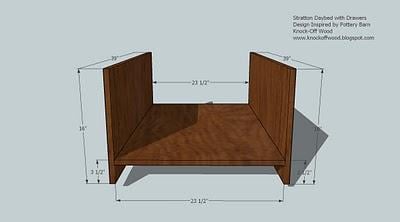
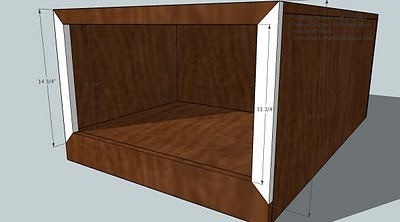
You will make 3 of the following benches: Start by nailing through the sides, A, into the bottom B. Use the measurements above to guide you.
Step 2
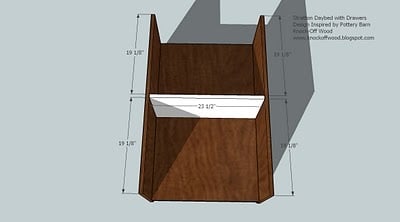
Then nail the center cubby divider, C, in place as shown above. Make sure you also nail from the bottom of the benches into the center cubby divider.
Step 3
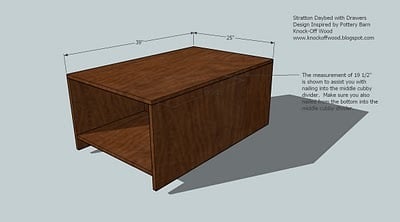
Nail the top of the bench, D, to the benches, as shown above. Make sure you nail into the center cubby divider, C, from step 3.
Step 4
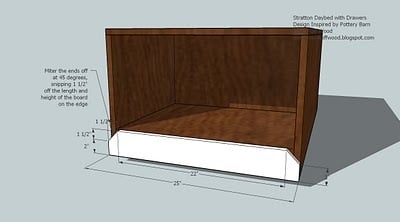
Cut trim piece E as shown above. Then nail to the bench on the top and ends, keeping all outside edges flush.
Step 5
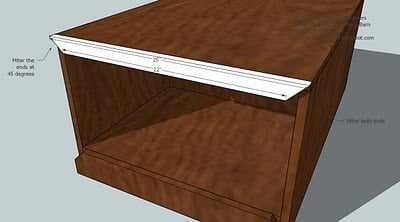
Step 6
Cut pieces G as shown above and nail to the sides of the bench, keeping outside edges flush. Make sure you use 2″ nails to nail from the outside edges of G into the ends of the top and bottom trim pieces.
Step 7
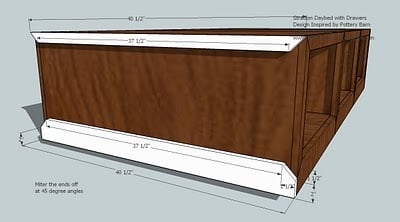
Line the three benches up and on the outsides of the outer two benches, add the following trim pieces: Cut H and I as shown above. Then nail in place, keeping outside edges flush. Use 1 1/4″ nails.
Step 8
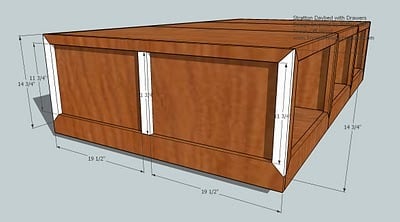
Cut J and K as shown above and nail in place. Use 1 1/4″ nails.
Step 9
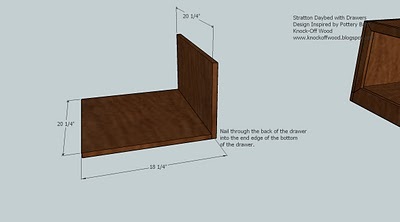
Drawer Assembly If your bench openings are not perfectly square, your drawers will not slide right. Assemble the drawer by nailing the back of the drawer, M, to the bottom of the drawer, L, as shown above. Keep outside edges flush.
Step 10
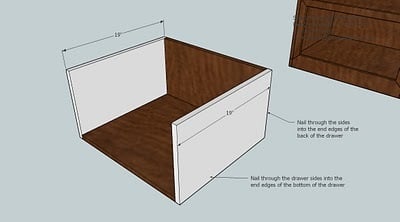
Add the drawer sides, N, as shown above.
Step 11
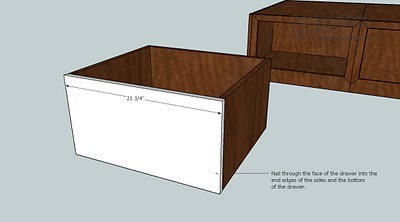
My “trick” to getting the perfect drawer front is to mount the drawer box into the slides in the benches without the face. Then, with the faceless drawer pushed in, center the drawer face on the opening (and not the actual drawer). When you are happy with the gap around the drawer, nail the face to the sides and bottom of the drawer.

Comments
Julie G. (not verified)
Fri, 12/18/2009 - 03:03
Ana!!! Thank you so much!! I
Ana!!! Thank you so much!! I am in TEARS with gratefullnes (not sure that's a word!)
I'll post pictures when I'm done!
Ana White (not verified)
Fri, 12/18/2009 - 10:38
Juile, thanks for giving me a
Juile, thanks for giving me a reason to build these plans! I love these plans! As long as you cut square (and I know you scored a table saw, awesome!) and keep everything square, this project will be easy.
Ana White (not verified)
Fri, 12/18/2009 - 10:40
When you assemble the Pottery
When you assemble the Pottery Barn Stratton Daybed, make sure you use 1 1/4" screws to screw the seperate benches together. Just remove the drawers (if you opted for drawers) and screw through the inside of the cubbies into the sides of the neighboring bench.
Bubba (not verified)
Sat, 12/19/2009 - 02:57
So, not to sound ungrateful,
So, not to sound ungrateful, but how hard would it be to include a materials list and suggested cutting layout also. I guess I mean help us novices figure out the best way to make the most of our materials purchase. I am assuming you are using blender to create all of your plans, so you already have your "pieces" created. Laying them out "precut" to help us maximize our material would definitely be helpful to the wife and me. Oh, and love the site, we have already made the children's stools and plan on making the entire kitchen in the upcoming months.
Thanks,
Jim
Ana White (not verified)
Sat, 12/19/2009 - 08:51
Hi Jim,Thank you for reading
Hi Jim,
Thank you for reading my blog! I am so happy that you have already had success with plans!
I totally agree with you about providing a materials list and cutting layout. However, these steps take additional time, and I would not be able to post as many plans as a result.
My hope is that readers like yourself will comment and request more information on popular plans, and then on those popular plans, I will go back and add more details and information. Because of the popularity of the Stratton Beds, I will work on a materials list and cutting layout.
After you build a few pieces, you will begin to develop a scrap pile. In general, cut your largest pieces first, and then smaller pieces from the scraps.
I also make every effort when determining my overall dimensions to conserve boards. That is why you will see consoles measuring 48" with a bottom shelf measuring 46" - then you only waste about an inch from a 8' board.
Thank you again for your comment. I am looking in to Blender - country girl me had never heard of it!
Chautona (not verified)
Sat, 01/09/2010 - 09:14
I have a question about
I have a question about cutting.
The cutting list says that the height of the pieces is 16.75" However, in the diagram, you have it listed as 16".
Before we cut, we wanted to make sure the measurement is 16.75" and maybe you just rounded off for the diagram?
Thanks for any help!
Chautona (not verified)
Sat, 01/09/2010 - 09:25
Oh! We just noticed that we
Oh! We just noticed that we can get it on 3 sheets of plywood instead of four if we cut them at 16" high making me wonder if you changed it for that reason?
Ana White (not verified)
Sat, 01/09/2010 - 10:50
Yes, you are correct. The
Yes, you are correct. The correct height of the sides is 16".
The overall height of the bed is 16 3/4", minus the top 3/4" thick, so the sides is definitely 16". I will change this immediately. Thanks so much for catching this!
Be very careful about getting 3 pieces at 16" out of one sheet of plywood (48" width). Don't forget that the saw blade take up 1/4" (approximately).
What you can do if you want to conserve plywood is cut the sides at 15 3/4" high. Cut all the rest of your pieces as directed. When you build, there will be an extra 1/4" on the trim pieces in height. Leave this 1/4" on the top. This will create a 1/4" lip around the top of the bed . . . keeping your mattress in place! You seem plenty bright enough to be able to make the necessary adjustments. Good luck, hope I answered some questions.
Thanks again for catching that!
Chautona (not verified)
Sat, 01/09/2010 - 11:45
Well, the way I have it drawn
Well, the way I have it drawn up, I don't have all 16" pieces on one board. I have five and then one of the C pieces at the end and the other 16" (A?) on another board. I'll draw up a schematic of how we cut.
However, does this mean we shouldn't draw all the lines on the boards and then cut them? We should cut one, draw, cut another?
Chautona (not verified)
Sat, 01/09/2010 - 11:48
Oops... I see that you're
Oops... I see that you're cutting them from the 48" side. We were working from 96" side on everything and it seemed to give us a good layout... except that I actually have 2 C boards drawn so we'll have to erase that. Snort.
(Sure wish this thing would let you edit instead of delete. I wrote 98" instead of 96" but we did work from 96")
Annie (not verified)
Sat, 01/16/2010 - 15:32
Ana, you seriously rock my
Ana, you seriously rock my world! I've been trying to convince my husband to let me build a storage bed, and then find your blog (courtesy of young house love) with PLANS!
Quick question - I wanted to make a bed with TWO layers of drawers - one stacked on top of the other. I know this would make it higher than normal, but we like that. Do you think simply making 6 cabinets would work (we're queen size), or is there another method you would recommend?
Thank you so much for your amazing site. I will definitely post pictures in gratitude.
P.S. If you added a paypal link, I (and others I'm sure) would really like to pay you *something* for your efforts. You are after all saving strangers thousands of dollars. Way to practice random acts of kindness!
BrEZe (not verified)
Sat, 01/16/2010 - 18:47
wow! i am soooo glad that i
wow! i am soooo glad that i stumbled across your blog!! LOVING IT!!!! keep up the good work... and i always wanted to work with wood, but as a woman, never really dared to... thanks for the inspiration!!!!
Ana White (not verified)
Sat, 01/16/2010 - 19:45
Annie, you can stack these
Annie, you can stack these beds and everything should be fine. The only thing I would recommend is making the sides the same height as the cubbies. This would essentially take a couple of inches off the overall height.
You will also have some trouble with keeping all the benches aligned properly. You should make sure you screw all the benches together, on each level, and also screw top benches to the bottom benches.
Good luck - sounds like you have a good handle on how this will work. Let me know if you have any more questions.
Suzee (not verified)
Mon, 01/18/2010 - 16:17
Hi Ana,I am trying to
Hi Ana,
I am trying to customize your plans to my nook size and wanted to make sure you think my thinking will work. My nook is 87" wide and 38" deep so I changed the main bench pieces to:
A) 16 x 36 (sides)
B) 26 1/2 x 36 (bottoms)
C) 26 1/2 x 12 1/2 (divider)
D) 28 x 36 (Tops)
Does that look right to you? I didn't want the daybed to stick out farther than the depth of the nook so I took 3 inches off of the depth and added a couple of inches to the width. I'll still have a little space on either side of the daybed which I think will be okay.
Thanks - you rock!
Ana White (not verified)
Mon, 01/18/2010 - 16:24
Hi Suzee,This looks right to
Hi Suzee,
This looks right to me. One thing to be aware of is a twin mattress measures 39" x 75". An extra long twin is 39" x 80, so that might be a better fit.
I would build one at a time, measure and make sure it fits before building the other 2 - just to be safe.
ANa
Anonymous (not verified)
Tue, 01/19/2010 - 10:56
did i miss the mattress size
did i miss the mattress size used in the daybed shown? i'm guessing twin. thanks!
Ana White (not verified)
Tue, 01/19/2010 - 11:42
The daybed shown will fit a
The daybed shown will fit a standard twin, sized 39" x 75"
Nichole Barton (not verified)
Thu, 01/21/2010 - 06:55
Do you have a plan for making
Do you have a plan for making the Stratton Daybed for a Queen bed? I liked the cubbyholes better than the drawers on the Stratton bed. Can I just make the Stratton bed and leave out the drawers...do you think that will look nice? These plans are awesome and I really think that it will be easy to make for a beginner (at least I am hoping!)
Blog Author(s) (not verified)
Sat, 01/23/2010 - 11:08
Ana, I just found this sight
Ana, I just found this sight today. Thank you and Bless you & Your Family for the rest of time.
Just my luck, I would be building for an extra long twin bed, full & Queen.
This is my favorite sight so far this year.
Thank you again.
Philip J (not verified)
Thu, 01/28/2010 - 09:45
Hi Ana, I believe I am going
Hi Ana,
I believe I am going to build a few of your beds.
My wife would like me to try and build a frame under them so I can add Casters, to move the bed around for cleaning or rearanging furniture.
Do you have any ideas on that, or has anyone done that in the past?
Thank you for your site.
Chelsea Anne (not verified)
Thu, 01/28/2010 - 13:02
OOoh I am so excited.I have
OOoh I am so excited.I have my own apartment and this is exactly what I need. I have graduated from ikea furniture to installing my own shelves along the perimeter of the walls, to new floors, and now i will fabricate my own furniture when the internet failed me. yes, i will do this!
I bought a 'floor cushion' from urban outfitters that measures 28x72x4. the platform that they sell to go with it will absolutely not do. unfortunately nothing else i could find was that size- no benches, no smaller daybeds. nothing but antique furniture and... i'll just modify these plans so that they are a slightly less wide, problem solved. and i'll probably like i a lot more since i can choose the trim and paint. Yay! will have to wait until spring break, but THIS IS GOING TO HAPPEN.
Jason Alexander (not verified)
Tue, 02/02/2010 - 18:43
Hi Ana just want to drop a
Hi Ana just want to drop a line saying that I just built the Stratton daybed for my daugthers. I did however make 1 slight modification to your plans that made building the boxes a tad bit easier and thought I would share it with anyone who would like to know. All I did was cut some of my scrap wood into 1 1/2 inch strips and attached them to the side panels at the bottom. I attached them at 2 3/4 inches so when I attached the 3/4 inch plywood for the bottom it was at the 3 1/2 inch height to match the shelf with the bottom trim. I then attached the bottom shelf to that strip of wood, then I came in from the side according to the plans to finish attaching the shelf. The bueaty of it is that no one will know it is there since it is covered by the trim. Also it gives the shelf a little extra meat to hold weight. If your kids are like mine they can get 300 lbs of stuff in the cubby holes down there. For a finishing touch I took wood-filler to all the nail, screw holes and seams and sanded it all down before painting them. I hope this helps
carrie (not verified)
Mon, 02/08/2010 - 09:08
First of all, Ana, thank you
First of all, Ana, thank you so much for generously sharing your hard work with the world!
I have very little experience with building, but I would really like to try this daybed. I don't have a saw, so I am having Lowe's cut the plywood for me, but does anyone have any suggestions for the trim? Is there any way to get around using a saw? Can you buy anything pre-cut?
Also, do you recommend staining it after you are completely finished? It seems like it would be hard to get in the cubbies to do a thorough job.
Sorry for the very-beginner questions! Thank you!
Ana White (not verified)
Mon, 02/08/2010 - 09:24
You will need some sort of
You will need some sort of saw to cut the mitered corners for the daybed. You could use a miter box (basically a box that holds your board and has notches to keep you saw straight at the correct angle) and a hand saw. This is actually the method that professional carpenters use to get exact cuts for mitered edges, like frames and windows. I you are going this route, I would recommend looking at moulding instead of 1x2s and 1x3s. The moulding will give you more of Pottery Barn's frame look, and also be easier to cut with the hand saw.
The other option is to review the plans for the Stratton Bed. The trim is not cut at a miter, and you could do the same for this bed.
The trick with painting cubbies is to paint the cubby first. Turn the boxes on their sides, paint the bottom, then work your way out. I would recommend sealing at least the bottoms and sides. You could also use a cabient roller, which is basicly a cheap smaller roller that will help you reach tight places.
Anonymous (not verified)
Mon, 02/08/2010 - 13:50
Ana what a great inspiration
Ana what a great inspiration you are to so many people! I plan on making this bed for my sons room...it's a very small room and I had been cringing over the cost of a captians bed which would've allowed me to eliminate his dresser and give him a little more space. My sister told me about your site and I fell in love with this bed so the plans are in the works! Thank you, thank you, thank you!
Anonymous (not verified)
Thu, 03/04/2010 - 19:37
We just built two Stratton
We just built two Stratton daybeds. I wanted to use the baskets but I can't seem to locate them. Does anyone know a good source for the baskets? 21" wide x 17" deep x 12" high
Thanks!
carrie (not verified)
Sat, 03/06/2010 - 05:02
I've scoured the internet for
I've scoured the internet for the right size baskets, and haven't found anything yet. I will post if I do. Please do the same.
Kathleen (not verified)
Mon, 03/08/2010 - 09:48
Pottery Barn carries (soon to
Pottery Barn carries (soon to be stocked) Savannah Lidded Baskets that would fit. The large one is 21x16x10 - just depends on if the width of the space is 21 or would handle a 21 inch basket.
http://www.potterybarn.com/products/savannah-lidded-baskets/?pkey=cbask…
merideth (not verified)
Wed, 03/17/2010 - 06:33
i want to thank not only ana
i want to thank not only ana (oh, my Lord, thank you, ana! lol!), but also everyone who comments with their tips and suggestions - thank you all!
i am waiting for my husband to come home so i can get started on this bed (he has the tools in his truck's toolboxes), and two comments in particular have helped me understand better.
i also want to say, about the baskets? those pb baskets are SO expensive! why not make your own fabric-covered bins? here's a great tutorial (not mine, but i plan to make these soon): http://sew4home.com/projects/storage-solutions/370-stylish-baby-nursery…
melimba (not verified)
Sun, 03/28/2010 - 18:50
jandee is my friend and I
jandee is my friend and I feel famous by association! what a fabulous project---she rocked it!oc
Liana Brooks (not verified)
Sat, 04/10/2010 - 17:09
I'm planning on building this
I'm planning on building this for my Eldest daughter. For the baskets, I'm planning on using this design (http://sew4home.com/projects/storage-solutions/370-stylish-baby-nursery…) and making my own that will match her quilt and pillows.
She's very in to purple, but I'm trying to avoid actually painting the bed purple. I'd like to be able to reuse it in a few years when she has a new favorite color.
Tanjia (not verified)
Sat, 04/17/2010 - 18:04
First of all - you are
First of all - you are amazing and this is the best blog I've ever seen!!
Second - I've always wanted built in benches for my kitchen. I think I could use these "bench" plans to do it myself. Oh how I love you!
Stephanie (not verified)
Tue, 04/27/2010 - 09:17
I love this bed but need one
I love this bed but need one for a full size and maybe a lip around so the mattress won't slide around. I'm so glad that my friend showed me this site!! I need to motivate myself to get some furniture built!!!
merideth (not verified)
Wed, 04/28/2010 - 02:53
stephanie, the lip? wish mine
stephanie, the lip? wish mine had one, but i've thought a lot about it and i think what i'd do different next time is use a 1x4 for the top trim on the benches-same as the bottom trim pieces. i'd use that extra width to stick up as a rail/lip to keep the mattress on. know what i mean?
dok0619 (not verified)
Tue, 05/04/2010 - 06:00
Concerning the lip to hold
Concerning the lip to hold the mattress: I noticed that the retail site indicated you should put a rug pad on top of the daybed before placing the mattress down to prevent slipping...
Kara (not verified)
Fri, 05/07/2010 - 02:23
Hi,I just built the daybed
Hi,
I just built the daybed this past weekend. If you decide to go with the 15 3/4th" instead of the 16" to save on plywood, don't forget to adjust your center divider by 1/4th an inch (shorter) too.
We put a small rug pad underneath our mattress and tried to wiggle the mattress free, and couldn't do it. The rug pad works like a charm!
Also, I found the exact sized baskets for this project at Lowe's for $20 a piece!! My pictures / project can be found here:
http://mekhart.blogspot.com/2010/05/big-project-reveal.html
Thank you so much Ana for posting these plans...I'm in love, and addicted to furniture building!!!
Kate (not verified)
Thu, 05/13/2010 - 17:22
This is marvellous, it's just
This is marvellous, it's just what I've been trying to plan for my son's bedroom for a while now, but someone's created the plans for me! Mine will fit against a wall - are the 'cubbies' necessary (are they providing stability) or could I omit them to use the greater bench space?
Kate (not verified)
Thu, 05/13/2010 - 20:01
Sorry, of course the
Sorry, of course the 'cubbies' are for stability! I shall consider how to stabilise the bench and provide sufficient strength at the front while moving the cubby toward the back, it could be a solution as simple as adding small blocks of wood to the inside angles to support the 90 degree angles.
orange sugar (not verified)
Sun, 05/16/2010 - 08:36
Am I reading this plan wrong
Am I reading this plan wrong or do you really need 15 separate pieces of 3/4" plywood?
At my local orange store one piece of 3/4" oak or birch plywood costs $48.97. That's $734.
I'm really hoping I'm interpreting the plans wrong. Can anyone help me out with this.
paulette (not verified)
Mon, 05/17/2010 - 11:15
I believe it is 3 or 4
I believe it is 3 or 4 sheets, you should be able to get more than one piece cut from each of the sheets
Just a Girl (not verified)
Sun, 05/30/2010 - 20:08
Thank you SO much for these
Thank you SO much for these plans. I just finished making this bed and I love it. I used fiberboard instead of plywood because it was cheaper at Lowes and it worked great. I never thought I'd be able to build anything, let alone an entire bed, but your plans are so easy to follow!
Nissa Lynn (not verified)
Thu, 06/24/2010 - 16:04
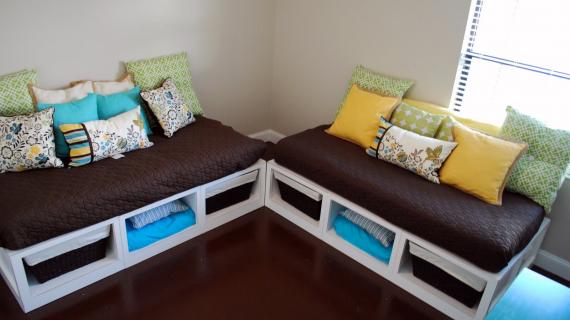
Our beds are now finished and
Our beds are now finished and they look fabulous. We cannot thank Ana enough (and we posted a picture of the completed bed in the thumbnail section for everyone else to see....ooops, didn't realize it was supposed to link somewhere so many apologies for that but ours is the photograph with the pup on the bed). It did end up costing what other followers have stated - ab. 250.00 a bed. How fantastic is that?! We built two because we live in a small (but charming) old Victorian house and needed to convert the original bedroom into a lounge for tv viewing, etc.
I think my husband might be in love with Ana :)
Thank you SO MUCH!
Best to all,
Nissa
Angel (not verified)
Sun, 07/18/2010 - 09:25
Is there any reason you
Is there any reason you couldn't use mdf for this? I'm planning to paint it white for my son's room, but even at $250 it seems cost prohibitive for us, after buying the mattress to put on it.
Caroline @ The… (not verified)
Thu, 07/22/2010 - 02:20
We just finished building
We just finished building this bed, and it only cost us about $150! We used plywood.
Here is a link to how it turned out!
http://davidandcarolineparker.blogspot.com/2010/07/building-daybed-than…
orange sugar (not verified)
Sat, 08/21/2010 - 14:43
Question about this plan. Is
Question about this plan. Is there a back piece? If I'm following your plans each box will end up being 39 3/4" wide. However in step 8 it looks like there is a back piece attached which is not included in the steps. Either that or I'm missing it. Also the top side trim piece is cut to 40 1/2, which is off by 3/4". I'm thinking there is supposed to be a back piece which has been left off the plans?
Build a Bed wi… (not verified)
Mon, 09/27/2010 - 06:52
[...] Now check out the
[...] Now check out the Stratton Daybed [...]
Love, Joy, and… (not verified)
Mon, 10/04/2010 - 05:13
[...] details about the bed:
[...] details about the bed: The bed is the Storage DayBed at ana-white.com. We used a 50″ 1 X 8 attatched with pocket screws as the rail for the bed. [...]
kindi (not verified)
Fri, 12/03/2010 - 11:04
Can you use particle board or
Can you use particle board or MDF rather than plywood to save on money? How much did this total project cost you? and i didn't see what you made your trim peices out of when looking at your cuts.
sherumsey (not verified)
Mon, 05/14/2012 - 05:19
They lack the structural
They lack the structural integrity, durability, and wood grain appearance and are much more susceptible to damage. When buying lumber, as in most things, you get what you pay for.
kindi (not verified)
Fri, 12/03/2010 - 11:07
Also, Do you know what kind
Also, Do you know what kind of mattress you would use to make the mattress look fatter like "Jordan and Jandee's" Looks thicker than a normal twin mattress