


Do you want a farmhouse table, but don't want to spend thousands of dollars? Have you thought about building your own? Check out this free, step by step plan to build your own with basic tools. From Ana-White.com

The Farmhouse Table Story
Beloved for hundreds of years, the Farmhouse Table was usually made by the family that used it, from wood that was locally harvested, using basic tools. Soft woods were easier to use, but the soft wood dents easily, and the tables showed wear, creating that authentic distressed look.
Today, a true farmhouse table is just that - built by hand by the family that uses it, using soft woods, and finished by hand. The tables are meaningful, with each scratch and scuff having a story, each moment creating memory for the family that uses it.
Start your family's Farmhouse Table Story by building your own table, and gathering around it to share a meal, to fold laundry on and do homework on - to create the foundation of your family's home.
The Farmhouse Table Plans
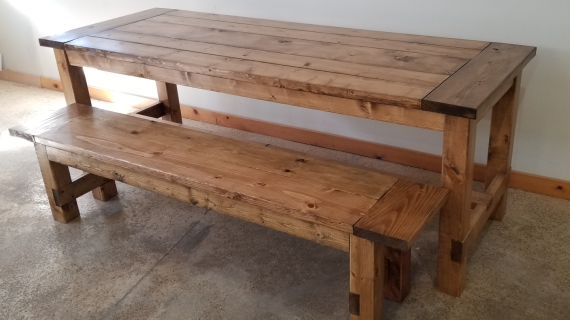
Our Farmhouse Table plans have been built tens of thousands of times and are in homes all over the world. The extremely sturdy, rustic styling is easy to build and authentic to history.
Built out of all off the shelf lumber - builders spend between $50 and $100 making their farmhouse tables.
You just need a saw and a drill to make this farm table.
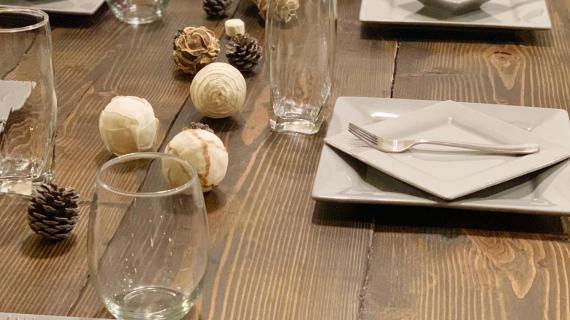
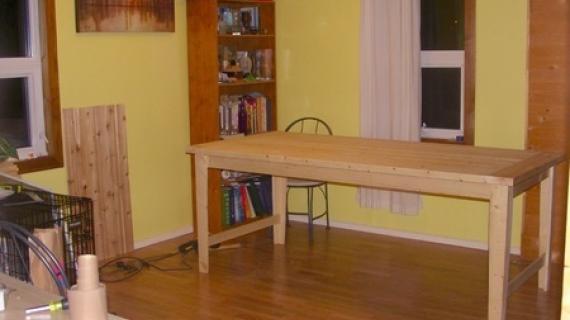
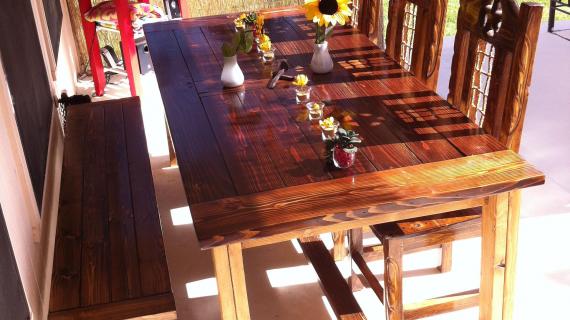
Special thanks to ssshindler for the featured photo.
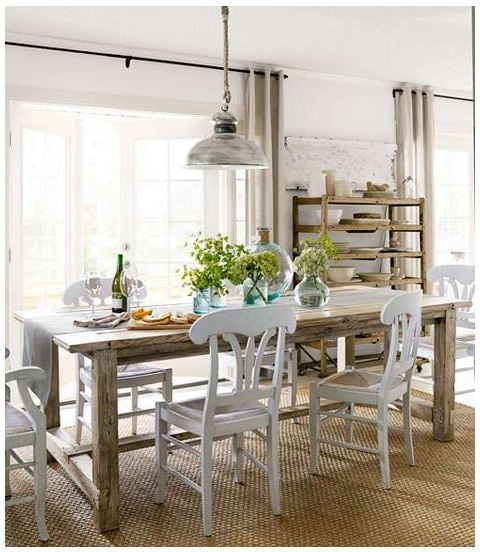
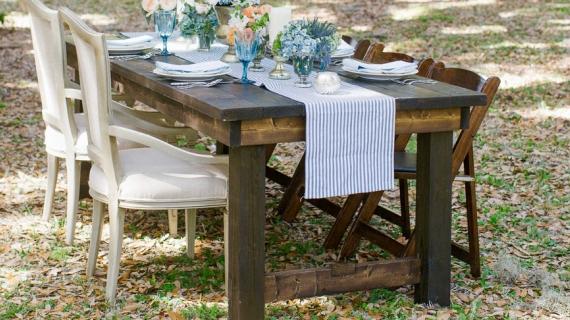
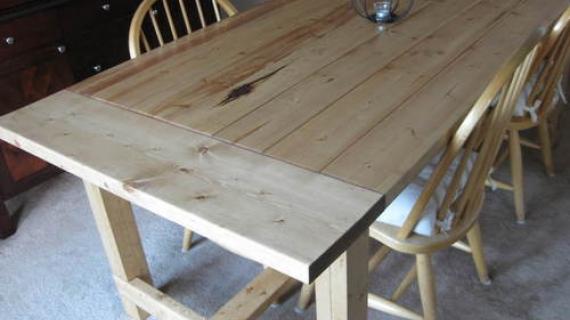
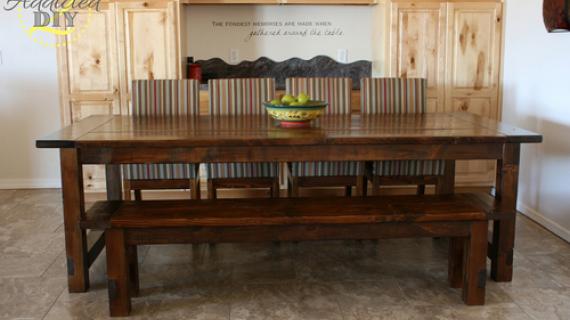
This table was also featured in Country Living Magazine! Built by Michael and Emily Knotts, photo by Lucas Allen
The plans for this farmhouse table follow. Also check out these other plans:
- Matching NO Pocket Hole Farmhouse Bench
- Farmhouse Table built with Pocket Holes (no screw holes showing)
- $50 Farmhouse Table - The most beginner friendly table you can build
Thank you so much for using our plans. If you build, please share a photo and let us know how your build went in the comments or a brag post.
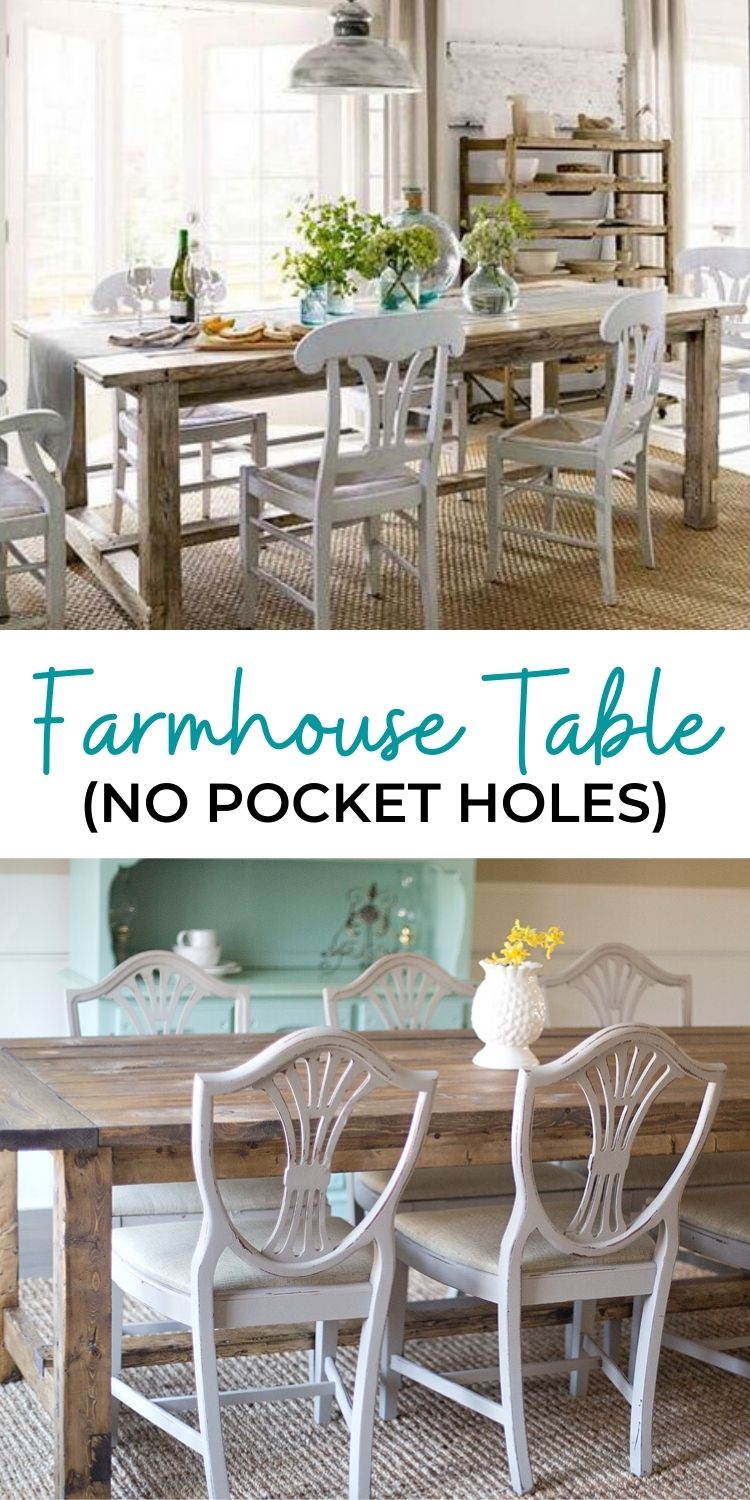
Pin For Later!
Preparation
- 8 – 2x4 8 feet long
- 6 – 2x2s 8 feet long
- 1 - 2×8 8 feet long
- 7 – 2x6s 8 feet long
- 2 3/4″ Self Tapping Wood Screws (About 100) (try spax brand or similar)
- 4″ Self tapping wood Screws (About 20)
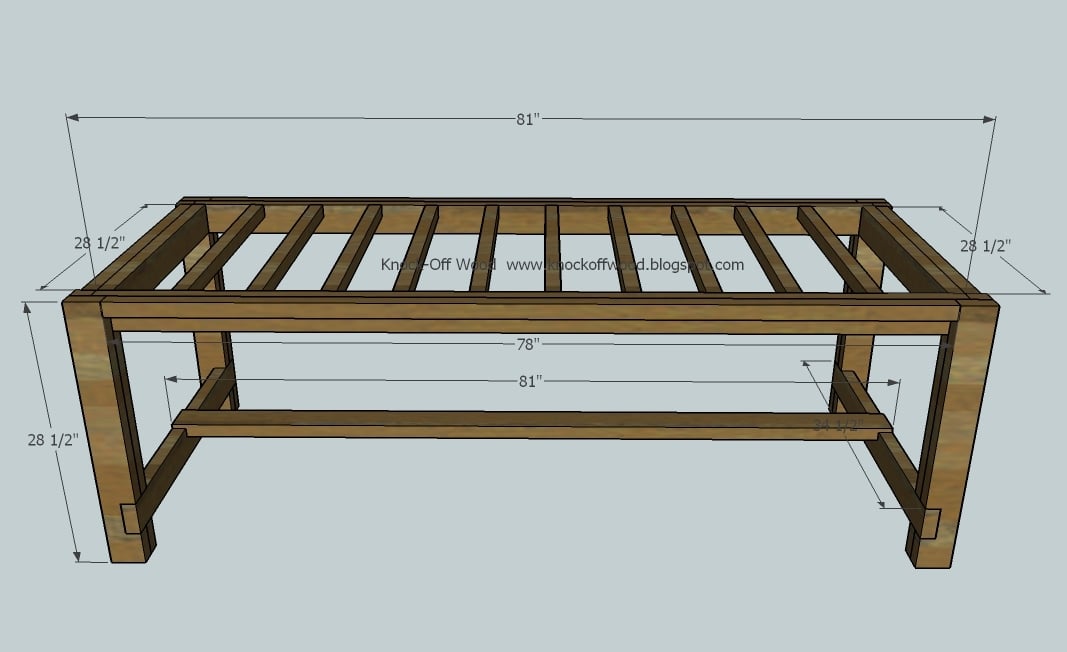
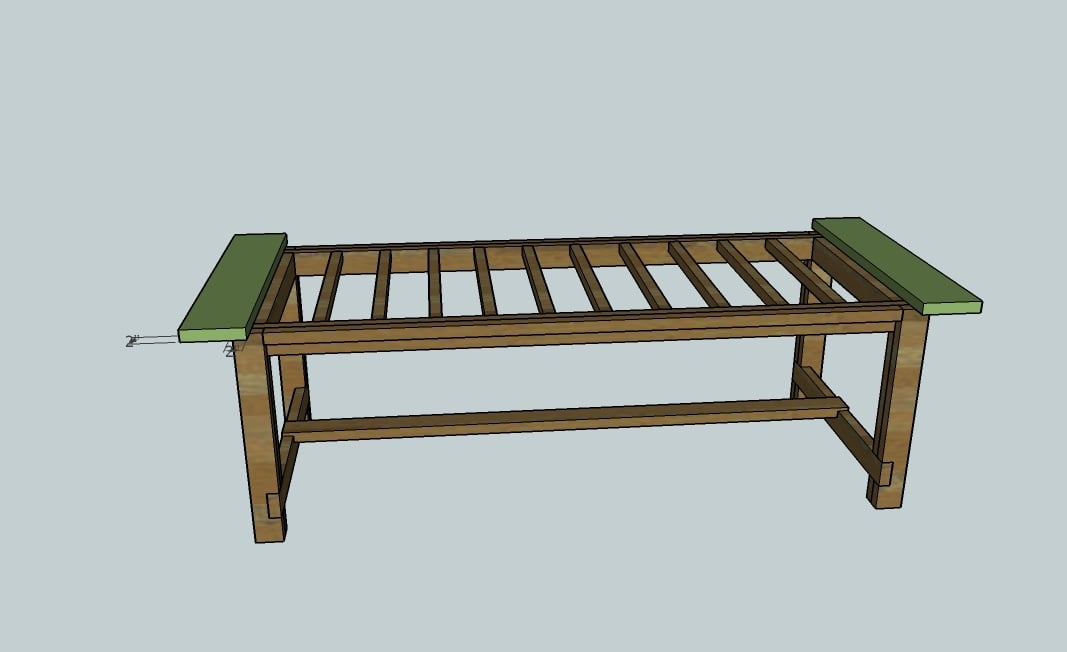
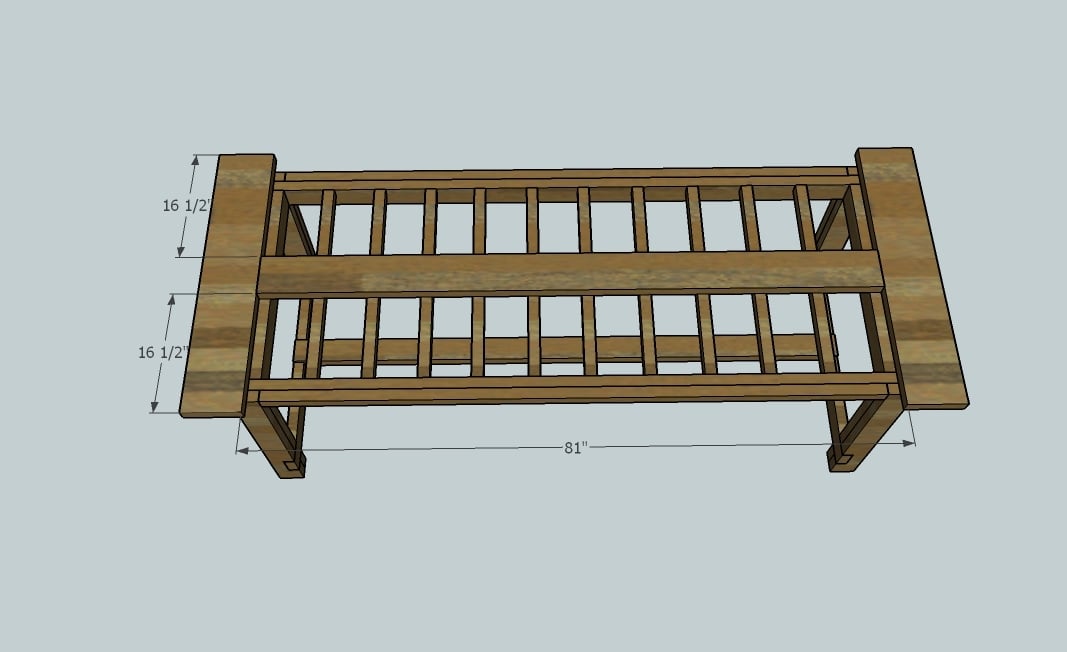
A) 4 - 2×4 @ 28 1/2″ (Outside Legs)
B) 4 – 2×4 @ 28 1/2″ (Inside Legs)
C) 2 -2×4 @ 34 1/2″ (Bottom End Supports for the Stretcher)
D) 1 – 2×4 @ 81″ (Stretcher)
E) 2 – 2×4 @ 81″ (Side Aprons)
F) 2 – 2×4 @ 28 1/2″ (End Aprons)
G) 2 – 2×2 @ 28 1/2″ (Overhang Supports, Ends)
H) 2 – 2×2 @ 78″ (Overhang Supports, Sides)
I) 10 – 2×2 @ 28 1/2″ (Under Tabletop Supports)
J) 2 – 2×8 @ 38 1/2″ (Breadboard Ends)
K) 7 – 2×6 @ 81″ (Tabletop Pieces)
Start by cutting all your boards. The best way to cut is with a compound miter saw. You can also use a circular saw with a guide - good square cuts are very important.


Always use glue. Use the longest possible screws, and predrill with a countersink bit to hide the screw heads.
Instructions
Step 1
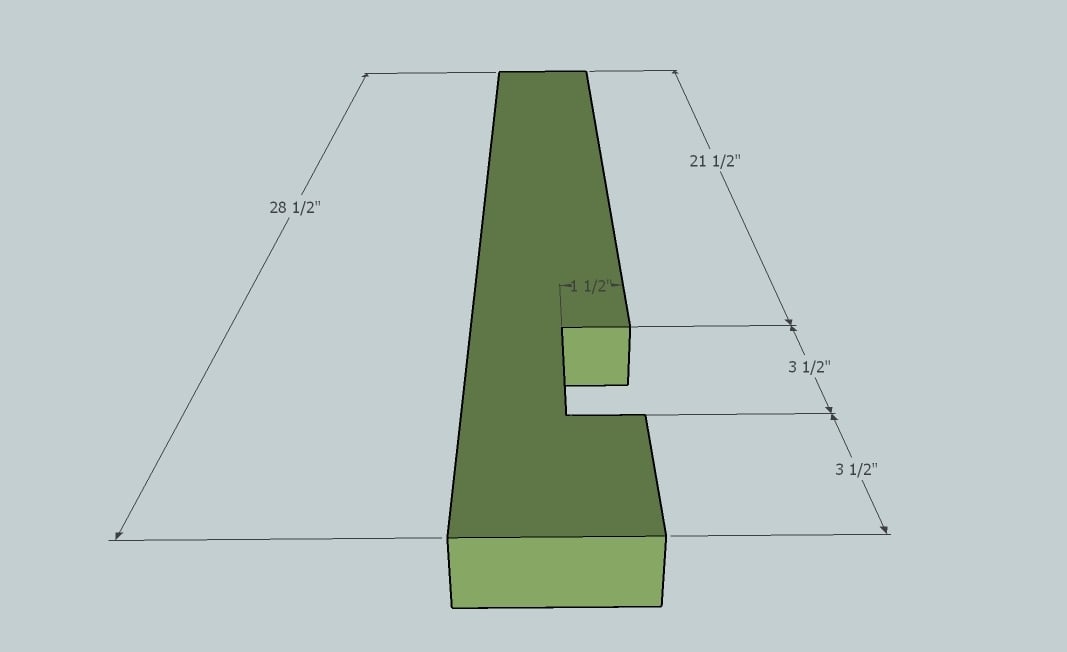
Notch out boards A, the Outside Legs, as shown above. If you do not know how to notch out boards, watch me notch the boards out for my table in my HOW-TO section.
Step 2

Notch out the inside leg as shown above. Make sure you notch both the top and the bottom as shown above. Use the measurements from step 2 to notch the bottom. See the below diagram for a closeup on notching the top.
Step 3
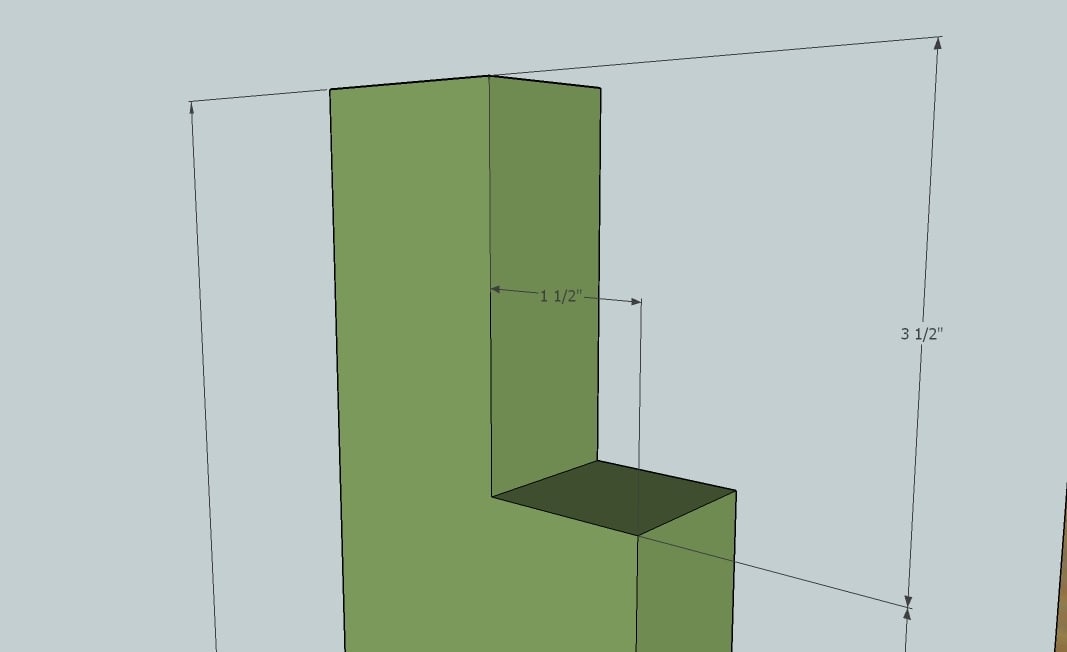
The above diagram show you how to notch out the top of the inside legs.
Step 4
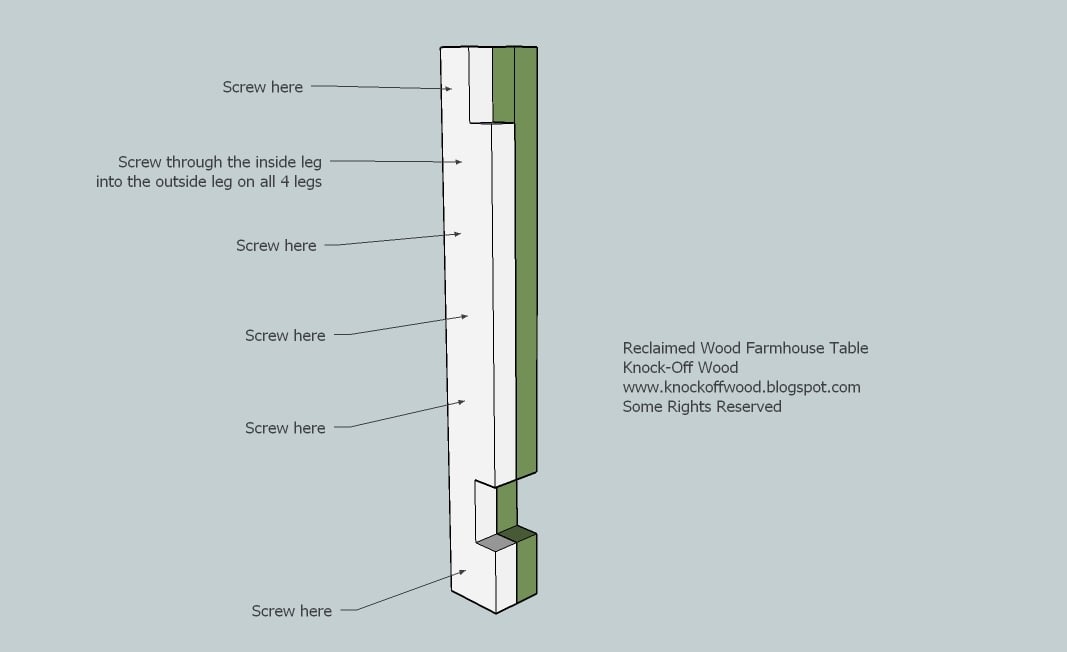
Now screw an inside leg to an outside leg, using glue and 2 3/4″ screws. Be aware of where each leg is placed – it does matter on what sides the inside leg sits. Also, screw through the inside leg into the outside leg to keep your screw holes on the inside.
Step 5
Step 6
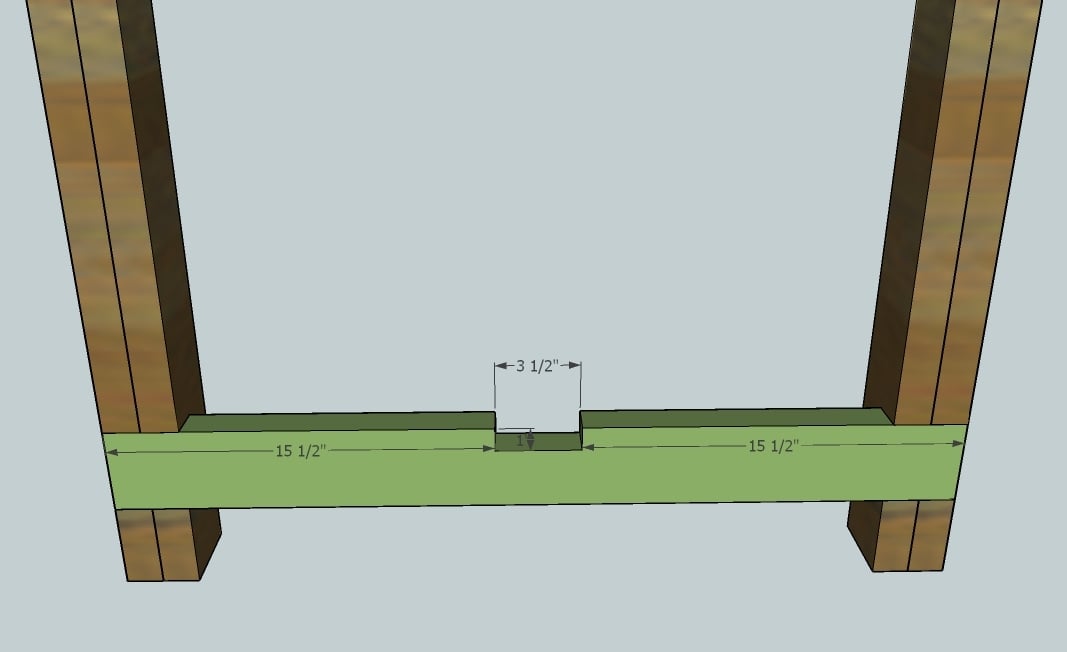
Screw the support, C, into the legs, as shown above. Make sure you use 2 screws on the inside leg and 2 screws on the outside legs per side of the end supports. NOTE: If you would like the support to be on the outside, rotate the legs, keeping the inside legs on the inside, and add 4″ to your stretcher, D. This will reduce your leg room for end chairs, but the notch out will be more visible, like my table and the Restoration Hardware table.
Step 7
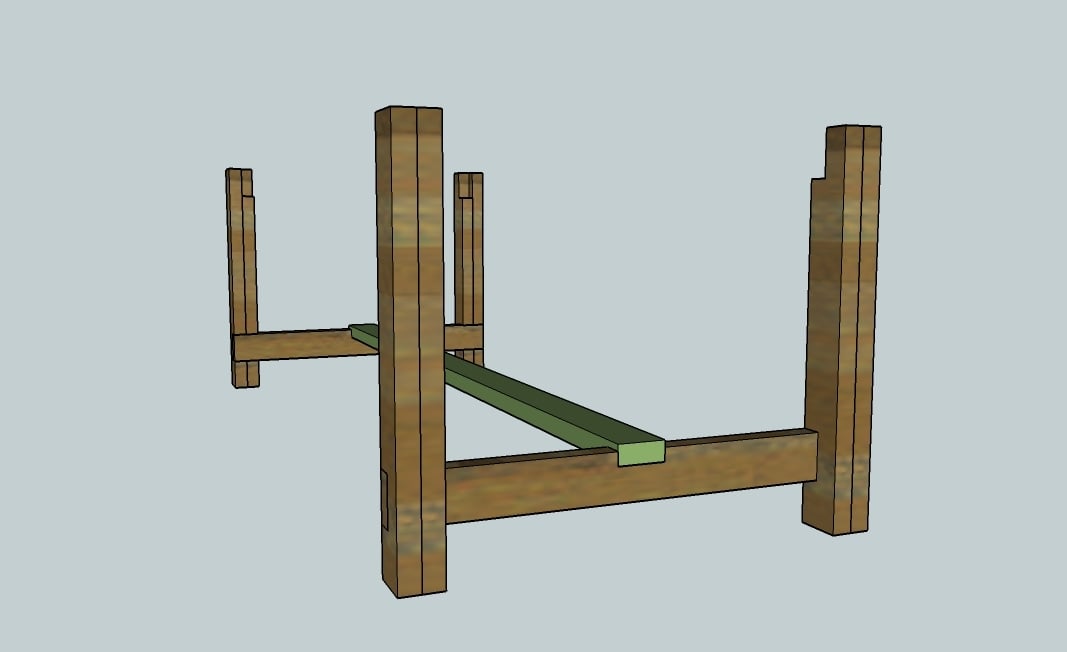
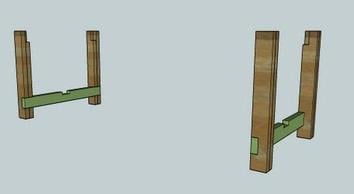
Put your stretcher in place and screw down.
Step 8
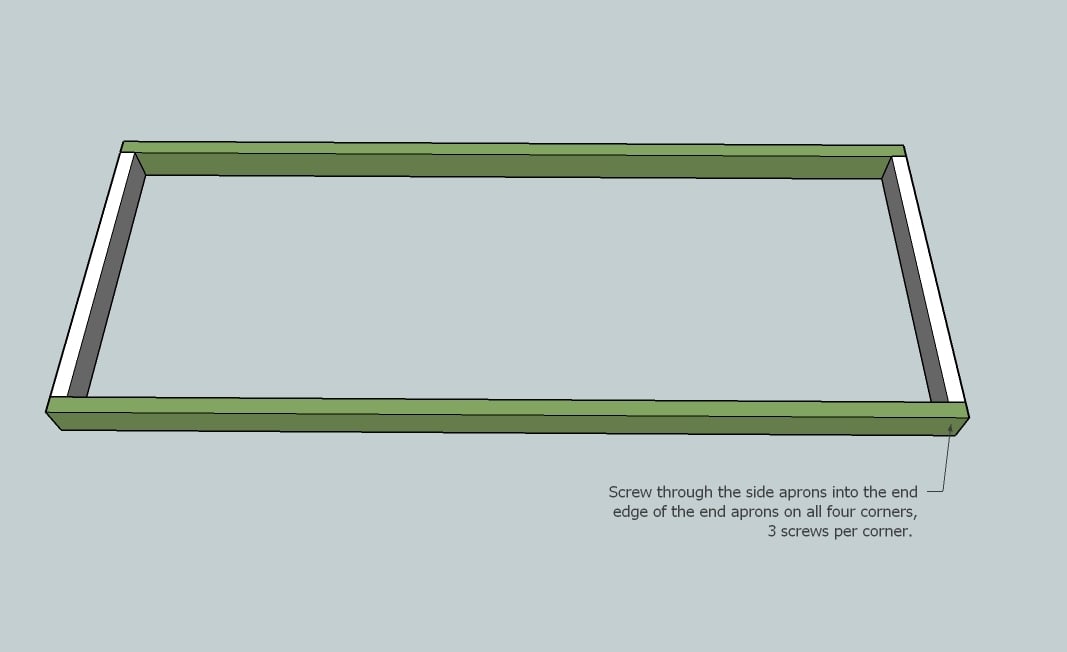
Build your apron on a level surface as shown above, using side apron boards E and end apron boards F.
Step 9

Fit the apron frame into the base of the table as shown above. Use the long screws to screw at an angle through the apron into the legs. Use 3 screws per leg on all legs. Lots of glue here. Now is a good time to check your table for square. Visit the HOW-TO section if you do not know how to check for square.
Step 10
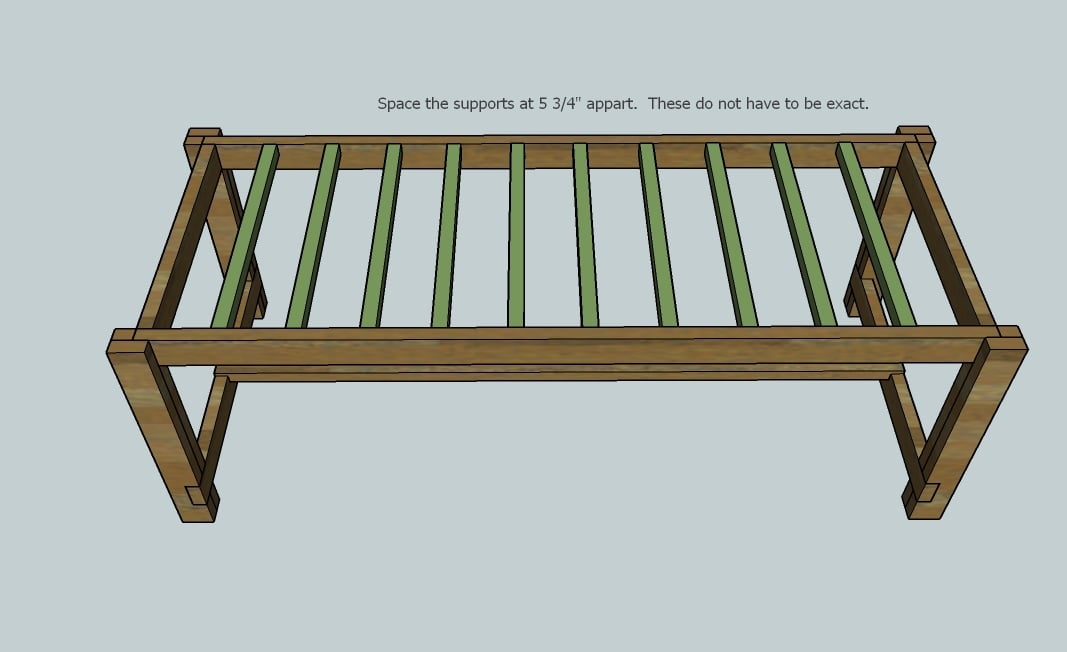
Mark the side apron every 5 3/4″ and place the 2×2 supports, I, as shown above. Remember that a 2×2 is 1 1/2″ wide. This does not have to be exact and the last support will not be exactly 5 3/4″ from the end. Use the 2 3/4″ screws here.
Step 11
Add the overhang supports, G and H, as shown above. Keep the top edges flush, use the 2 3/4″ screws. Make sure you screw these in good.
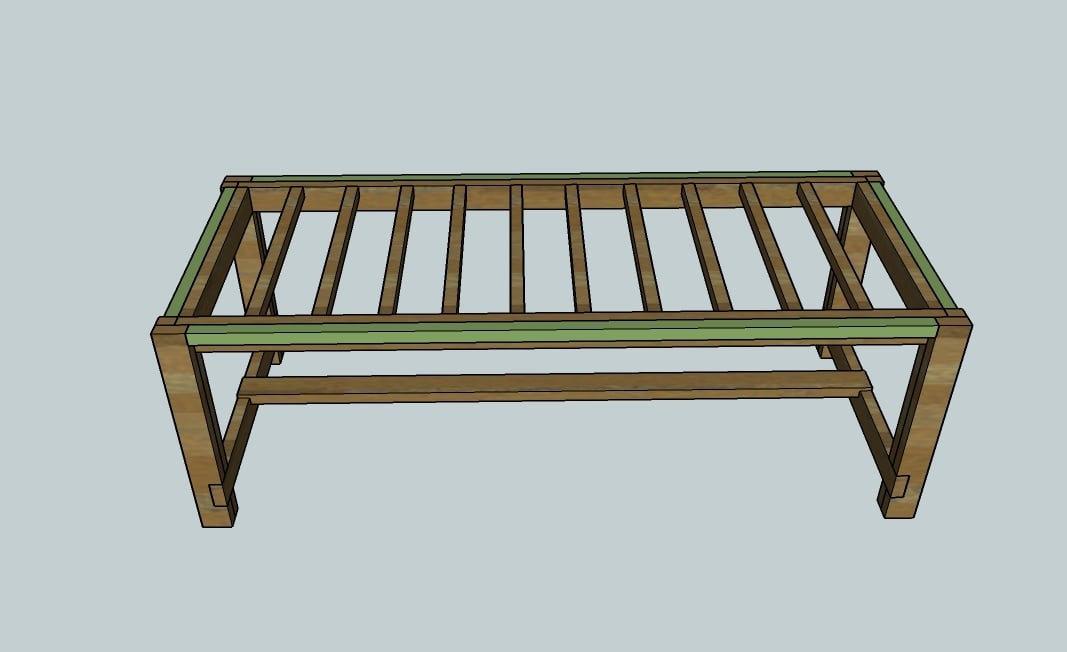
Step 12
Now the breadboard ends, J. See the below diagram for measurements:
Step 13
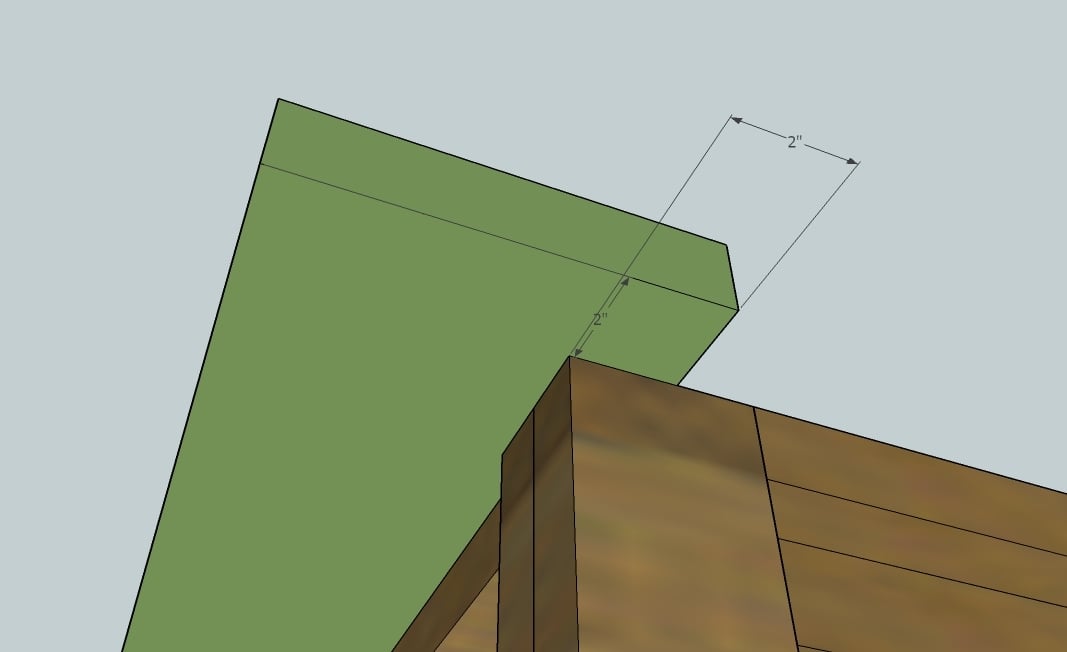
Use the long screws to screw the breadboard end into the legs. Then screw from the underside of the overhang support, board G, into the underside of the breadboard end.
Step 14
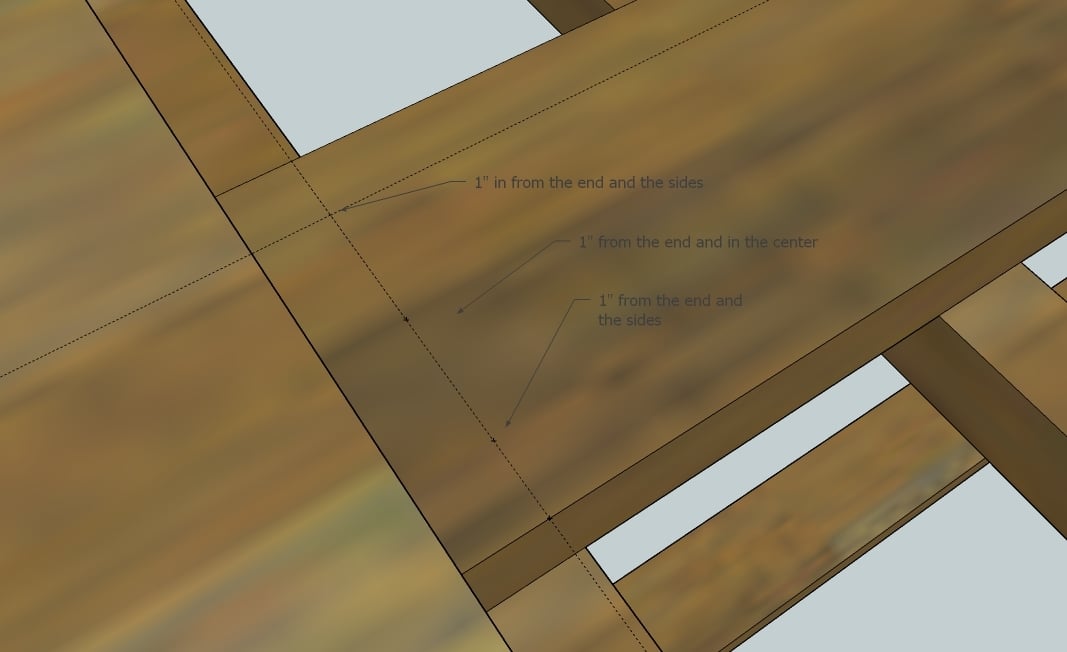
First mark all the ends of the tabletop boards, K, for the screw pattern. The screw pattern I used was 1″ from the end, and 1″ from each side and one in the middle. Predrill the ends on the marked pattern, as shown above.
Step 15
Then begin adding the tabletop pieces K, starting with the center piece. Screw the center board in place on the ends through the top, pre,drilled and marked in step 15. Then from the underside of the table, screw through the tabletop supports, I, into the underside of the tabletop boards, K.
Step 16
Add the next tabletop boards, K, as shown below. As you screw each board down, take special care to line up the edges with the existing boards. You do not want a gap between the boards on the tabletop. Remember to screw through the top on the ends and then screw through the bottom of the under supports to the underside of the tabletop boards.
After all the boards are screwed in place, then use the long screws to screw through the tabletop boards into the breadboard ends, as shown above.
Sand the entire table with 120 grit sandpaper, working in the direction of the wood grain.
Refill holes with wood filler if needed.
Sand table with 180 grit sandpaper.
Stain or paint. If the table feels rough between coats, lightly sand with 180 grit sandpaper.
A final coat of poly on the top can help keep the top easy to finish and wipe cleanable.


Comments
Kim Porter (not verified)
Sun, 12/06/2009 - 19:33
Amazing!!! It is beautiful.
Amazing!!! It is beautiful.
http://www.gla… (not verified)
Thu, 09/06/2012 - 17:12
Reply to comment | Ana White
I know this site gives quality dependent articles or reviews and extra material, is there any other
web page which provides such things in quality?
In reply to Amazing!!! It is beautiful. by Kim Porter (not verified)
cdrum89
Thu, 03/06/2014 - 06:25
Awesome!!
More than beautiful. I would've said it's very difficult if not that you outlined the steps.
In reply to Amazing!!! It is beautiful. by Kim Porter (not verified)
Smartmiltoys
Sun, 11/13/2016 - 09:40
gorgeous
This is gorgeous. I don’t have the room for one that big but will just make it as large as I can for the space. If I want a natural matte look and feel to the table (like a living edge top) does anyone know what type of stain and protective coating to use to avoid the shiny look? Want the stain to have some colour to it. Thanks.
hspahr
Sat, 10/31/2020 - 13:31
4 years later....Rubio mono…
4 years later....Rubio mono coat will give protection and a matte finish.
Sue (not verified)
Sun, 12/06/2009 - 20:27
ARE YOU KIDDING ME??? OMG..I
ARE YOU KIDDING ME??? OMG..I just went to Restoration Hardware and picked up their catalogue and drooled over these very pictures...that dried up real fast at the prices.! LOL
This is amazing. Now I have to find old wood. We have so much in the garage...there has to be some cool stuff.
THANK YOU!!!! I am going to sow this to my hubby tomorrow. I know he will be thrilled that I have discvered your blog via Shabby Nest
Attic Gal Alysa (not verified)
Sun, 12/06/2009 - 21:26
I'm came to your blog via
I'm came to your blog via Shabby Nest. I love your table. I can't believe you made this yourself and for what a price! How rewarding. Thanks for sharing and inspiring the rest of us.
Six in One Hand (not verified)
Sun, 12/06/2009 - 21:55
WOWZUHS!!!!!I just stumbled
WOWZUHS!!!!!
I just stumbled upon your blog via Shabby Nest and I am in l-O-V-E with your blog!!!
I just became a follower and will be back...like every day....back....(kinda stalkerish?)
Funky Junk Interiors (not verified)
Sun, 12/06/2009 - 22:31
Ohhhh fabulous! Shabby Nest
Ohhhh fabulous! Shabby Nest fan here too. Now I'm your fan as well. :) This girl with tools is most curious and will be following closely!
Donna
Jennifer (not verified)
Mon, 12/07/2009 - 05:36
WOW... you did a *fantastic*
WOW... you did a *fantastic* job! I love it!
Victoria@Whims… (not verified)
Mon, 12/07/2009 - 05:50
Love this table! My husband
Love this table! My husband is getting ready to build me a farm house kitchen island...we are doing a mahagony top, so there goes the idea of only spending $9 for us. lol I am so glad I found your blog, will be a follower now! Have a wonderful day and look forward to many more visits. :)
Hugs,
~Victoria~
KolentynePoppy (not verified)
Mon, 12/07/2009 - 06:19
YOU. ARE. AMAZING!
YOU. ARE. AMAZING!
Kasey Hunt (not verified)
Mon, 12/07/2009 - 11:39
Wow, that is impressive. I
Wow, that is impressive. I love it!!
Elizabeth (blu… (not verified)
Mon, 12/07/2009 - 12:10
Wow! Stopped by from the
Wow! Stopped by from the ShabbyNest too. What a beautiful piece you made, and to share the instructions- so very kind and generous of you. I'm off to become a follower and to check out more of your blog. Thank you Thank you.
Jen R. (not verified)
Mon, 12/07/2009 - 15:27
That is amazing and looks
That is amazing and looks fabulous!!!!!
Ana White (not verified)
Mon, 12/07/2009 - 22:36
Thank you so much for your
Thank you so much for your nice comments! This is why I blog!
Karyn (not verified)
Tue, 12/08/2009 - 04:03
Gorgeous. Blessings!
Gorgeous. Blessings!
Ana White (not verified)
Tue, 12/08/2009 - 08:46
Victoria building an island -
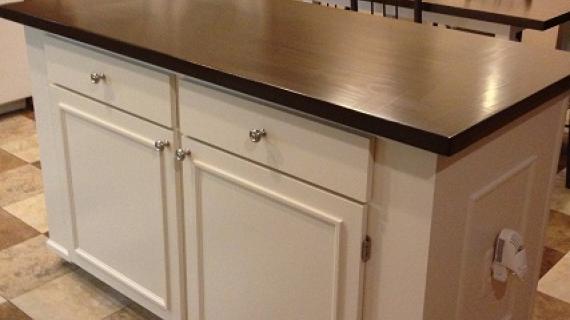
Victoria building an island - One of the tables pictured from Restoration Hardware is actually an island. I actually loved the island more than the table, so I built a hybrid of the two (island's design, no shelves underneath). If you would like to see modified plans to make a farmhouse island please comment.
You are smart to use the hardwood top - more functionality.
Thanks for reading my blog and commenting!
Ana
Guest (not verified)
Mon, 03/28/2011 - 05:34
Farmhouse island
I would love to see the plans for the farmhouse island. We live in a 120 year old house, and are making plans to renovate the kitchen.
Kristy Ethridge (not verified)
Wed, 04/06/2011 - 08:55
Farmhouse Island
I would love to see the plans for the farmhouse island! I found an island from Lexington I fell in love with that has a hammered stainless steel top but it's really expensive. I came across your blog and love all of these ideas and plans. I love the table, but an island made similiar with a stainless top might just be what I'm looking for! Thank you!
Rebecca (not verified)
Tue, 12/08/2009 - 09:02
Love your blog! I got here
Love your blog! I got here through Shabby Nest, and am now hooked. I think that given the proper tools, I would love working with wood as this is something that I always did with my Dad growing up. I've always had a mental list of "why couldn't I build that" things such as bookshelves, a console table, and coffee table. With your site to inspire, I KNOW that I could do some of it! Thanks for providing your talent as a resource - look forward to visiting your blog!
shelly (not verified)
Thu, 12/10/2009 - 05:00
That is AWESOME!!! I like
That is AWESOME!!! I like yours hands down better then R.H.'s! (I never liked the little island thing on theirs...or the dried up old wood look.). Your instructions are great---after this Christmas rush, I'll be making a mini version as a coffee table...I've been drooling over the same design in the pottery barn catalog!
Delightful Dwelling (not verified)
Tue, 01/05/2010 - 09:09
Wow, I can't believe you made
Wow, I can't believe you made this and the plans. It looks so amazing!
Heather@ thehe… (not verified)
Tue, 01/05/2010 - 10:18
What a fantastic project! You
What a fantastic project! You did a great job on it!
julie (not verified)
Tue, 01/05/2010 - 15:10
i love it! it looks awesome!
i love it! it looks awesome! i have always wanted to try to make one but seems hard! great job!
The Decorating… (not verified)
Tue, 01/05/2010 - 16:06
What talent! I think I can
What talent! I think I can learn a lot from your blog. I hope I can go to the next level and do a project like that table.
Janet
Mandy (not verified)
Tue, 01/05/2010 - 17:07
So, so gorgeous. You are
So, so gorgeous. You are amazing!
Rhonda (not verified)
Wed, 01/06/2010 - 09:41
Wow! I'm speechless. That
Wow! I'm speechless. That is amazing. I would LOVE to be able to build like that.
Vike (not verified)
Sun, 01/10/2010 - 18:05
You are evil... Just, evil. I
You are evil... Just, evil. I can't think about anything else in life right now except building your furniture! Not that my wife is complaining.
justlikelead (not verified)
Fri, 01/15/2010 - 10:15
Wow, that looks great! And I
Wow, that looks great! And I am one who usually doesn't like anything distressed (not even jeans). I discovered your blog via apartment therapy.
P.S. I'm sure you could get better lighting by moving a ton of lamps into the room...but then you have to move them back. Nevermind!
Maddy AK (not verified)
Fri, 01/15/2010 - 11:11
This is an amazing site! My
This is an amazing site! My roommate and I want to get a farm table but they're...well...expensive. Since I'm unemployed, I definitely have the time to make this. Also, I live in New York where we have Build It Green - all recycled wood for way cheap. I'm going to abuse them so bad.
Quick question though, would the table still be supported if you didn't have the beams underneath the table? I hate sitting at the end of a table and kicking your feet into the ends of the table.
Thanks! I'm so excited!!!
Ana White (not verified)
Fri, 01/15/2010 - 13:38
Table without stretcher. You
Table without stretcher. You can build the table without the stretcher supports, and it should be just fine. Just make sure you keep everything very square, because you won't have the underneath supports to square everything up with. Check out the Hyde collection of tables. They are all built this way. You could also use 4x4 posts instead of the notched 2x4s.
Maddy AK (not verified)
Fri, 01/15/2010 - 13:40
Yeah...I saw that after I
Yeah...I saw that after I looked around a bit more. I'm so excited about this project!
Keep this up! It's a fantastic site!
Brittany at Mo… (not verified)
Sat, 01/16/2010 - 04:39
I just found your blog and I
I just found your blog and I love it love it love it! I spemd all my free tie building things and knocking off furniture so this is just perfect. Usually I just post what I have done once a week on the old bloggy blog you know! I was just in Restoration Harware last night and decided to build the coffee table of reclaimes wood along with this table, although I need it to be more like a trestle table since I have a banquette and people need to be able to slide in. My third baby is due on Tuesday so hubby has cut me off the saws as of yesterday (when he caught me ;)but I will be back! You are awesome! My new best friend!
Angela (not verified)
Sat, 01/16/2010 - 08:25
Ana, you mentioned modified
Ana, you mentioned modified plans for an island? I would LOVE to have them..we're going to be building our very own in the coming weeks and I would love the help. We're so excited and grateful to have found your site. Keep up the great work!
Anonymous (not verified)
Sun, 01/17/2010 - 17:06
Right on! I'm glad to see
Right on! I'm glad to see something honest and real instead of some cheap knock off that was made in China (like all of Restoration Hardware's "reclaimed" wood items)...Keep up the good work, I'm bookmarking your great site.
Anonymous (not verified)
Tue, 01/19/2010 - 11:44
I, too, just discovered your
I, too, just discovered your blog and FB page. Please tell me how to make this an island. Sounds just like what I've been wanting. Great site!!!
Cynthia
Anonymous (not verified)
Tue, 01/19/2010 - 13:00
I, too, just discovered your
I, too, just discovered your blog and FB page. Please tell me how to make this an island. Sounds just like what I've been wanting. Great site!!!
Cynthia
krisha (not verified)
Wed, 01/20/2010 - 06:58
Does this table have a
Does this table have a matching buffet?
Erika (not verified)
Wed, 01/20/2010 - 08:06
OK,now i'm addicted to your
OK,now i'm addicted to your blog. got here via young house love and can't get away. I have wanted a farmhouse table for I don't know, forever!I immediately sent this link to my husband who I am going to partner with to make this! Thank you so much and can't wait to try all of your other plans, love them!!
banananutmeg (not verified)
Thu, 01/21/2010 - 18:15
I'm in love. No really. Your
I'm in love. No really. Your blog is a total drug for a furniture junkie! I love it. I'll be back for another hit soon...like tomorrow.
ainhoa vega (not verified)
Sun, 01/31/2010 - 02:36
I found your blog via
I found your blog via Apartment Therapy and I love it! I've wanted a solid wood table for my patio but all of them are really expensive. So after seeing this I think I'm going to try and make one myself with the help of my boyfriend! Our only question is what kind of wood should we use if it rains a lot where we live? I know we would probably be better of with a plastic/metal table but I really don't like them...
Bill K. (not verified)
Sat, 12/29/2012 - 09:05
Given the price listed for
Given the price listed for the wood pieces, I would assume it is pine. If the table will be an outdoor table, be sure to coat it with water sealant. Also, there are better, longer lasting, wood such as cedar, which is better suited for furniture exposed to the elements.
Ana White (not verified)
Mon, 02/01/2010 - 16:59
For an outdoor table, I would
For an outdoor table, I would recommend using cedar or teak or other outdoor woods. These are expensive options.
You can use pine or other hardwoods, but you will need to refinish the table every year if you live in a rainy area (think rotting picnic tables). Refinishing is easy if you keep up with it - just scrape and apply a new coat of poly or varnish.
bundle#1 (not verified)
Sat, 02/06/2010 - 08:47
Ana --- How many people does
Ana --- How many people does this table sit? We have a lot of family get togethers and that means a LOT of people.
Thanks!
Beth Bliss (not verified)
Tue, 02/09/2010 - 08:14
Love this table, but
Love this table, but currently looking to do an island and would LOVE one w/this style, maybe w/ 2 shelves underneath vs just the one bottom? am in love with your site! :)
Anonymous (not verified)
Tue, 02/16/2010 - 07:06
Hey Ana,One more time of
Hey Ana,
One more time of begging you to tell me how to make this an island. Mt dd's bday get together is 3/5 and I'd like to have it in my kitchen by then. ;-)
Cynthia
Kelly (not verified)
Mon, 02/22/2010 - 15:39
Just finished building this
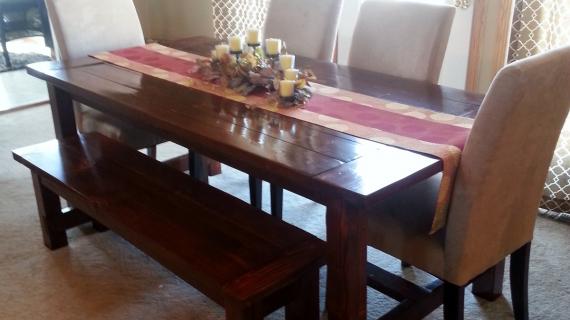
Just finished building this and I LOVE IT!!! Never built anything before, but I'm quite in love with the feeling of a saw in my hand! This thing is HUGE for our big family of 7 and I have my grandmother's old dining chairs that will be added with a bench (our next build) and we'll have plenty of seating. About to head to the garage to apply my stain in Cabot's Peppermill and Tannery semi-transparent... Can't wait to see it. I have pics and will post them to my blog soon!!!!
KGJ (not verified)
Sun, 10/14/2012 - 17:23
Farmhouse Table
What kind of wood did you use? Was it pine or something else?
Cottage Panach… (not verified)
Wed, 03/10/2010 - 10:45
Wow Ana ~ right now I am
Wow Ana ~ right now I am doing the ~ I AM NOT WORTHY bow to you! I googled "plans for a farm table" and found your blog ~
You Rock
Maureen