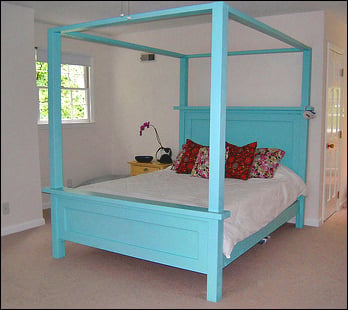


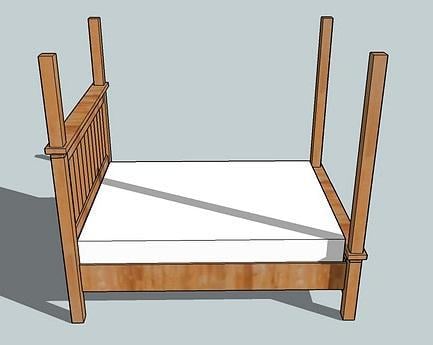
It's simple to add a canopy to our Farmhouse Bed plans. The solid wood beams are perfect for adding a touch of luxury to a bedroom space.
This plan is built on top of our Twin Farmhouse Bed, Full Farmhouse Bed, Queen Farmhouse Bed, King Farmhouse Bed or California King Farmhouse Bed.
Preparation
- 2 – 4×4 Posts, 8′ Length
- 4 – 2×4 Boards (stud or 8′ length)
- 4 – Hanger Bolts, at least 5″ Long (see below)
- 4 – Angle Brackets (see below)
- 8 – 3″ wood screws Flat headed wood screws for the brackets, at least 1 1/2″ long
- wood glue
Measure your Headboard and Footboard heights. Find the difference between the two heights (should be about 37-1/2")
- Canopy Post, Headboard – 2 – 4×4 Posts @ 24″
- Canopy Post, Footboard – 2 -4×4 Posts @ 24" + difference between height of headboard and footboard (should be about 57-1/2" cut)
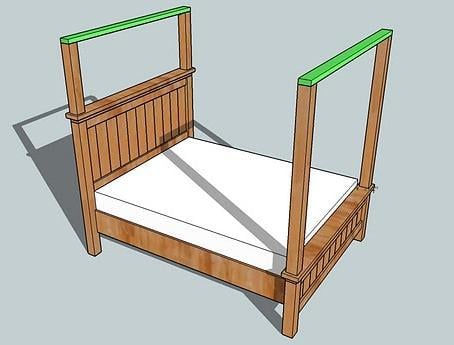
Post heights are shown to work with Farmhouse Beds from Ana-White.com. Canopy top boards need to be cut to the width of the bed/length of the bed. Please see instruction steps for more information.


Cut all your pieces, as described below. You will need 2 headboard posts, 2 footboard posts, 2 canopy sides and 2 canopy ends.
Instructions
Step 1
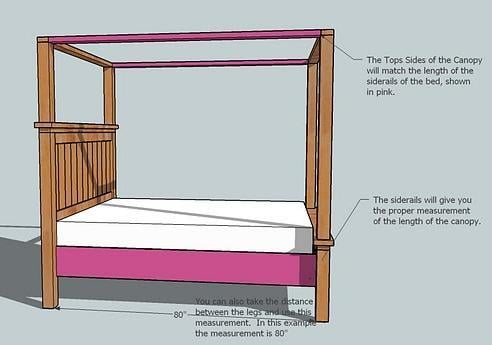
Canopy Sides are equal to the distance between the legs on the sides, as shown in the diagram above.
Step 2
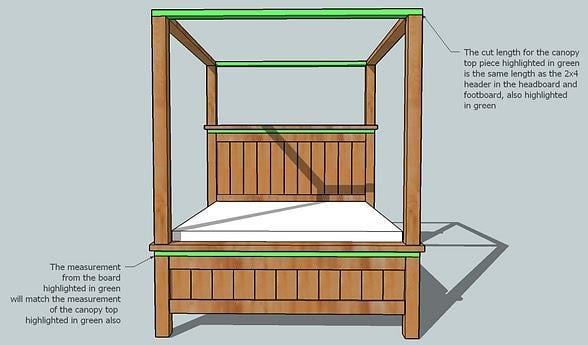
Canopy Top and Bottom are equal to the 2×4 header in the headboard and footboard as shown in the diagram above.
Step 3

You will need 4 brackets like these (the L30 – should be less than 1 dollar each) http://www.strongtie.com/products/connectors/L-LS-GA.asp These are available at most hardware stores. Just remember, the bracket needs to be less than 3 1/2″ wide and less than 1 1/2″ high, like the L30 bracket from Simpson Strong
Step 4
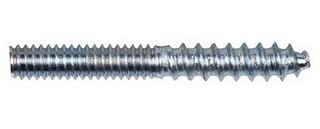
You will also need 4 Hanger Bolts, like these
Step 5

Step 6

Drill holes in the Canopy Posts. The holes will be in the center of the bottom of the posts. Drill the hole to the depth and width of your hanger bolts, wood screw end. Screw the hanger bolt into the canopy post, using glue to hold in place.
Step 7
Screw the posts into the headboard and footboard holes. Tighten until snug, but do not break the glue hold in the posts. Adjust the posts so that they line up with the legs. This is shown above.
Step 8
Screw the canopy top ends in place, as shown above. Use at least 3″ screws. I recommend predrilling the screw holes first before attempting assembly.
Step 9

Screw the Brackets to the Canopy Sides. The diagram shown above details how to screw the brackets to the remaining canopy top sides. Predrill your screw holes before fastening. Use a flat headed screws.
Step 10

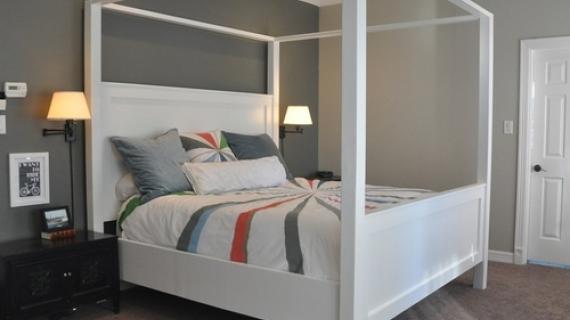
Attach the Canopy Top Sides. Predrill your holes first. Rest the Canopy top sides on the Canopy Ends with the bracket. Screw in place, as shown above. There should be no visible screw holes. Sand and finish as desired. You may wish to finish the canopy unassembled, then bring it into your bedroom and assemble the prefinished pieces. I am not making any guarantee of the structure or safety of this plan. Use at your own risk.

Comments
Sindy (not verified)
Sun, 01/10/2010 - 04:29
Hi Ana!This is my first visit
Hi Ana!
This is my first visit to your blog and I am so impressed!
You make it all seem so easy and doable not to mention inexpensive :)and with a little patience and perseverance it gets done--my kind of project!
Hoping you are reading this cuz my question is. . .do you know how to build a narrow, but fairly tall corner cabinet?
Thank you!
Sindy
orlando awnings (not verified)
Mon, 10/17/2011 - 12:04
awesome
thanks for sharing! I'm glad to see some impressive canopys. I'm looking for a new one myself, very nice blog!
Janelle (not verified)
Sun, 01/10/2010 - 05:34
Ana,You are amazing. I am
Ana,
You are amazing. I am totally impressed and inspired. I want to use the power tools in the garage now and get building!!!
Keefer Family (not verified)
Sun, 01/10/2010 - 09:13
You are an absolute genius!
You are an absolute genius! I have been looking for a site like this for a LONG time. I can't wait to go buy some wood and do some projects.
Do you by chance have a dresser plan? Not the tall ones but the ones that have the side-by-side drawers (with mirrors on top)? Even a nice SIMPLE one would do!
Again, you are amazing and I can't wait to try some of this stuff out!
Crystal
The Weathered … (not verified)
Sun, 01/10/2010 - 10:28
Ana! I cannot believe your
Ana! I cannot believe your blog, it is amazing and I'm so glad I found you! I will be making that farmhouse bed for sure. Love it!
Question: could you do a plan for this:
http://www.ballarddesigns.com/Furniture/Cabinets/All-Cabinets/Devon%20S…
I love that little media cabinet but have no idea where to even start!
lanisanford (not verified)
Sun, 01/10/2010 - 10:29
oooh we are soo building
oooh we are soo building this! Right now we are working on an island inspired by the farmhouse table and hyde coffee tables. Its turning out gorgeous!
Grace (not verified)
Sun, 01/10/2010 - 11:25
I came by your blog through U
I came by your blog through U Create! You are a talented lady! I also being crazy about furniture when I moved to the USA last year because I liked so many things but did not have the sort of money to buy beautiful furniture. I will be starting a woodworking course this month and am excited about it. Thank you for sharing your ideas on your blog, I am now a follower, to be inspired by your ideas.
GT (not verified)
Sun, 01/10/2010 - 12:33
Ana,Was planning and
Ana,
Was planning and designing to add a canopy to the Farmhouse bed plans that you have provided on my own. You now have save me a lot of time and measurements. :)You ROCK!!!
-GT
Bridgette (not verified)
Sun, 01/10/2010 - 13:34
I am thankful you posted
I am thankful you posted these-my husband (the GT from above) had spent most of the afternoon planning measurements for the canopy part.
In fact, he's spent over a week pouring over your site, and his mind is racing with ideas. And I will definitely benefit from this. Thank you so, so, so much! :)
Bridgette
Sarah. (not verified)
Sun, 01/10/2010 - 15:19
That is so the bed I've been
That is so the bed I've been wanting. Now I'm going to have be ambitious and make it!
and amenities (not verified)
Sun, 01/10/2010 - 16:43
Thank you!!
Thank you!!
Don Gulley (not verified)
Sun, 01/10/2010 - 18:05
Ana,Thanks so much, my wife
Ana,
Thanks so much, my wife is going to love this. I'm going to begin this project very soon and i can't wait. Thanks again for doing this.
Don
bagfashionista (not verified)
Mon, 01/11/2010 - 06:43
thank you!! this was one of
thank you!! this was one of the items i was hoping you'll include plans for!! maybe we'll be able to upgrade from sleeping on a mattress on a floor to an actual bed!!
bagfashionista (not verified)
Mon, 01/11/2010 - 07:03
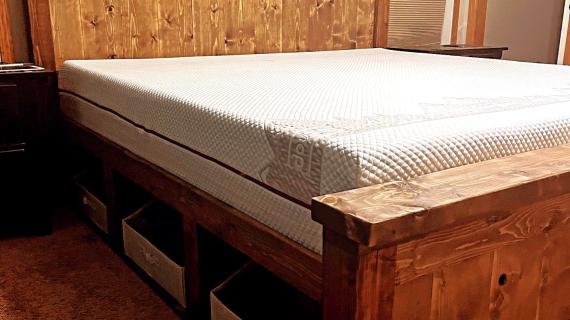
ana - quick question --- i
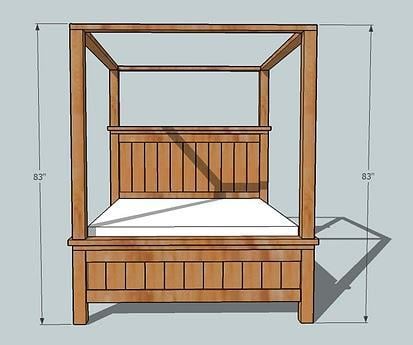
ana - quick question --- i love the finish of the bed in the dark wood (2nd picture)...how would you recommend getting that look? A black stain? or just spray paint it black?
thanks so much!
Stephanie
SaraReno (not verified)
Mon, 01/11/2010 - 09:47
This is exactly what I was
This is exactly what I was looking for! I'd printed up the Farmhouse plans so I can build this for the guest room but I was still thinking it needed a canopy. THANK YOU!
seletikoka (not verified)
Mon, 01/11/2010 - 11:19
I just came across your
I just came across your website from U creat and I love it!! Quick question on the bed if I were to paint it what type of wood would you use and if I were to stain it what wood would you recommend I use?
Thanks for your posting your awesome creations!!
Ana White (not verified)
Mon, 01/11/2010 - 12:57
WOODI just used lumber for
WOOD
I just used lumber for this project. To me, anything that says Farmhouse needs to be rustic and thick, and regular old lumber is the definition of Farmhouse Style. I've also used lumber for a stain grade Farmhouse bed, and the results were equally fantastic.
Also, the boards I have listed for you to use are lumber boards. This is also the cheapest method.
Jayne-at-the-e… (not verified)
Tue, 01/19/2010 - 11:36
This is a gorgeous design and
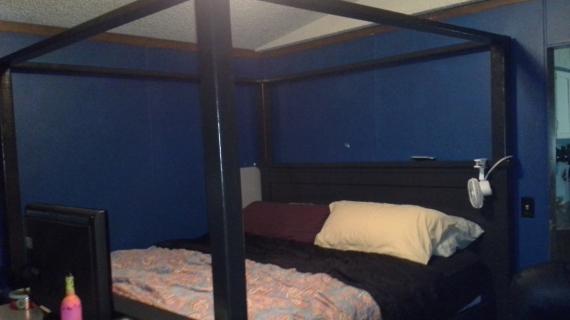
This is a gorgeous design and one I really want to make! I LOVE anything rustic country!!! But I was wondering if you have simple plans for the chest at the end of the bed in the first photo I have always wanted one, but could never justify the price tag. Thank you so much for your website, I *love* it!
Lindsay Cesari (not verified)
Fri, 02/26/2010 - 05:30
As someone else mentioned
As someone else mentioned above, I'd LOVE plans for that chest at the foot of the bed. :)
Jessica P (not verified)
Fri, 01/21/2011 - 21:49
My husband doesn't know it
My husband doesn't know it yet be we are about to make this bed for our preteen who just upgraded to a full size mattress set. I have her new mattress set on a simple metal frame while I researched the type of bed that I wanted to get her and this is perfect! I will definately add pictures of the outcome once finished!