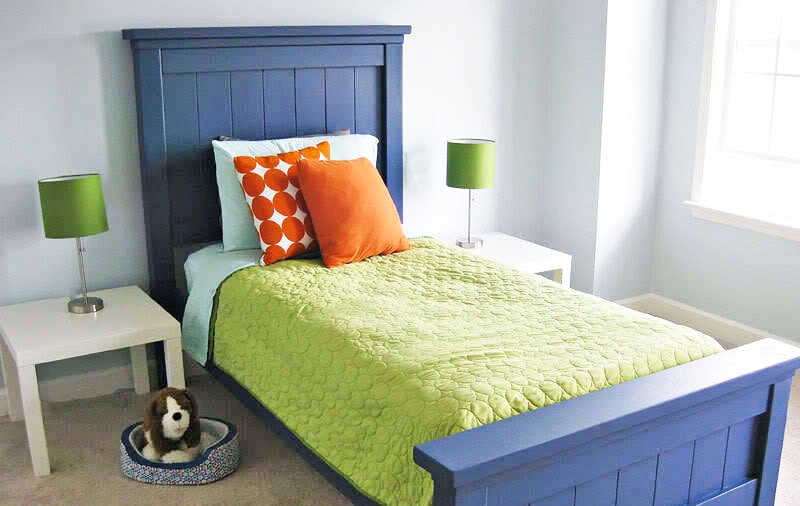


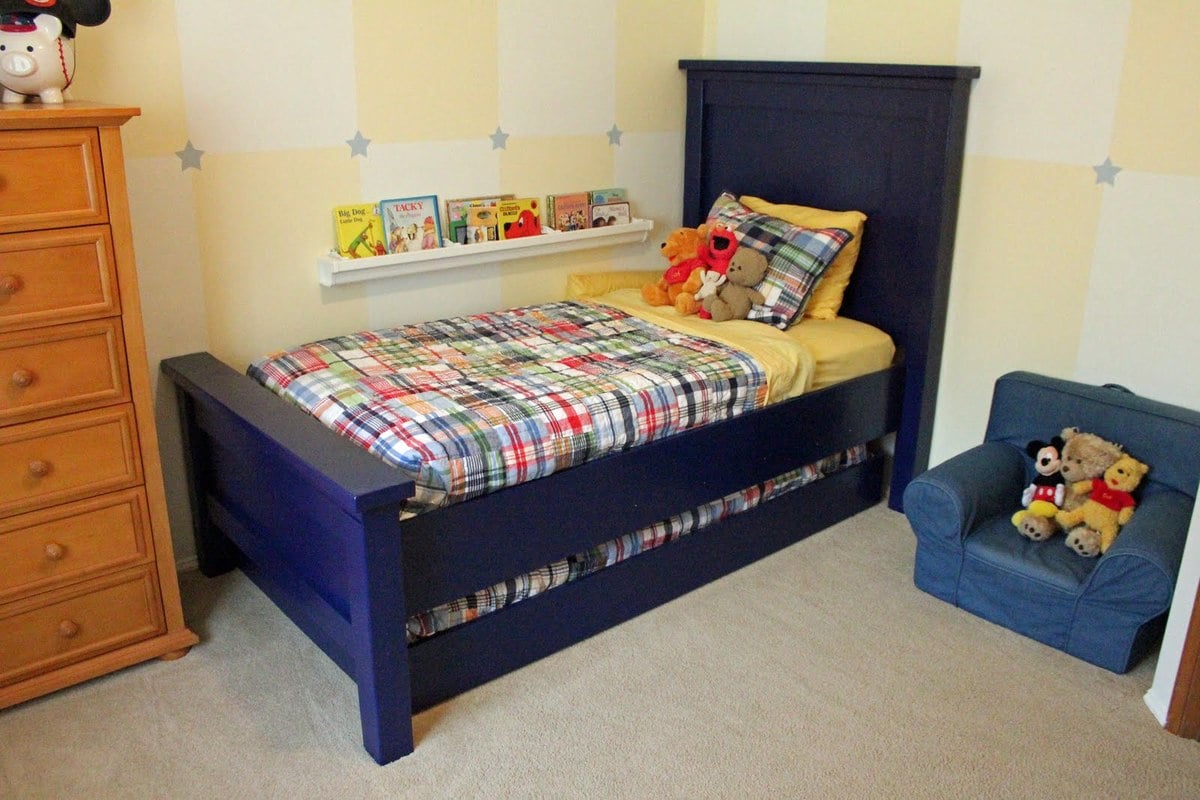
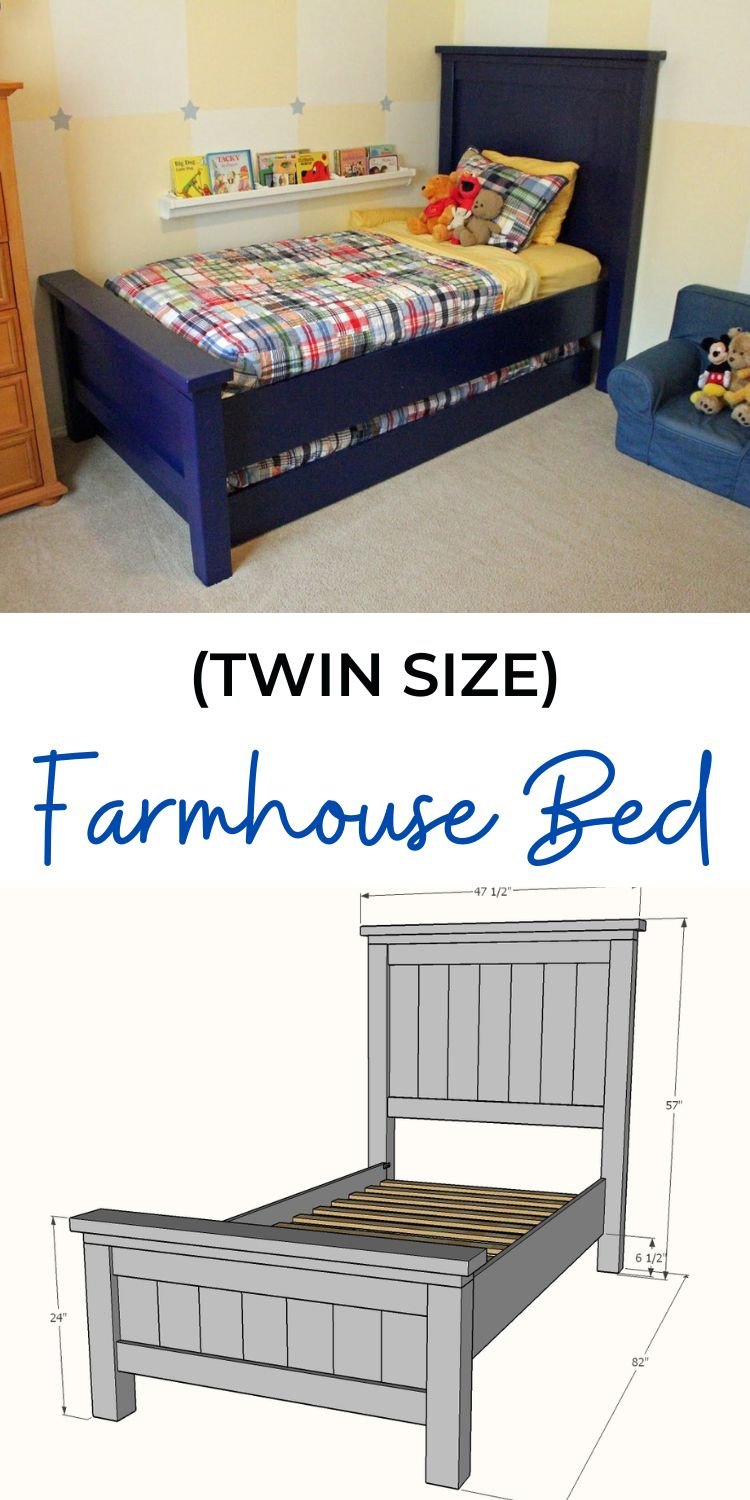
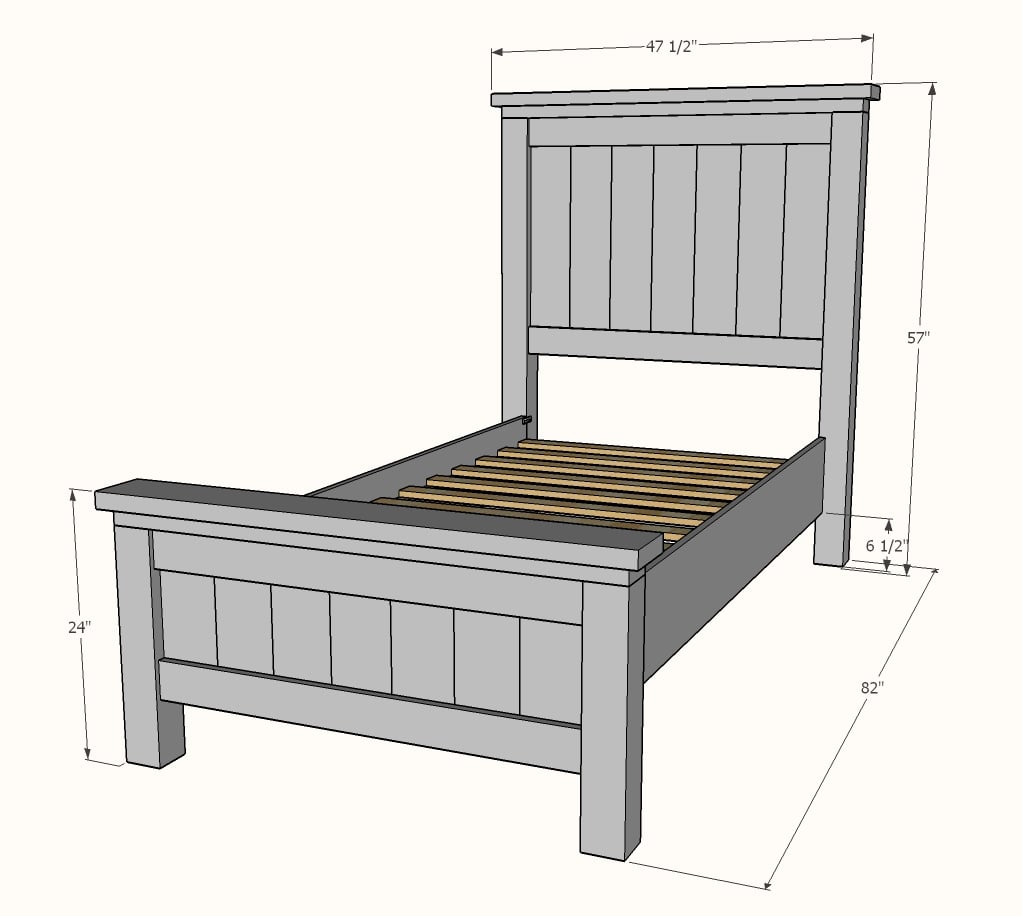
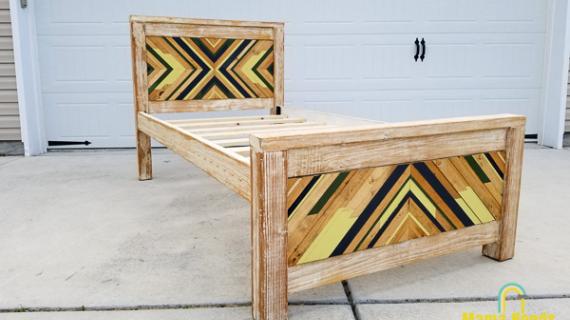
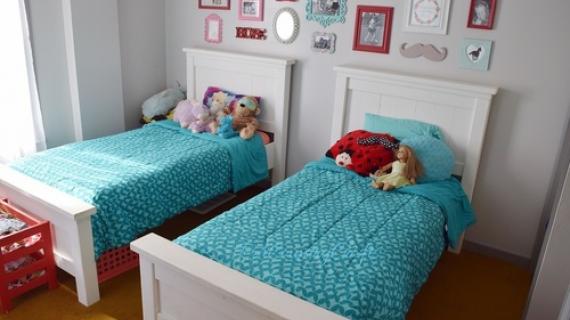
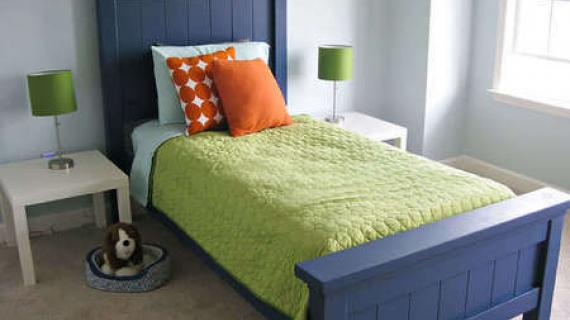
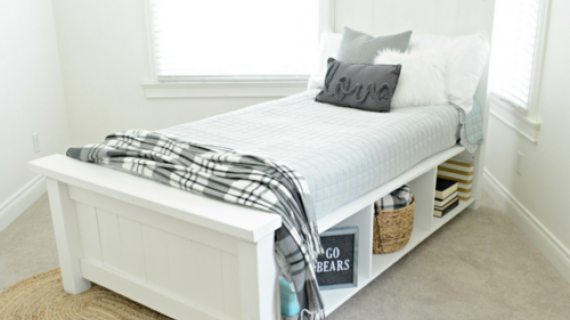
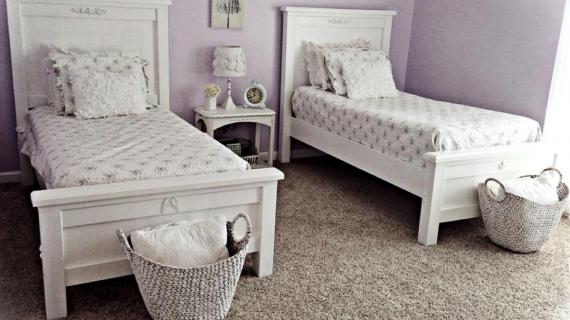
If you are looking for a classic farmhouse style bed for your child's room, this is the project for you. Featuring simple styling, large headboard and footboard tops, substantial legs, sturdy siderails, and the option to go with or without a boxspring, this beautiful bed is definitely worth your sweat!
Step by step plans with diagrams and lots of readers submitted photos. Check out all our Farmhouse Bed plans here.
Pin For Later!
Preparation
3 - 1x6 @ 8 feet long
1 - 1x6 @ 4 feet long
2 - 1x4 @ 8 feet long
2 - 4x4 @ 8 feet long
1 - 2x2 @ 8 feet long
4 - 2x4 @ 8 feet long
2 - 2x6 @ 8 feet long
2 - 1x10 @ 8 feet long
6 - 1x3 @ 8 feet long
2 - 1-1/2" x 1-1/2" L brackets
2 - 3" long straight mending plate brackets
HEADBOARD
- 7 - 1x6 @ 30"
- 2 - 1x4 @ ~38-1/2" - measure and cut to fit
- 2 - 4x4 @ 54"
- 2 - 2x2 @ 30"
- 2 - 2x4 @ ~45-1/2" - measure and cut to fit
- 2 - 2x6 @ 47-1/2"
FOOTBOARD
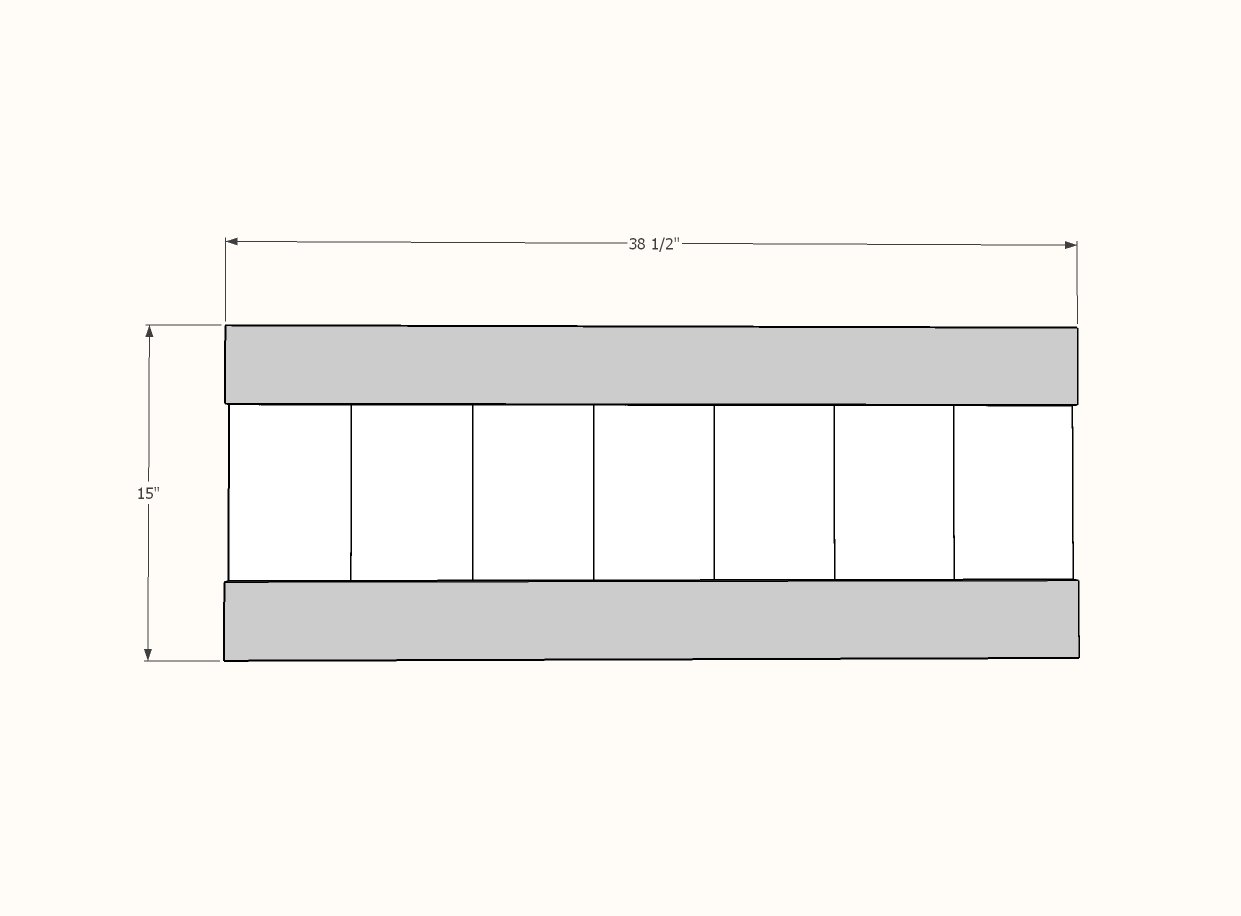
- 7 - 1x6 @ 15"
- 2 - 1x4 @ ~38-1/2" - measure and cut to fit
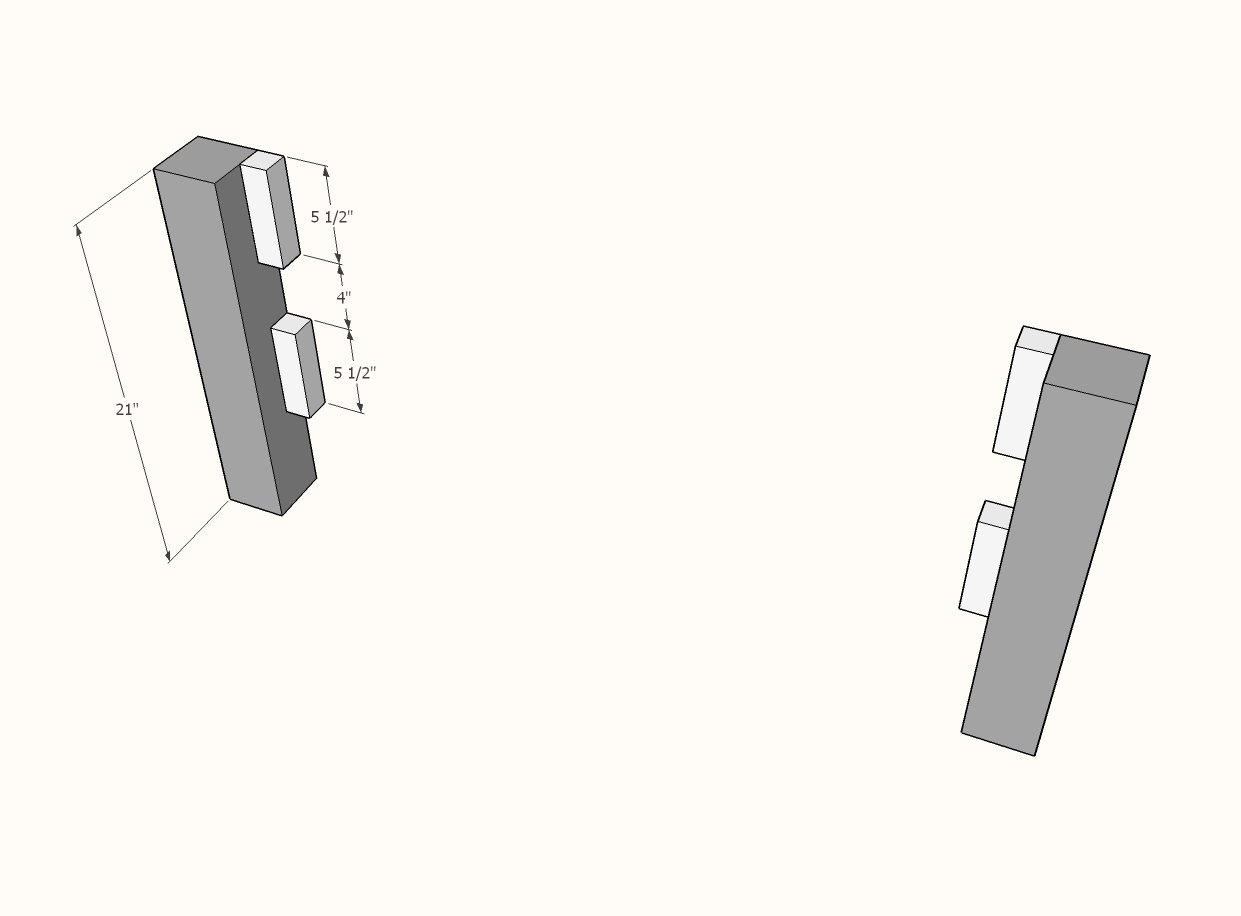
- 2 - 4x4 @ 21"
- 4 - 2x2 @ 5-1/2"
- 2 - 2x4 @ ~45-1/2" - measure and cut to fit
- 2 - 2x6 @ 47-1/2"
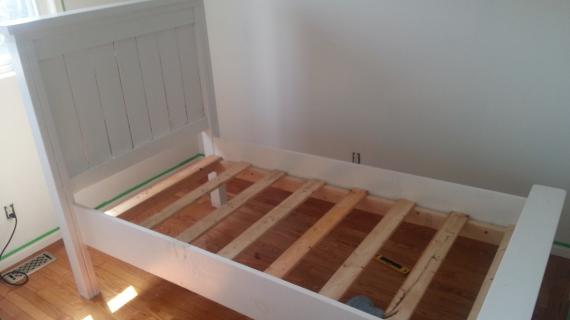
BED FRAME & SIDERAILS
- 2 - 2x4 @ 80"
- 2 - 2x4 @ 8-1/2"
- 2 - 1x10 @ 75"
- 12 - 1x3 @ 38-1/2" - measure and cut to fit


Instructions
Step 1
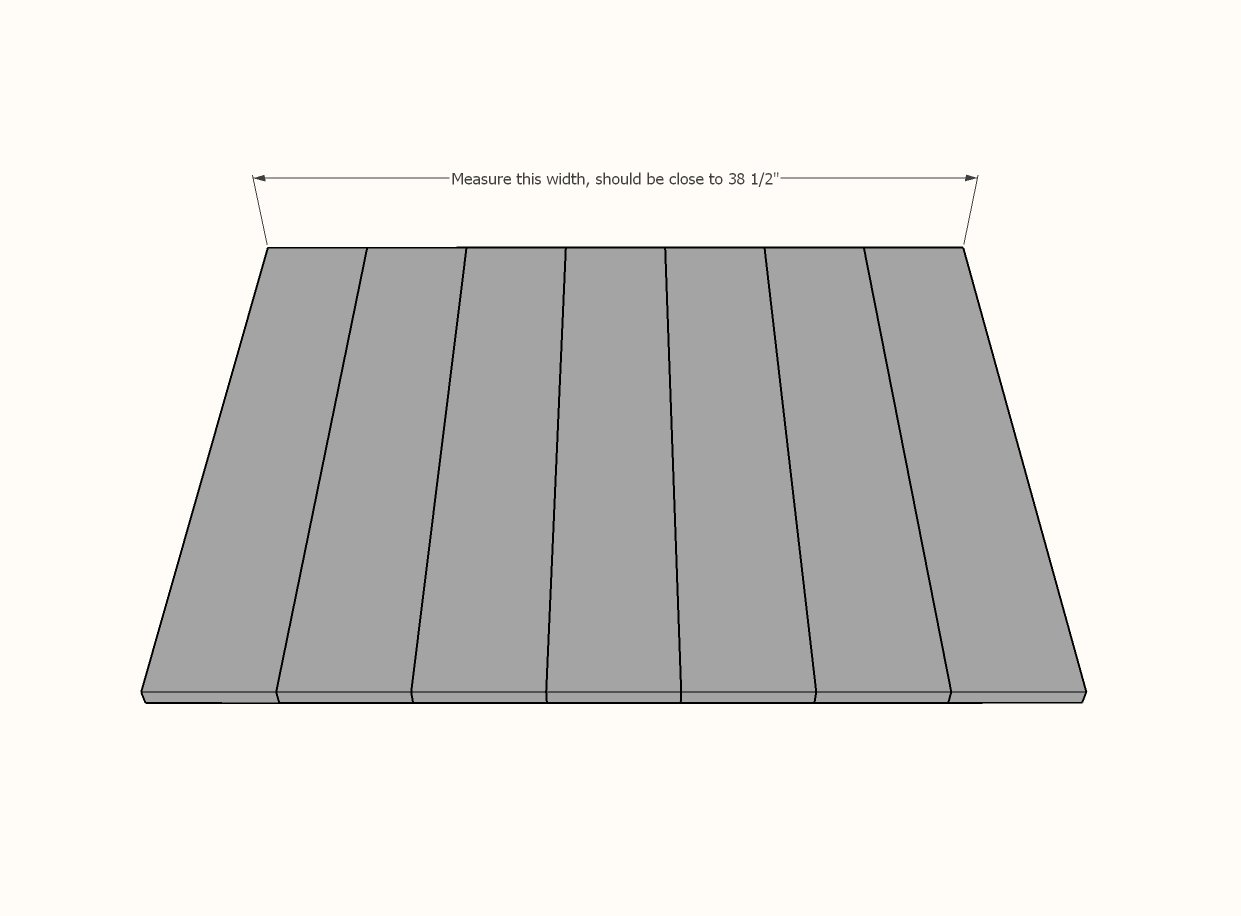
Cut the 1x6 headboard boards with a miter saw (preferred) or circular saw with straight edge.
Lay out as shown in diagram.
Measure the overall width.
POCKET HOLE USERS: You can join the 1x6 boards together edge to edge with 3/4" pocket holes and 1-1/4" pocket hole screws.
Step 2
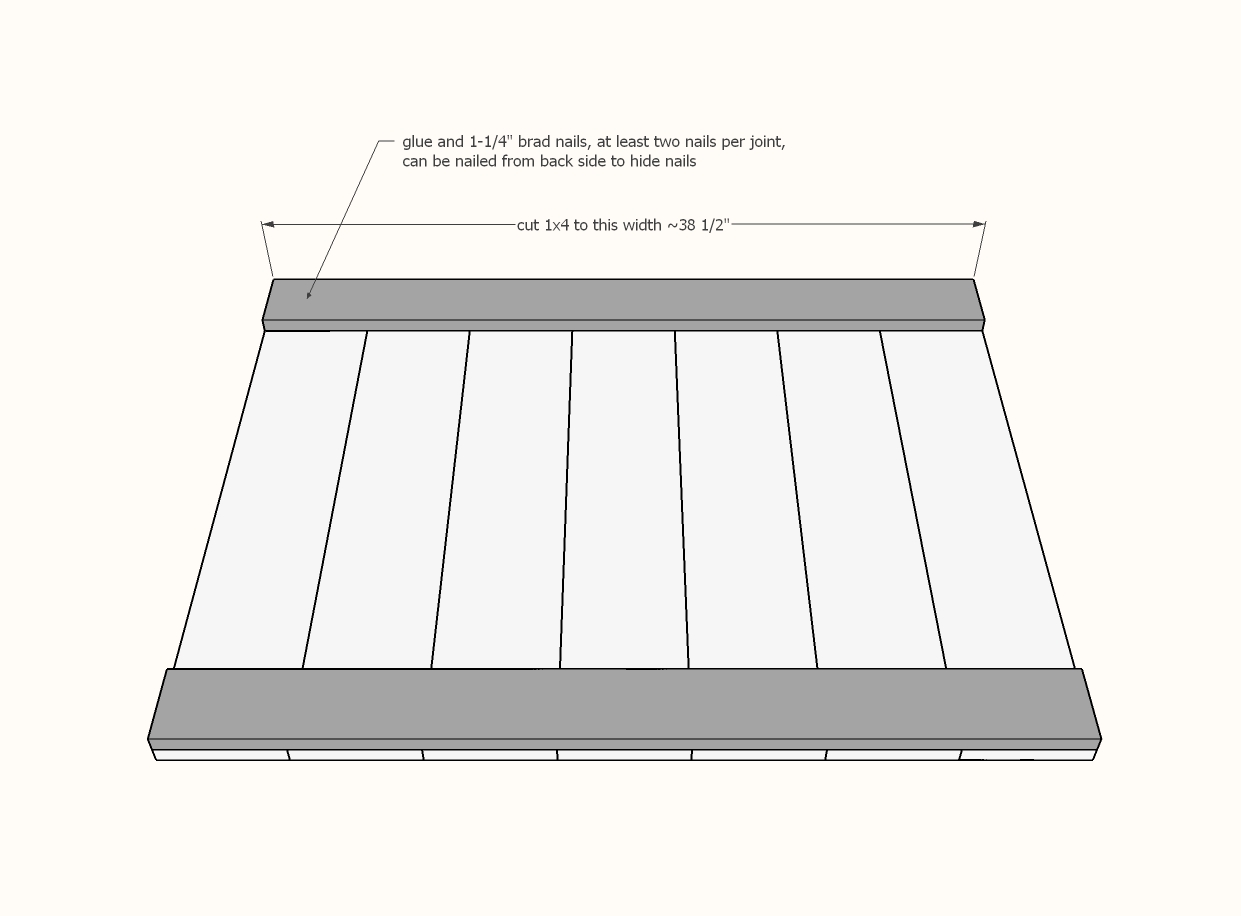
Attach 1x4 on top and bottom, with all outside edges flush, with 1-1/4" brad nails and glue.
Make sure the panel is square (not a parallelogram) by taking outside corner diagonal measurements and adjusting until the two opposite diagonals measurements match.
POCKET HOLE USERS: Drill two 3/4" pocket holes on each end of the 1x4 boards. Attach to the 4x4 legs with 1-1/4" pocket hole screws. Then nail the 1x6 boards to the 1x4s.
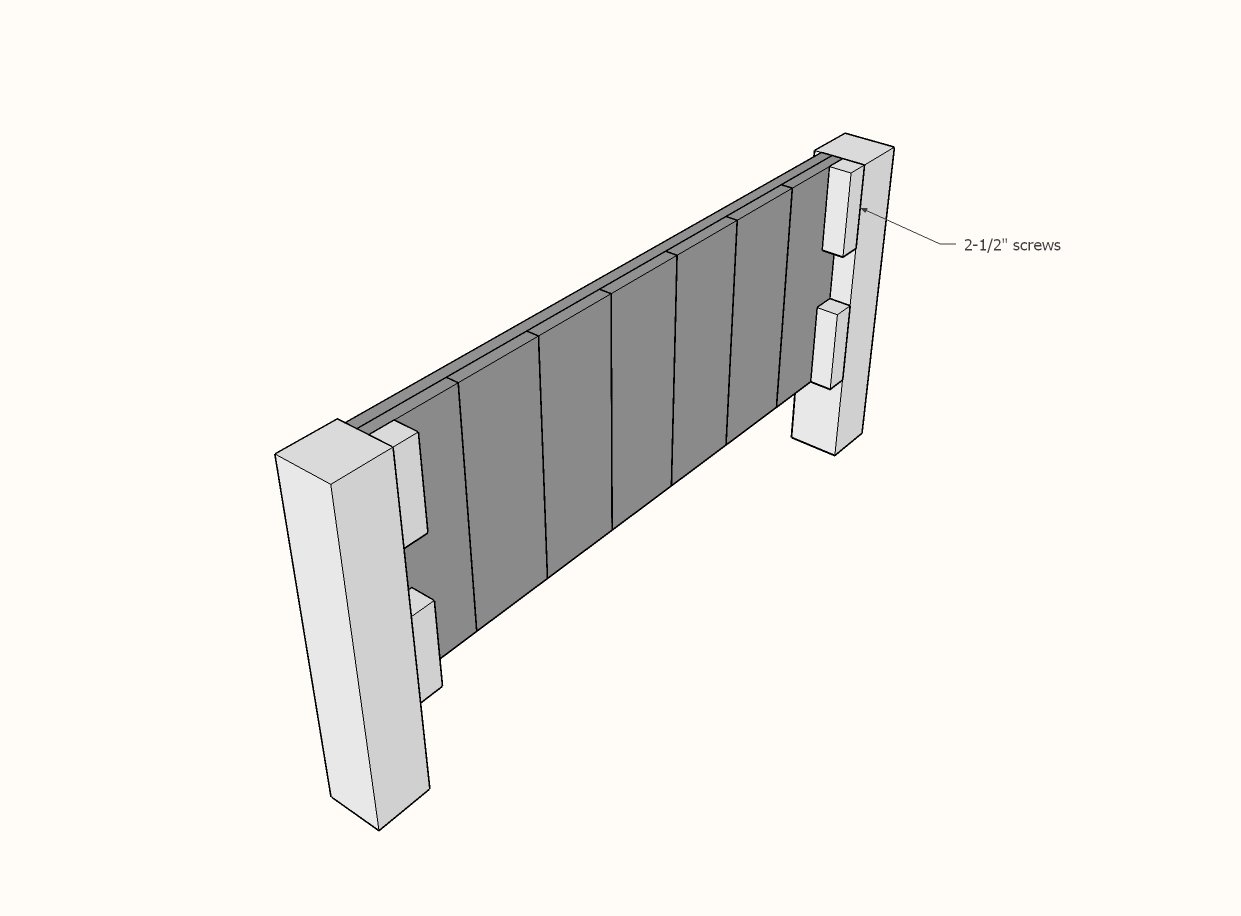
Step 3
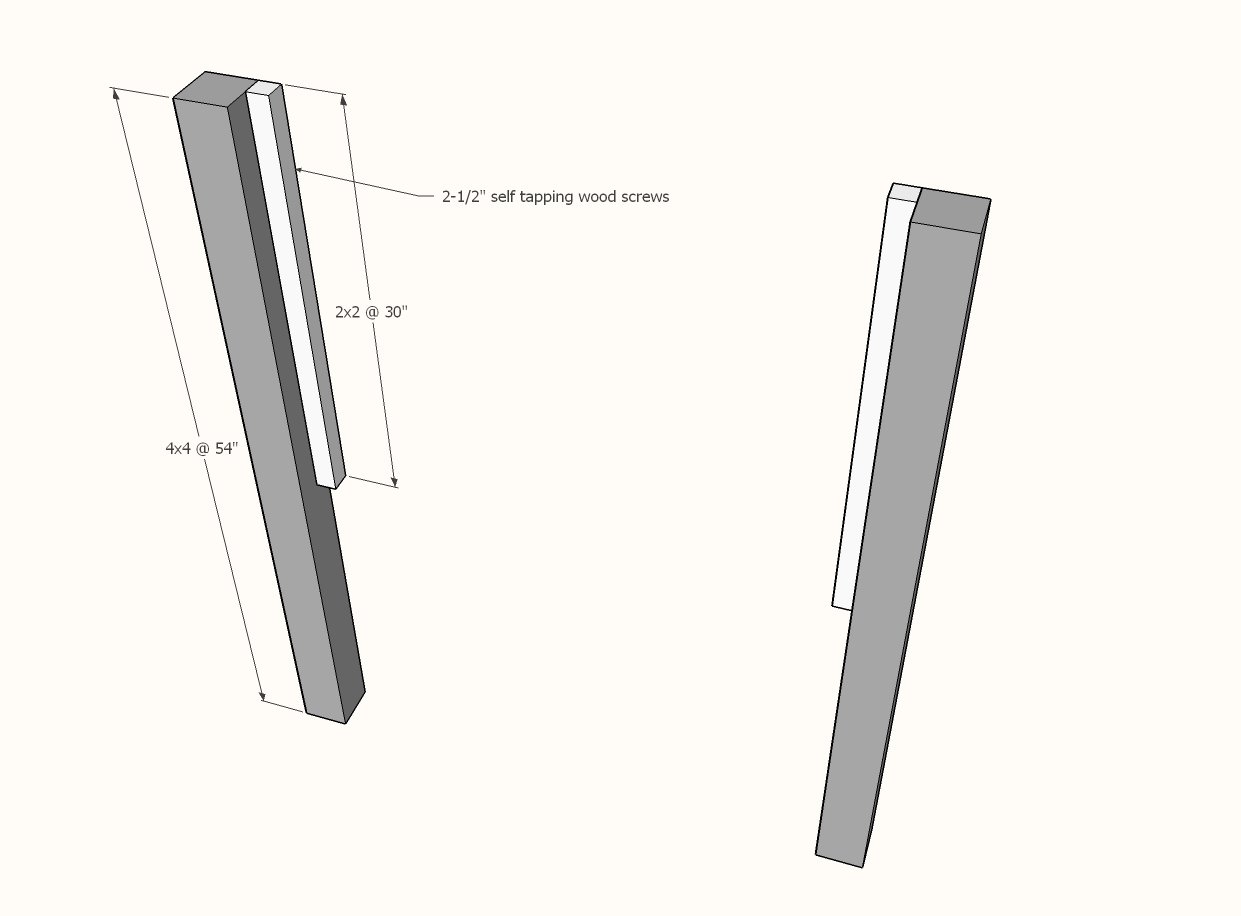
Use 2-1/2" screws to attach the 2x2 cleats to the inside back edge of the 4x4 legs.
POCKET HOLE USERS: Skip this step.
Step 4
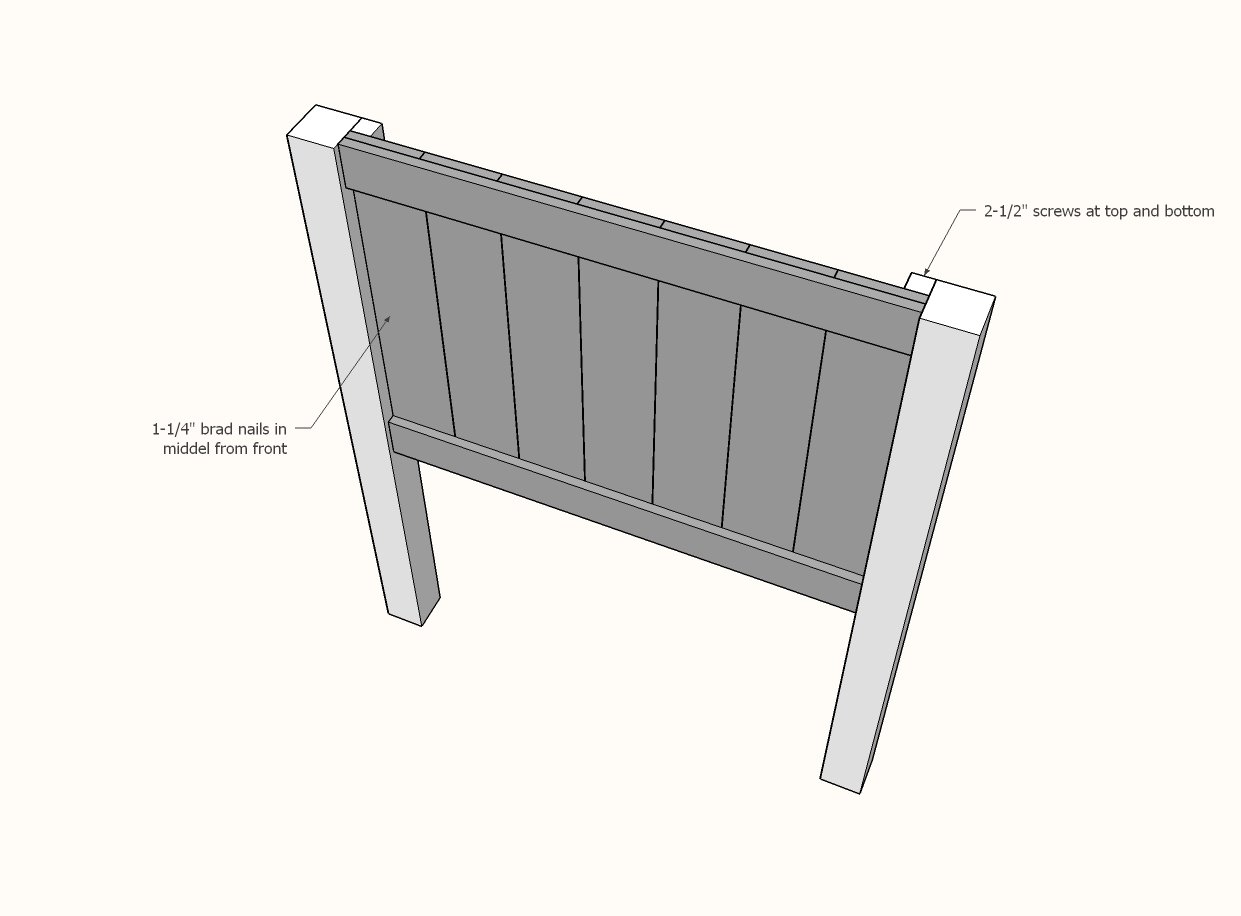
Attach panels to the 2x2 cleats with 2-1/2" screws and 1-1/4" brad nails and glue.
POCKET HOLE USERS: Skip this step.
Step 5
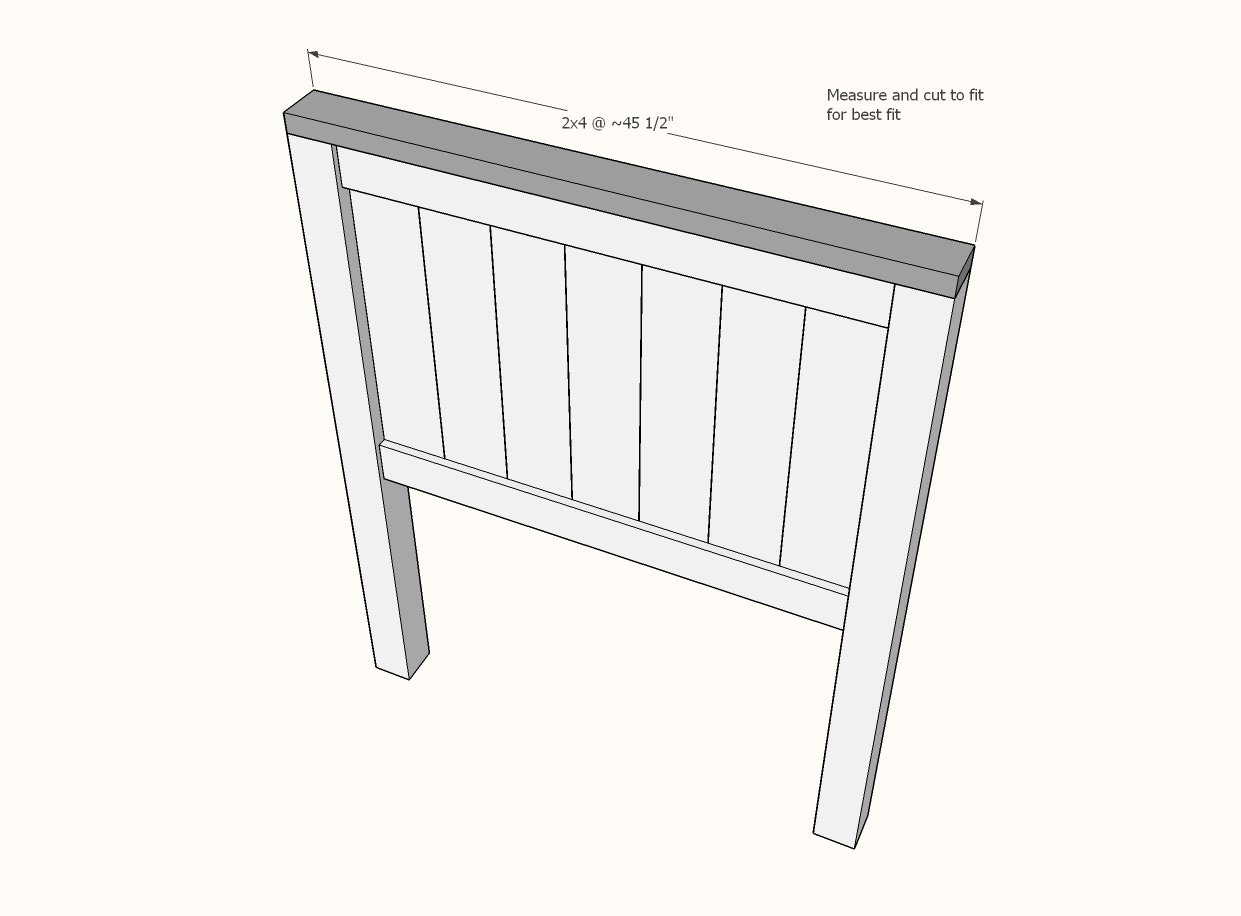
Measure and cut the top 2x4. Attach with 2-1/2" screws and glue.
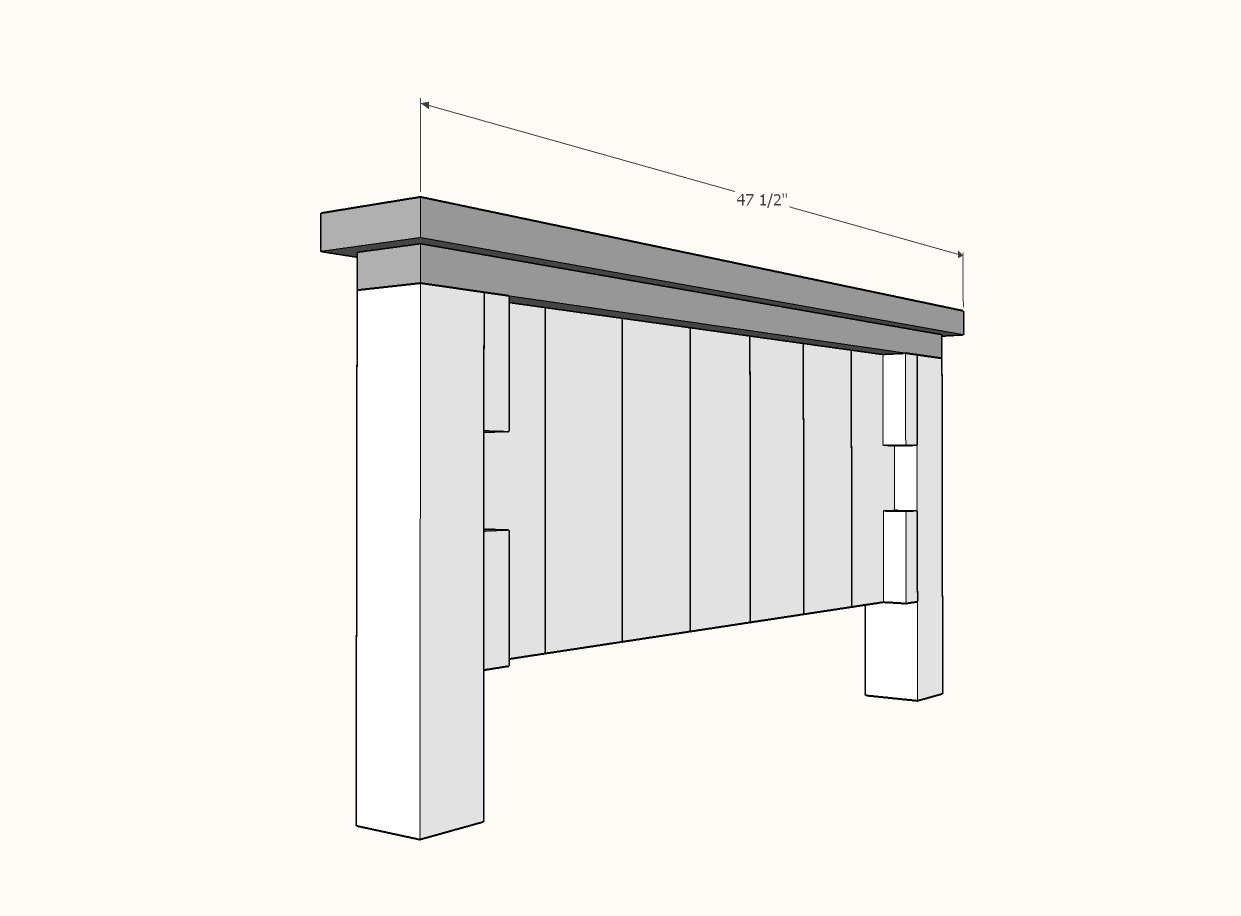
Step 6
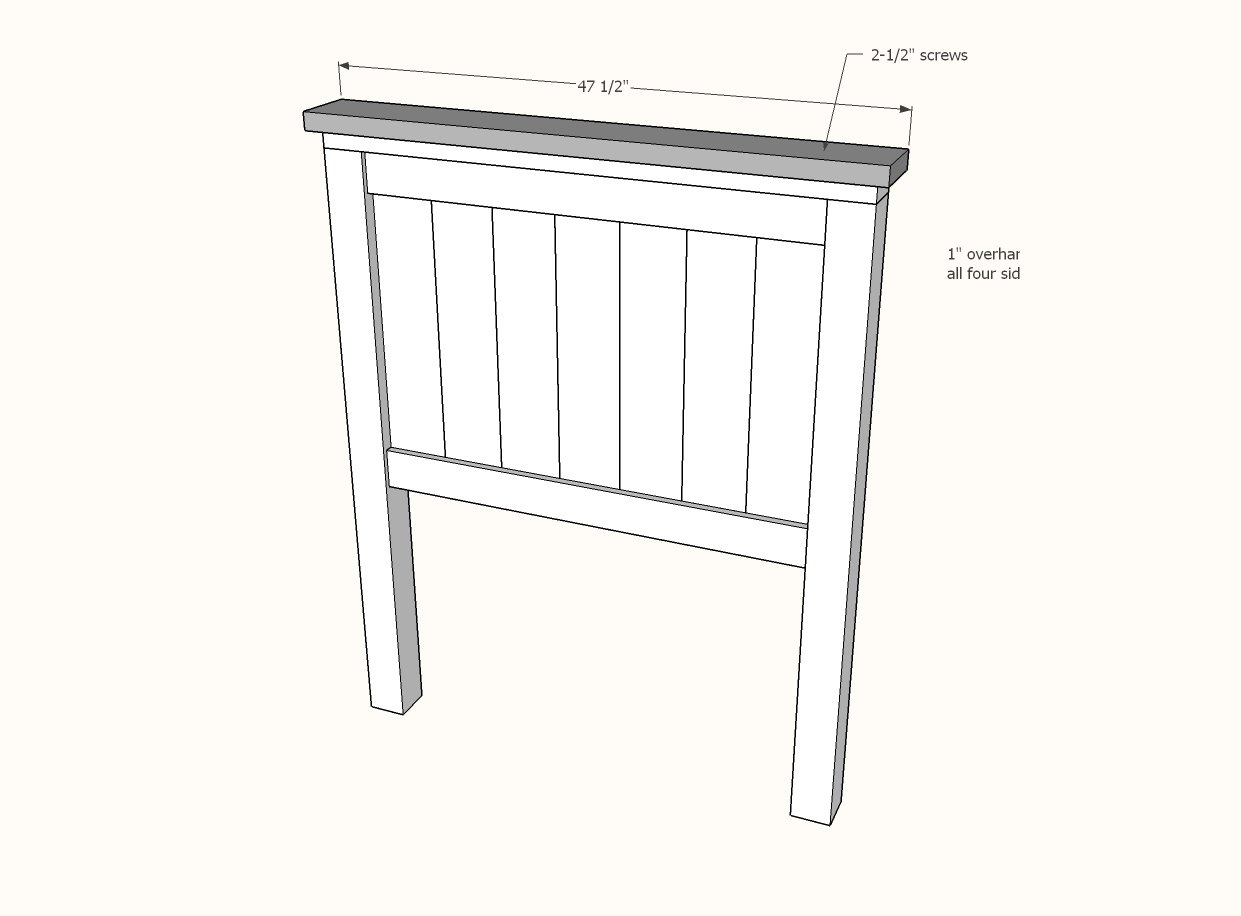
Place 2x6 on top of 2x4. Make sure all outside edge overhangs are even.
Screw on with 2-1/2" screws and glue.
Step 7
Repeat the same steps for building the footboard panel.
Step 8
If using the cleats for attaching, leave a space in the cleats as shown for accepting the bed frame in later steps.
Step 9
Attach footboard panel as you did the headboard panel to the legs.
Step 10
Repeat steps to finish top of footboard.
Step 11
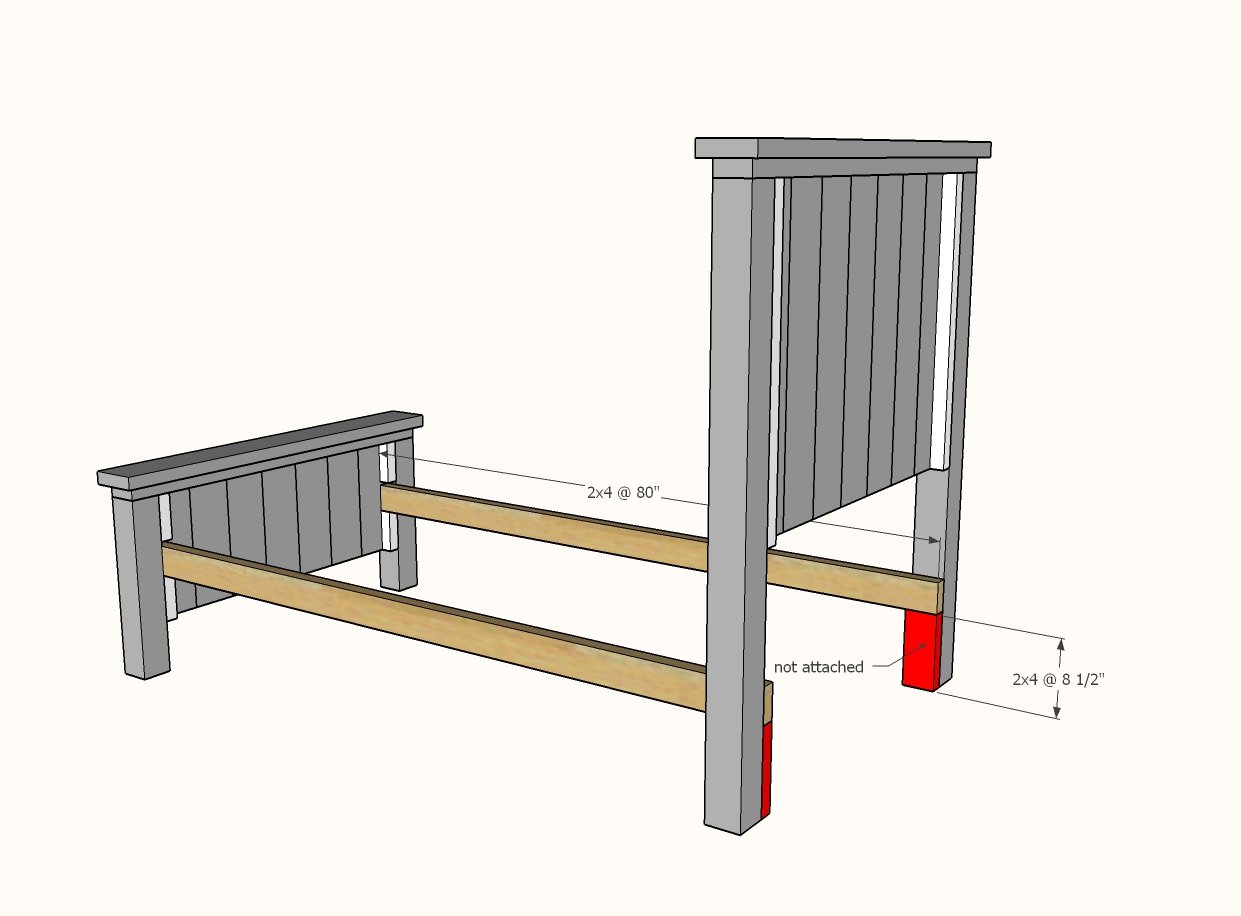
Attach 2x4 cleats to the 4x4 legs with 2-1/2" screws.
The spacer blocks are not attached and are just used as guides for setting up the bed.
Step 12
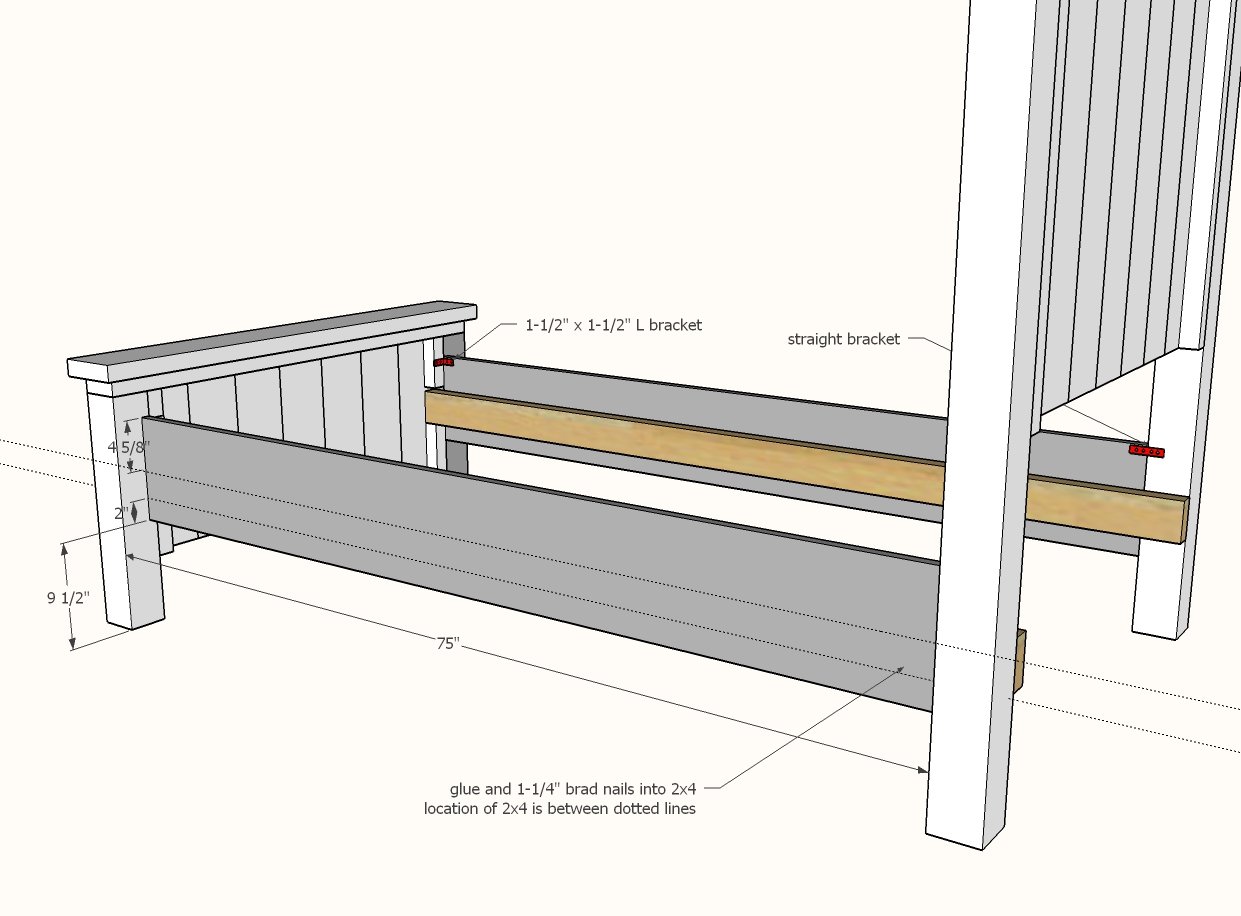
Place sidreails on cleats and attach with glue and 1-1/4" brad nails.
Also recommended is attaching with an L bracket and a straight bracket at tops. Pocket hole users can use a 3/4" pocket hole and 1-1/4" pocket hole screws.
Step 13
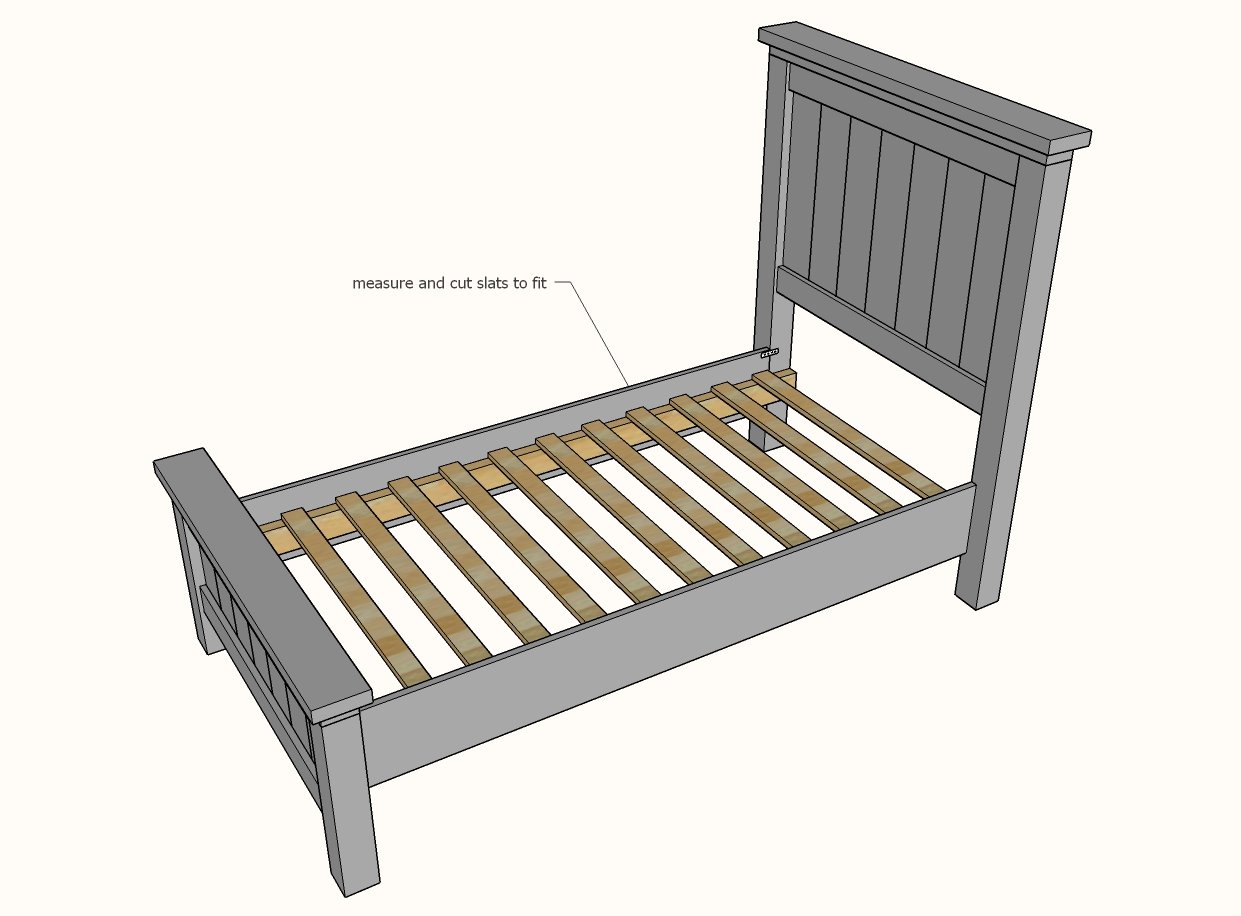
Lay slats in bed frame, space evenly. Screw down with 2" screws or 1-1/4" brad nails.

Comments
Shanty 2 Chic (not verified)
Thu, 01/07/2010 - 04:34
Woohoo!! I'm building
Woohoo!! I'm building 2!!
~Whitney
Karen (not verified)
Thu, 01/07/2010 - 05:57
Dang.... I want this bed for
Dang.... I want this bed for my granddaughter.......
Samantha2818 (not verified)
Thu, 01/07/2010 - 08:21
Oh my god. I've just found
Oh my god. I've just found your site and you are amazing! I can never find what I want in the UK so have everything made for me based loosely on things I find on Pottery Barn or Land of Nod (which are not available in the UK). I'm pretty handy with tools and anything I can't do my husband can and will! Part of my downfall though is working out how things should be made so you've solved all my problems and save me some money! I'll be following you so much now you'll think I'm a stalker!!
Thanks a bunch.
The P*dunc's (not verified)
Thu, 01/07/2010 - 09:17
I can not wait to get settled
I can not wait to get settled and start building! Thanks for all the amazing plans and inspiration! Girl power!
Rebecca (not verified)
Thu, 01/07/2010 - 11:01
Now I'm not sure which to try
Now I'm not sure which to try first - the 'cameron' bookshelf or this bed! Thank you, thank you, thank you!!!
eve (not verified)
Thu, 01/07/2010 - 12:27
I just found your site from
I just found your site from Be Different, Act Normal and I have to say I LOVE your work! I am hope hope hoping that I will make something from here one day. Thank you SO MUCH for sharing your knowledge with us! I might just have to become a follower...
Tori (not verified)
Thu, 01/07/2010 - 15:19
I am also here from Be
I am also here from Be Different, Act Normal and I love your blog! I have a lot of time to sit and browse while I nurse my one month old. I already showed this to my husband and told him we're building the Stratton bed for ourselves when we get out of this apartment!
Kati @ Obscure… (not verified)
Thu, 01/07/2010 - 16:06
your projects are incredible!
your projects are incredible! I love that you include plans with it! I'd love to get my hands on some software like that!
Your bed is beautiful!!!
The Faveros (not verified)
Thu, 01/07/2010 - 17:57
Ok I am officially in love
Ok I am officially in love with your site!! I have spent almost all day going through all your ideas- my husband just went last night and bought wood to try and make my daughter a bed and then I found your site with all these amazing ideas!! I can't wait to get started on so many of these plans- thanks so much for all the great stuff:)
Kristin (not verified)
Sat, 01/09/2010 - 06:15
Ooh I thought of something
Ooh I thought of something else! Is there a way to make this so that you can break it down for transport? We are a military family and move every 3-4 years. I would think this bed would survive moving better if it can be taken apart.
Mollylizc
Sat, 07/11/2015 - 11:33
Agree
We are military too. I wonder what could be changed to make it more mover friendly?
In reply to Agree by Mollylizc
Lady Goats
Sat, 07/11/2015 - 20:28
Mover-Friendly
To make this mover friendly, just build the headboard, footboard, and slat section (you could build them attached to the sides) separately, and then use surface mount bed rail hardware to easily disassemble. I actually recommend using bed-rail hardware on any bed that you build, because it allows for movement between the headboard or footboard and the rails without pulling/straining the screws that connect them. Here's a link to some with great reviews. Click here.
In reply to Ooh I thought of something by Kristin (not verified)
worrow
Sun, 05/29/2016 - 03:53
Bed rail hardware
Kristin,
It's simple, just buy the bed rail hardware. When building do not attach the side rails to head or foot board.
http://www.leevalley.com/en/hardware/page.aspx?p=65560&cat=3,40842,4126…
Kristin (not verified)
Sat, 01/09/2010 - 07:57
I deleted my previous comment
I deleted my previous comment after reading through some of your other posts. Mainly the TOOLS category! How long do the slats need to be to not use a boxspring?
Lissa (not verified)
Sat, 01/09/2010 - 09:35
SO gorgeous! I love this bed
SO gorgeous! I love this bed and everything about it! We don't have room in our bedroom right now for a bed frame for our king size bed but this is going into my "someday" folder. Love it!
Ana White (not verified)
Sat, 01/09/2010 - 10:57
KING SIZE STRATTONI will be
KING SIZE STRATTON
I will be posting the diagrams to modify the bed to a king size today! I am listening!
Ana White (not verified)
Sat, 01/09/2010 - 11:05
SLATS FOR TWIN SIZED BEDFor
SLATS FOR TWIN SIZED BED
For those of you who do not have a box spring, you can use 2x2s cut at 38 1/2". Just rest the 2x2s on the cleats and screw in place. You will only need a single screw to keep each slat in place on each end.
I would space the slats ever 1 1/2" , just because you might have little ones jumping on the bed. The easiest way to do this is to just use a scrap 2x2 (measures 1 1/2" wide) and hold it in place while you screw the next slat in place. Then remove the scrap and so on. You will need approximately 24 2x2s, so about 12 2x2 boards (these are cheap, about $1.50 each, you can buy them in bundles)
Also, if you are not using a box spring, this will affect the overall height of the mattress, moving the mattress down. To avoid an empty space under the headboard, you can either:
1. Shorten the legs of the headboard. Measure your mattress and determine how high it will sit on the headboard. Subtract the difference.
2. Higher the mattress. Simply attach the cleates higher on both the headboards and footboard. Please note that this will make your mattress higher.
3. Make your headboard panel longer. Just cut your panel pieces, the 1x6s, longer (instead of the 30"). Determine the extra length by measuring your mattress and determining how much empty space would be exposed, and add this amount to your panel pieces (so if 6" would be exposed, cut your panel pieces at 6")
LouLou@thelife… (not verified)
Sat, 01/09/2010 - 14:09
Ana!! Thank you for these
Ana!! Thank you for these plans! I only requested them a week or so ago!!! I can't wait to get started.... As soon as those trundle instructions are posted we're headed to Lowe's!
Jessica (not verified)
Mon, 01/11/2010 - 05:49
I just found your blog and I
I just found your blog and I cannot even tell you how amazed and excited I am! I have been trying so hard to find two twin beds for my boys room and they are all so expensive so I was having no luck. I have no experience building, but I am a big DIY'er so I am so excited to try my luck with these beds.
Thanks SO much for posting!
TheOnesInColorado (not verified)
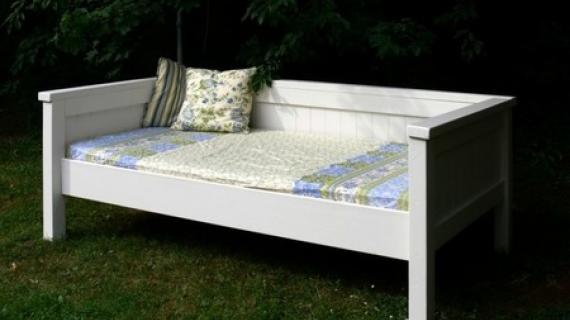
Sun, 01/17/2010 - 17:19
Wow - this is beautiful! I
Wow - this is beautiful! I have been in love with this daybed
http://tinyurl.com/yz398y6
for my daughter and think that your Farmhouse bed might be just the thing. I think I could make one long "headboard" for the long back piece of the bed. How might you modify the sides for a daybed? Thank you so much for sharing!
Erika
Robert (not verified)
Mon, 01/18/2010 - 16:43
Wow this is a great. It was
Wow this is a great. It was pretty easy to build once I got the gumption to start. I would recommend this design to any do it yourselfer. It looks great and is very strong.
The buy list is short a couple things for the twin size only.
1 2x6x8
1 1x6x8
I feel like the 4x4's should be pre-drilled all the way rather than half way. They just seem to fit better totally drilled and cinch up more completely.
Thank you for an excellent site and i plan on building more of these great designs.
Magic Brush (not verified)
Tue, 01/19/2010 - 10:14
This is fantastic!!!!!!
This is fantastic!!!!!!
Kristin (not verified)
Sat, 01/23/2010 - 15:39
I only found the list to be
I only found the list to be short one 1x6, but a 4 foot board will work instead of an 8 foot. Also for the 1x4s (that you nail the 1x6s to) the measurement is short about a 1/2 inch. Measure your 1x6 planks before cutting the 1x4 trim. Unfortunately I already cut all mine before I realized it, but fortunately I was in a fully equipped wood shop and just took my panels down with the table saw.
It is taking me MUCH longer than I thought it would (11 hours total so far!), but it is my very first project. I am also in a public wood shop and have had to wait on machines a little. With it being my first project, I can attest to the fact that nothing has been too difficult! I have done a few things a little different. I will post on that once I am finished with the bed.
I absolutely love it so far!!!
Ana White (not verified)
Sat, 01/23/2010 - 15:49
Hi Kristin, I 'm sorry to
Hi Kristin, I 'm sorry to hear about your challenges. To avoid this in the future, it's a good idea to cut to measurement, like your recommended. The other thing to look out for is a different width in your 1x6 board. A standard 1x6 measures 3/4" x 5 1/2" , and 7 of these would measure exactly 38 1/2". If you purchased boards that were "off" even just an 1/8", over seven boards, you would be off almost 1".
Thanks for sharing your challenges!
Ana
Erin (not verified)
Tue, 01/26/2010 - 07:25
This is exactly what I have
This is exactly what I have been wanting for my daughter but in a daybed form. Any ideas on how to make this twin farmhouse bed into a daybed??
Thanks! We're making the Stratton bed for our room too!
Jody (not verified)
Fri, 02/19/2010 - 18:42
Did the TWIN farm bed
Did the TWIN farm bed instructions dissappear?? I cannot find them for the life of me and the "Read More" is not popping up above the share button. Is there a direct link? I LOVE LOVE LOVE your site Ana, its my birthday on Monday and I told my husband I need some tools:)
meg (not verified)
Sun, 02/21/2010 - 09:25
Went and bought all my wood
Went and bought all my wood on Friday. Started cutting today and realized the wood list is short one 1x6x8. Just back from Lowes with another board. Hoping this is the last trip there today.
Ana White (not verified)
Mon, 02/22/2010 - 13:06
http://knockoffwood.blogspot.
http://knockoffwood.blogspot.com/2010/01/plans-how-to-modify-farmhouse-…
Kristin (not verified)
Fri, 02/26/2010 - 09:37
I built this bed! I thought
I built this bed! I thought some of you might like to know the approximate cost. I live in north Florida and the lumber cost me about $95. I made my slats as described on the plans for the Simple Bed. I used whitewood board. I didn't have to buy nails, screws, or glue. So $95 for the lumber...not bad!
FYI for all military out there: Lowes (at least mine) gives a 10% military discount! Not much when you run in for paint, but a considerable amount when you buy $100 in lumber! The $95 mentioned about is without the discount.
lindsy (not verified)
Tue, 03/02/2010 - 21:29
Hi AnaI'm going to start
Hi Ana
I'm going to start building 2 of these tomorrow. It sounds like you can use the metal frame instead of the cleats (with a boxspring) ... how exactly do you do this? Do you screw the metal frame to the rails so the boxspring sits on the metal frame??
Thanks
Krystal (not verified)
Thu, 03/04/2010 - 13:57
Working on it right now! Just
Working on it right now! Just realized it is short one 1x6...guess the footboard will have to wait until tomorrow! It has been way fun and easy to put together so far though! My son is going to LURVE it SO much!
The Snyder Family (not verified)
Tue, 03/09/2010 - 06:55
Just thought I would mention,
Just thought I would mention, now that I have actually assembled the bed that the cut list is not short a 1x6. If you do the foot board the recommended height...I had mine originally cut at 30" and realized the foot board is supposed to be about half as tall as the headboard...so the cut list is correct. Just thought I would post this to correct my previous post.
Stefanie (not verified)
Wed, 03/17/2010 - 15:50
Do you have an rec's on how
Do you have an rec's on how to attach bed rail hangers? We're a military family and we move around a lot so we would have to make this bed to where it could come apart easily.
Emily Snow (not verified)
Sat, 03/27/2010 - 11:06
has anyone made this bed and
has anyone made this bed and stained it? if so...do you have an approximate price range you think was spent on the lumber for that? I am assuming the other prices are for the cheaper wood that you wouldn't stain, home depot and lowes both don't carry the posts and stuff in pine..i'll have to go to a lumber yard. just wondering.
Emily Snow (not verified)
Tue, 03/30/2010 - 05:11
now i'm discouraged bc lumber
now i'm discouraged bc lumber yards don't carry the 4 x 4 posts in the nicer stainable woods or the 2 x 6, or 2 x 4. Any ideas where to get some nice stainable wood at a decent price? i really want this bed for my boys.
Scott (not verified)
Fri, 04/02/2010 - 04:07
If you go to a lumber yard
If you go to a lumber yard that carries hardwoods, you should be able to find 4x4 wood that will look better stained. However, 4x4 wood that is stainable can be incredibly expensive. Look for lumber yards that cater to woodworkers (if you live in SoCal, Eagle Rock Lumber is a good bet). You may be looking at a minimum of $4.00 a foot for basic clear pine, or much more for oak or walnut.
Scott (not verified)
Fri, 04/02/2010 - 12:15
UPDATE: I just came back
UPDATE: I just came back from Lowe's and have this answer for Emily Snow's question about staining. A 1x6x8 of plain white wood was $5.92, for clear pine it was $14.77, and for oak it was $24.82. So, getting a good wood that will take a stain well will cost you anywhere between 400% and 500% of the cost if you get paint grade wood. Than again, this bed would look great in oak and become a family heirloom. Cheers!
Kelli Eudis (not verified)
Fri, 04/09/2010 - 07:29
Thank you Thank you!! You're
Thank you Thank you!! You're awesome. My husband and I are going to make the this for our almost 3 yr. old girl. I will let you know how it turns out!
Jessica (not verified)
Sat, 04/10/2010 - 13:01
lindsy said... Hi Ana
lindsy said...
Hi Ana
I'm going to start building 2 of these tomorrow. It sounds like you can use the metal frame instead of the cleats (with a boxspring) ... how exactly do you do this? Do you screw the metal frame to the rails so the boxspring sits on the metal frame??
I had the same question as Lindsy. Maybe it is somewhere else on the blog? does anyone have any recommendations on this?
Ana White (not verified)
Sat, 04/10/2010 - 14:44
The easiest way to use a
The easiest way to use a metal frame is to just attach the footboard and headboard to the metal frame, with no siderails. Depending on your frame, you may be a able to also attach the siderails to the frame.
Foote Family (not verified)
Mon, 04/26/2010 - 03:43
I love this bed!!! Is it
I love this bed!!! Is it possible to make it into a daybed?
lady m (not verified)
Fri, 04/30/2010 - 13:47
I am looking at building the
I am looking at building the Twin version of your bed. I would like to be able to take the bed apart later, for ease of moving it.
I'm sorry if you have answered this question already, I didn't see an answer when I looked in the comments.
How would you make this bed disassemble, at least down to three pieces (head board, foot board, and mattress support frame)?
In addition, we don't have a box spring and will be shortening the headboard to accommodate the design :)
Thanks again for the great plans!
siggriff (not verified)
Mon, 05/10/2010 - 16:57
This plan is really good,
This plan is really good, although I am wondering if you have any suggestions on how to raise the height of the footboard above the mattress?
Laurie Bridges (not verified)
Mon, 05/10/2010 - 19:44
I've been looking for a bed
I've been looking for a bed for my almost-2-year-old son and stumbled upon your site. LOVE IT. My husband and I have never done carpentry work, although we have done extensive renovations on our house. We're going to give making a bed using your plans a try! One question, we like both the farmhouse bed and the simple bed, so we'll do the one that is the easiest. In your opinion, which one would that be? Thanks!! Laurie
Anneke (not verified)
Thu, 06/24/2010 - 20:06
I found your blog and have
I found your blog and have been oogling the past two days on everything I want to do....and it's been years since I built anything! I'm going to build two of these with canopies for my daugthers who share a room. I'm nervous, but SOOO excited!!!
Erin Gross (not verified)
Sat, 07/31/2010 - 11:20
Hi Ana and all! We have a
Hi Ana and all! We have a metal bed frame, but only one end is able to be bolted/screwed to the headboard...anyone come across this issue, and how did you modify to be able to attach your foot board to the frame? We thought about getting a second frame, flipping it around where what would be the head of the bed would be at the end to be able to attach foot board...another thought is getting some side rails that have the "hooks" on them that would go into the head and foot boards...but we aren't sure how to make the "slit" cut on the 4x4s so it will slide down and be secure...make sense to anyone? Thanks for any input!
Emily (not verified)
Mon, 10/18/2010 - 16:54
Can anyone give me an
Can anyone give me an approximate cost on this project? I know lumber prices will vary so I'm just looking for a ballpark figure. Thanks so much!
Rooms You Can … (not verified)
Mon, 11/08/2010 - 19:00
[...] this bed also boasts a
[...] this bed also boasts a trundle. Would you like to make this room too? Kayleen used plans for the twin Farmhouse bed, but made the headboard and footboard the same heights. Then she added this trundle [...]
Amy Nicholas (not verified)
Tue, 11/16/2010 - 11:00
Could I modify this to make
Could I modify this to make it work with the trundle underneath? Add a few more inches the headboard and footboard? Thoughts?
I was thinking of the daybed, but really like the look of the farm bed better.
Thanks, Amy
Ana White (not verified)
Tue, 11/16/2010 - 11:20
Amy this is the post for you
Amy this is the post for you :) http://ana-white.com/2010/11/rooms-you-can-build-kayleens-farmhouse-gir…