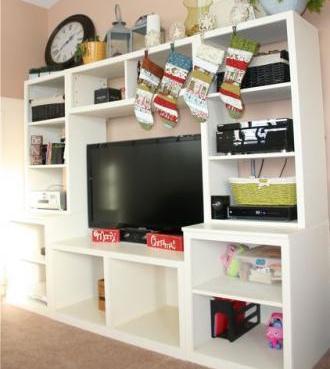


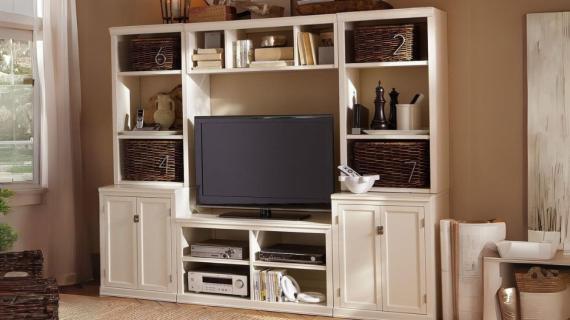
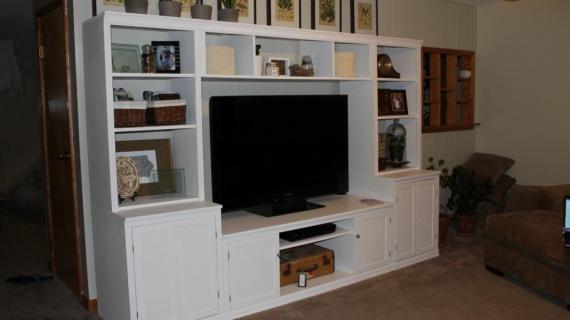
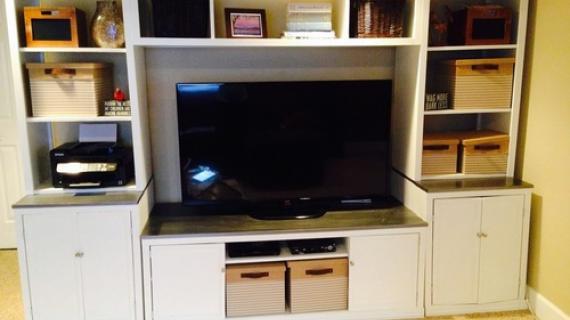
Reminiscent of pricy built-ins, this project is designed to work with the rest of the Classic Storage Collection to provide not just storage around your TV, but storage throughout your home. Simple plan, fully framed, open backs, optional removeable/adjustable shelves, and moulding make this simple piece rightly named the Classic Collection.

Preparation
1 Sheet of 3/4″ MDF or Plywood, cut into 15 1/2″ Strips, 8′ long
1 – 1×2
1- 1×3 (you will only need 24″)
at least 24″ of 2 1/2″ high moulding
Shelf Pins
Edge banding (for plywood uses)
A) 2 – 1×16 @ 44 1/4″ (Sides)
B) 1- 1×16 @ 24″ (Top)
C) 3 – 1×16 @ 22 1/2″ (Bottom and Shelves)
D) 4 – 1×2 @ 45″ (Side Trim)
E) 1 – 1×3 @ 21″ (Front Top Trim)
F) 1 – 1×2 @ 21″ (Back Top Trim)
Crown Moulding, 2 1/2″ overall height, 24″ Long
Cut your 3/4″ Plywood or MDF into strips 15 1/2″ wide by 8′ long. These strips become 1×16 boards. Cut your sides from 1 of the 1×16 boards. Cut the shelves and top from a second strip. You will have one strip leftover. Save it! If you build 2 of the open hutches, use the leftover scrap for the bridge.


Work on a clean level surface. You can fasten with nails or screws, depending on your tools and the use of this piece. Screws will hold better, nails are easier. My general rule is screw anything that will be “used” like chairs and benches, and nail sedentary pieces like bookcases and hutches. I will leave this up to you. If you are screwing, make sure you predrill and countersink your screws. If you are using MDF, avoid fastening within 1″ of the edge of the MDF. Do not use wood screws on MDF. Wood screws do not have a straight shaft and will split your MDF. I have had luck with drywall screws (after all, drywall is very similar to MDF). Make sure you predrill the entire distance of the screws. It’s going to screeech, so wear hearing protection. And glue, glue, glue.
My favorite option is to screw the “box” together, and then use finish nails to add the frame. That way the frame does not have blemishes, but the piece is built sturdy.
Make sure you take a square of the project after each step. Measure and mark out any joints before fastening. Be safe, have fun.
Instructions
Step 1
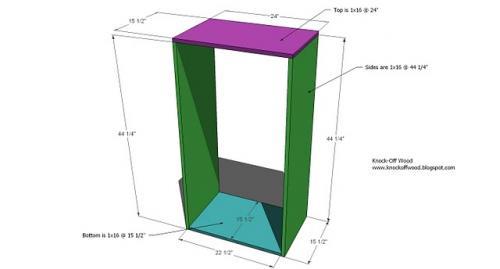
Build the box. Fasten the bottom to the sides, as shown above. Then fasten the top to the sides. You will need to take a square of the project (See HOW-TO section). Use glue and 2″ fasteners.
Step 2
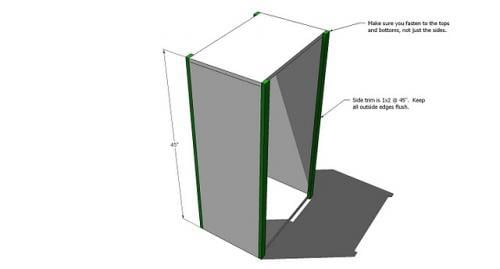
Trim the sides of the box. Keeping outside edges flush, attach the trim to the sides of the project, as shown above. Make sure you fasten to the top, bottom and sides. The trim reinforces the joints on the hutch.
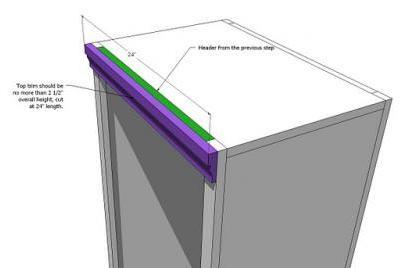
Step 3
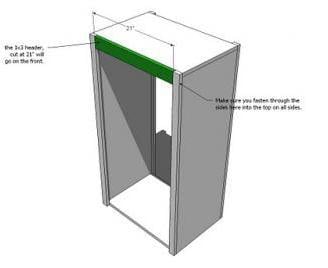
Top Trim. Fasten the top trim, as shown above. Make sure you also fasten through the sides into the top trim, shown in green. You must use the 2″ fasteners when fastening through the sides.
Step 4

Back Trim. Attach the back trim in the same manner as the front trim. The back trim is a 1×2.
Step 5
Step 6
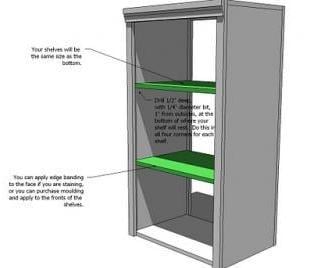
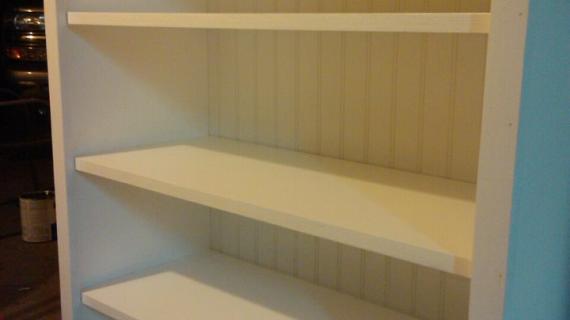
Shelves. The shelves should be finished seperately. Then using your shelf pins, install the shelves in the hutch.
Comments
Amanda (not verified)
Fri, 01/22/2010 - 05:46
Ana, do you have the plans
Ana, do you have the plans for the bottom half of this? I would love to build something like this for our office!
Ana White (not verified)
Fri, 01/22/2010 - 05:48
plans for the logan
plans for the logan collection can be found here
http://knockoffwood.blogspot.com/search/label/logan
yes, there are some plans up, some in the works.
lanisanford (not verified)
Fri, 01/22/2010 - 07:35
Thanks Ana, I am really
Thanks Ana, I am really excited about this collection!
Julie (not verified)
Fri, 01/22/2010 - 07:42
Hi Ana, your blog is my new
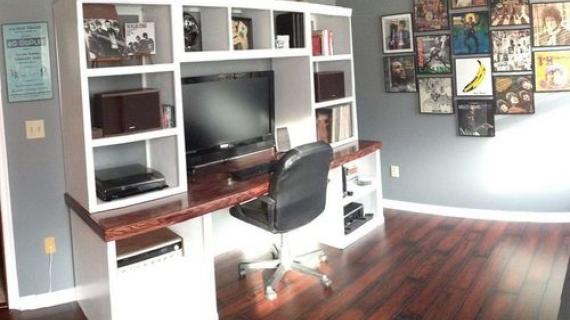
Hi Ana, your blog is my new addiction...I can't believe I never considered building my own furniture before. I need to start small though because I'm a total newbie with no tools (yet!). Any future plans for the Bedford office desk? It's been on my wish list for a long time but I can't stomach paying the PB prices. Anyway, thank you for all that you do!!
Fitness Journey (not verified)
Fri, 01/22/2010 - 09:05
OH Happy Day!!! :) Thanks
OH Happy Day!!! :)
Thanks Ana!
Maggie (not verified)
Fri, 01/22/2010 - 14:53
I have the most STUPID
I have the most STUPID question EVER...
When you say "fasteners", do you mean nails?
(It took me days to ask b/c I feel dumb!) :(
Tiffany (not verified)
Fri, 01/22/2010 - 15:42
i'm SO excited for this! i'm
i'm SO excited for this! i'm in dire need of office furniture. we're getting ready to move into our first home, and i MUST have some great furniture!
do you think this collection would be difficult for a newb?
Ana White (not verified)
Fri, 01/22/2010 - 16:52
Hi All, I'm so glad you like
Hi All, I'm so glad you like this collection! I love it too.
I really have to get a FAQ page up, because none of your questions are dumb, it's just that you have not been given the opportunity to learn.
I use the word fasten alot because some people prefer to screw, some prefer to nail, and I do both. Screws will hold tighter and resist a wiggle, so if you are building benches, tables, chairs, kid's stuff, you probably want to screw. Nails are easier because you don't need to predrill or even drill for the matter. Also, nails are much prettier - just a tiny bit of wood putty and they are gone. But nails don't hold up as well. Sometimes that doesn't matter, for example, wall cabinets, bookshelves, end tables, and other low use pieces. Also, if you can nail from multiple directions, then you reinforce the joint and maximize the overall strength.
That said, I tend to build all of my pieces with screws, and then frame with nails. So the structure is screwed together and the pretty wood frame is nailed on.
I say fasten because everyone has their favorite method, and some people have drills, others have nailers.
FAQ post sounds like a good idea next week when I'm in Hawaii!
Drew (not verified)
Sun, 01/24/2010 - 10:29
Hey Ana,LOVE your blog. I'd
Hey Ana,
LOVE your blog. I'd love it if you put up some plans for the Bedford Office Collection. I'm kind of surprised you haven't yet. I think its there most popular collection. Anyways, thanks for your blog, it's GREAT! Keep up the good work.
Thanks,
Drew
Adult Social Network (not verified)
Thu, 01/28/2010 - 02:58
Amazing ! Great Work ! I'll
Amazing ! Great Work ! I'll try in the summer!
Donna (not verified)
Wed, 02/03/2010 - 19:39
I LOVE your site!!! Thank you
I LOVE your site!!! Thank you for sharing your talent with all of us!!! I'm so motivated in building this but have to convince hubby!
In your post, you say "shelf pins" what are those and where do you buy them and how are they attached? If I can't find shelf pins can I just screw/nail the shelves on?
Tasha (not verified)
Sat, 03/13/2010 - 05:41
I love love love this site.
I love love love this site. I will buying a new home soon and I could not afford new furniture, but.... NOW I can. Thank you so much. This give me the idea to just look at the furniture I want and build it. Why pay 1000's when I could make if for a fraction of the cost.
Christine (not verified)
Thu, 05/13/2010 - 04:50
Are there instructions for a
Are there instructions for a framed glass door for the hutch? Not there yet, but we're planning on one hutch being closed and one being open.
LOVE your site...thank you for sharing your talents with us!
Christine (not verified)
Thu, 05/13/2010 - 11:57
Nevermind...I just found the
Nevermind...I just found the plans! Love it!
Christy (not verified)
Fri, 07/16/2010 - 04:18
Ana, could I just make the
Ana, could I just make the side hutches taller and not make the base? Those bases are really big and we really just want a bookcase look on both sides of our media unit.
Thanks for the plans! We just got new couches and need to get a media unit in the works...this is perfect!
Ana White (not verified)
Fri, 07/16/2010 - 06:50
Christy, this is absolutely
Christy, this is absolutely doable, but I would recommend creating some sort of open bottom. With a flat bottom, if your floor is not perfectly level, your bookcase is going to sit "off" or rock. But with legs or feet or sides that extend (check out how I do other pieces) you can easily add felt pads to level your furniture. Just some thoughts, good luck! Ana
The view from … (not verified)
Thu, 12/09/2010 - 11:39
[...] on Pottery Barn’s Logan
[...] on Pottery Barn’s Logan modular wall system that she calls the Classic Storage Wall Base and Classic Storage Wall Hutch. And the wonderful thing about building it yourself? You can make it perfect for you. Which [...]
Robyn (not verified)
Mon, 01/03/2011 - 13:16
I'm seriously, seriously
I'm seriously, seriously considering building the entertainment AND desk units, side by side. But just to clarify, the measurements for the cutting list, is it to make the PAIR or just one?
Tiffany (not verified)
Thu, 01/06/2011 - 17:16
In the process of making
In the process of making these and their "base" counterparts! Just finished final sanding, tomorrow some paint and then enjoy for years to come!!! Thank you for giving us the "tools" (aka plans) we needed to make this system a reality! I could have never paid Pottery Barns prices...but we CAN follow a plan and build them, thank you!!!
Donna (not verified)
Fri, 02/04/2011 - 13:00
I am so new to the situation
I am so new to the situation here! I am in total awe of what you accomplish! Apparently I have your same "want-to-have-a-project-going-at-all-times" gene, but definitely not the same energy/knowledge/be-able-to-focus-on-anything-else at-the-same-time-until-the-project-is-done" gene! I am wondering: Can I use 1/4 inch MDF instead of 3/4 inch for this project? Does it matter the kind of load I will be putting on the shelves? (I am looking at cutting my cost in half for a sheet of MDF..Did I mention the I-am-obsessed-with-finding-the-cheapest-way-possible-to-do-a-project" gene?)
Thanks!
Amy Freeman (not verified)
Thu, 12/29/2011 - 17:54
Cabinet base
Hi Ana! I have looked all over your site for the plans for the base to this hutch and this link posted earlier in the comments does not take me there. I would appreciate any thoughts! Thanks!
kellyepowell
Wed, 03/25/2015 - 12:08
Cuts in the Plywood
Does anyone have pictures of how each cut is supposed to be made in the plywood? Just thought a visual would help me in cutting all of this wood! Thanks in advance!!!!!