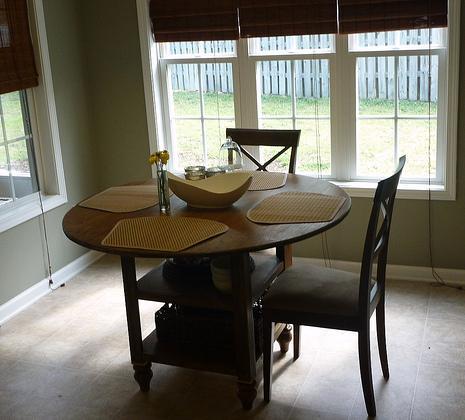
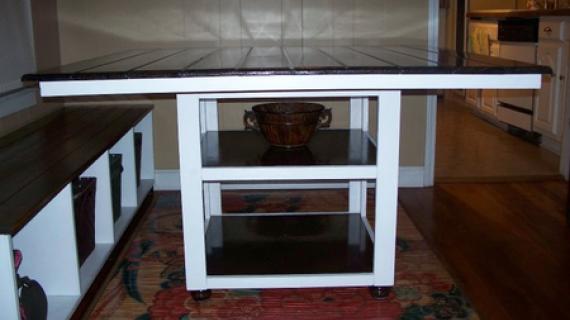
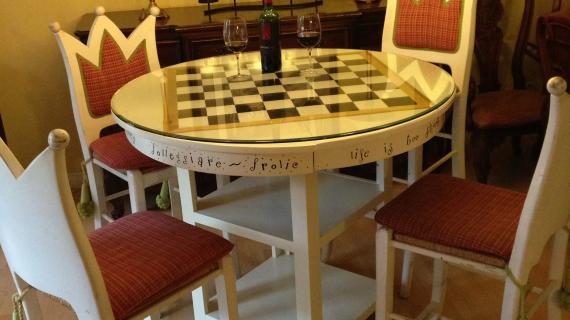
Round dining tables are idea for small dining spaces because they still seat the same number of people, but you can easily move around the table. Take greater advantage of your small space needs by building a round storage dining table. This simple plan uses a standard round tabletop, standard bun feet, and an easy to build storage center.
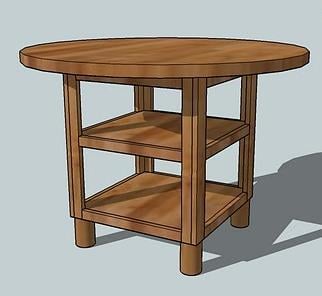
Preparation
1 – 42″ – 48″ Unfinished Round Tabletop (Available at Lowes and Home Depot)
A) 4 – 1×2 @ 28 1/2″ (1×2 Part of the Legs)
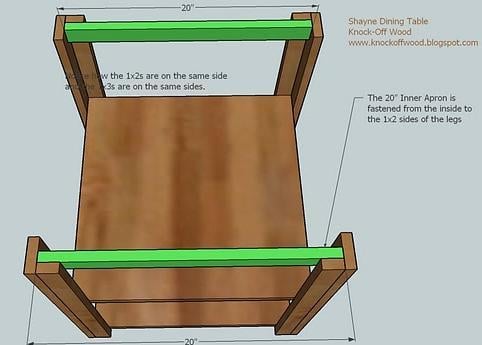
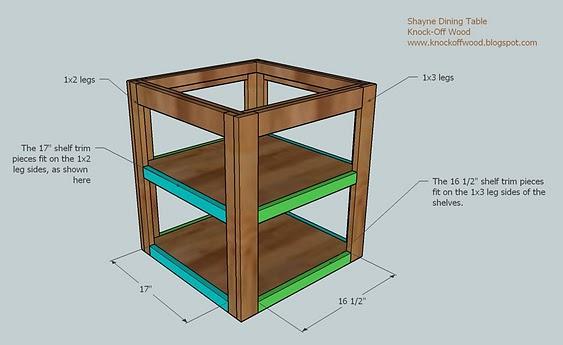
Cut all your boards first. You can choose to cut your trim and outer apron pieces as you go to get the best fit. Always use glue. Use 2″ nails or screws unless otherwise directed. Always take a square of your project after each step (see HOW-TO section). Work on a clean level surface. If your table is going to be subject to alot of abuse, I recommend using screws instead of nails. Always predrill and countersink your screws.






Comments
Anonymous (not verified)
Mon, 01/11/2010 - 03:34
Hi Ana!Do you think if I put
Hi Ana!
Do you think if I put a 37x42 rectangle top on this base it would be sturdy? Love the design. Thanks so much for the post.
Abby
Melodie (not verified)
Mon, 01/11/2010 - 04:00
This is perfect for a friend
This is perfect for a friend of mine! Thanks so much for doing what you do, and inspiring us to tackle these projects :)
The Monkey Bugs (not verified)
Mon, 01/11/2010 - 04:08
I'm ashamed to say that I
I'm ashamed to say that I rarely leave comments on the many blogs I read, but I just had to leave a comment on yours.
I LOVE your blog!!! We are a military family and can't afford to furnish our house with expensive furniture, not to mention that even if I could I wouldn't want to fork out that much cash for something that is going to get loaded on and off a truck every three years!
I am so happy you have this blog!!! How awesome!!! Now I can have that pottery barn/ land of nod look that I really, really want for about the same price (or less) that I would pay for something not quite right off of craigslist.
My next craigslist purchase won't be a table for my new kitchen, it will be a table saw!!
Thank you! You rock!!
Ana White (not verified)
Mon, 01/11/2010 - 07:37
Hi Abby, that size top would
Hi Abby, that size top would actually be smaller, so you should be fine, depending on what type of top you are using. If you are using boards 1 1/2" thick or a premade tabletop you should be fine.
Also, if you would like the base to be larger, more rectangular, etc, just cut your shelves 1 1/2" less than your desired base size. For example, if you want the base to be 30" x 24" then cut your shelves 28 1/2" x 22 1/2". Then follow the steps in the diagrams, adding the legs first, then taking measurements to add the aprons and trim. If you are going larger than about 30" you may need to add some tabletop supports in the center of the table, attached from inner apron to inner apron.
Hope this helps!
Ana
Tricia (not verified)
Tue, 01/12/2010 - 05:02
Hi Ana. I just discovered
Hi Ana.
I just discovered your blog and can not believe that I have lived so long without it!!!
Thank you so much for all that you do. I have been pouring over your archives and my to-do list is growing rapidly.
You are very talented and quite an inspiration. ;)
XO*Tricia
brandi (not verified)
Tue, 01/12/2010 - 08:12
I just found your blog,
I just found your blog, thanks to Young House Love! I've wanted this table in the worst way, but can't afford it. I can totally do this! You made my day!!! :)
Chelsea (not verified)
Fri, 01/15/2010 - 11:12
I have to agree with Brandi!
I have to agree with Brandi! I found your site from Young House Love, and couldn't believe my eyes at what I've been finding! And then I found this table, which I've been dreaming and drooling about for months, but my husband and I can't afford just about anything from there - we are newlyweds who just bought our first house (and he's still a student). So this is wonderful! Thanks so much!
Oh, and I was wondering - do you think the parson's chairs would fit under this table? If our table building goes well, we might tackle that project, too!
Cara M (not verified)
Fri, 01/15/2010 - 18:19
I just found your site, and
I just found your site, and it is SO inspiring! About 3 years ago I asked my grandfather to build this table for me. He say if I found the plans, he would build it. I looked everywhere for plans, and now here they are! Sadly, he passed away last year, but I may just have to build this myself in memory of him. Thank you for the plans!
Elisa @ whatthevita (not verified)
Sun, 01/17/2010 - 10:46
LOVE THIS - LOVE YOUR BLOG.Ok
LOVE THIS - LOVE YOUR BLOG.
Ok - question time.
We really want a 54" or 60" table - do you think the plans would still work if I put on a 54" round top instead of a 48"? Would it still be sturdy?
Let me know - we want to make this immediately :)
Ana White (not verified)
Mon, 01/18/2010 - 15:30
Hi Elisa, I would make the
Hi Elisa, I would make the base much larger if you are using a 54" tabletop or a 60" tabletop. I would make the base at least 36" for the shelves alone. This is easy to do. Just cut your shelves at your desired dimensions, add the legs as instructed, and then measure and cut trim pieces to trim out the aprons and the sides.
Another concern with the larger tabletop is going to be finding a tabletop that large. What I might suggest doing is to use tongue and groove to create your tabletop.
Hope this helps!
Ana
savvy_homegirl (not verified)
Mon, 01/18/2010 - 17:54
I also just discovered your
I also just discovered your blog thanks to Young House Love. Your description of your house doesn't sound too different from my own. Mismatched furniture longing to come together in some sort of photo-worthy style. This table plan might just be the encouragement I need to try to build some of my own, much needed pieces, including bookshelves to flag a living room fireplace. Looking forward to trying to build something on my own and sharing my experience!
Jenn. (not verified)
Sat, 01/23/2010 - 09:43
Love it! Found you via Young
Love it! Found you via Young House Love. I have had my eye on this table for a while now. Maybe we will make it instead! Thank you!!!
Eva-from MD (not verified)
Sun, 01/24/2010 - 02:51
Hello Ana,I found your site
Hello Ana,
I found your site about a week ago and I am just beside myself. I have your site as one of my favorites so I can visit often. I have to admit that I have been searching for a website like this for some time now. I love to work with wood, but never to this level, so your tips and plans are very very helpful as it is easy to follow. Yesterday I went to my home depot and I had them cut all the necessary lengths I needed to make this table and I'm so excited. I have the base pretty much done and I need to buy the top, but it came together relatively easy. I have to admit that your suggestion on cutting the aprons later is good, because some of my pieces are a little short... nevertheless I will make it work. Thank you so much for your site and your time in getting the plans to us.
Oh, I would love, love love to see your plans for the Parson chair. :)
lsorum (not verified)
Wed, 01/27/2010 - 16:52
I love that Eva left her
I love that Eva left her message at 4:51 AM - we're all so excited! I also love this table. I would also like to build the shelves on the back wall of the picture (the wine rack and glass racks). Would it be possible for you to draw up some plans. I have a new apartment and I just can't wait to make it feel like home. Additionally, I would also like to make the Holman shelves from PB, which look easy enough, but I was wondering how I go about hanging them. I look forward to your next endeavor! So excited to get started.
jacksmom (not verified)
Sat, 02/06/2010 - 05:08
Question on this, is there an
Question on this, is there an error on the cut list for the trim? You have 4 cut out of 1x2 at 17 and 4 cut out of 1x3 at 161/2, they won't meet up right if that correct or maybe I am reading it wrong. Can you clarify if I am looking at it right?
Ana White (not verified)
Sat, 02/06/2010 - 08:18
The cut list is accurate, as
The cut list is accurate, as far as I can see. The trim lengths will be different because the legs measure 2 1/2" on the 1x3 side and 2 1/4" on the 1x2 sides, so you get an extra 1/2" on the 1x2 sides. What I would do is measure and cut your trim to fit, instead of precutting. Then you can get a nice tight fit.
jacksmom (not verified)
Sun, 02/07/2010 - 04:12
I understand that the trim
I understand that the trim length is different at 17 and 16 1/2 because of the legs but my question is you are using 1x2 for 2 sides of trim and 1x3 for the other 2 sides of the trim. Won't the height of the sides be different then? I guess the queston isn't about the cut but the material used for the piece.
H) 4 - 1x2 @ 17" (Shelf Trim on the 1x2 Sides)
I) 4 - 1x3 @ 16 1/2" (Shelf Trim on the 1x3 Sides)
Wouldn't they be all four sides be cut out of the same height of wood 1x3 or 1x2 at the different length to accommodate the legs?
Thanks again!!
Thanks agian!
lsorum (not verified)
Sun, 02/07/2010 - 04:43
I would love to see the plans
I would love to see the plans for the shelves in the background of this picture. I have all of next weekend set aside for building :) Can't wait!
Betsy (not verified)
Mon, 02/08/2010 - 13:37
Hi Ana! First of all, thank
Hi Ana!
First of all, thank you so much for your wonderful blog and plans. I was in a real "February Funk" before I found you! After seeing your blog, I declared myself a "future furniture maker" and went out and bought a new table saw and miter saw!
Your plans are very easy to follow and the table base went together well. Except for one thing. Jacksmom is correct about the trim pieces. They should all be 1x2's. I had plenty of wood so I cut the needed pieces out of the 1x2 wood and I'll keep the 1x3 pieces for another project.
Thanks again for everything. The hardest part about making your designs is choosing which one to make next!
Betsy
Ana White (not verified)
Tue, 02/09/2010 - 07:36
So right, ladies! I am so
So right, ladies! I am so sorry, Jacksmom, I didn't realize you were talking about board I, the type of board, not the length. Thanks Betsy for catching this! All fixed.
Sierra (not verified)
Wed, 02/17/2010 - 14:37
Hi Ana,LOVE your blog!
Hi Ana,
LOVE your blog! AMAZING! And I can identify with tiny starter homes...I've been married for less than a year...we live in a 1 bedroom, 1 bath apartment...but we're moving to a 2 br, 2 bath one in May! And BOY do I have plans with your plans! I'm going to make this table, some of your bookshelves and maybe a trundle bed...anyway, what I'm wondering is, how much would a table like this cost to build? Are we talking $50? Or is it closer to $100?
Thanks! Again, you rock!!
-Sierra
Heather (not verified)
Fri, 02/26/2010 - 16:34
We bought the wood to make
We bought the wood to make this table today and it came out to right at $200. I wanted a 48" round top and that has proved impossible to find unless I want to pay over $200 just for the top so we bought stainable pine counter tops and plan to connect them then cut out a circle. Hope it works out!
lsorum (not verified)
Sat, 02/27/2010 - 05:41
I really hope that you post
I really hope that you post the plans for the shelving in the background of this picture some day!
It's on my to-do list, for sure.
hollyann87 (not verified)
Sun, 04/11/2010 - 18:01
I am so addicted to your
I am so addicted to your site. I will (hopefully) be getting engaged near the end of the summer and married next may (2011.) For years I have looked at furniture that I would like to have in my future home, knowing that I wouldn't be able to have it in my first home though, for financial reasons being a will be just graduate from undergrad and masters program (23) and one still possible an undergrad student(22). Now I think I will be able to have some of the furniture that I dream about!! I plan on talking to the future fiance/husband tonight about how he feels about doing this project, and possibly others! Thanks so much for an awesome site!!
meghan (not verified)
Mon, 04/26/2010 - 18:10
I just stumbled upon your
I just stumbled upon your site as I was surfing around looking for a storage bed for my new tiny apartment and wondering how on earth I would be able to afford a nice one made from real wood. Your site apparently had the solution to that problem. I was also shopping around for a table with storage space a lot like the one you show here. I love this table but was hoping for something a little taller like a counter or pub height table. Do you have any reccomendations on making it taller?
Jenna (not verified)
Thu, 09/02/2010 - 15:32
I have a coffee table that
I have a coffee table that once belonged to my grandparents. I think I am going to take the legs off & make it into the storage dining table. The plans are so well-written that I think I can do this! Thank you for all of the work you do to bring these plans & ideas to us.
Ana White (not verified)
Thu, 09/02/2010 - 16:11
Jenna, can't wait to see your
Jenna, can't wait to see your new dining table!
Make your own … (not verified)
Tue, 09/28/2010 - 14:32
[...] seen on Ana-white.com
[...] seen on Ana-white.com This entry was posted in Interior Design and tagged dining room table, diy, interior design, make [...]
Amanda (not verified)
Mon, 10/04/2010 - 14:17
Hi Anna! I just started
Hi Anna!
I just started working on this table, and i realized that your first diagram is different from the cut instructions. For the four cut pieces for the legs it says 28 1/2" while in the first step of putting it together it says the height of the legs are 23 3/4" which one is accurate? Assuming that the height of the table is only 30" and the legs themselves are over 4" should we be cutting the legs at 23 3/4" height rather than 28 1/2" ?
thanks!
roxy_gurl189 (not verified)
Sun, 10/10/2010 - 18:59
Figured it out......on the
Figured it out......on the cut list, for the legs, it should be for 23 3/4" NOT 28 1/2"
also, what really helped was buying 4 small metal "L" brackets, and putting them on the inner apron, and attaching the tabletop to the table through those. This allows me to take the tabletop on and off when needed. (for moving, and getting it in and out of doors)
Thanks for the great plans! I will post photos soon, and on to the next project on my long list of saved plans!
Pottery Barn K… (not verified)
Sun, 11/21/2010 - 09:29
[...] to spend $700 for a new
[...] to spend $700 for a new kitchen table. Luckily, I found an amazing website that shows you how to build your own furniture, including this table! I was a bit intimidated at first, but once I got started, I was shocked at [...]
Ashley (not verified)
Tue, 12/14/2010 - 19:29
Ana- thank you so much for
Ana-
thank you so much for this plan! I have wanted this table for the longest time! I have a question though- is there anyway to make a tabletop to fit instead of precut? Where I live the precut tabletops are in the $200 price range and that's for a smaller one. The 48" is more and special order. What materials would we need?
Thanks! :)
Guest (not verified)
Sat, 06/18/2011 - 16:56
Chair plans???
Chair plans???
Guest (not verified)
Sun, 01/15/2012 - 13:36
I want to build this, but
I want to build this, but with a 60" tabletop...would the base support it still??
Kimbelry (not verified)
Mon, 01/14/2013 - 09:49
changing to a coffee table
Hi Ana,
I love your site. Thanks for all you do! Do you think I could use these plans to make a coffee table? Just only have one shelf underneath? Would it be sturdy enough with just one shelf?
Thanks,
Kim
SCLemley0819
Fri, 01/24/2014 - 16:08
Hi Ana!!
I was thinking about making this with a square top but I want two of the sides to drop. My dining area isn't very big but I want to be able to put two people on each side when I need to. Also thinking about making it taller. I have a big dog that can rest her chin on my current table!! Any advice? I haven't built anything before!! This would be my first project.