

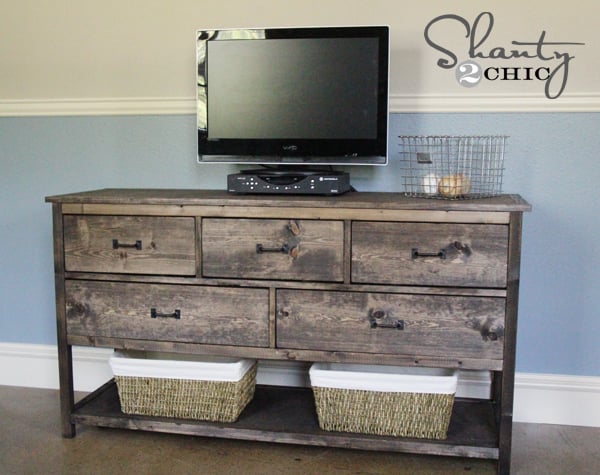
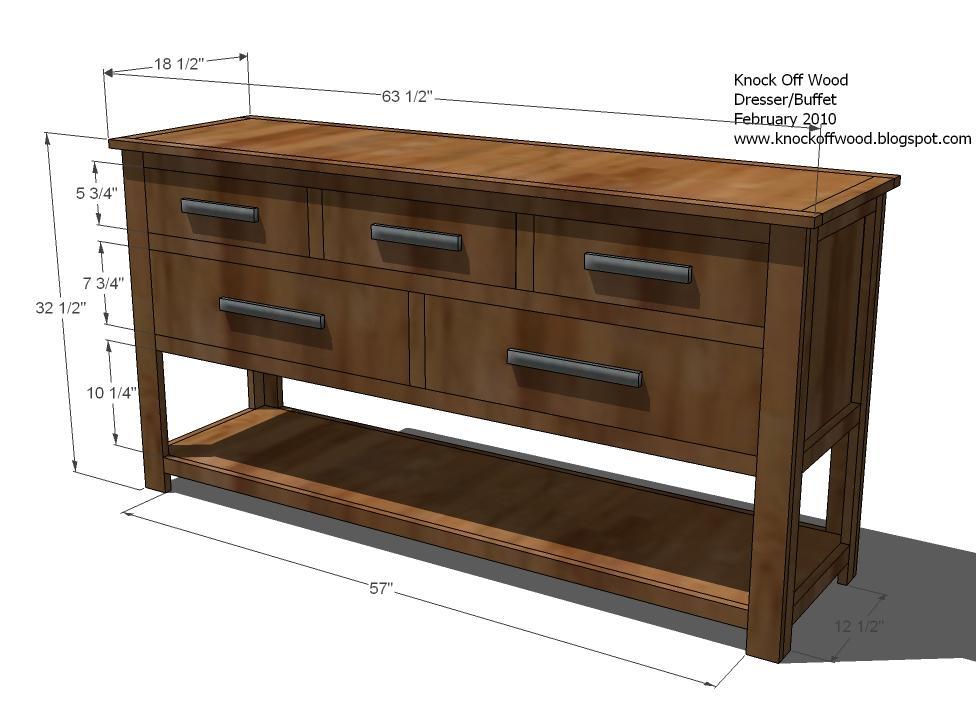
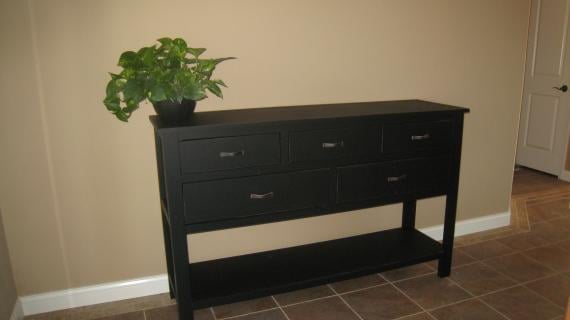
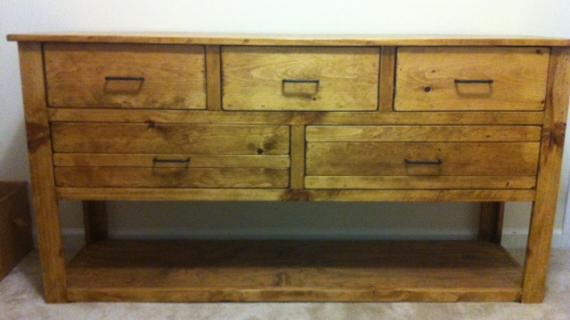
This rustic solid wood dresser features five drawers and one large open bottom shelf. This plan is very similar to this dresser, it differs in that the legs are built using 1x3 and 1x2s in an L shape, instead of a 2x2 leg.
Free step by step plans by Ana-White.com include shopping list, cut list and lots of reader submitted photos.
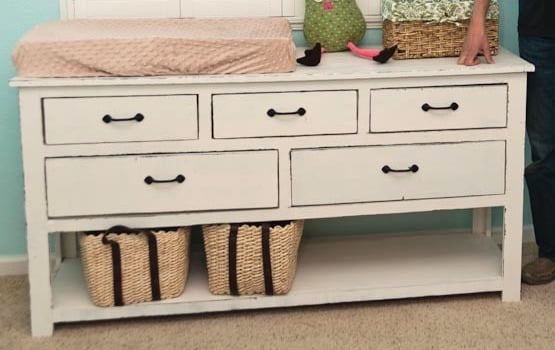
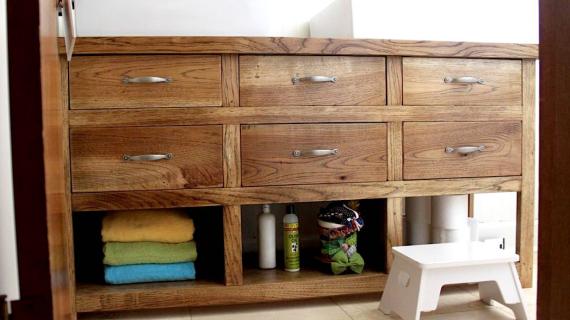
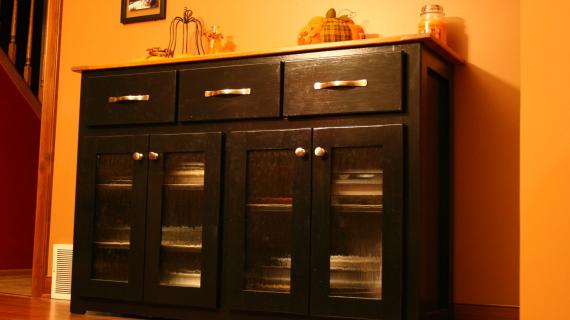
Build photo by DIANAJUNE
See Also - Open Bottom Dresser Plans with 2x2 Legs
This dresser is very similar in style to our 2x2 leg dresser plans, that use metal drawer slides. The free plans for this dresser are here.
Preparation
- 2 – 4′x8′ Sheets of 3/4″ MDF or Plywood, cut into 15 1/2″ wide strips, 8′ long
- 1 – 4′x8′ Sheet of 1/4″ MDF or Plywood (can be a scrap, used to cover the back)
- 2 – 1×3 Boards, 8′ Long
- 10 – 1×2 Boards, 8′ Long
- 1 - 1×6 Board, 8′ Long
- 1 – 1×6 Board, 10′ Long
- 2 – 1×8 Boards, 8′ Long
- 5 – Drawer Pulls or Handles
- 2″ Brad Nails
- 1 1/4″ Brad Nails
- Wood Filler
- Wood Glue
- Sand Paper
- Stain, Paint, Varnish, or other finishing supplies
Box and Legs
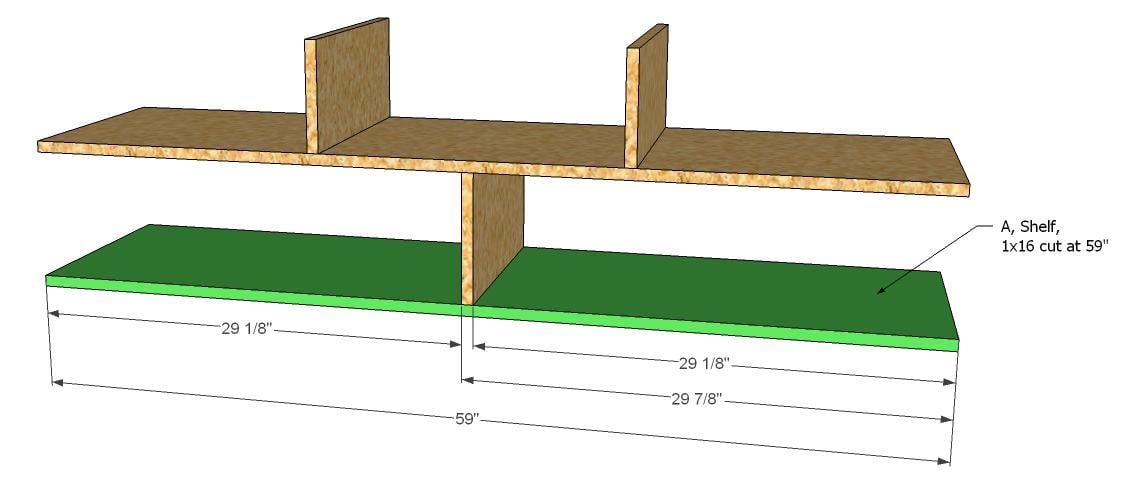
- A) 2 – 1×16 @ 59″ (Shelves for the Drawer Housing)
- B) 1 – 1×16 @ 8 1/2″ (Bottom Partition)
- C) 2 – 1×16 @ 7 1/4″ (Top Partition)
- D) 2 – 1×16 @ 17 1/4″ (Sides)
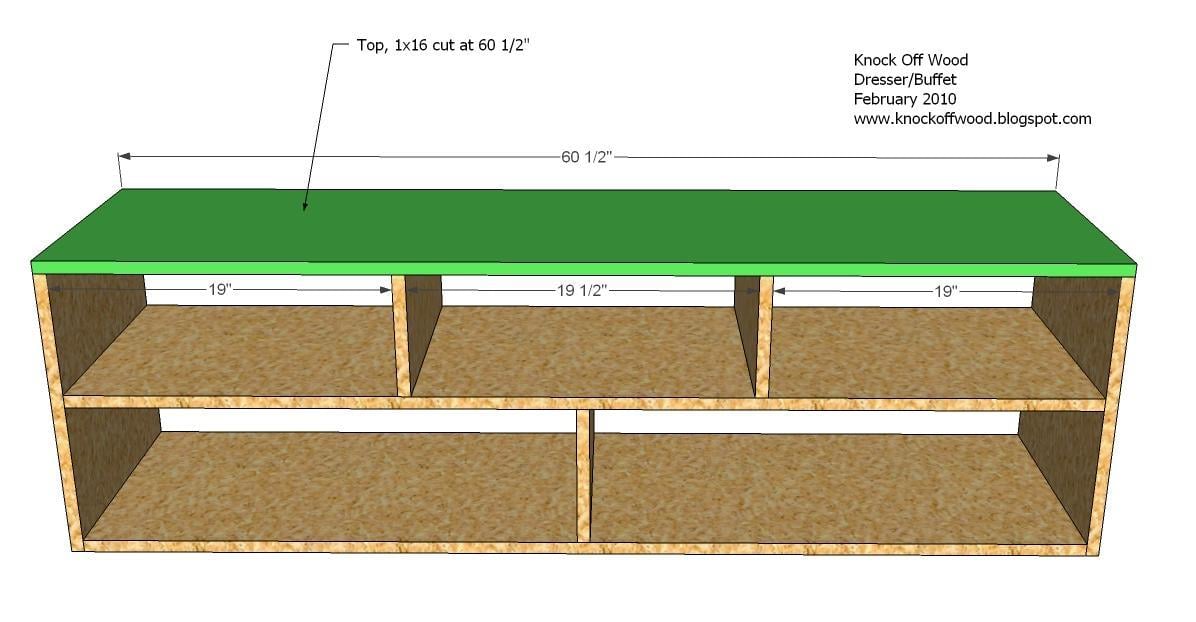
- E) 2 – 1×16 @ 60 1/2″ (Top and Bottom Shelf)
- F) 4 – 1×2 @ 31 3/4″ (Side Legs)
- G) 4 – 1×3 @ 31 3/4″ (Front and Back Legs)
Trim (I always cut my trim as I go to get perfect joints)
- H) 6 – 1×2 @ 12 1/2″ (Side Trim)
- I) 2 – 1×2 @ 15 1/2″ (Top, Ends)
- J) 2 – 1×2 @ 63 1/2″ (Top, Front and Back Edges)
- K) 8 – 1×2 @ 57″ (Front and Back Shelf Trim)
- L) 2 – 1×2 @ 7 3/4″ (Bottom Partition Trim)
- M) 4 – 1×2 @ 5 3/4″ (Top Partition Trim)
- N) 1 – 1/4″ Plywood or MDF @ 18″ x 59″ (You could actually omit this and the piece would be fine)
Drawers - should be cut to fit
- O) 6 – 1×2 @ 15 1/2″ (Drawer Guides) Top Drawers
- P) 3 – 1×16 @ 16 1/4″ (Bottoms of Top Drawers)
- Q) 6 – 1×6 @ 15 1/2″ (Sides of Top Drawers)
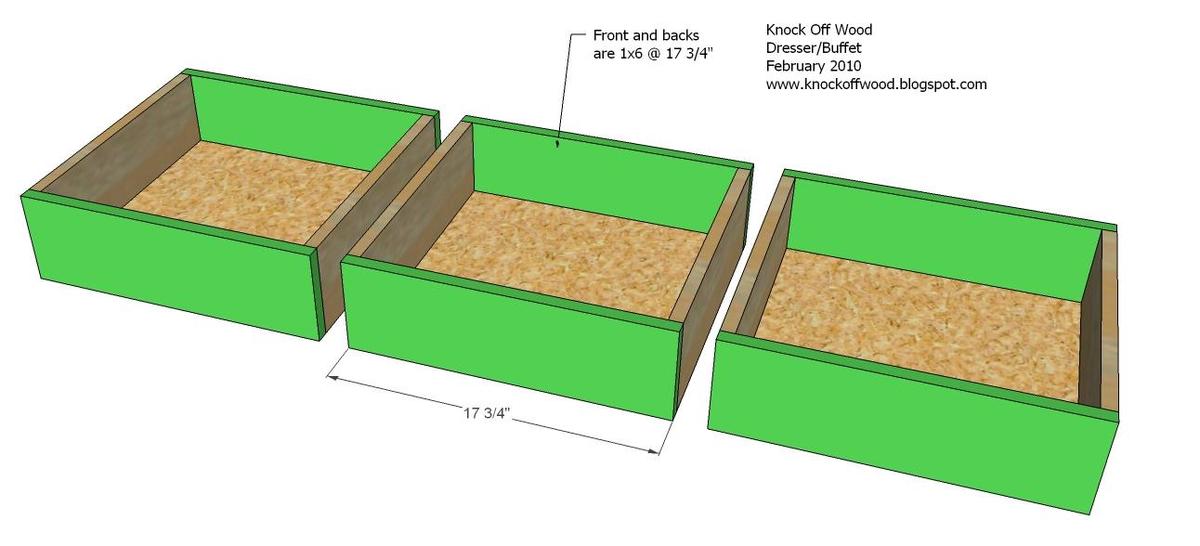
- R) 6 – 1×6 @ 17 3/4″ (Fronts and Backs of Drawers Bottom Drawers
- S) 2 – 1×16 @ 26″ (Bottom of Bottom Drawers)
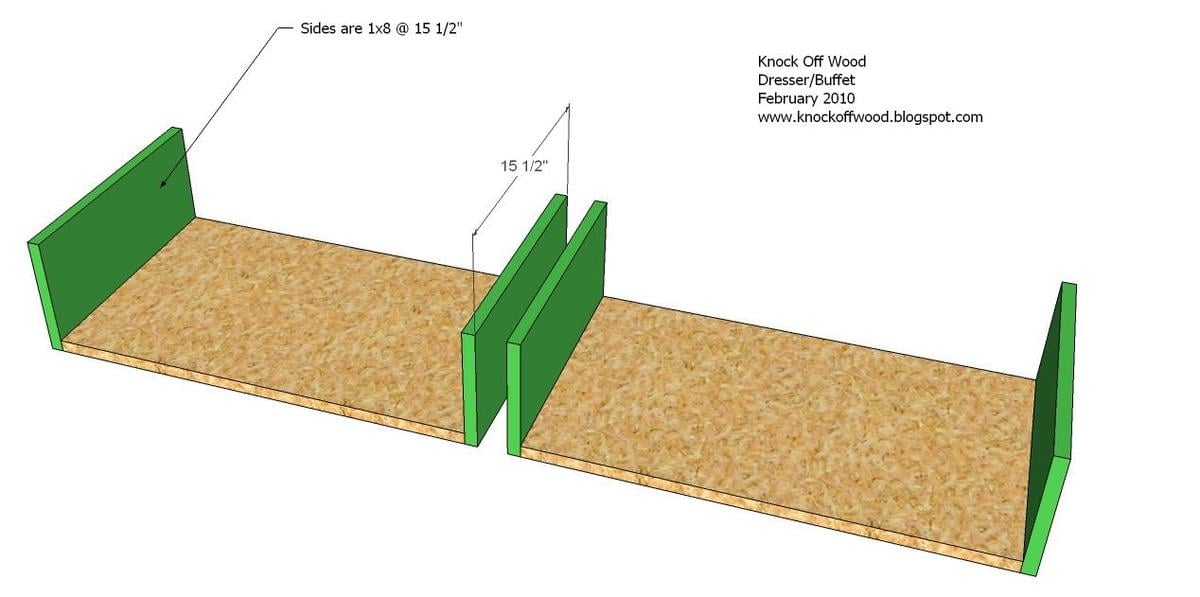
- T) 4 – 1×8 @ 15 1/2″ (Sides of Bottom Drawers)
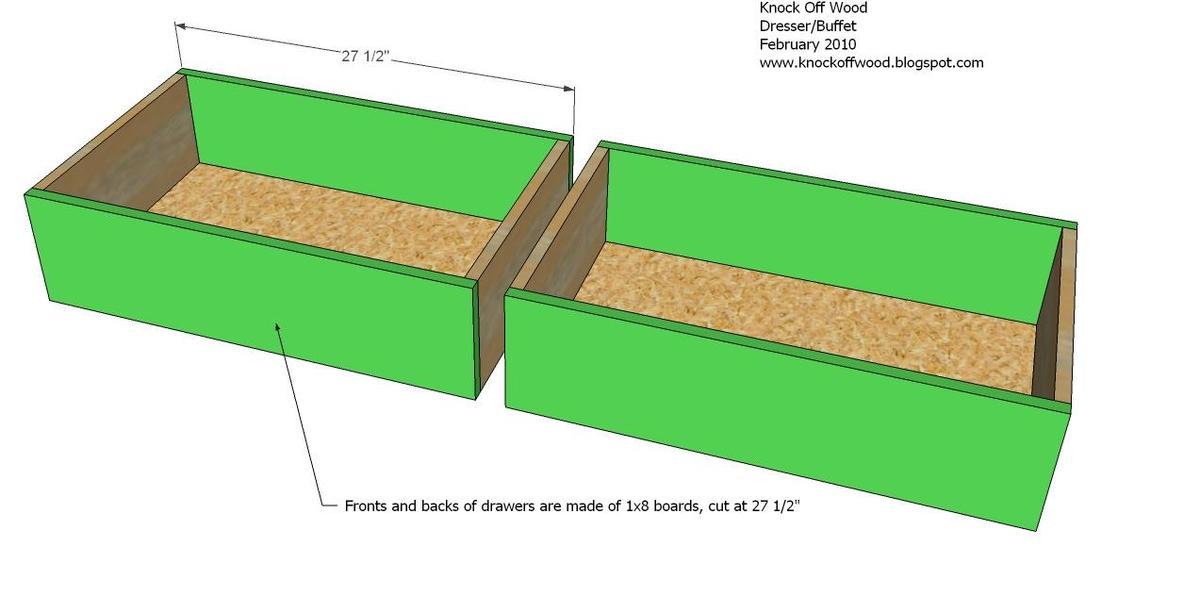
- U) 4 – 1×8 @ 27 1/2″ (Front and Back of Bottom Drawers)
This dresser uses a standard width 1x6 and 1x8 for the drawer fronts. The plan assumes that your 1x6s are 5 1/2" wide and your 1x8s are 7 1/2" wide. Your boards could have a slightly different width, which will create problems with the drawer faces. It is good practice to measure the true width of your boards and adjust the plan to fit your materials.


General Instructions. Use 2″ nails and glue to fasten pieces, unless otherwise directed. Take a square of the project after each step. Work on a clean, level surface. Keep outside edges flush unless otherwise directed. If using MDF, avoid nailing within 1″ of the outer edges to avoid splitting. Cross nail to reinforce whenever possible. Whenever possible, mark out your joints with a square. This will save you time. Be safe and have fun.
Instructions
Step 1
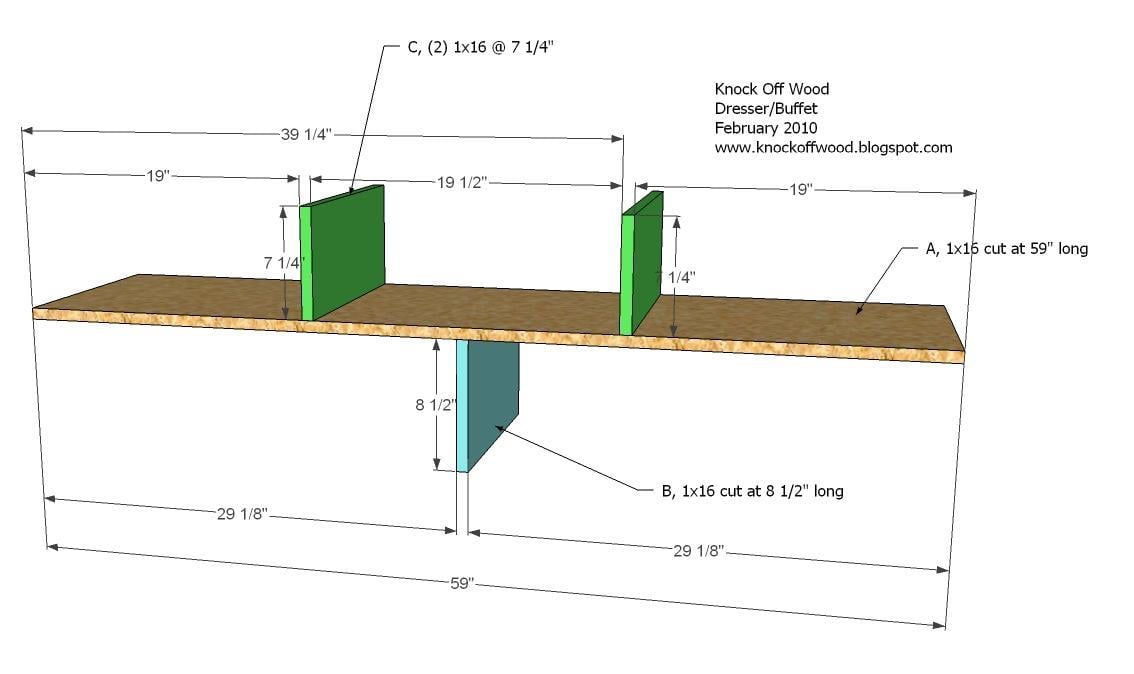
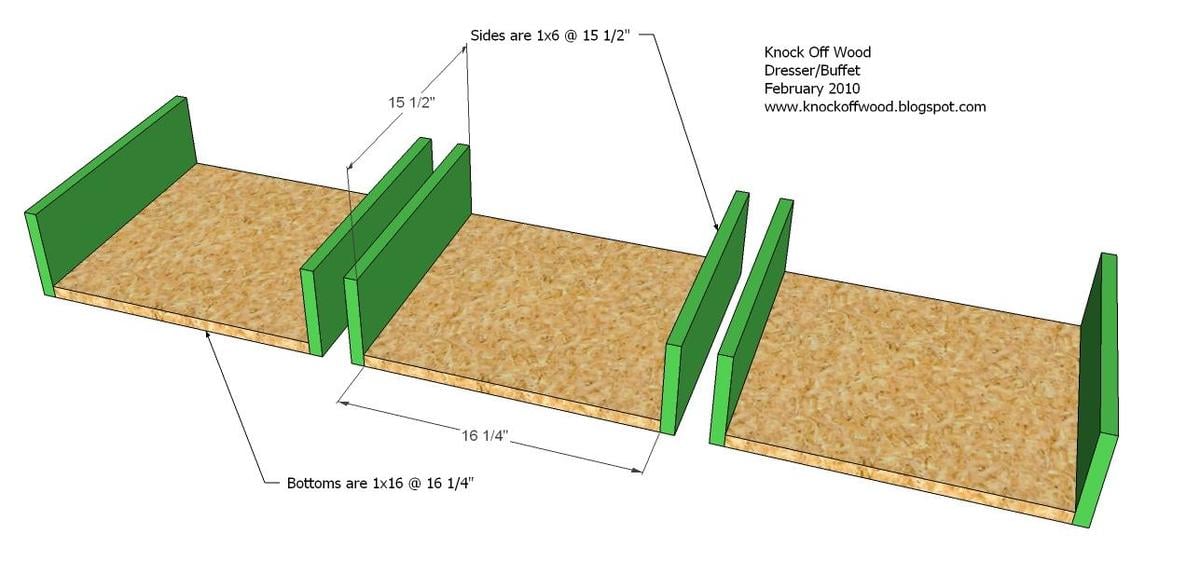
Partitions. Begin by fastening the partitions to one of the shelves, board A, as shown above. Use the meausurements above to guide you. You must be 100% accurate when working with drawers, or your drawers will not slide correctly.
Step 2
Lower Shelf. Add the lower shelf as directed above, using the remaining board A.
Step 3

Sides. Fasten the sides in place, using the measurements above to guide you.
Step 4
Top. I refer to these first four steps as “building the box.” After building countless pieces of furniture, I now know that most storage pieces are simply a ”box” trimmed out to become a bookcase or dresser or other storage piece. This one is no different. Fasten the top in place, using the measurements above to guide you.
Step 5

Step 6
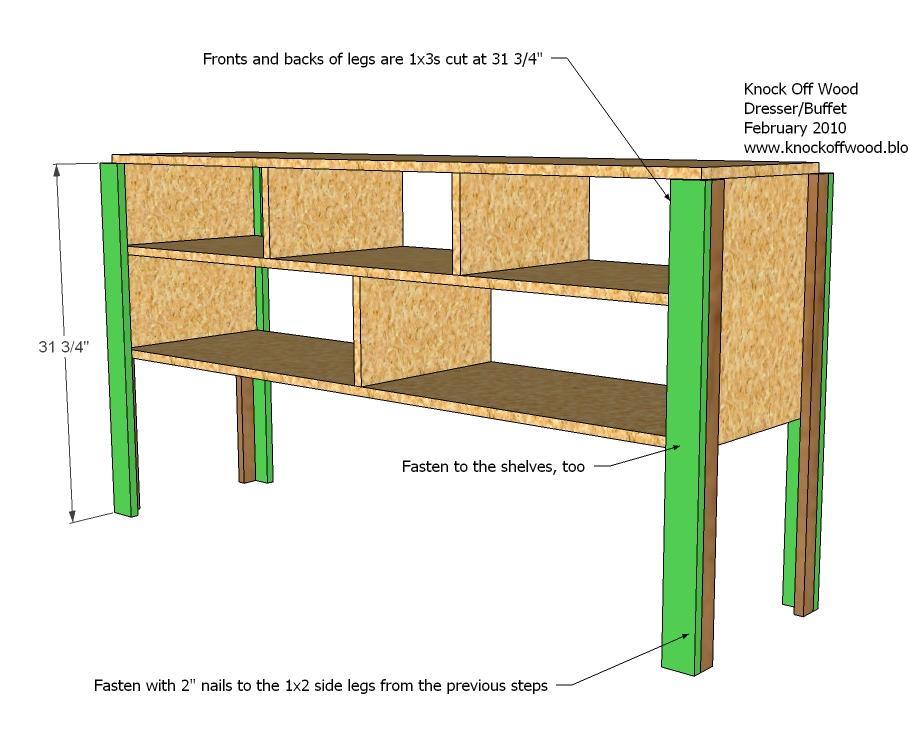
Front and Back Legs. Fasten with the 2″ nails and glue the front and back legs in place, making sure to fasten to the shelves and the side legs. Keep the outside corners of the legs flush.
Step 7

Bottom Shelf. Mark on the legs 2 3/4″ up. This will be the bottom of the bottom shelf. Using the 2″ nails and glue, fasten the bottom shelf in place, as shown above.
Step 8
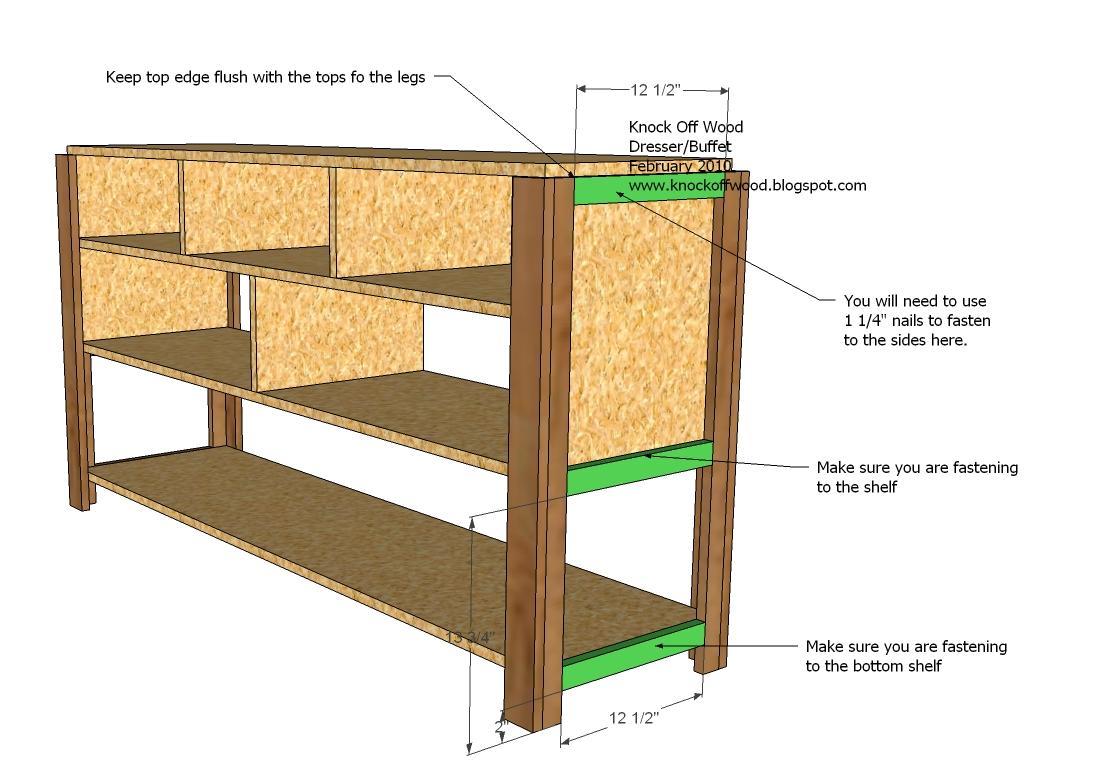
Side Trim. Using the above diagram, fasten the side trim, boards H, to the sides of the dresser. Remember to use 1 1/4″ nails on the top trim piece. Use the measurements to guide the placement, taking note of the top trim piece being flush with the tops of the legs.
Step 9
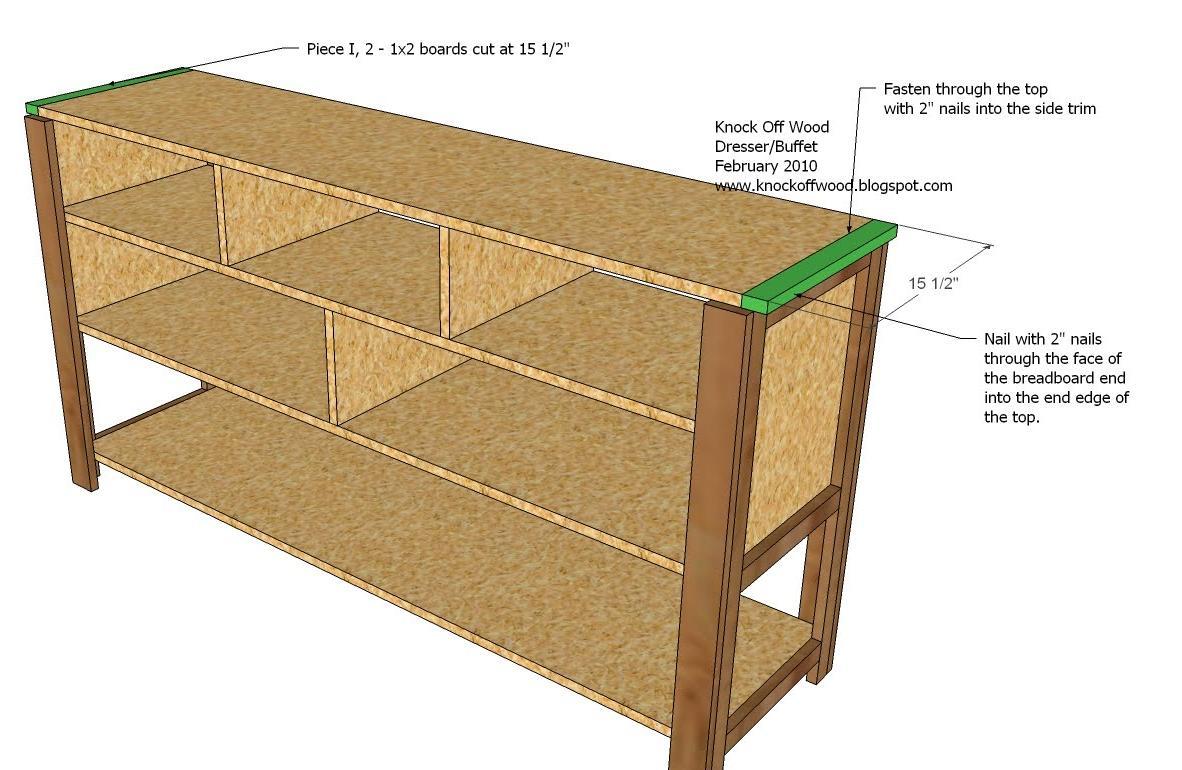
Breadboard Ends. Use boards I to trim out the ends of the dresser top. Follow the above instructions on fastening.
Step 10
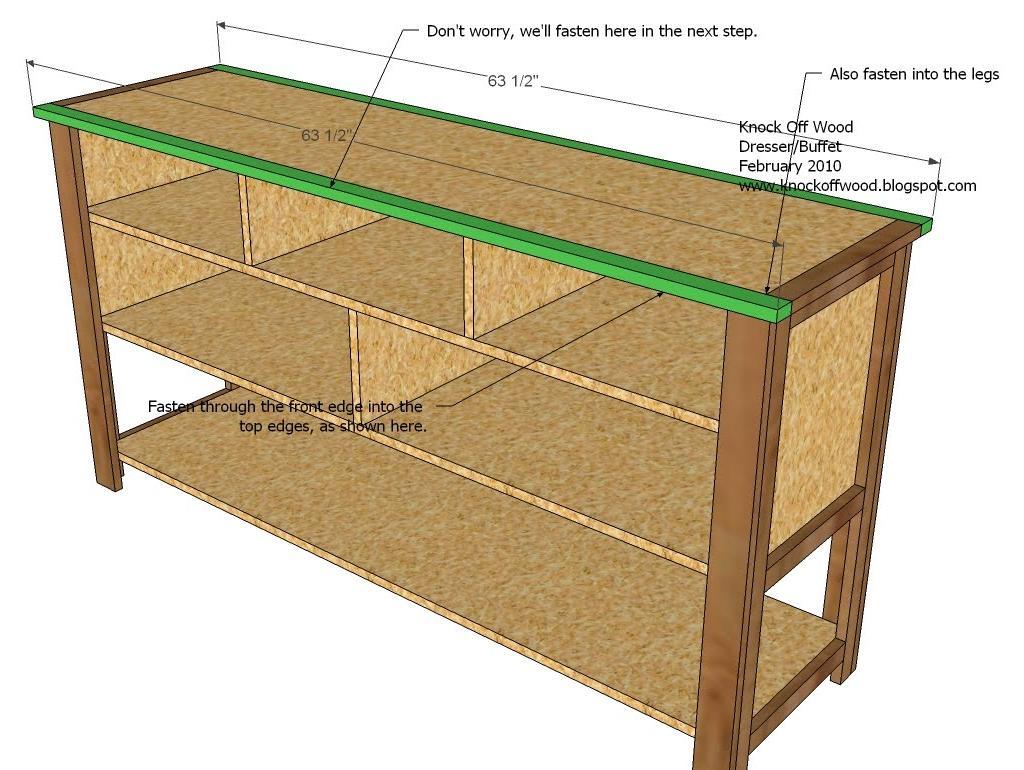
Front and Back Edges. As you did in the previous step, follow the above instructions to fasten the boards J to the front and back of the dresser. Use the 2″ nails to fasten through the face of J into the edges of the top. Also fasten to the legs.
Step 11
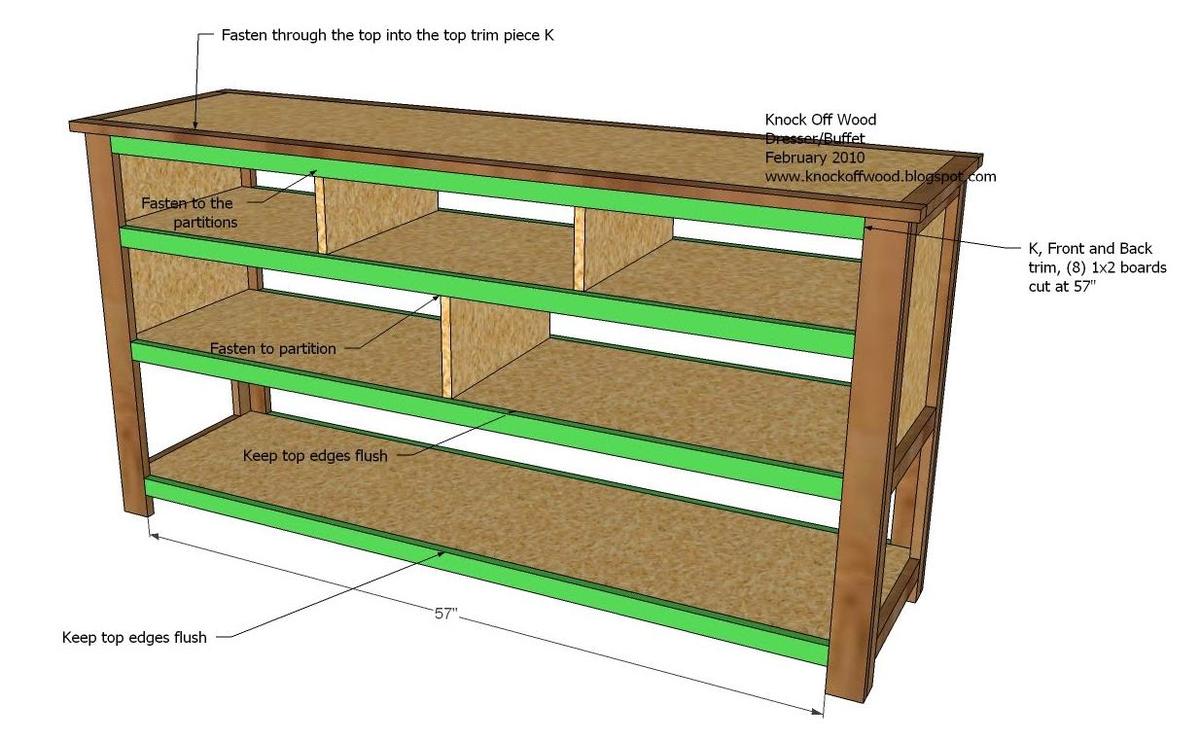
Front and Back Shelf Trim, Boards K. Trim out the shelves as shown above. Notice how both the front and back of the dresser are trimmed. Keep top edges flush.
Step 12

Partition Trim. Follow closely the diagram above to fasten the partition trim pieces, boards L and M, to the partitions. The most important point is the drawer openings must match the above diagram. Again, you will need to do this on the front and back.
Step 13

Back, N. Using the 1 1/4″ nails, fasten the back to the back of the dresser. Avoid nailing where there is less than 1 1/2″ of backing.
Step 14

Drawer Guides, O. The drawer guides just need 2 nails each to keep in place. Use the shorter nails and fasten in place. If you cannot fit your nailer into the drawer opening, you can fasten through the face into the end edges of the drawer guides.
Step 15
Top Drawers, P and Q. Fasten the sides of the top drawers to the bottoms, as shown above. A trick to get your drawers to slide better is to bring the bottom piece up slightly. Then rub vasoline on the drawer sides. The bottoms of the drawer sides act as glides, and the bottom of the drawer is not dragging on the bottom shelf. Just 1/4″ would do the trick.
Step 16
Top Drawer Backs, R. Fasten the backs to the top drawers as shown above. See the final diagram for attaching the fronts.
Step 17
Bottom Drawer Sides and Bottom, S and T. Following step 15, assemble the bottom drawers.
Step 18
Bottom Drawer Back, U. Fasten the backs to the drawers, as you did for the top drawers.
Step 19
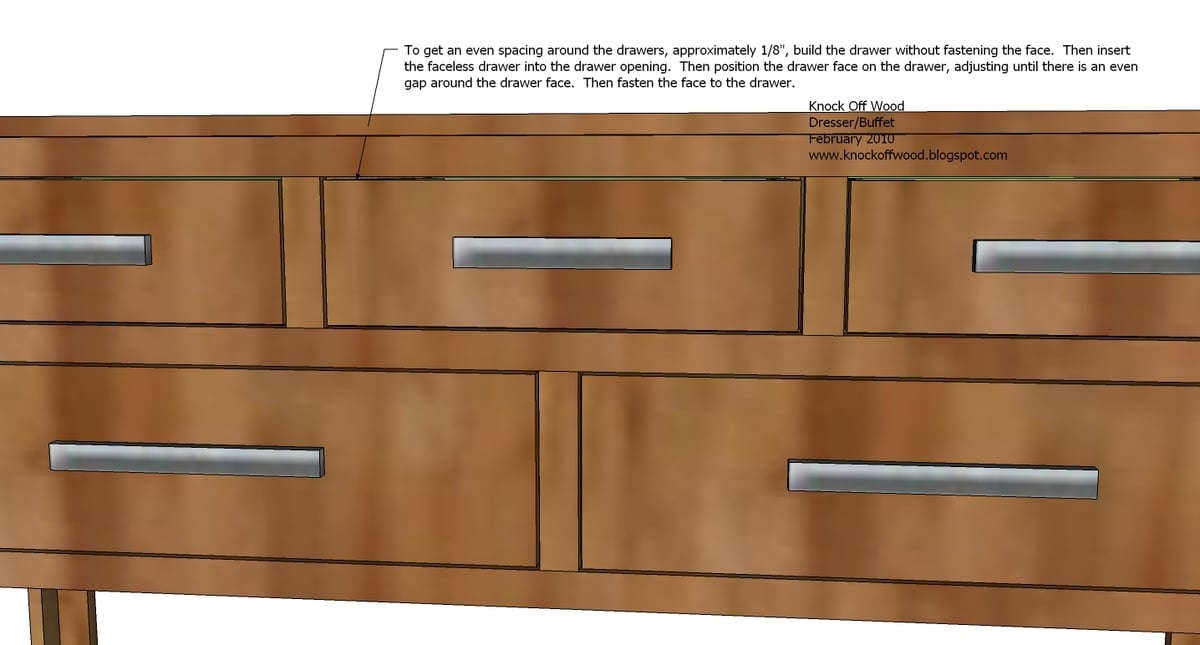
Drawer Faces. Insert the faceless drawers in the correct openings. Position the matching faces on the drawers, keeping approximately 1/8″ gap around the drawer face. As shown above, you want the space to be equal on all sides. When satisfied, use the 2″ nails to fasten the drawer face to the sides and bottom of the drawers.
Comments
Denise (not verified)
Wed, 02/03/2010 - 23:46
Love it! You ROCK!
Love it! You ROCK!
Anonymous (not verified)
Wed, 02/03/2010 - 23:49
plans looks great anna!thanks
plans looks great anna!
thanks a lot!
ljgctn (not verified)
Thu, 02/04/2010 - 02:42
You are so inspiring. I would
You are so inspiring. I would also like to know if you could do plans for the easels that are shown! I gave myself a gift of a compound miter saw just because of you.
Erin @ The Imp… (not verified)
Thu, 02/04/2010 - 04:05
I love it. Well, I love all
I love it. Well, I love all of your plans but I'm a little apprehensive with my skills. When I look at this piece I see a bathroom vanity. Of course you'd have to adjust the drawers for plumbing but that's not such a big deal. Honestly ... this is just what I was looking for in a vanity. Hmmmmmmm ... got me thinking on this one.
christine grove (not verified)
Thu, 02/04/2010 - 04:50
Can you just tell me how you
Can you just tell me how you can be so fantastic? I am so dying to make furniture!!
Carole @ Cross… (not verified)
Thu, 02/04/2010 - 05:09
Wow - I love it! This is
Wow - I love it! This is definitely going into my project file to try once I develop my woodworking skills a little more. Thanks for the inspiration!
Leia (not verified)
Thu, 02/04/2010 - 05:57
Love these plans! I would use
Love these plans! I would use this as a media stand! Could you make some suggestions how to modify the hutch to fit a TV and DVD player. I am really excited to get started.
The Weathered … (not verified)
Thu, 02/04/2010 - 09:00
I posted on facebook and
I posted on facebook and here, I must REALLY love/ want this table. Ana you're so awesome, I know you can do it!
http://www.potterybarn.com/products/norfolk-dining-table/?pkey=csquare-…
Anonymous (not verified)
Thu, 02/04/2010 - 11:06
I'm curious if i'm the only
I'm curious if i'm the only one who cannot access the facebook group - I've tried several searches from 2 addresses using different ISP's and still cannot find it.
could someone please help?
Serena (not verified)
Thu, 02/04/2010 - 12:42
I really like this! I think
I really like this! I think it will go well with the Farmhouse bed. Thanks again for all of the plans you so generously share. You're awesome!
courteneykay (not verified)
Thu, 02/04/2010 - 13:29
You Rock!!! I look forward to
You Rock!!! I look forward to reading your blog every day. I am wondering how to modify it to where it is like the Farmhouse dresser.........
Genie (not verified)
Thu, 02/04/2010 - 13:37
WE've been looking for a
WE've been looking for a buffet for our dining room! This is such perfect timing, I can't wait for hubby to make this! In a red finish it will be so pretty and go with the rest of the house... THANK YOU for posting this! You are quickly becoming one of my favorite blogs!
John (not verified)
Fri, 02/05/2010 - 07:44
AWESOME!
AWESOME!
Lora (not verified)
Sun, 02/07/2010 - 05:33
WOW! Just what I'm looking
WOW! Just what I'm looking for...but I will use it as a bath vanity (inspiration from your FB Page). But, I am horrible with math and not sure how I need to calculate to make it smaller than 62". I need it closer to 50". Also, we just have one sink...so I would gut the middle drawer, correct?
Thanks,
Lora
Amy E. (not verified)
Sun, 02/07/2010 - 07:24
these look awesome, i really
these look awesome, i really hope to build this one!
The Gilje Crew (not verified)
Thu, 02/18/2010 - 10:48
This is great! I think I'm
This is great! I think I'm going to have my father-in-law make this for our babies room. It's deep enough to put a changing pad on top and when baby is old enough it's just a nice dresser w/out being solely meant for a baby room. I like that we can put bins underneath for easy access to toys!
Anonymous (not verified)
Sun, 02/28/2010 - 16:23
My dad and I are almost
My dad and I are almost finsihed building this peice!! After it is painted, I am going to make a cushion for the top and use it as a window bench in my daughter's room! Thanks Ana!
nicolle (not verified)
Mon, 03/01/2010 - 10:55
On this piece... can the
On this piece... can the bottom become drawers instead of storage? If so, can you give me some direction on how to do this? Thanks so much.
Shannon (not verified)
Fri, 03/05/2010 - 08:02
YES, this is lovely! I could
YES, this is lovely! I could see a vanity in this style, too. Too bad PB's cost over 1000 bucks! I saw your farmhouse vanity - and while it's adorable, we are packrats that need storage! LOL Ana, any way you could modify this to accommodate the plumbing under the sink? I'm sure we could eventually figure it out...but since we're newbies I'm sure you'd do it faster and obviously better! Thanks for everything!
Mrs. Foot (not verified)
Wed, 03/24/2010 - 13:42
I love this and hope to make
I love this and hope to make it... but I need something a bit more narrow. If I send an email with our measurements could you tailor the measurements a bit?
Anonymous (not verified)
Sun, 04/04/2010 - 15:59
Are there instructions for
Are there instructions for how to do the drawer glides? Or am I just not seeing it? I am a way newbie on drawers, if there are instructions here that would be great, or direct me to another post. Thanks!
buchanan2211 (not verified)
Mon, 04/26/2010 - 08:02
this dresser is a good one
this dresser is a good one but it cost me $450 so far and i used nice pine wood so if ur doing this and want it to be nice keep that in mind and dont cut ur drawer wood until u get the frame built a couple of the measurements where off on the trim at the top too!
Whitney (not verified)
Wed, 06/09/2010 - 05:21
I have a bunch of 1/2 inch
I have a bunch of 1/2 inch mdf scraps. Do you think the dresser would still be sturdy enough if I used those?
Whitney (not verified)
Wed, 06/09/2010 - 05:23
I have a bunch of 1/2 inch
I have a bunch of 1/2 inch mdf scraps. Do you think the dresser would still be sturdy enough if I used those instead of the 3/4 inch?
Melanie (not verified)
Wed, 06/30/2010 - 10:34
I am going to try and use
I am going to try and use this as a basic outline to make a bathroom vanity, I hope it works out, there are vanities like this at pottery barn that go for like 2000 buckeroos!
Nikki@KreativeKnack (not verified)
Wed, 07/14/2010 - 05:42
This is gorgeous! I think I'm
This is gorgeous! I think I'm going to try it as a tv stand :) thanks!
kellyking (not verified)
Fri, 09/10/2010 - 16:35
I can't wait to build this
I can't wait to build this along with the hutch. I'm going to use it in my dining room along with my farmhouse table that we are building right now. I love this website......