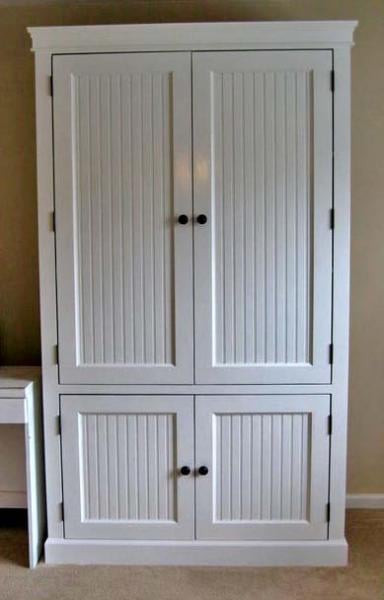


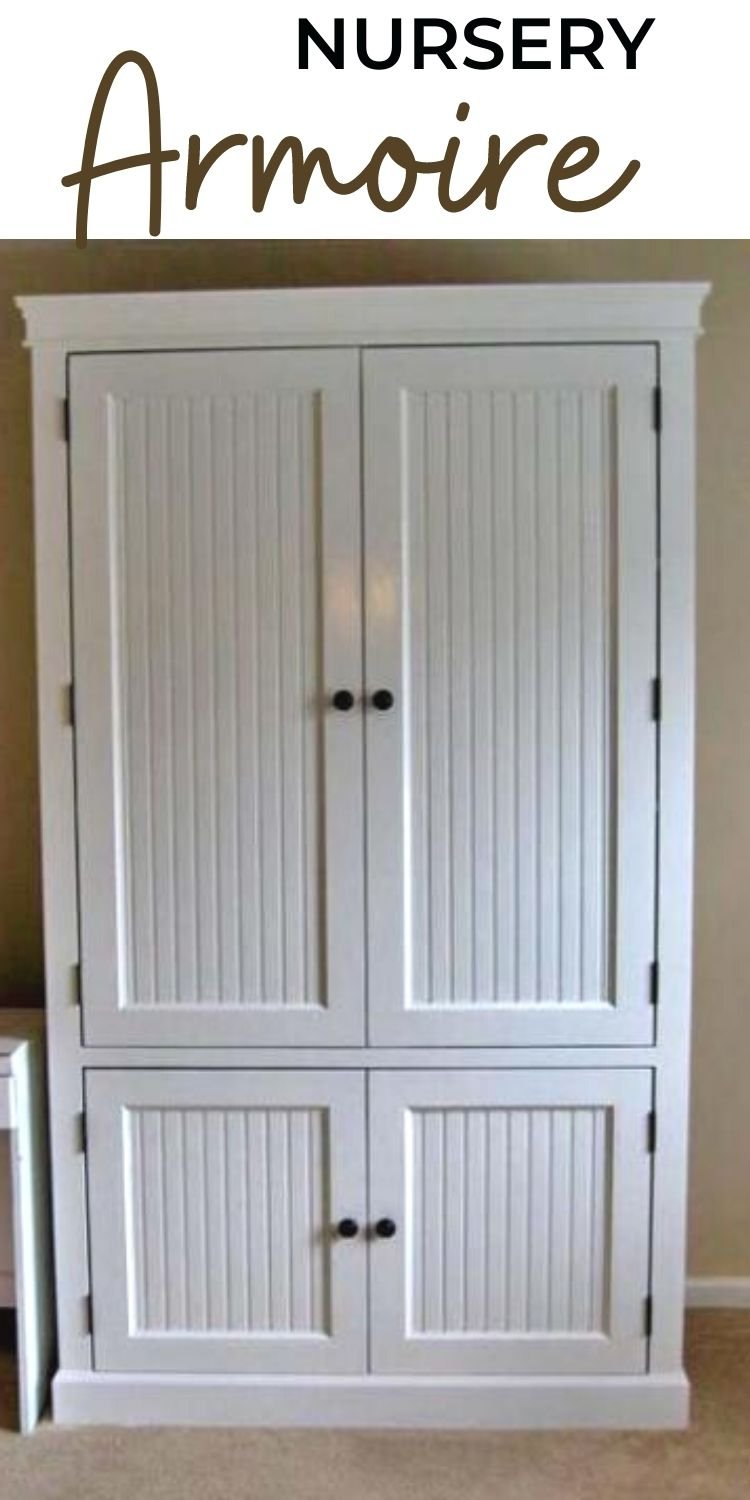
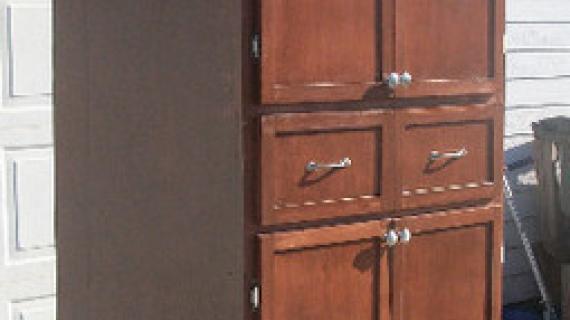
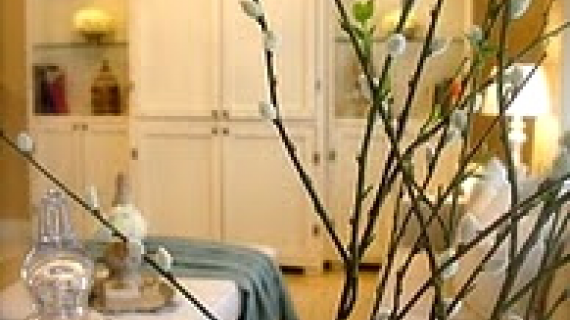
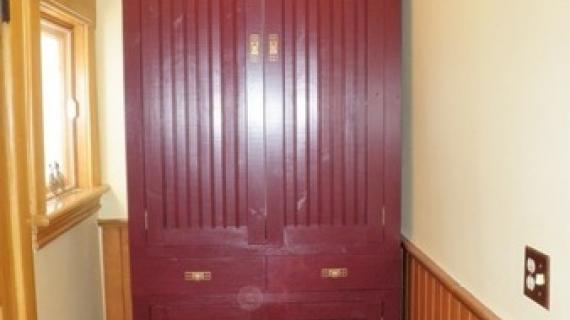
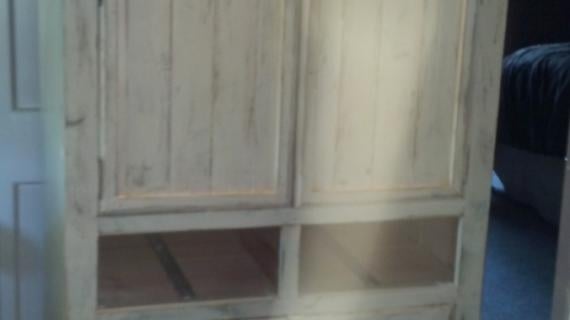
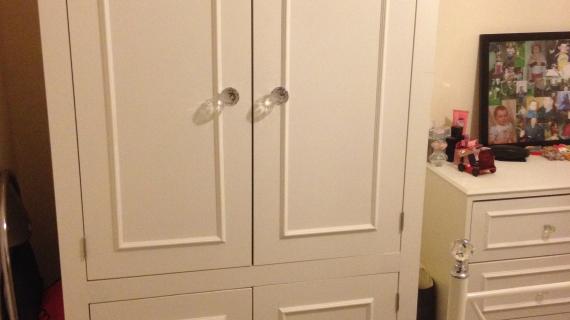
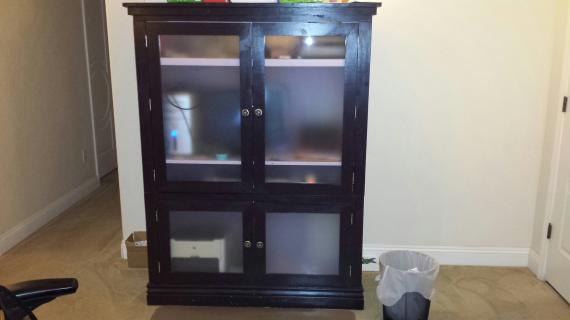
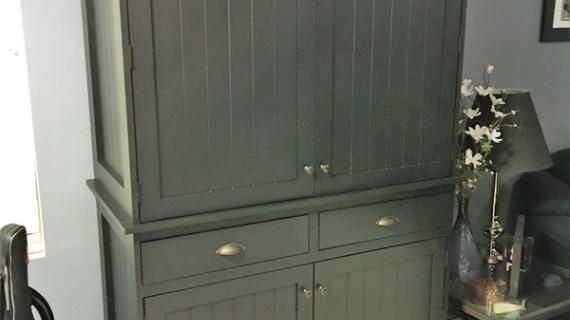
Free plans to build a nursery armoire - step by step directions with shopping list and cut list and diagrams. Lots of reader submitted photos.
Pin For Later!
Preparation
- 2 – Sheets of 3/4″ hardwood plywood
- 1 – Sheet of 1/4″ plywood (for the back)
- 1 – 4'x4' (half sheet) of 1/2" thick hardwood plywood (used for the backs of the doors)
- 1 - 1x4 @ 4 feet long
- 2 - 1x3 @ 8 feet long
- 3 - 1x2 @ 8 feet long
- 1-1/4" pocket hole screws (About 50)
- Wood Filler
- Wood Glue
- 2″ Brad Nails
- 1-1/4″ Brad Nails
- 5/8″ Brad Nails (for the cabinet doors)
- 3 – Sets of Full Overlay Frameless Door Hinges
- 5 – Sets of basic hinges
- 1 - 8′ stick of 5 1/4″ base board molding
- 3 – 8′ sticks of 1/4″ x 2 1/2″ hobby boards for the door detailing
Additional Shopping List for Optional Drawers
- Scrap 1×24, or matching width to the box from the armoire, 3′ or (2) 18′ pieces
- 2 – 8′ 1×6 Boards
- 2- Sets of Undermount Slides
Cut List for the Box
- 1 – 3/4" plywood @ 23-1/4" x 6-1/2″ (Drawer Divider)
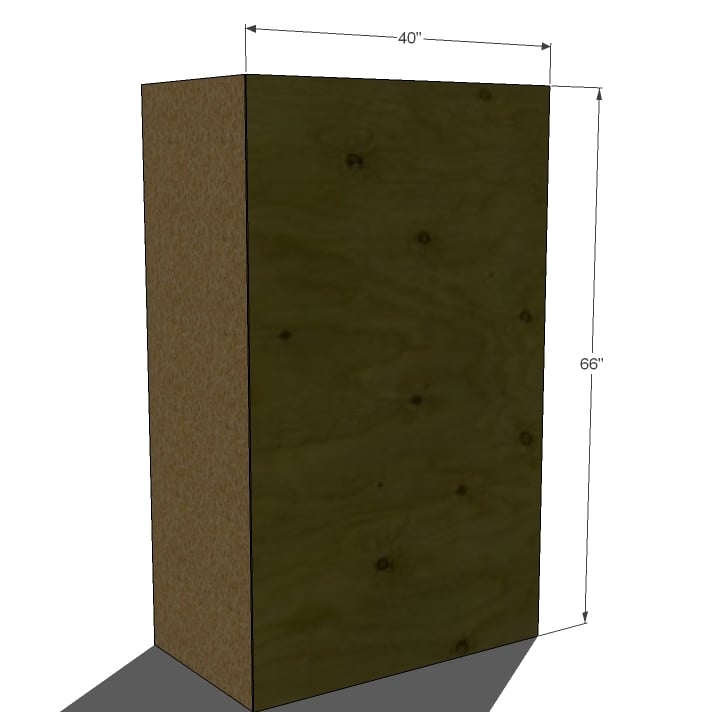
- 2 – 3/4" plywood @ 23-1/4" x 66″ (Sides)
- 4 – 3/4" plywood @ 23-1/4" x 38-1/2″ (Shelves)
Cut List for the Trim - Cut to fit as you go
- 1 – 1×4 @ 40″ (Top Header Trim)
- 2 – 1×3 @ 26-1/2″ (Bottom Side Trim, Fixed) (cut at 62 1/2″ if you want the top trim fixed too, for non-flat folding doors)
- 2 – 1×3 @ 36″ (Top Side Trim, if you choose to have the flat folding doors)
- 2 – 1×2 @ 35″ (Shelf Trim)
- 4 – 1×2 @ 24-1/4″ (Side Crown Trim)
- 1 – 1×2 @ 41-1/2″ (Bottom Front Crown Trim)
- 1 – 1×2 @ 43″ (Top Crown Front Trim)
- 2 – 5-1/4″ Base Moulding, @ 25″ (Longest Points, mitered out on front end) (measure to fit)
- 1 – 5-1/4″ Base Moulding, @ 41-1/2″ (Longest Points, mitered on both ends out) (measure to fit)
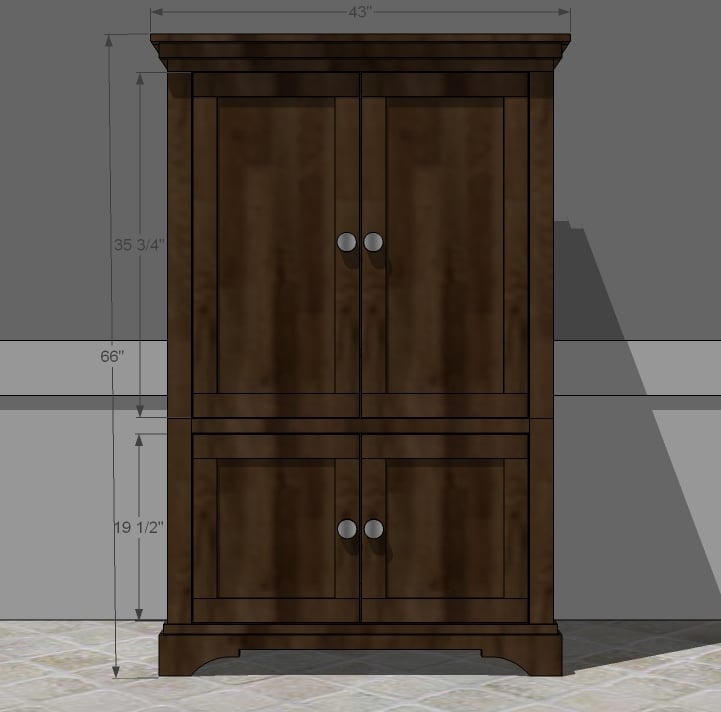
Cut List for the Doors
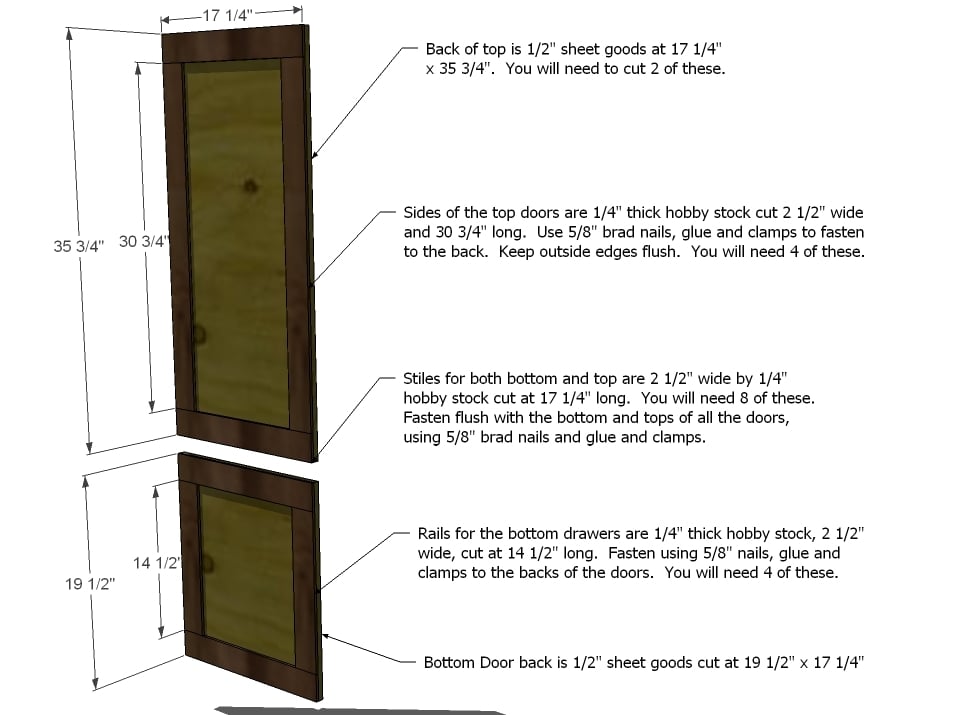
- 2 – 1/2" plywood @ 35 3/4″ x 17 1/4″ (Back of top Doors)
- 2 – 1/2″ plywood @ 19 1/2″ (Back of bottom Doors)
- 8 – 1/4″ plywood x 2-1/2″ wide hobby stock @ 17-1/4″ (Top and bottom trim for all doors)
- 4 – 1/4″ x 2-1/2″ wide hobby board @ 30-3/4″ (Top Sides, cut to measurement)
- 4 – 1/4″ x 2-1/2″ wide hobby board @ 14-1/2″ (Bottom Sides, cut to measurements)
Optional Drawers Cut List
- 2 – 1×24 @ 17 7/8″ (Bottoms)
- 4 – 1×6 @ 17 7/8″ (Fronts and Back)
- 4 – 1×6 @ 22″ (Sides of Drawers)
Rip the 3/4" plywood into strips 23-1/4" wide x 8 feet long.
Then cross cut with a circular saw to the needed lengths.


Work on a clean level surface. Have someone help you rotate and move this project, it’s going to be HEAVY. To decrease expense and weight, you can use a 1×16 or even a 1×12 board width instead of the 1×24. The 1×24 is designed to fit the older TVs. A 1×16 would still be enough room for a hanger to use this as a closet. When working with MDF, predrill the entire length of the screws shaft and use special MDF screws or drywall screws. Do not use wood screws. Always use glue and mark out your joints on both the joint and the outside to assist with build. Take a square after each step. Use proper safety equipment.
Instructions
Step 1
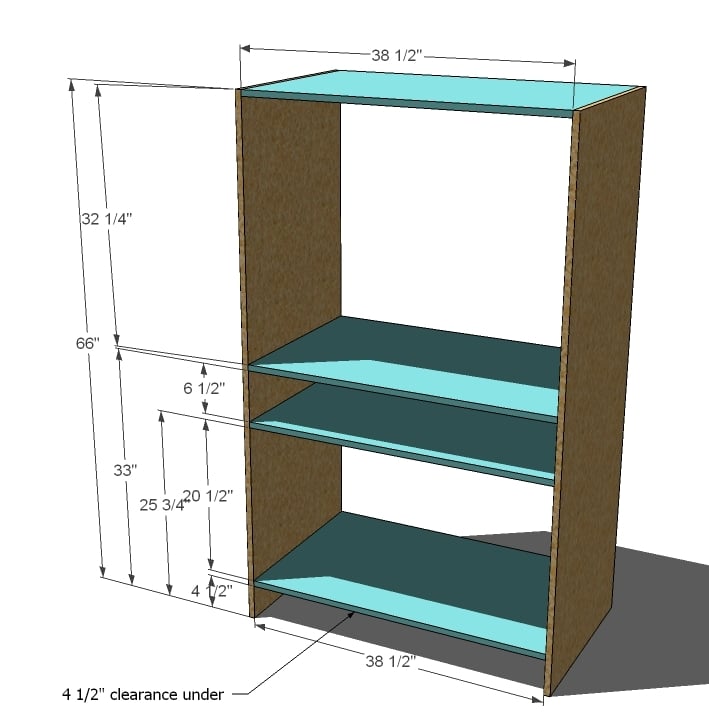
Carcass assembly -
Drill four 3/4" pocket holes on each end of each shelf board. Mark out and attach to the sides of the carcass to create the basic carcass for the project.
Step 2
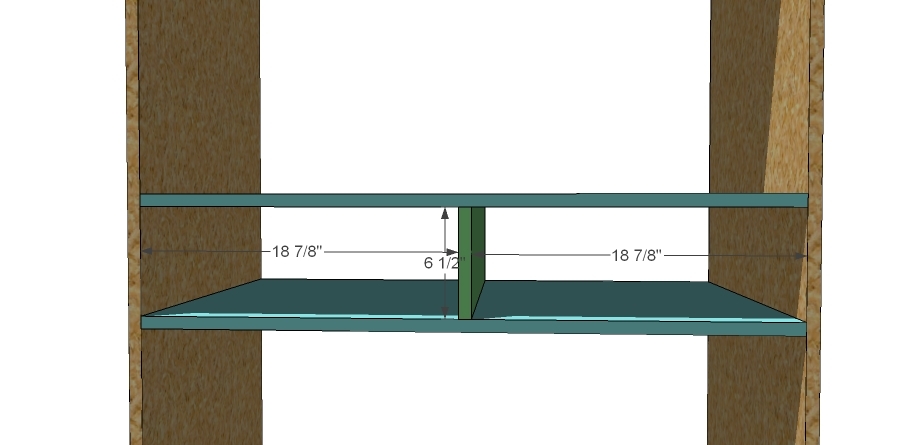
Divider for shelf -
Center the divider between the shelves as shown. Then fasten the divider in place as shown above using glue and 1-1/4" brad nails.
This divider is not just for the drawer housing. It adds strength, helping your shelf carry a heavier weight.
Step 3
Back. Using the 1 1/4″ nails and glue, fasten the back in place. Use the back to square up the armoire.
Step 4

Begin Trim
Start with the header trim. Fasten in place with 2″ nails and glue, to both the top and sides. Then fasten the bottom side trim, also to the sides and shelves. Finally, measure and cut the blue trim above from 1×2 boards, and fasten in place with 2″ nails and glue. Keep edges flush with the tops of the shelves.
Step 5
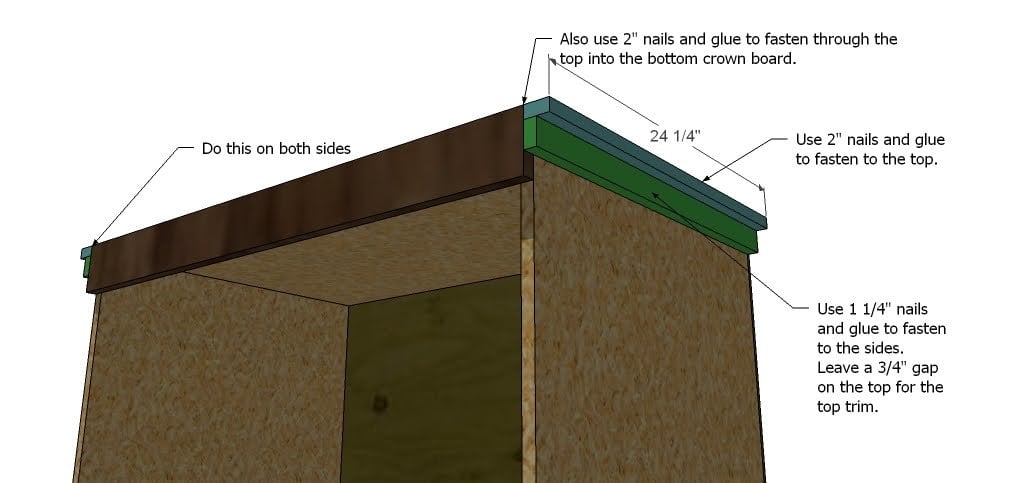
Attach the side crown pieces together and then to the side of the armoire as shown.
Step 6
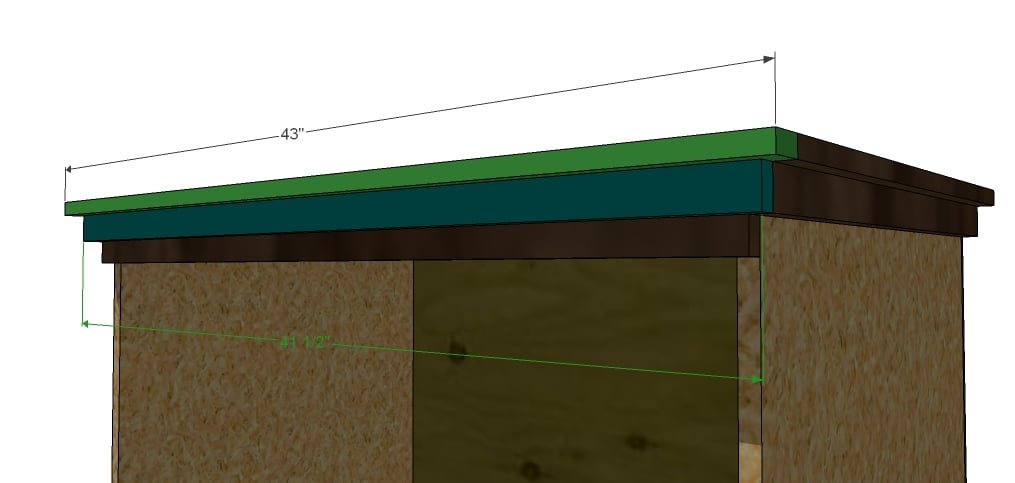
Front Crown Trim
In the same manner as you fasten the side trim, fasten the front crown.
Step 7
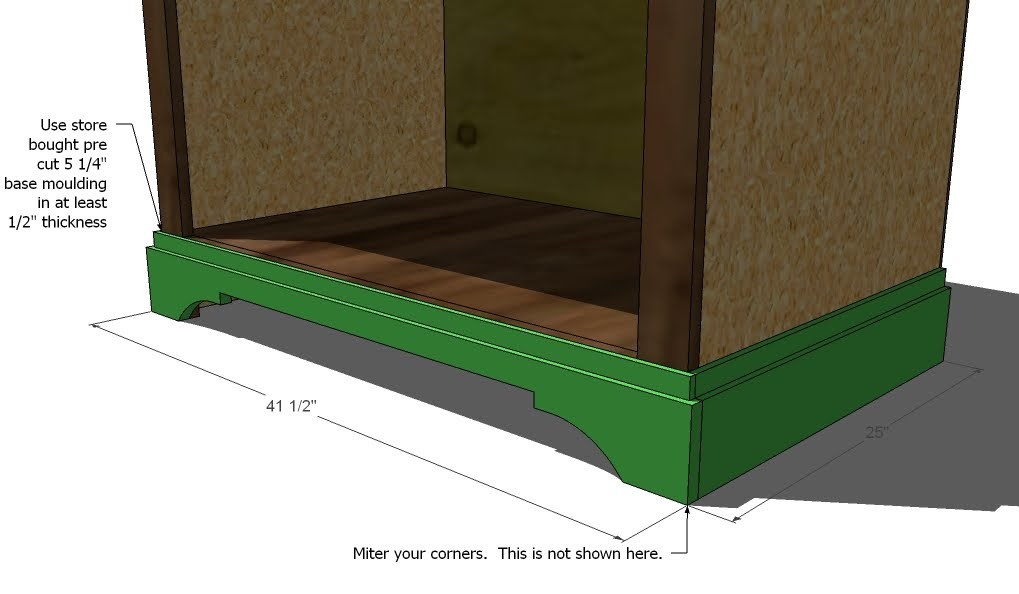
Footer
Mitering your corners, cut the base moulding to fit your sides. Then measure and cut your front piece, mitering out both sides to fit the sides. Use 1 1/4″ nails and glue to attach.
Step 8
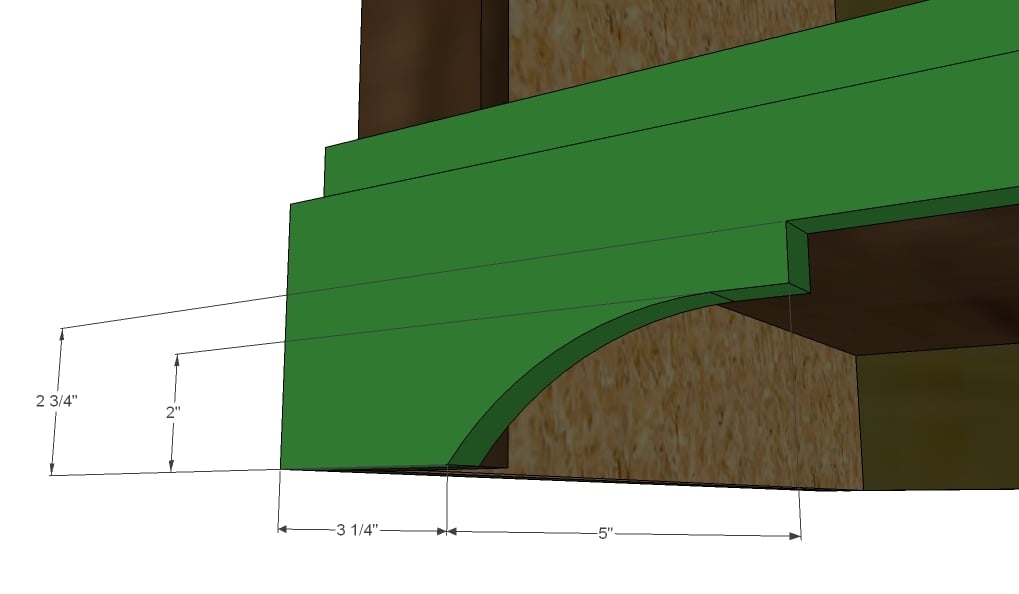
Footer Cutout
Cut out your footer as shown above with a jigsaw.
Step 9
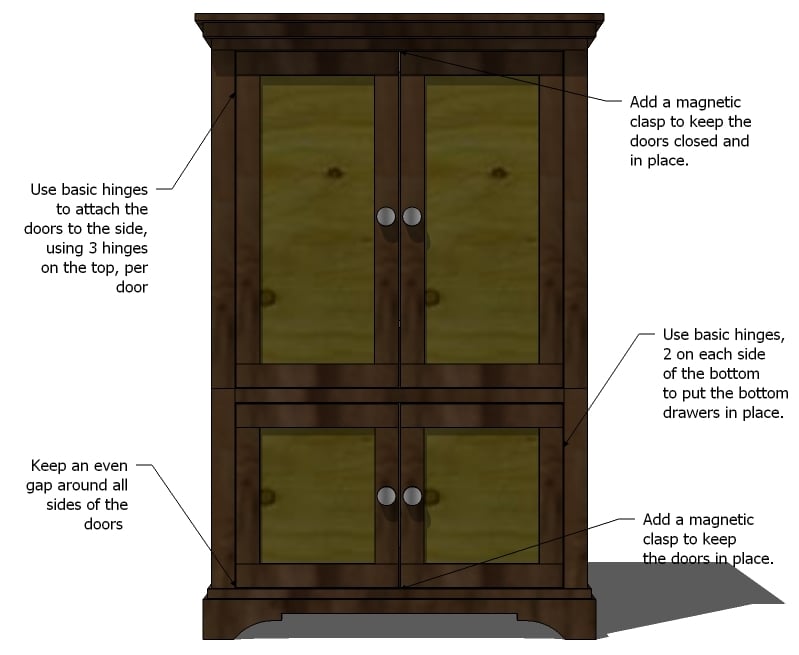
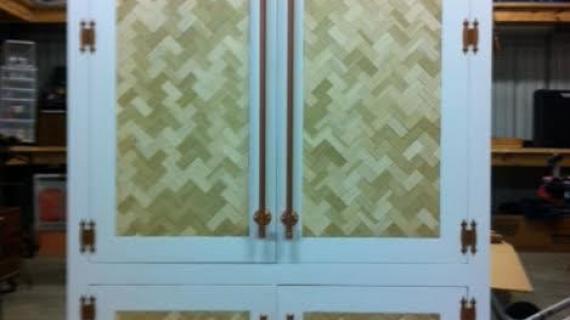
Doors
Cut your door pieces as shown above. Using 5/8″ nails, start by gluing and clamping the tops and bottom trim pieces to each door. Let dry flat. Then add the side trim for all the doors. If you wish to stain this piece, you will need to add edge banding to the visible edges of the doors.
Step 10
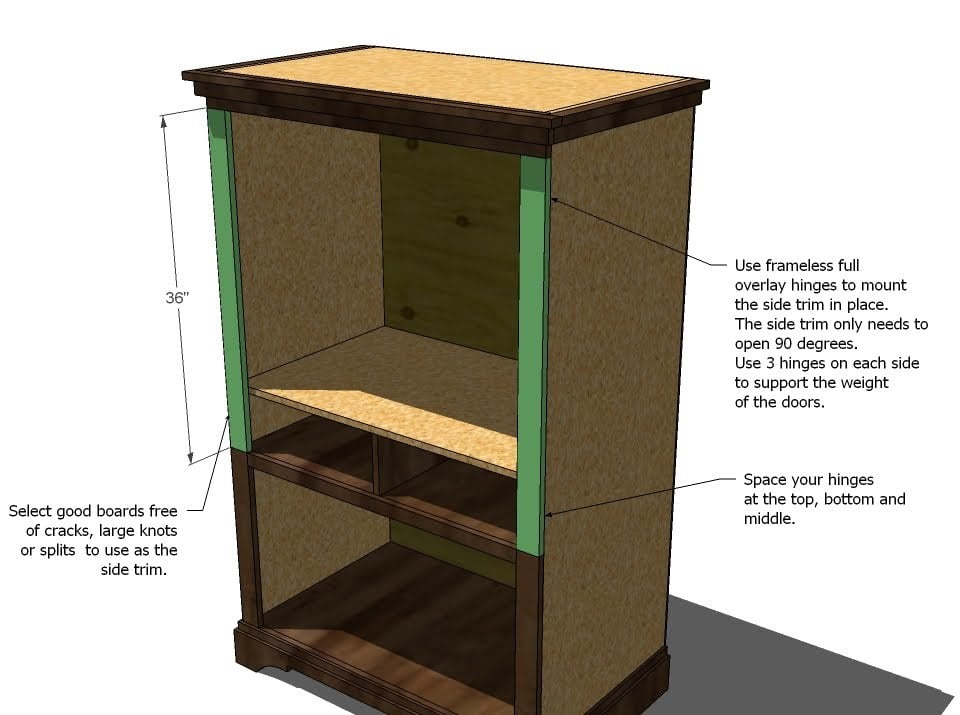
Top Side Trim for Fold Flat Doors. Measure and cut the side trim, approximately 36″. Using framless full overylay hinges, fasten the trim piece in place. The trim will need to extend out 90 degrees when opened. You can use euro style (needs a special bit to install), but there are also other types. The important elements are FRAMLESS, FULL OVERLAY and opens 90 DEGREES or more.
Step 11
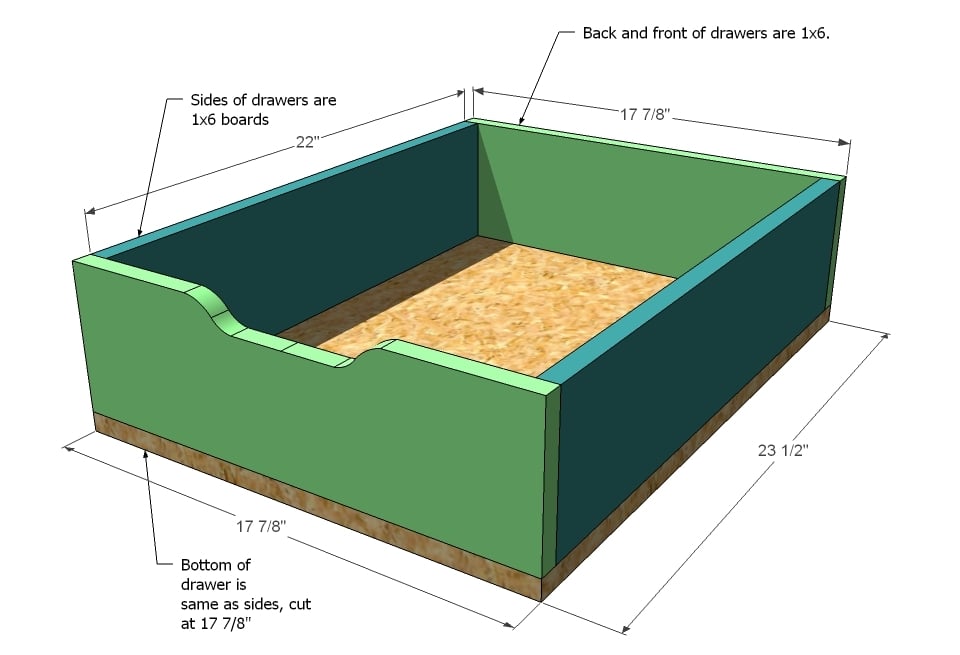
This drawer is designed to work with the flat folding doors. If you choose to have non-flatfolding doors, you will need to cut your drawer bottoms and sides @ 15″. Build your Drawers by fastening with glue and 2″ nails the fronts and the backs of the drawers to the bottoms. Then fasten the sides in place, with glue and 2″ nails, to both the bottom and the sides. Mount in the openings using undermount drawer slides.
Step 12
Fill any holes with wood filler. Let dry and sand and finish as desired. If you are staining, you may need to add edge banding to any exposed plywood edges.

Comments
Viola (not verified)
Thu, 03/11/2010 - 09:38
Thank you so much Ana. This
Thank you so much Ana. This is great. I was just trying to think how to build one this morning for our bedroom. You are so awesome!
bundle#1 (not verified)
Thu, 03/11/2010 - 09:41
I really like this!! And I
I really like this!! And I love the layout of this post. Good job. :)
Isabel (not verified)
Thu, 03/11/2010 - 09:45
Like they say: What doesnt
Like they say: What doesnt kill you makes you stronger! What good-looking post! I love it, it would look so awesome in my bedroom and would give me the so needed storage!!
Ananda (not verified)
Thu, 03/11/2010 - 09:48
Love your idea for including
Love your idea for including a way to see the "real" version. Brilliant!
Erin @ The Imp… (not verified)
Thu, 03/11/2010 - 10:02
Very nice ... and thank you
Very nice ... and thank you for showing me where I can buy it for $1,400 but I'd rather spend $200 to make it!
(wink, wink ... nice job on pleasing the lawyers)
Karene (not verified)
Thu, 03/11/2010 - 10:05
I love the way you are
I love the way you are approaching this whole PB thing. It is so funny just to follow your blog just to read what you will politely say but at the same time saying, UH hello, seriously!
Keep up the awesome work and empower people to get back to the basics of learning how to do things themselves. It iss a major lost art.
I started a blog on simple gourmet cooking to empower people to cook like a chef. I can not imagine if, we"ll say WS... tried to tell me to stop. What about all the other informative blogs who teach how to make boutique items ect. CRAZY!
Goings on at t… (not verified)
Thu, 03/11/2010 - 10:08
I agree with Erin and Ananda.
I agree with Erin and Ananda. Making everyone happy! I love this piece too. I so can't wait to have our own house and more room to fill with beautiful functional furniture. BTW we just finished the simple beds to bunk beds and will be working on setting them up in the kids room soon. Can't wait to show you! They are bright red too!
Lea (not verified)
Thu, 03/11/2010 - 10:15
As if seeing your gorgeous
As if seeing your gorgeous and inspiring designs wasn't enough to keep me coming back again and again and again, now I'm going to come back just to see how you deal with that big ol' bully. Good for you girl. BTW...I burned all my Pootery Farm and Price Be-damned catalogs.
ShOrt StoRy (not verified)
Thu, 03/11/2010 - 11:02
All I can say is WOW....you
All I can say is WOW....you are one talented lady and I want to thank you, Thank you, THANK YOU for sharing your plans for all the expensive inspired brands!!!
First two things on my list: Collector's bookshelves for my two sons, and the toddler farmhouse bed for by daughter!
Oh and another thing....I literally stayed up until 1 am going through your entire sight, THEN woke up at 3:30 so inspired I came back to the computer to look some more! Don't ever go away, I don't know what I'd do without you!!!! plus I am an idiot when it comes to measuring and you make it so easy and non-intimidating!!! I will be sure to post asap of my upcoming projects!
Laree (not verified)
Thu, 03/11/2010 - 12:01
Love this idea! my sister has
Love this idea! my sister has something similar for her tv - for $2000!
And I love the new layout. I think it's even better with the aprox. cost, time, skill level. You go girl!
Mia (not verified)
Thu, 03/11/2010 - 12:33
Your revamp is fab! Thank
Your revamp is fab! Thank you for all the wonderful plans. I am excited about this plan. The doors particularly. I wonder can they be adapted for other pieces? Keep up the fantastic work.
Rachel (not verified)
Thu, 03/11/2010 - 12:49
Love the new look and
Love the new look and feature: ABOUT.
It is so helpful to know the skill level and possible cost before broaching my hubby about the plans:)
Thanks for all your great plans.
Tammy James (not verified)
Thu, 03/11/2010 - 13:34
Hi Ana, I really like the
Hi Ana, I really like the about you have added and wanted to say the way you have handled your legal issues with the pricing and link are most clever and impressive. Well done and thank you.
slowknitter (not verified)
Thu, 03/11/2010 - 14:09
Hi Ana,I've been lurking,
Hi Ana,
I've been lurking, reading all of the plans, thinking maybe I could attempt something simple like the rustic bench. After the brouhaha with WSI, I'm definitely stepping out of my comfort zone and giving furniture building a try.
Anonymous (not verified)
Thu, 03/11/2010 - 14:55
Ana you are too cute! I just
Ana you are too cute! I just love how you roll with the punches! L.O.V.E the new post layout. It is kinda sarcatic, and I like that!
Anonymous (not verified)
Thu, 03/11/2010 - 15:23
Hey Ana, I am having a good
Hey Ana, I am having a good laugh going through the comments on the post about the letter you received. Does Pootery Barn think that they are the originator of all this simple furniture? Maybe their finishes and a few details are something new that they came up with, but other than that I don't think they are originators of the farmhouse table or an armoire! They would even have to give that credit to someone else! So the fact of the matter is you could make plans all the live long day and more than likely somebody somewhere can find something similiar that another company makes. I think all the people that have commented saying that you are in the wrong are just upset that they paid full price for their piece of furniture and they have none of the satisfaction of saying I built it myself!!
Anonymous (not verified)
Thu, 03/11/2010 - 16:49
Hooray for the continued
Hooray for the continued postings! I'm a big fan of your site.
-Sara B
Brooklyn NY
Kristi M. (not verified)
Fri, 03/12/2010 - 10:36
Holy Cow this armoire could
Holy Cow this armoire could not have come at a better time. I have been wanting to find one of these for a long time. More like buy one but now my husband and I are going to take on this project soon for our tv. I am SO excited and want it like, yesterday. He is even totally on board and thinks it is an awesome idea. He looked at the plans and mentioned how they were easy and straightforward. I can't wait. I will definately send pictures when that happy day comes. Thanks for the awesome plans and your ability to roll with the punches.
Heather (not verified)
Fri, 03/12/2010 - 11:17
Love this one!!!Ana, I don't
Love this one!!!
Ana, I don't have a facebook account, and I wanted to offer up a suggestion for a future project: a tansu - type bookcase, as in this photo:
http://s3.amazonaws.com/atimg/1228935/031010-stica6_rect540.jpg
I hope this is okay to do in the comments.
Brown Sugar Babies (not verified)
Fri, 03/12/2010 - 12:17
This is fabulous!!! I would
This is fabulous!!! I would love to see you create something for us crafters! The furniture/storage units are SO EXPENSIVE!!! I scrapbook, rubber stamp, paint and sew!!LOL I'd go broke trying to buy storage units for all of my hobbies.
Brittnei (not verified)
Fri, 03/12/2010 - 12:39
You are so wonderful :) Look
You are so wonderful :) Look at what did! http://youhavegottobe.blogspot.com/2010/03/you-aint-gonna-believe-this-…
Barefoot Liz (not verified)
Fri, 03/12/2010 - 12:48
I can't wait for warmer
I can't wait for warmer weather so I can star building outside.
Nicki (not verified)
Tue, 05/04/2010 - 08:07
I have this printed out to
I have this printed out to use as a pantry in my kitchen. This is EXACTLY what I have been looking for. Add a few more shelves to each layer & it will be perfect!!!!!!
Nursery Armoir… (not verified)
Mon, 01/31/2011 - 08:27
[...] in Brag Blog Put on
[...] in Brag Blog Put on my TO-DO List Save as PDF Print this PostShare/Bookmark Builder: Suzanne Experience Level: Some Experience Estimated Cost: $300 Estimated Time Investment: 30 hours From Plan: http://ana-white.com/2010/03/plans-beautiful-nursery-armoire.html [...]
Olivia’s Armoi… (not verified)
Sat, 02/19/2011 - 05:58
[...] so much in love with
[...] so much in love with their price. As you may know from past posts, I got these amazing plans from Ana White that shows me step by step how to make the exact same armoire. Since I put Olivia’s bed in [...]
MrsD2008
Tue, 04/19/2011 - 19:42
Once again...
I am so flippin' happy I found your site! (Keep reading for the good part that actually goes along with this project).
I showed my husband the Laundry Basket Dresser and told him I wanted to put it across from the washer/dryer in my laundry hallway (we live in a ranch--LOOONNNGGGGG but skinny house, thus I have a laundry hallway instead of a laundry room). We measured and I thought there would be enough room, but he said it was too tight and I trust him. So we stood there trying to think of a solution, because this is a project I really wanted to do.... (and I totally didn't think he'd support my plans, but it's nice that he is) We have this awkward tall cabinet right next to the dryer that we use for food storage. It's tall and skinny and just weird. It's split into three cabinets so it's not even a real pantry. I said, what if turn this into a bigger project, would that be okay? He said, sure....so we're going to demo those cabinets and use that area for the laundry basket dresser. We measured that area and we're going to be able to take off the cabinet doors and cabinet bottoms, but keep the two side structure pieces to build upon for my laundry basket dresser! It will be the stacked design and I will be able to fit all 6 baskets.
After deciding that was the way to go, I jumped on here to find a plan for an armoire type cabinet that we could build upon to make into a pantry with smooth roll out shallow drawers to store our food goods. You have to understand, this is something I have been asking for FOREVER. So, I found these plans which are going to work awesome (according to hubby, who is going to have to help me with this one because of the alterations). So, to make a long story short--THANKS SOOOOOOOOO much for making this website!!
guest (not verified)
Mon, 07/25/2011 - 19:31
Drawers
Did anyone have trouble with the drawers? I am building this piece by piece in sketchup so I will know exactly what to do when I build with wood. When I use the dimensions given the drawer is too big for the opening. What size do they need to be in order to use the undermount?
Rolando Arroyos
Thu, 03/26/2020 - 11:27
Doors
i know this is an old post, not sure if anyone will respond but is the plywood used on the doors sandwiched between the 1/4" hobby stock and then a trim piece all around?