


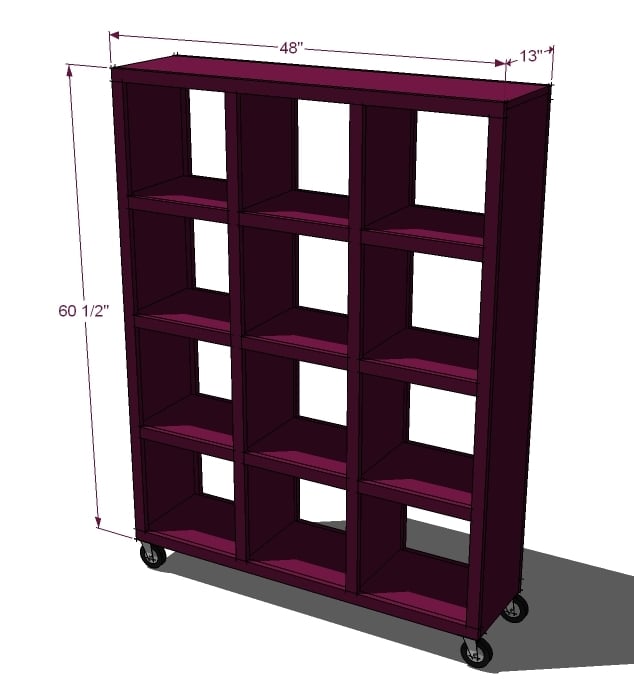
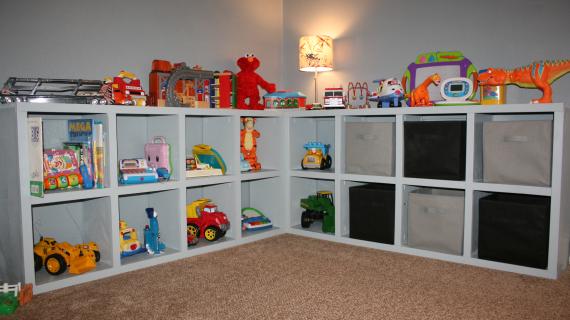
Cubby shelves are so loved because they enable you to further divide down your storage spaces. This simple cubby was transformed by one of our amazing readers into this outstanding storage playroom.


Preparation
10 – 1×2 Boards (pine boards are about $1 each)
5 – 1×12 Boards (pine boards are about $9 each) OR 2 Sheets of 3/4″ A1 Plywood or 3/4″ MDF
Wood Glue
Wood Filler
2″ Nails for finish nailer
1 1/4″ Nails for finish nailer
5 Caster Wheels, shown in diagrams with a 2 1/2″ diameter, with screws
Sand Paper
Paint, Stain, Varnish or other finishing supplies
Cut List for the Box
2 – 1×12 @ 59 3/4″ (Sides)
4 – 1×12 @ 46 1/2″ (Shelves)
1 – 1×12 @ 48″ (Top)
8 – 1×12 @ 14″ (Dividers)
Cut List of Trim (recommend to cut to measurements for exact fit)
4 – 1×2 @ 48″ (Top and Bottom Trim)
8 - 1×2 @ 57 1/2″ (Side Trim and Divider Trim)
18 – 1×2 @ 14″ (Shelf Trim)
3 – 1×2 @ 11 1/2″ (Wheel Supports)


Work on a clean level surface. Mark out joints prior to fastening. Take a square after each step to ensure your project is square. Use glue and 2″ nails unless otherwise directed. Wear saftey gear and take necessary safety precautions. If you are working with sheets of plywood or MDF, have your hardware store cut your plywood or MDF into strips that are 8′ long and 11 1/2″ wide. These will become dimensionally the same as a 1×12 board. If you are working with MDF, avoid nailing close to edges to avoid splitting your MDF whenever possible. You can alternately use drywall screws for MDF or wood screws for wood.
Instructions
Step 1

Composition for Paint or Rustic Stained Look is pine boards in 1×12 width for the “box” and pine 1×2 boards for the trim
Composition for “Framed in Solid Hardwood” Look is 3/4″ A1 plywood in choice of hardwood (ie Maple) cut into 1×12 strips (11 1/2″ wide) with hardwood 1x2s for the frame.
Composition for Economical Painted Finish is 3/4″ Particle Board or MDF cut into 11 1/2″ wide strips, framed in 1×2 MDF or pine boards.
Step 2

Build the box. Start by marking out the sides where the shelves will be fastened. It is a good practice to mark on both sides of the shelves to mark where to nail. Remember that the shelves are 3/4″ thick. Leave a 3/4″ gap under the bottom of the bottom shelf as shown above.
Step 3

Dividers. In this step we are just going to fasten the dividers in so they don’t move. The trim will actually hold the dividers in place. Start by marking your shelves and top where the dividers will go. Remember that the dividers are 3/4″ thick.
Starting on the bottom shelf, fasten the bottom dividers to the bottom and first shelf. Working your way up, fasten the next level of dividers in place. This time you will only be able to fasten through the shelf on the upper shelf. On the lower shelf, you will need to nail at an angle through the front edge of the shelf into the ends of the dividers. Do this on the remaining dividers. Use 2″ nails and glue. Remember, we will add more support in the frame to the dividers.
Step 4

Bottom and Top Trim. Check for square. Then using 2″ nails an glue, fasten the bottom and top trim in place. Make sure you fasten to any vertical dividers, whenever possible. Keep outside edges flush. Do this on the front and back.
Step 5

Step 6
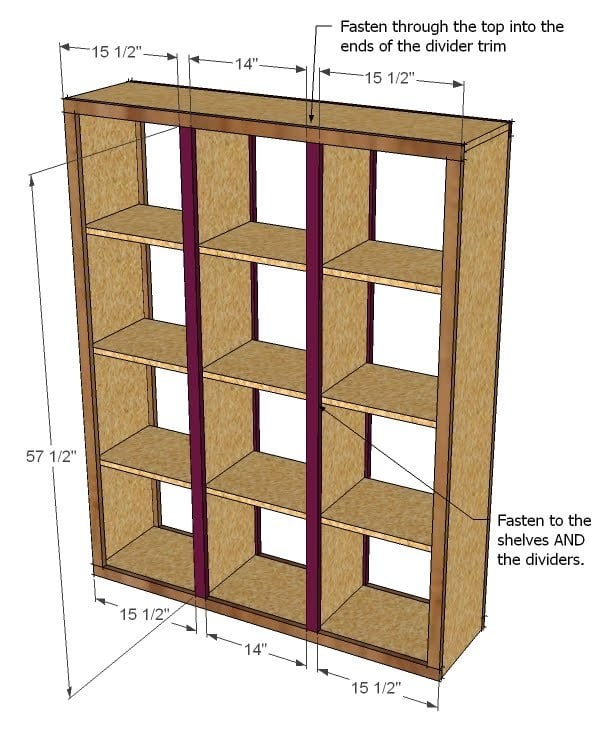
Divider Trim. Measure and cut your divider trim. Mark the bottom and top trim boards as shown above. Fasten the divider trim to the dividers, as shown above. The trim will be centered on the dividers. Make sure you fasten to the shelves too. Use 2″ nails and glue. Do this on both the front and back.
Step 7
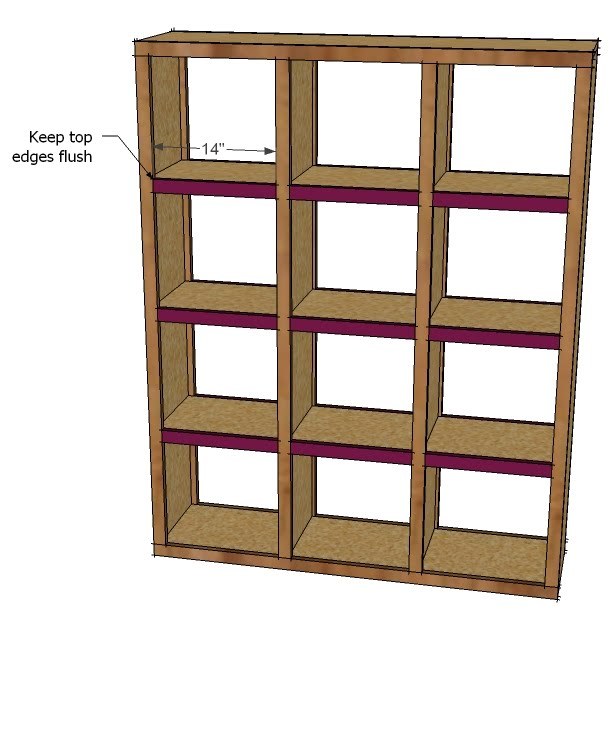
Shelf Trim. Measure and cut your shelf trim, keeping top edges flush with the tops of the shelves as you fasten the shelf trim in place. Use 2″ nails and glue. On the ends, fasten through the side trim into the ends of the shelf trim.
Step 8

Wheel Supports. As shown above, fasten the wheel supports to the bottom of the piece. Then attach your wheels to these support pieces.
Step 9
Finishing. Fill nail holes with wood filler and sand and finish as desired.
Comments
Jenny (not verified)
Thu, 03/18/2010 - 19:25
Very Clever!
Very Clever!
Viola (not verified)
Thu, 03/18/2010 - 19:54
Wow, I sure can think of a
Wow, I sure can think of a lot of uses for these. Playrooms, kids rooms, family rooms, craft rooms, etc. Thank you Ana!
renata (not verified)
Thu, 03/18/2010 - 19:57
Hi Ana you make all the
Hi Ana you make all the instructions very easy to follow and they look even better, so thanks for all your hard work, will post back when have completed project no1!
Shirley Varela (not verified)
Thu, 03/18/2010 - 20:01
Nice shelves. Would be great
Nice shelves. Would be great in a playroom.
Love that picture of Shirley Temple!
Mary (not verified)
Fri, 03/19/2010 - 02:10
Oh I love it! It looks like
Oh I love it! It looks like it would be very reasonable to make too, with so few materials!
One question: Have you ever considered doing the wooden peg system for shelving like IKEA uses? I am very leery of going in at an angle- I'd be afraid of wood splintering and mishaps of all sorts, lol. I am thinking of how I can make these without the angled nailing.
Erin (not verified)
Fri, 03/19/2010 - 03:23
You read my mind! We looked
You read my mind! We looked at a house last week that had me thinking about how to turn Expedit shelves into built ins. This is in my bookmarks for when we finally find a house! Thanks, Ana!
Leslie (not verified)
Fri, 03/19/2010 - 04:33
I have this magazine too, and
I have this magazine too, and I love that section. How 'bout those curtain, huh? Awesome............
Thanks for another great plan. This may be just the thing for the dressing room in my house. You rock!
Anonymous (not verified)
Fri, 03/19/2010 - 05:16
Can 1 1/4 and 2 inch brad
Can 1 1/4 and 2 inch brad nails be used?
Ana White (not verified)
Fri, 03/19/2010 - 05:36
Hi Mary, you can use dowels
Hi Mary, you can use dowels if you want, just make sure you line up the dowels perfectly. A couple of thoughts here from someone who has built a lot of furniture. Toenailing (nailing at an angle) is very easy to do, I usually hold my nailer backwards. But more important is that you do not need much support in the tonailing step. notice how when you put the trim on it covers the dividers and the shelves? This trim holds everything in place and adds to the overall strength. The trim is what holds the dividers in place, and the toenail just makes your life easier before you fasten the trim in place.
Brad nails tend to refer to an 18 gauge nailer instead of a 16 gauge finish nailer. You may need to use a few more nails, but your should be fine. Just use glue, that's what really holds everything together.
Melissa (not verified)
Fri, 03/19/2010 - 06:53
Yay! I've been waiting for
Yay! I've been waiting for you to do the expidit shelving for a while now. I really want to make one of these to store all of our daughters extra toys in.
savvy_homegirl (not verified)
Sat, 03/20/2010 - 04:45
In case there's any cheaters
In case there's any cheaters out there (like me) that are on the fence whether to buy or build.. EXPEDIT shelving - the 4 cube & 8 cube - is on sale this weekend at IKEA in Burlington, ON (maybe everywhere??).
The 8 cube is $59 instead of $99 and the 4 cube is $39 instead of $69.
subversivecynic (not verified)
Thu, 03/25/2010 - 18:12
Do you suppose that this
Do you suppose that this could be built strongly enough to be a window bench as well as the storage? (we've a shortage of toy storage and a shortage of seating, I like the two birds, one stone approach.)
Kari Clark (not verified)
Mon, 03/29/2010 - 18:30
This was great info, gives it
This was great info, gives it a great finished, built-in look.
Sommer (not verified)
Sat, 04/24/2010 - 05:41
I love it with the solid
I love it with the solid counter top! I have a HUGE basement that is pretty much one big rec room and I've racked my brain tring to figure out how to furnish it so it doesn't look cluttered and I think these would be great! Thanks Ana. Oh and those tree's are too cute. Here is a link to a super cute fabric tree project you can make with your childs hand =) http://atsecondstreet.blogspot.com/2010/03/mod-podged-hand-trees.html
Liz (not verified)
Sat, 04/24/2010 - 08:39
I love the look of these, so
I love the look of these, so we started building them and we are short of 1 x 12s! 3 was not enough to get the top, sides, shelves and six dividers... we were only able to get two dividers! Am I missing something?
Joe Helfrich (not verified)
Sun, 05/02/2010 - 08:37
That didn't seem right to me
That didn't seem right to me when I started looking over the plans either, so I roughed out a cut plan in sketchup. There's no way to get all the wood out of three 8 foot boards. If you only need two dividers you can do it in three, (if you have scrap, or need fewer shelves); otherwise you need 12 foot boards or four 8 foot boards.
Travis (not verified)
Tue, 05/18/2010 - 04:41
This is great!!! I'm only
This is great!!! I'm only going to make one of the units instead of 3 because it'll be in a smaller room. It looks like the cut list for the box is for one unit and the cut list for the trim is for 2 units??? Am I looking at this right? What is the shopping list for? One or two units or the whole thing (3 units including a corner)?
Erica (not verified)
Thu, 06/24/2010 - 12:55
We're planning on doing an
We're planning on doing an entire wall, 12 ft wide, to look like built-in "shelves".
Any tips/advice on doing this going from floor to ceiling? :-) Thank you for all your postings Ana!
ATableforTen
Thu, 03/10/2011 - 10:05
Love it...
I love this..Im thinking something like this all along one wall in our game room would be so nice. I'm SO loving the tree sitting on top in the pic! Where can I find one of those!??
jaybird
Wed, 04/13/2011 - 15:47
Tree!
I'm lovin' the cubbies, but I really want the pattern for the tree cut-outs!!
team crane (not verified)
Fri, 07/01/2011 - 17:15
trees
hey there! my husband built these shelves and also jigsawed these trees for me. we got the pattern here: http://www.diyideas.com/howto/WorkWithWood/plywood-tree_1.html
we printed it, projected it onto a piece of...hm, it's not plywood (it's thicker)....he traced it, and he needed to make several tries, to be honest...using a projector (we did ours in the garage where we could make it dark) makes it easy to make the trees the size you want...I wanted mine sizeable....
good luck!
Kristopherson (not verified)
Thu, 07/14/2011 - 14:37
shelving/base
Nice job on these shelves. Can you give me an idea of how you did the base? The trim looks slightly larger there--it is a good look...
Thanks!
Jessica Kennedy (not verified)
Wed, 06/27/2012 - 10:32
tree pattern
The link doesn't work. Could you please send me the pattern
Thanks
Guest (not verified)
Mon, 12/19/2011 - 08:13
trees are so cute
First I would like to say I was thinking of making somehting like this and today I come across this article:) I love the tree cut outs but the link is not working for me can someone send them to me please...Thank You
jessica kennedy (not verified)
Wed, 06/27/2012 - 11:30
tree
Please me too! Would love these trees
Mrs. Wags (not verified)
Wed, 01/11/2012 - 13:27
First time builder here. I
First time builder here. I would like to build this but turn the plan horizontal so my finished product is approximately 60" wide and 48" tall. The only thing I can't figure out is what thickness the shelves are. If I make this out of strictly pine it says the boards are 1"x2" but in the plans it says they are 3/4" thick. Help! Which is it?
claydowling
Wed, 01/11/2012 - 15:13
Lumber thickness
The dimensions of surfaced lumber are their rough-sawn thickness. Coming off the saw boards have a very rough surface. It's planed down to a more agreeable surface before it reaches you. Typically it looses 1/4" in thickness and about 1/2" in width.
If you have the material planed to order by the lumber yard, you can sometimes get it slightly thicker, but that's not worth doing unless you are ordering hardwoods. My lumber supplier was willing to go to 13/16", to leave me some room for final cleanup, but I did notice that some boards still have a bit of the rough surface that I'll need to take down on my own with a hand plane.
When you go to buy lumber, you should take a ruler or tape measure with you to check the actual thickness. Some places are selling 1x stock that is actually 5/8" in thickness. Don't buy from those stores. Sorry, don't know which ones are doing that, and I suspect that it's only isolated cases. But it's a warning sign that they aren't selling quality materials.
Mrs. Wags (not verified)
Thu, 01/12/2012 - 07:04
Thank you clay.
Thank you clay.
MCGBishop
Sat, 08/23/2014 - 11:57
Kreg Jig?
Hi there! I'm really looking forward to making this, or a similar project for my mudroom. I noticed in the list of tools needed, it lists a Kreg Jig, but it is never mentioned in the directions. Is this only if you use screws instead of nails? And if so, you would use it instead of the angled nails?
jlharrison
Mon, 11/21/2016 - 06:33
Dimensions
Ok. I am a little confused. The expedit shelving is designed for the drona bins. They measure 13x13x15. So 1x12 would not be sufficient in making a shelf deep enough to accommodate these. I want to be able to utilize these bins in my closet. Any suggestions on those to work with out using plywood?! Can you buy 1x16 boards? I wasn't sure if that was possible!? I have seen edge glued ones at Menards but they are only 4ft and that won't work for this project?!
Help!!