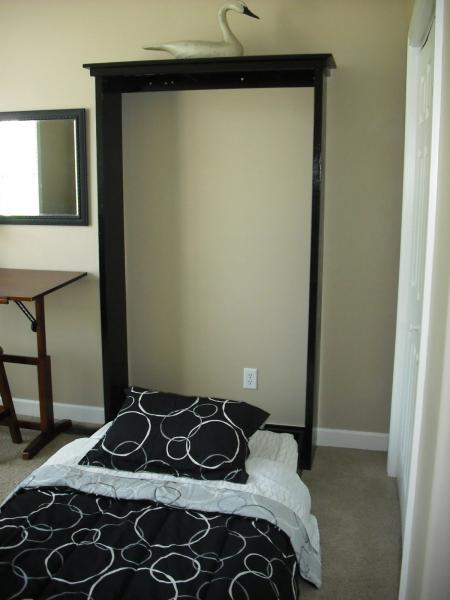


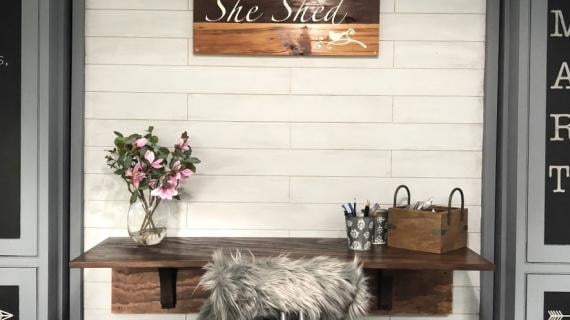
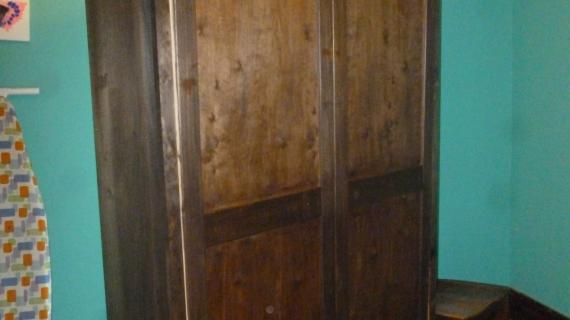
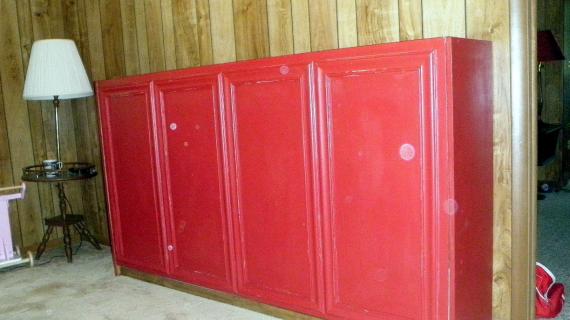
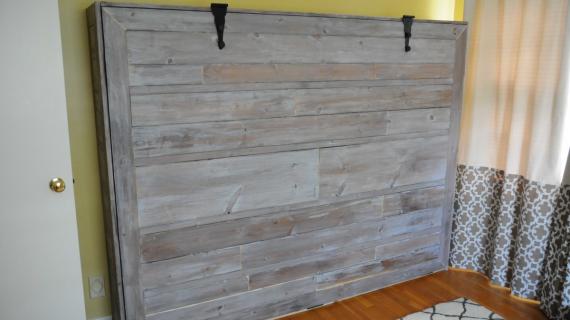
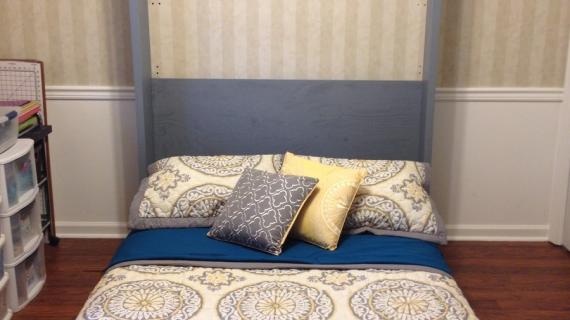
Do you need a guest sleeping spot, but don't have a guest room? Or is your guest room also a nursery or office? Add a hidden murphy bed with this easy project plan. The bed folds away into a cabinet that looks like an armoire. Easy instructions, no special hardware required.
Preparation
1 – Sheet of 1/2″ Plywood or MDF
3 – 1×12, 8′ Long
1 – 1×8, 8′ Long
1 – 1×4, 8′ Long
1 – 1×3, 8′ Long
3 – 1×2, 8′ Long
2″ Screws
2″ Nails
1 1/4″ Nails
5/8″ Brad Nails
Glue
Wood Filler
Sand Paper
1/4″ Thick Hobby Boards
Hinges (preferably heavy duty door hinges or continuous piano hinge)
Heavy duty magnetic clasp to keep the bed from falling open
Optional compression hinges to slowly lower the bed in place
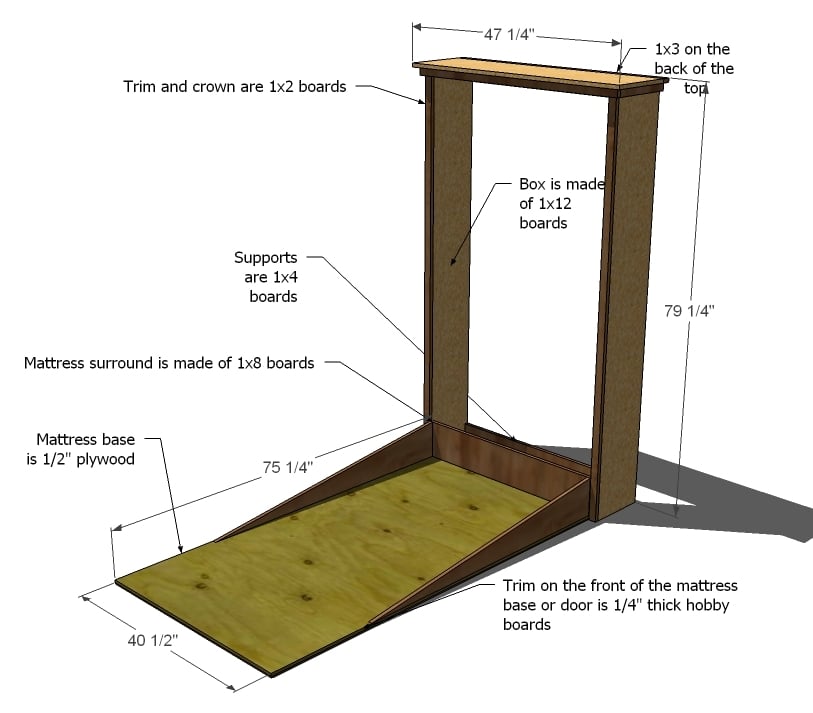
Cut List for the “Box”
2 – 1×12 @ 78 1/2″ (Sides)
1 – 1×12 @ 42 1/4″ (Bottom)
2 – 1×4 @ 42 1/4″ (Back Supports)
1 – 1×2 @ 43 3/4″ (Front Support Trim, Top)
2 – 1×2 @ 77″ (Side Trim)
2 – 1×2 @ 12 1/4″ (Top Side Trim)
1 – 1×2 @ 45 1/4″ (Front Top Trim)
1 – 1×3 @ 47 1/4″ (Top, Back)
1 – 1×12 @ 47 1/4″ (Top, Front)
Cut List for the “Bed”
1 – 1/2″ Plywood @ 40 1/2″ x 76 1/2″ (Back)
1 – 1×8 @ 40 1/2″ (Bottom)
1 – 1×8 @ 55″ (Cut Length wise at a diagonal as shown in the plan to get 2)
Trim as desired with 1/4″ thick hobby stock


General Instructions. Work on a clean level surface. Use proper safety precautions and equipment. Take a square of your project after each step. Use good straight boards. Countersink and predrill all of your screw holes before fastening.
Instructions
Step 1

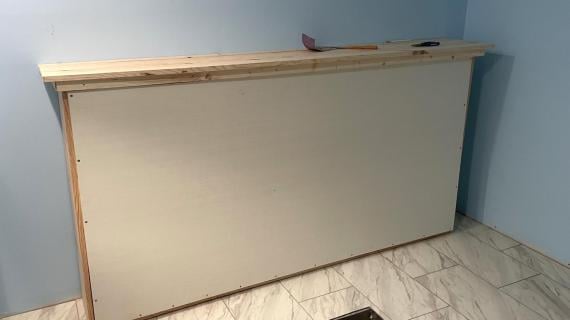
Build the Box. Using the 2″ screws and glue, fasten the sides to the bottom
Step 2
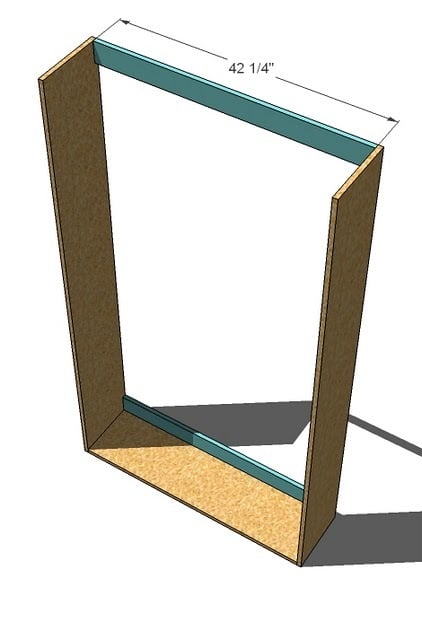
Back Supports. Fasten the back supports to the box, flush with the top and back. Also fasten through the bottom of the box into the bottom support. Use 2″ screws and glue.
Step 3
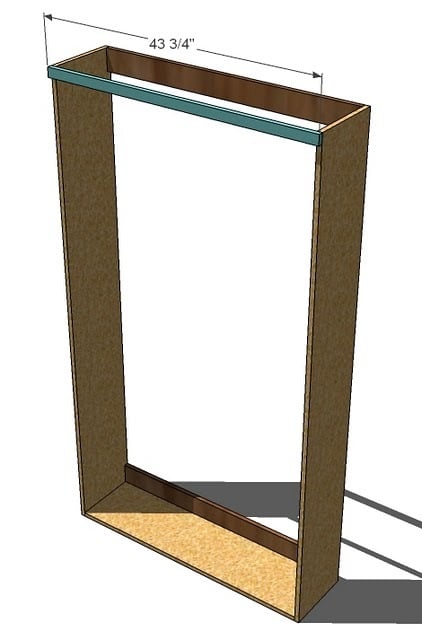
Front Support. Fasten the front support to the box as shown above. Top edges are flush. Use 2″ screws and glue.
Step 4
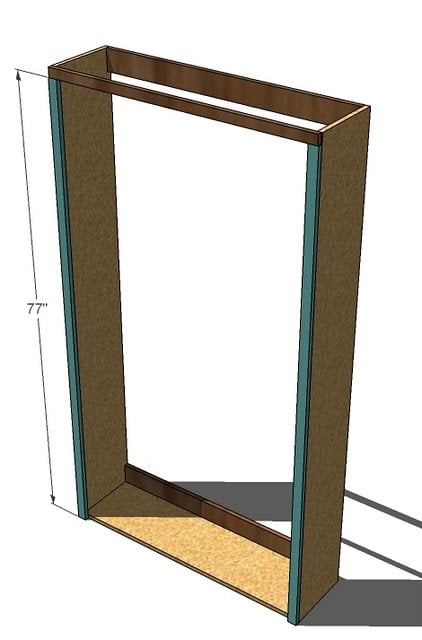
Side Trim. Using 2″ nails and glue, fasten the side trim to the box. Outside edges are flush. You will need to also fasten to the bottom of the box and fasten through the top of the top trim into the top end edge of the side trim.
Step 5
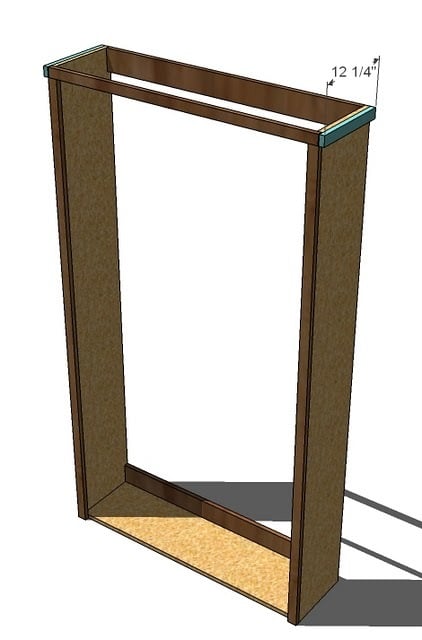
Step 6
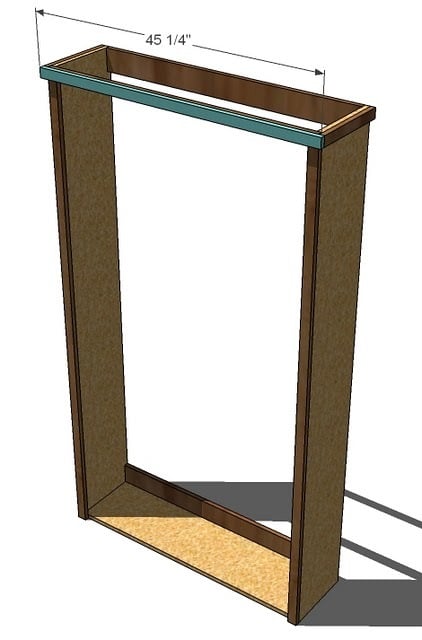
Front Top Trim. Fasten the front top trim in place using 1 1/4″ nails and glue. Keep top and outside edges flush. Use 2″ nails on the ends to fasten to the side trim and the sides.
Step 7
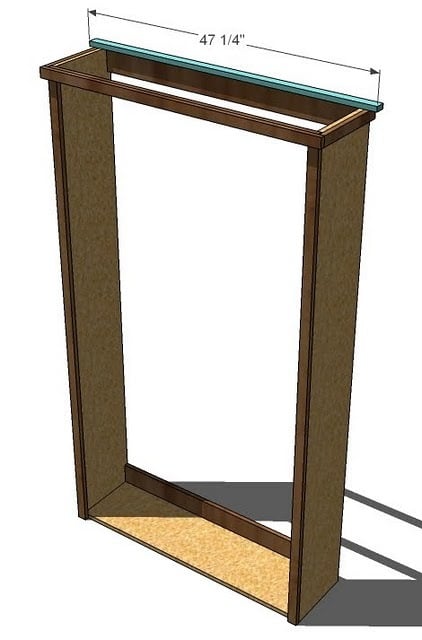
Top, Back. Using 2″ nails and glue, fasten the top back piece to the top, leaving 1″ overhang both ends. Back will be flush.
Step 8
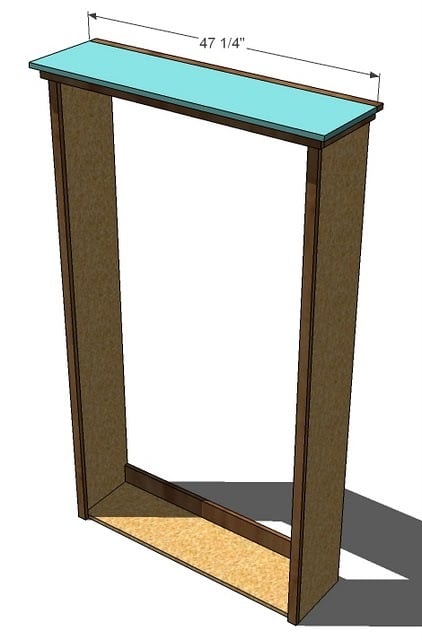
Top, Front. Leaving a 1″ overhang on front and sides, attach the top as you did the top in step 7.
Step 9
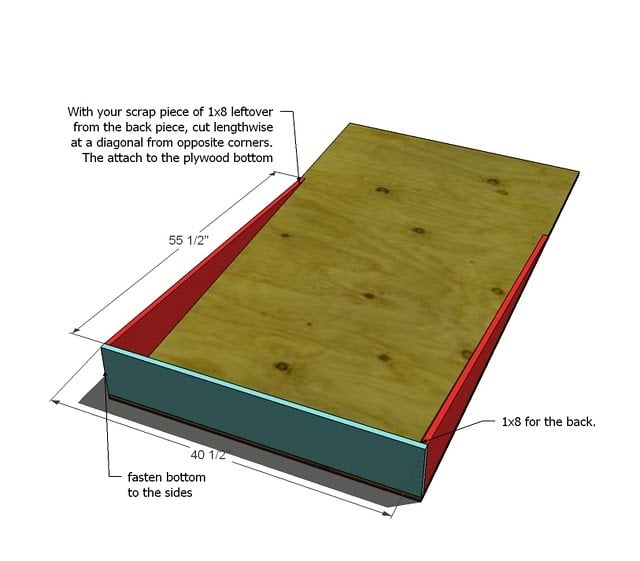
Mattress Box. Build the mattress box by using 2″ screws to screw the bottom 1×8 board to the plywood bottom. Use glue. Then fasten the sides to the bottom and the back using 2″ screws and glue. The sides are simply the scrap 1/8, cut at a diagonal to create two boards. You can cut with a jigsaw or a circular saw.
Step 10
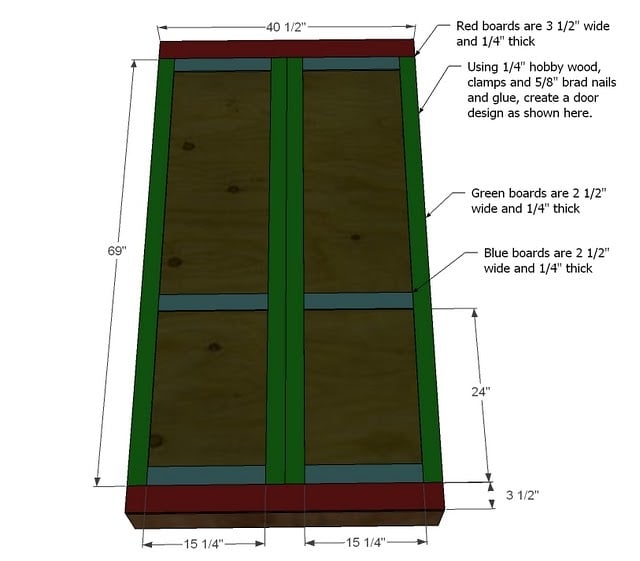
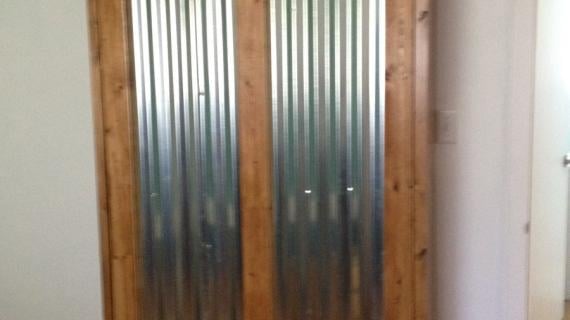
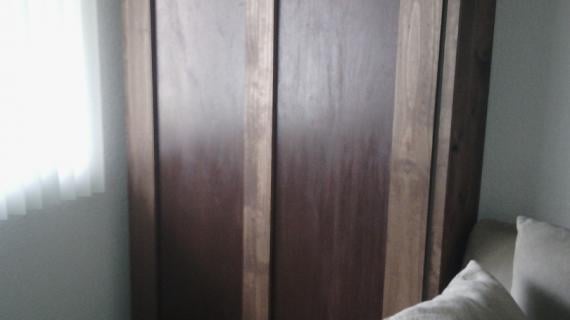
Door Decorations. Using 1/4″ thick hobby stock, fasten your desired door pattern to the face of the door (mattress bottom). Secure with glue, 5/8″ nails and clamps and let dry. Dimensions shown are for the sample pattern above.
Step 11
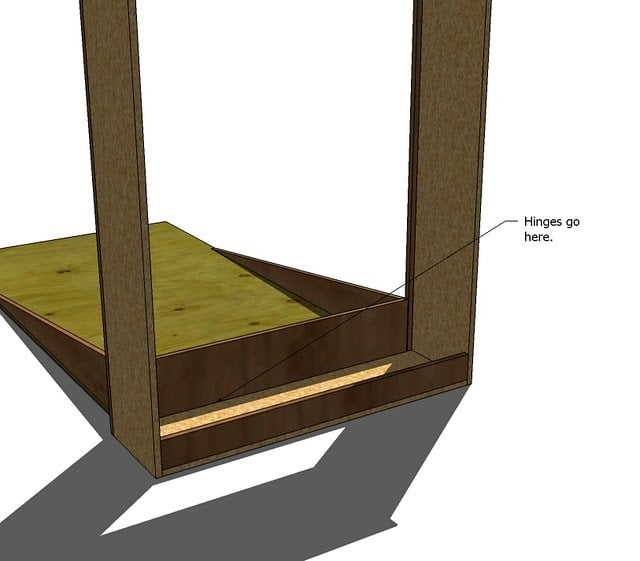
Hardware. Use the hinges to attach the mattress box to the wall box as shown above. You should also use a clasp to keep the door from falling open when shut. You can also use support hinges to keep the door from free falling open when unlatched.
Step 12
Finishing. Fill any nail or screw holes with wood filler and sand and finish as desired.
Step 13
Installation. You will need to use screws to fasten through the 1×4 support boards into a stud in the back wall. This recommended on the top and bottom. Also recommended is a wide elastic strap secured to the plywood door to keep the top of the mattress in place when the door is closed.
Fits a standard twin mattress 39″ x 75″
Comments
Thicket Dweller (not verified)
Mon, 03/22/2010 - 00:50
FYI, if you're looking for
FYI, if you're looking for the plans for a vertical Murphy bed with the hardware, you need to go here to buy the hardware: http://www.rockler.com/product.cfm?page=17212 and the vertical plan is *included* with the hardware. The link in this post is to a separately available side-mount bed using the same hardware, not the vertical one.
Melanie (not verified)
Mon, 03/22/2010 - 02:54
Ana-- this bed is GREAT! I am
Ana-- this bed is GREAT! I am going to have to make it.. our guest room is running out of space. Great idea. Do you think we could use this plan for a full size bed? That is what we have. Thank you for your blog... my family loves it!
gkey (not verified)
Mon, 03/22/2010 - 03:00
Dear Ana, at K O W Happy
Dear Ana, at K O W
Happy Spring
Happy Monday
Happy Building!
I enjoy your site so much.
My husband and I will have to build the Murphy bed for our library (the only place we can put an extra guest bed just now) We have talked of this for a long time...30+ years as we slept in one on our honeymoon. I joked him really good (which is so rare).. that at the headboard I could see down to the room below us!! We have laughed about that many a time. Thanks for the
fun idea.
love,
Murphy Memories in Nebraska
Debbie (not verified)
Mon, 03/22/2010 - 03:26
So I'm beginning to think you
So I'm beginning to think you have a bug planted in our house. I just said yesterday, when we finish the basement bedroom, we should put in a murphy bed, and then I wished you had plans to one!
Love your blog...love you!
thanks
Rebecca (not verified)
Mon, 03/22/2010 - 04:20
Very neat. Do you think you
Very neat. Do you think you could do a bookcase plan for tall, real wood bookcases and recommended hardware? I desperately need bookcases that look like builtins for book storage and can't pay a fortune.
Kathy (not verified)
Mon, 03/22/2010 - 04:49
What good timing you have.
What good timing you have. We can really use a Murphy bed for the small room we fixed up for my grandson, who rarely visits. I'm changing it over to my sewing/craft room to get all my "stuff" out of the living room, but will still need a bed in case he does come to stay. This one would be great and still allow me all the room I need for crafting!
Cindy (not verified)
Mon, 03/22/2010 - 08:31
Well, I'm the third person so
Well, I'm the third person so far who just mentioned *last week* that a Murphy bed would be great in my in-the-works craft room, if only Ana had plans for one! :D
~~ (not verified)
Mon, 03/22/2010 - 09:52
I just got back from Lowes
I just got back from Lowes with the hardware and a brand new air compressor. Now one more trip with no children in the van and I'll have the wood. OH, THIS IS EXCITING!! I will be posting my progress on my blog - I hope to make you proud!
Parvoti (not verified)
Tue, 03/23/2010 - 10:11
If we wanted the bed to be
If we wanted the bed to be sideways would all we need to do is switch the hingeing spots to the long sides instead of the short sides? I kinda like how the link showed the bed sideways and then it could be used for a nice shelf when not in use.
kitcat858
Sat, 08/30/2014 - 16:16
I have the same question...
I have the same question... Seen other people's pics that have done it that way, but no one explains how they modified the plans.
Anji (not verified)
Tue, 03/23/2010 - 15:40
On the cut list the front
On the cut list the front side trim shows 75" but then the actual measurement should be 77" per the diagram - is that an accurate correction to you? I guess we'll make a decorative little corner piece at the bottom... no one will eeeever know!
The (not verified)
Tue, 03/23/2010 - 16:44
I'm with Crissybug - would
I'm with Crissybug - would love a Murphy bed for a queen sized bed, but it seems the DIY options that are out there suggest that twin or full are the max that the hardware will support. Your design of resting the floor on the bed seem like they may be more forgiving for a larger bed... what do you think?
Ana White (not verified)
Tue, 03/23/2010 - 16:57
Hi Anji, there was defintely
Hi Anji, there was defintely a typo in the cut list - side trim should be 77". I made this change, thanks so much for taking the time to comment on this.
Hardware is definitely an issue when considering a queen. The support problems will not be when the bed is open or closed, but when you open or close it. Might be difficult to open or close a queen bed without some help. Could be dangerous too. Hmmmm . . . a wind up winch . . . this needs to be hacked!
Brent (not verified)
Sun, 03/28/2010 - 20:15
Ana, perhaps instead of a
Ana, perhaps instead of a winch, you could incorporate a counter-balance weight in the sides, if they were a little deeper.
Loni (not verified)
Sat, 08/21/2010 - 07:56
Hi Ana! I was revisiting this
Hi Ana! I was revisiting this post because I've been trying to figure out how/where to put a nursery without losing my guestroom. And then I remembered the murphy bed! We already have a queen sized bed in there that I planned on using for this project. I saw where you mentioned it being a safety hazard due to weight, I wanted to let you know that I plan on modifying your plans so the bed lays out horizontally, which will make it much more manageable for its size, but also I can put molding on the outside so it has that feaux fireplace/mantel effect while not in use. Thank you so much again for all you do!
Loni
Kacie (not verified)
Thu, 09/30/2010 - 17:52
If anyone has actually
If anyone has actually attempted to do the queen size bed, please message me at kacieadavis@gmail.com as I would love to do this with our existing queen mattress so I don't have to lose my guest bedroom when we turn it into a nursery! Probably would work best if turned horizontally?
James K Polk r… (not verified)
Wed, 11/24/2010 - 10:33
[...] Knock off Wood : This
[...] Knock off Wood : This plan was actually posted after I constructed my bed or I would have gone with it. You have to be able to lift the weight of your mattress, but the same is true of the Lori bed and I’ve had no issues. The bed would also be a bit low to the ground, but a few mods to the plans would fix that. [...]
Patty (not verified)
Thu, 02/10/2011 - 21:44
Awesome plan Ana. We own a
Awesome plan Ana. We own a pop up trundle. I wonder if you could fit that in this plan--it would take care of the expensive hardware. I just cannot put my parents on the floor. They are aging.
Keri
Fri, 04/01/2011 - 14:09
I made this out of the
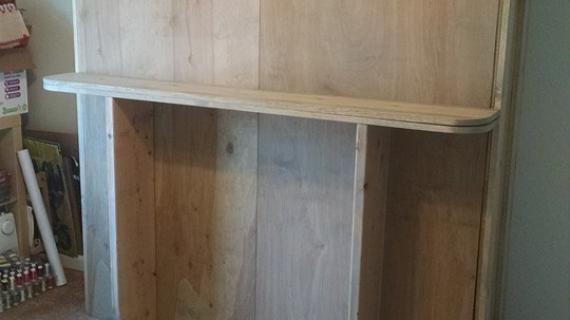
I made this out of the knottiest pine Orange had for an extra-long twin mattress we had, so just added 5 inches to the height. It makes for a very tall "cabinet" but I'm planning to build a shelf system in next to it and match the doors so that it'll look like a half-wall of tall built-in storage when the bed is closed.
I used a 30" piano hinge for the bottom, were I to do it again I'd buy a longer one and cut it to size. The trim kept pricing out to be pretty expensive, so I ended up using 1/4" luaun ply cut into strips. I went over to my dad's & we cut the strips on his tablesaw, but orange would've done it for me too, albeit with a little more edge sanding. I finished it with watered down white semi-gloss latex paint (for a siort of white-wash) which helped camouflage the ply sides and filled pocket holes but lets the knots and some of the character show through. It ended up looking slightly old fashioned without being distressed, although that could work too with a little 150 & elbow grease.
I used 1x2's I already had, but if you're buying them new I'd check if they match the thickness of 1x12 before you leave the store, or use 1x2 to trim out the front of a scrap of plywood. The jig saw hasn't been unearthed from our chaos yet so I made all the cuts (save trim) with a chop saw. For the sides I used another 1x8 and cut an angle at the top to keep there from being a sharp corner and help it look a little nicer. Ended up having to trim a strip off the front of the "door" because I didn't account for the thickness of the cabinet bottom when it's folded up, so I'll add to the chorus of check your measurements before you build =0)
PS The watered down paint thing I read on a website awhile back but can't remember where and can't find it to give proper credit. I saw them do it on DIY yesterday but they dipped the brush first in paint, then water, then dabbed. I stirred paint into water until it looked good and rolled/brushed it on.
Guest (not verified)
Wed, 04/06/2011 - 05:26
what does this look like when closed
this looks really cool, but what does this look like when closed? Do you have any pics of the stow away version? I would love to see them.
Aunlu88
Wed, 05/04/2011 - 11:09
Horizontal rather than Vertical
I am not an extreamly experienced woodworker so I can't really modify plans I just go by exactly how it says. So with that being said how would I convert this to being horizontal rather than vertical? Any tips can be e-mail to me at aunlu88@gmail.com Thank you!
asroka
Tue, 05/17/2011 - 14:48
Horizontal?
I would also like to know how the plans would change if the bed was build horizontally. If anyone out there has tried this, could you please comment for everyone to see? Thanks.
Heidi JL (not verified)
Tue, 06/14/2011 - 01:23
Queen? Pictures?
I am wanting to make this in a queen. If anyone has done it and has the measurement adjustments, I would LOVE to have them. Can you please post or email me? If you have pictures, even better!!
mydoghank
Wed, 05/29/2013 - 11:34
did you find queen plans?
just wondering if u found any plans for a queen or if that would be super heavy-i'd even take fullsize plans-if anyone has them or has any feedback on the weight issue, could u email me at carolinapalomaduncan@yahoo.com?
Guest (not verified)
Wed, 06/15/2011 - 10:21
Queen Murphy??
Funny that I ran into this today. My husband and I have been discussing what to do with our guest bed. It takes up so much of the room, but we only have guests here and there. I also use want to use the room for sewing and crafts. Has anyone figured out how to adjust the plans for a queen-sized bed? If so, please email to sunshinemelb@yahoo.com. Thanks!
raedeerae (not verified)
Sun, 06/26/2011 - 09:14
Horizontal!! PLEASE
I too am interested in making this horizontal. Has anyone done it?
Guest (not verified)
Sun, 07/31/2011 - 21:57
Horizontal Full/Queen
I just happened upon your blog! I'm so happy I did! I was trying to figure out what to do for my son's room. He has the smallest room in the house and wants a full or queen size bed. He also wants his floor space for hanging out with his friends. A full or queen won't fit in his room AND allow for "floor space." This is PERFECT! I would want it to be horizontal. He currently has a daybed in his room. What would I need to change to make it horizontal and to fit that size of mattress? Thank you so much! Aubrie aubrie.litster@gmail.com
Audrey McCrimmon (not verified)
Sun, 08/14/2011 - 16:44
Murphy Bed
Great Plans for a Murphy Bed. I will be able to do this myself.
One question. Most Murphy beds are off the floor.
How would I set the bed so it was off the floor, and would an entertainment centre around the box work?
Sara Jo (not verified)
Wed, 09/21/2011 - 18:26
Horizontal Murphy Bed
Has anyone attempted the horizontal murphy bed? I have a full size mattress I want to use. And what about setting it up off the floor?
Chair
Fri, 10/28/2011 - 12:36
Horizontal, Double, Raised!
I would so love this for the double bed in my studio/guestroom/playroom but it has low ceilings so I think horizontal would work best. Plus, I'm in central Canada, the room is in a basement and it's an OLD house so drafts are always a problem in the winter so I would like to have it raised off of the floor a bit (as it would be with legs). I have a pretty good idea of how to make it work, but I seem to do best making stuff up as I go (and I lack the terminology know-how) so I can't really describe it well -though it's already figured out in my head. I will post photos once I start working on it but I won't likely be building it until next spring. In the meantime I'll keep checking back to see what ideas and suggestions others have to offer.
Guest (not verified)
Thu, 11/24/2011 - 16:40
murphy bed
Any ideas how to make it raised a foot off of the floor with legs. Is the plywood strong enough to support it if it is raised? I was concerned with bowing.
Thanks
Meg
Guest (not verified)
Wed, 12/07/2011 - 17:34
off the floor
i am currently building 3 that are off the floor just added inches to the side and front piece I will let you know how it comes out in a few days
Titabehm (not verified)
Tue, 12/13/2011 - 10:10
OFF THE FLOOR?
Were you succesful with your project?... could you please share? did you use twin or a full bed?
Thank you!
Guest (not verified)
Tue, 12/13/2011 - 15:55
off the floor
we used twin sized added height to the side pieces raised the bottom up and added a small board under it for support and added legs it worked great we made all three no problems :) thank you for the plans best thing I have in the house now we have a play room and a bedroom
ReeAnn (not verified)
Mon, 02/20/2012 - 07:46
How do you hid the legs and
How do you hid the legs and board when you close it?
Guest (not verified)
Mon, 02/20/2012 - 22:54
feet
as far as the feet go we went to home depot and got of all things fence post toppers perfectly round so they were a great shape and we didn't have to hide them.
lk (not verified)
Thu, 12/22/2011 - 09:07
How to open?
This looks perfect for my studio apartment! Thanks so much.
One question - maybe I am just not reading the plans right, but how do you open the bed? It looks like the mattress box/door is flush with the side and front trim when it is closed, so I am not sure what I would hold on to in order to open the door. Do I need to attach a handle?
Also, can anyone explain "compression hinges", mentioned as optional in the parts list. I googled the term but didn't find any useful information.
Thanks.
babysteps
Mon, 02/20/2012 - 14:41
Queen Bed with Legs Please
Ana, please consider creating plans for a queen sized version with legs or a raised platform. I found some directions of the DIY network site, but without your detailed plans and drawings, their tutorial was useless.
http://www.diynetwork.com/how-to/how-to-build-a-murphy-bed/index.html
Guest SYLVIA (not verified)
Tue, 03/06/2012 - 22:35
wall bed..i would like to see what it looks like when the bed is
do you have a picture of the bed up ?? can u see it to me. i would true like to see it
thanks
sylvia
Guest Jeff (not verified)
Thu, 03/08/2012 - 05:46
Instructions. Kreg Jig?
Being a novice at wood working I read through the instructions and found the Kreg Jig listed as a necessary tool. I didn't however see any reference in the instructions on where/how to use the said tool.
Do you have any words of wisdom on which steps it is necessary to use the Kreg Jig?
This will be a perfect setup for my son's bed as he's only with me every other weekend and when not in used it will take up very little space.
Please advise on the Kreg Jig and useage.
Thank you,
Jeff
claydowling
Thu, 03/08/2012 - 07:16
Kreg Jig research
My advice is to research the kreg jig first. It's a pretty slick little tool, and the manufacturer has a lot of videos and other material out showing you how to use it. Once you see it used, you'll understand where you should use it in the construction.
Char O (not verified)
Fri, 03/23/2012 - 20:20
Horizontal Full?
Has anyone been successful in doing a horizontal of this in a full size bed? I would love to get the cut list for that, I think it would be relatively easy to alter the plans to accomate it, but if anyone has done it already and has a cut list that would be great!!
Guest123 (not verified)
Tue, 04/17/2012 - 16:15
Does this close and open like
Does this close and open like a Murphy bed?
jaime6891
Thu, 04/19/2012 - 13:05
Horizontal version
Has anyone made a horizontal version of this? If so, could you please send the modifications to jaimelaplant@new.rr.com? I LOVE, LOVE, LOVE this plan!
Amy J (not verified)
Mon, 10/01/2012 - 15:12
Horizontal with a double please! :)
This plan looks GREAT however I too am interested in a horizontal version since our ceiling is very low. I don't see where there is any replies to these requests. Not sure how your website works but I sure am interested in a full/double horizontal tilt plan if there is one that exists. Thank you in advance!!!
Saad Amanullah Khan (not verified)
Fri, 01/18/2013 - 06:55
An Amazing Site -- so Userfriendly
Ana ... greetings from Pakistan. My wife since she visited our daughter in Canada has been after me to build a Murphy Bed for our study ... I looked all over the internet and everyone is selling their kits, but I cannot import a kit to Karachi -- to expensive. I can build it as workmanship is affordable and easlity available. You have a big heart, you put the entire design on teh site. I would love to get some more info. e.g. the design I want to use has piston type hinges ... what are they called? You have my email, appreciate if you can help me in any way. Super site, a breath of fresh air. Must visit Alaska in one of our global travels :) Take care
RV AJ (not verified)
Wed, 01/23/2013 - 08:19
Great post!
Very impressive and very detailed on building a murphy bed. I think this would work great in an RV! I added a link to this to my blog for RV'ers. Thanks again.
Post goes live tomorrow. Link to the article: http://www.doityourselfrv.com/rv-murphy-bed-diy/
scrapbkr
Tue, 03/05/2013 - 19:50
This is exactly what we want in our basement for extra sleeping!
I was wondering if anyone has built this only full size? I also would like to see finised pics of it folded up. email me scrapbkr@hotmail.com