
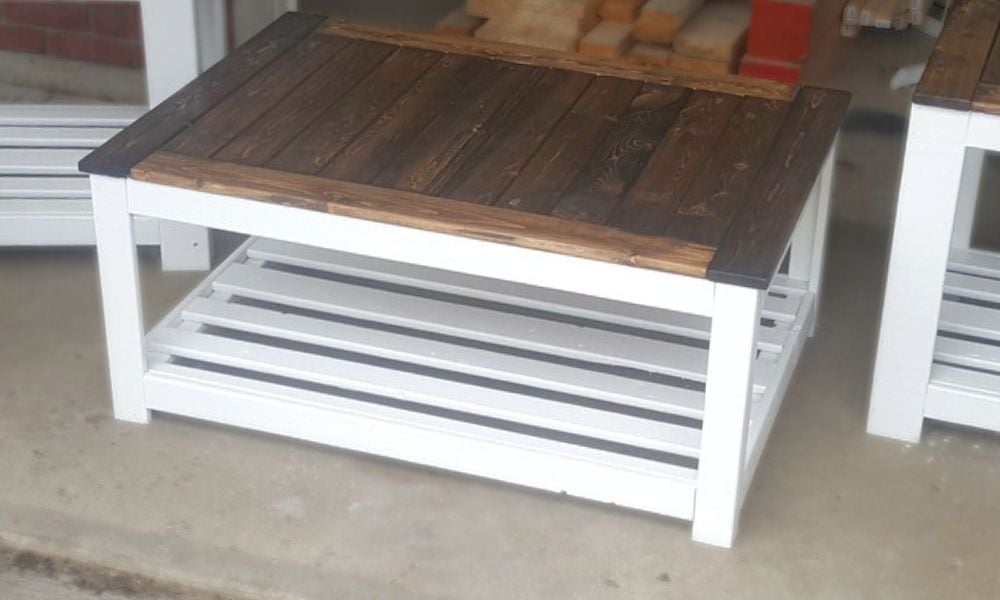

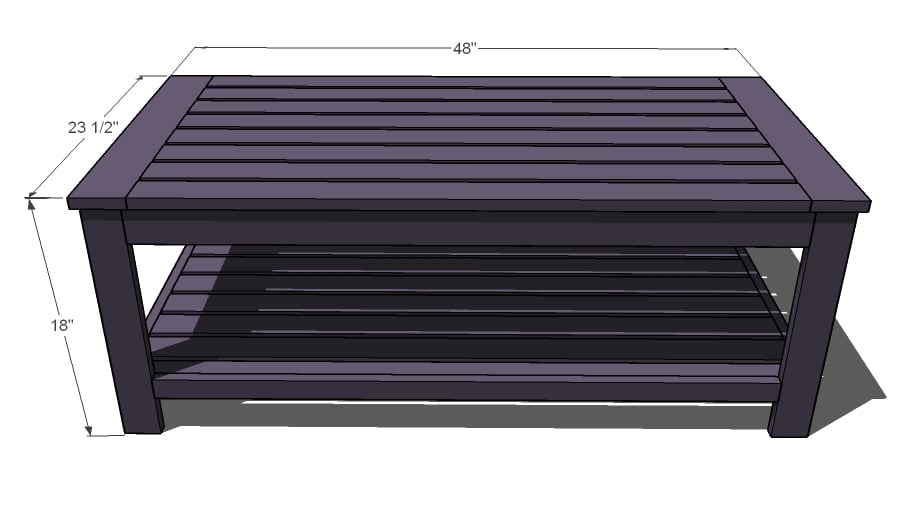
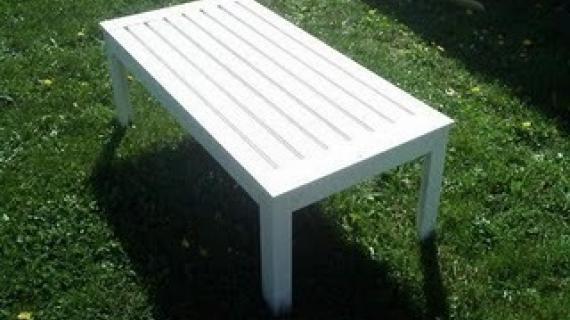
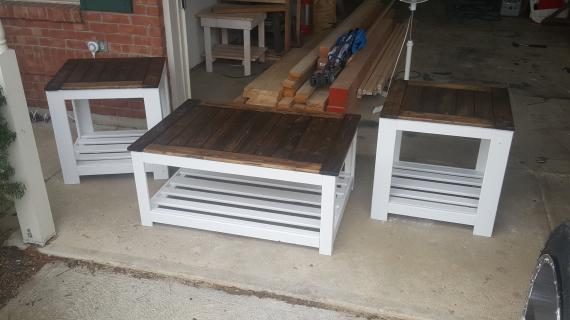
A slatted design coffee table that does not require pocket holes. Solid wood sturdy design, features full bottom shelf and open legs. Uses standard dimensional sized boards.
Preparation
- 1 – 1×4 board ( you only need 4 feet)
- 9 – 1×2 boards (8′ Long) - Douglas Fir furring strips
- 10 – 1×3 boards (8′ Long) - Douglas Fir furring strips
- Wood Filler
- Wood Glue
- Outdoor Appropriate Paint or Stain and/or Topcoat
- 2 – 1×4 @ 23 1/2″ (Breadboard Ends)
- 8 – 1×2 @ 45 1/2″ (Top Supports)
- 4 – 1×3 @ 17 1/4″ (Front and Back Legs)
- 4 – 1×2 @ 17 1/4″ (Sides of Legs)
- 2 – 1×3 @ 18 1/2″ (Top Side Apron)
- 2 – 1×3 @ 42″ (Top Front and Back Apron)
- 8 – 1×3 @ 41″ (Tabletop Boards)
- 2 – 1×2 @ 21 1/2″ (Bottom Shelf Supports)
- 2 – 1×2 @ 45 1/2″ (Bottom Shelf Top Pieces)
- 6 – 1×3 @ 45 1/2″ (Bottom Shelf Top Pieces)
- 2 – 1×2 @ 18 1/2″ (Bottom Shelf Aprons)
- 2 – 1×2 @ 42″ (Bottom Shelf Aprons)


Instructions
Step 1
Breadboard Ends and Supports. First mark you breadboard ends as shown above on the bottom side. This is important – the end supports will have a different gap than the middle supports. This is correct, just follow the measurements above. Remember that there is a 1 1/4″ inset on the support ends and the outside edge of the breadboard ends. This is shown above. Use 1 1/4″ screws and glue to fasten in place. Screws are recommended here.
Step 2
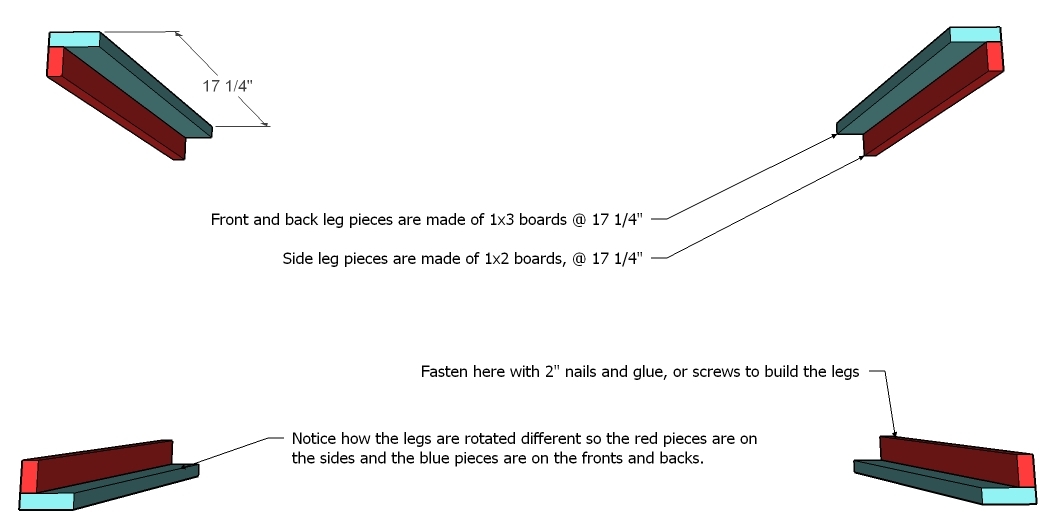
Legs. Build your legs as shown above.
Step 3
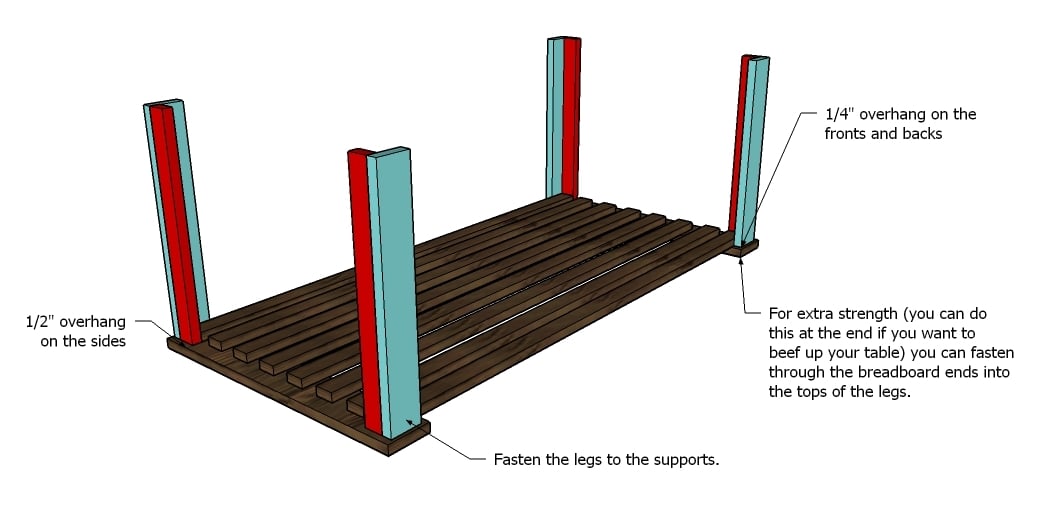
Putting Legs on the Table. As shown above, fasten the legs to the supports. You can use 2″ nails or screws, and of course, glue. You don’t need to fasten through the top. If at the end you want to “beef” up the table, you can screw through the breadboard ends into the tops of the legs.
Step 4
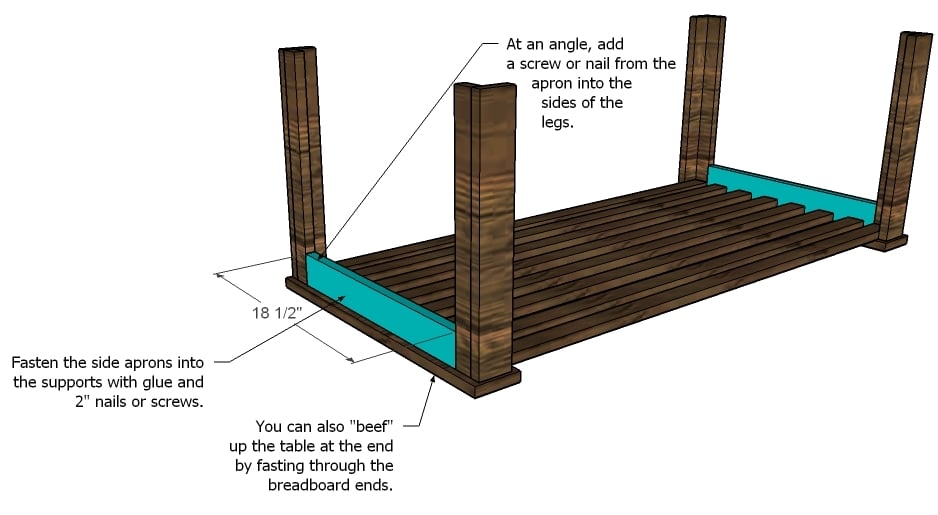
Side Aprons. Fasten the side aprons in place as shown above.
Step 5

Step 6

Tabletop Pieces. The table top pieces are spaced 1/2″ apart. Turn the table over and fasten through the supports into the bottoms of the tabletop pieces to hide your screw holes. Use glue and 1 1/4″ nails. If you don’t want a bottom shelf, you’re done! However, the bottom shelf will strengthen the table considerably if you are interested in a stronger table.
Step 7
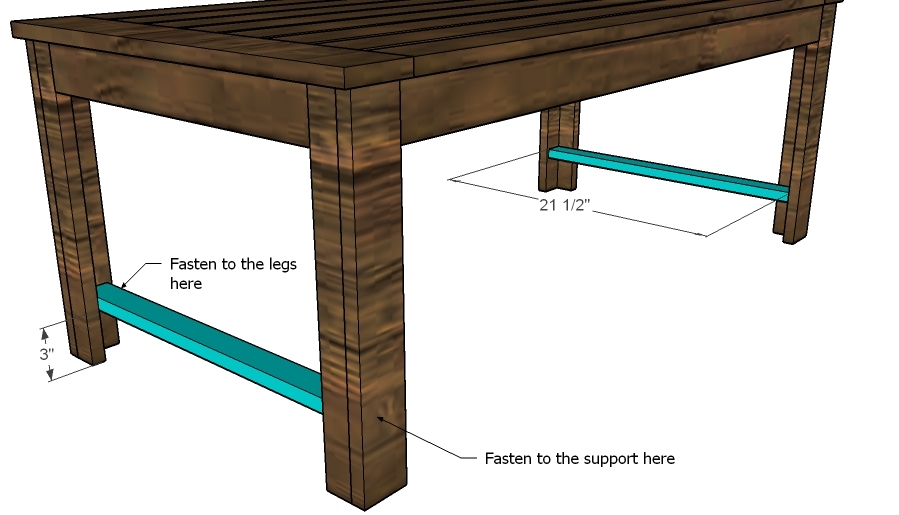
Bottom Shelf Supports. Fasten the bottom shelf supports as shown above to the legs.
Step 8

Bottom Shelf Boards. As shown above, fasten the bottom shelf boards to the bottom shelf support. Fasten through the underside using 1 1/4″ screws or nails and glue.
Step 9
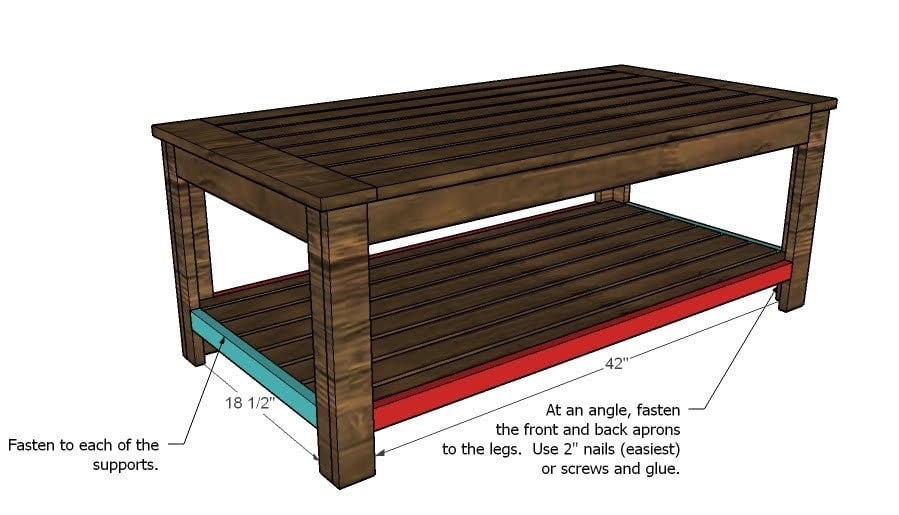
Bottom Shelf Aprons. Cut and fasten the bottom shelf aprons as shown above. Use glue and 2″ nails or screws.

Comments
Yolanda (not verified)
Sat, 03/13/2010 - 10:24
Holy wow! We ask and boy do
Holy wow! We ask and boy do you deliver. Outdoor furniture! Yay! And this is so clean-lined and gorgeous.
Qycone (not verified)
Sat, 03/13/2010 - 10:25
It is a cold rainy day here,
It is a cold rainy day here, but nothing like where you are. I am so excited about this outdoor furniture. I just moved into my first house last year, and love my backyard. I didn't get to enjoy it last year because there was no place to sit and no money to buy furniture. I want to get started on this gorgeous piece right away, but first I have my eye on a couple of the rolling cubbies. Just have to get my boyfriend to go to the lumber yard with me! Maybe if the rain lets up, I can talk him into going tonight. I can't wait to see what you show us to go with this table! Keep up the wonderful work! It is very exciting to those of us following along.
offtoworkigo (not verified)
Sat, 03/13/2010 - 10:38
Excellent! I totally need
Excellent! I totally need this...and it's beautiful!
Now all I need is a small outdoor bistro table and my patio is complete.
Ana, you rock!
Heather (not verified)
Sat, 03/13/2010 - 10:48
YAY! I can't wait to build
YAY! I can't wait to build this for our patio I'm planning to make with pavers this spring! If it'd ever stop raining and warm up long enough that is...
Lianna (not verified)
Sat, 03/13/2010 - 11:03
Gorgeous! I was thinking of
Gorgeous! I was thinking of using the modern harvest table plans for an outdoor table. Thanks so much Ana for the coffee table plans!
Michaela at Th… (not verified)
Sat, 03/13/2010 - 11:27
Fantastic! Will pass it
Fantastic! Will pass it on!
Michaela
Debby H (not verified)
Sat, 03/13/2010 - 11:30
Love it! Love it! Love it!
Love it! Love it! Love it! I hope the couch bases are coming soon!
Of course, I would expect no less from my favorite blog! I share your site with everyone! I think my friends are tired of hearing about it! Now, I just need to actually make something! I have mygarage cleaned out and ready to build!
Thanks! for all the inspiration!
Rachel (not verified)
Sat, 03/13/2010 - 11:54
This looks amazing! I just
This looks amazing! I just wish I had someplace to put it outdoors...soooo nice!
Carrie (not verified)
Sat, 03/13/2010 - 12:52
Just love it. We have just
Just love it. We have just started building a patio so will soon have a space to put this table. Please please please do plans for the seats.
Joni (not verified)
Sat, 03/13/2010 - 12:56
Let me just say that YOU are
Let me just say that YOU are amazing! This table is just perfect! We are furnishing the patio and deck this spring/summer and THIS is perfect! Cannot wait for more awesome plans!!! Thank you, Thank you, Thank you!!
Kelly@TearingU… (not verified)
Sat, 03/13/2010 - 13:04
Nice! And in time for
Nice! And in time for spring!
Kelly
Pine Tree Home (not verified)
Sat, 03/13/2010 - 15:32
I desperately want new patio
I desperately want new patio furniture, but didn't want to spend the arm and leg. Thanks for sharing this. I'm sure this will be my spring project.
Rayna (not verified)
Sat, 03/13/2010 - 15:47
Awesome! I've been hoping you
Awesome! I've been hoping you were going to do some outdoor furniture. I'm waiting semi patiently to see if you do the couch bases too.
This just made my day!
Yes, it doesn't take a lot to make me happy haha.
Denise (not verified)
Sat, 03/13/2010 - 17:04
This is great. I just built
This is great. I just built a cheap and easy console table for my nephew's 30th birthday gift, and I'm feeling so very clever. Thanks for everything.
Liz Butler (not verified)
Sat, 03/13/2010 - 17:15
HA! You are a genius! I love
HA! You are a genius! I love the way you're referencing the furniture it's "like' without using their names. Well done, Ana! Keep up the fabulous work!
orange sugar (not verified)
Sat, 03/13/2010 - 19:28
Very nice!
Very nice!
Life in Rehab (not verified)
Sun, 03/14/2010 - 01:00
Ana, Ana, Ana, you are a
Ana, Ana, Ana, you are a genius! I love how you've also managed to skirt your pesky legal issues as well. Please tell me there are simple canvas topped gazebo plans in our future? I'm tired of shelling out $200 a year, and I'm sure whatever you design would be pretty permanent.
Shel at Dreamy Nest (not verified)
Sun, 03/14/2010 - 04:35
I love this!!! We've been
I love this!!! We've been looking at outside furniture and this is beautiful!! Girl - you soooo totally rock!!!
Dittle Dattle (not verified)
Sun, 03/14/2010 - 05:12
Love this collection! You
Love this collection! You read my mind.... I have been telling myself that this was going to be my spring project. Thanks for the plans! Can't wait to see the rest of the collection.
Samantha Carnathan (not verified)
Sun, 03/14/2010 - 17:37
Yes! Outdoor patio furniture!
Yes! Outdoor patio furniture! I love it. It is getting warm here and I am thinking about all we need to furnish our deck. Do you have a outside couch in the works? Thanks for all of your hardwork!
J (not verified)
Mon, 03/15/2010 - 04:13
YAY! This looks beautiful and
YAY! This looks beautiful and simple! Love it! Can't wait to see the chairs you come up with for it :)
KRISTINA CIPOL… (not verified)
Mon, 03/15/2010 - 07:21
Ok so I think I need a coffee
Ok so I think I need a coffee table on my patio! LOVE this! Thanks for sharing! :)
Annalea (not verified)
Mon, 03/15/2010 - 08:08
Ana, you're da bomb with
Ana, you're da bomb with SketchUp. Your drawings just keep getting better and better!
And I really love this table. Even though it's only hovering above freezing around here, (the crocuses are up, though), it's good to think of warm weather. :o)
Heather (not verified)
Mon, 03/15/2010 - 08:45
Ana, I'm dying to make some
Ana, I'm dying to make some outdoor pieces - thank you!! I'm also hoping that some simple outdoor chair plans (that we can add cushions to), might be coming soon :)
mar (not verified)
Mon, 03/15/2010 - 10:42
Thanks for doing some outdoor
Thanks for doing some outdoor furniture Anna! I can't wait to trick out my backyard! Any other backyard furniture would be greatly appreciated!
Kristie (not verified)
Tue, 03/16/2010 - 03:14
I love the outdoor table!
I love the outdoor table! Can't wait to get my husband started on this. Matching chairs would be a wonderful!
Deb Weyrich (not verified)
Tue, 03/16/2010 - 10:57
Hi Ana, just a suggestion re
Hi Ana, just a suggestion re outdoor furniture layout. As you mentioned drainage is huge, so when applying tabletop boards make sure the end grain curves are facing down. This way water won't collect on the surface and will prevent "cupping" of the boards.
Jenny @ Anythi… (not verified)
Wed, 03/17/2010 - 08:20
Love this! I have been
Love this! I have been hoping that you were going to tackle some outdoor furniture and this is definitely bookmarked!
nillabeans6 (not verified)
Tue, 03/23/2010 - 18:05
I just moved into a house
I just moved into a house with a country porch and thought it felt empty, wishing I could afford something furniture-wize....this and it's side table will be my very first projects when I unpack the tools!
hcharnock (not verified)
Wed, 03/31/2010 - 11:35
I love this piece. Was just
I love this piece. Was just building it and noticed that I think there is a mistake in the cutting list. Front and back top aprons should be 1x3, not 1x2. I think? Thanks! Will send pics when I'm done. :)
Loni (not verified)
Wed, 04/14/2010 - 07:28
I was curious, I'm just
I was curious, I'm just getting started building this and I noticed that your wood and cut list did not include the wood for the bottom shelf. (Unless I've totally messed something up, which is totally possible). I thought you might would like to add a note about that so more people wont have to make a second trip to the store. Thanks so much! I cant' wait to post pics!
TotalSolidarity (not verified)
Tue, 04/27/2010 - 10:20
Can anyone tell me
Can anyone tell me approximately how much this costs to make, and how long it took you to make?
nkdub (not verified)
Fri, 04/30/2010 - 10:09
Love the plan! Quick question
Love the plan! Quick question before I get started. Can anyone tell me if the top is flat or are the breadboard ends higher? The instructions make me think it is not perfectly flat but the more finished illustrations show it flat. BTW, Anna, your step-by-step illustrations ROCK!
Ana White (not verified)
Fri, 04/30/2010 - 10:25
The top boards sit flush with
The top boards sit flush with the breadboard ends. :)
TotalSolidarity (not verified)
Fri, 04/30/2010 - 16:12
yeah I was wondering this
yeah I was wondering this too. I thought the top boards were lower than the bread board ends, and then i realized I was just looking at the support boards. The top boards that go over the support boards are flush with the breadboard ends.
McKenzie (not verified)
Wed, 05/12/2010 - 16:49
girl. i currently live in
girl. i currently live in rexburg idaho. it is like alaska's slightly more tame step-sister. and im from ARIZONA! thank you for posting this and reminding me that yes, somewhere out there, there is warm weather!
Loni (not verified)
Wed, 01/26/2011 - 09:04
Just wanted to add this. I
Just wanted to add this. I did totally mess up. lol. Being a first time buyer of lumber, I accidentally bought 6' boards instead of 8'. I didn't even know you had a choice so I never checked.
I'm sorry!
Sam G (not verified)
Tue, 05/03/2011 - 06:00
How to convert
I'd love to convert these plans to make a 36" square upholstered ottoman similar to this one http://www.overstock.com/Home-Garden/Hudson-Dark-Brown-Leather-Ottoman/…. I think I would just reduce the leg length by the height of the foam cushion and use a solid piece of wood for the top. Hopefully my husband can figure out the right dimensions.
Ben H (not verified)
Mon, 07/02/2012 - 10:58
Is anyone else confused by
Is anyone else confused by the image for the first step? It doesn't show how much space you should put between the supports.
Ncs123
Sun, 06/02/2013 - 04:13
Image is wrong
Yes the first image must be wrong. Even though it is referred to as important. It's a nice table and I'm trying to build it but this does not help.
Also the PDF link is its own disaster, and the correct image is not there either. Help!
Ncs123
Sun, 06/02/2013 - 04:13
Image is wrong
Yes the first image must be wrong. Even though it is referred to as important. It's a nice table and I'm trying to build it but this does not help.
Also the PDF link is its own disaster, and the correct image is not there either. Help!
Ncs123
Sun, 06/02/2013 - 04:14
Image is wrong
Yes the first image must be wrong. Even though it is referred to as important. It's a nice table and I'm trying to build it but this does not help.
Also the PDF link is its own disaster, and the correct image is not there either. Help!