


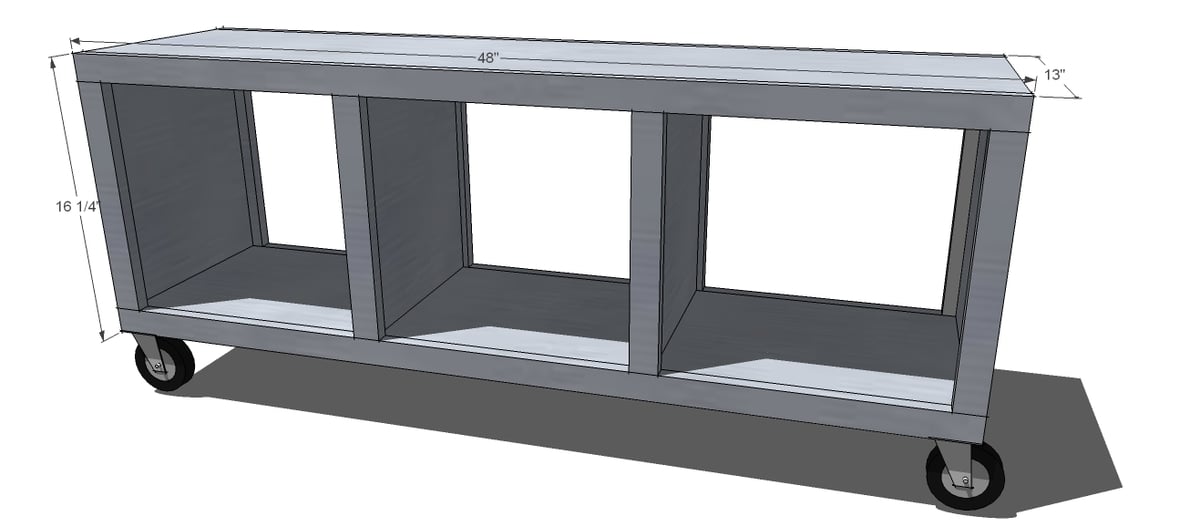
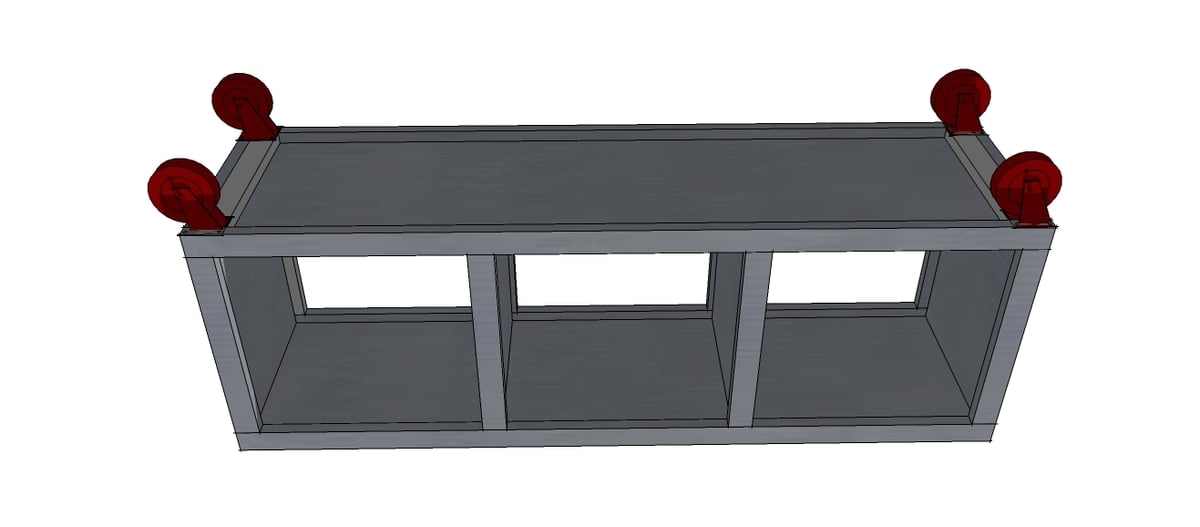
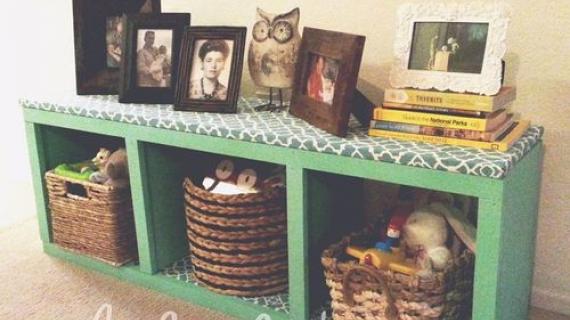
These rolling cubbies feature three large cubbies at bench height. Easy to build and fully framed, inexpensive and sturdy, there is a place for these rolling cubbies in every home.
Preparation
1 – 8′ 1×12 board
1 – 6′ 1×12 board
4 – 1×2 8′ boards
2″ nails for finish nailer
Wood filler
Wood glue
4 caster wheels with screws
1 – 1×12 @ 48″ (Top)
1 – 1×12 @ 46 1/2″ (Bottom)
2 – 1×12 @ 15 1/2″ (Sides)
2 – 1×12 @ 14″ (Dividers)
4 – 1×2 @ 48″ (Horizontal Trim)
8 – 1×2 @ 13 1/4″ (Vertical Trim, measure to fit perfectly)
2 – 1×2 @ 11 1/2″ (Wheel Supports, measure to fit)


Work on a clean level surface. Mark out joints prior to fastening. Take a square after each step to ensure your project is square. Use glue and 2″ nails unless otherwise directed. Wear saftey gear and take necessary safety precautions.
Instructions
Step 1
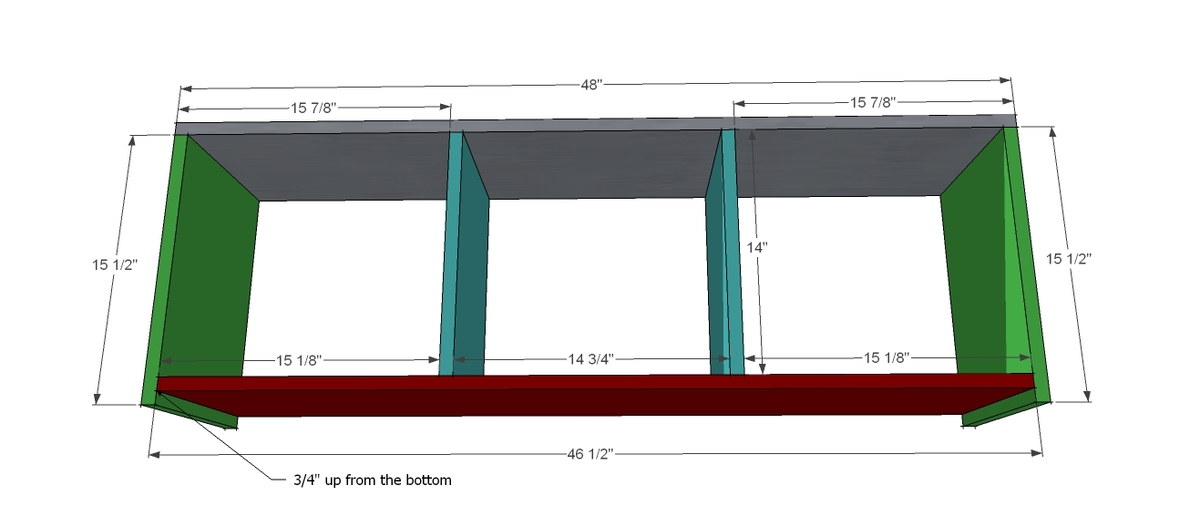
Build the box. Build the box, as shown above. Use the 2″ nails and glue to fasten in place.
Step 2
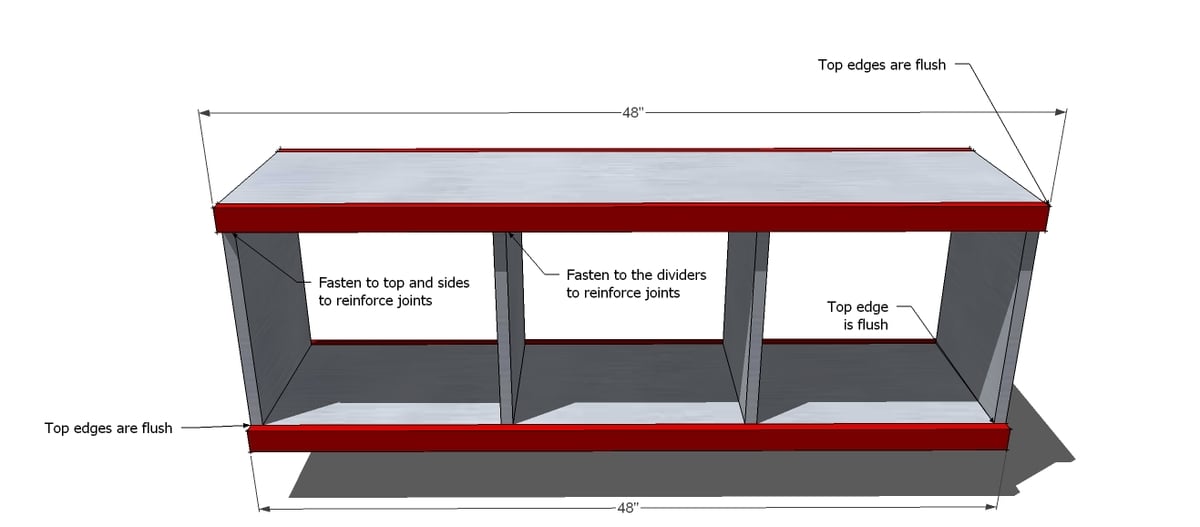
Top and Bottom Trim. Fasten the top and bottom trim pieces, as shown above. Keep top edges and outside edges flush. Make sure you fasten the top piece to the dividers, sides and top. This will help reinforce your joints. Use glue and 2″ nails.
Step 3
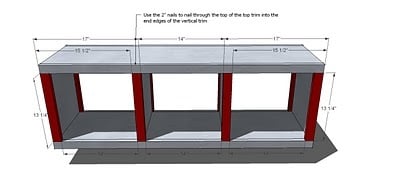
Vertical Trim. Fasten the vertical trim in place, using the measurements shown above. Keep the outside edges flush. The center vertical trim pieces will be centered on the vertical dividers. Use the 2″ nails and glue. Also fasten through the top and bottom of the horizontal trim pieces from step 2 into the end edges of the vertical trim.
Step 4

Supports. Fasten the supports as shown above.
Step 5


Comments
Christine (not verified)
Tue, 03/02/2010 - 07:25
Awesome! I want to make a
Awesome! I want to make a few of these to corral the kids' toys! Is a finish nailer essential? Because I have NO tools... besides my cordless drill, hammer, etc.
Ana White (not verified)
Tue, 03/02/2010 - 07:32
Hi Christine, you could screw
Hi Christine, you could screw it together, nails are just easier and easier to hide. Make sure you predrill and countersink your screws.
ima (not verified)
Tue, 03/02/2010 - 07:34
So - if I did want it
So - if I did want it bench-height, do I need to modify your plans?
Kelblue (not verified)
Tue, 03/02/2010 - 07:35
YAY for modern...thanks!!
YAY for modern...thanks!!
Ana White (not verified)
Tue, 03/02/2010 - 07:44
To get bench height, simply
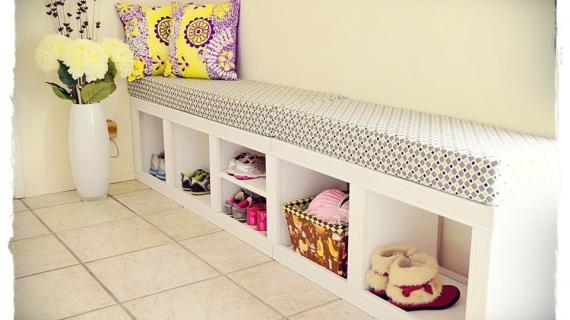
To get bench height, simply use caster wheels with an overall height close to 2"
So Bella (not verified)
Tue, 03/02/2010 - 08:15
Eeek! This is the one I've
Eeek! This is the one I've been waiting for! Can't wait to see the plans for the big cubbie, too! Thanks, Ana, you rock!
LoriD (not verified)
Tue, 03/02/2010 - 08:57
I love this! I can't think
I love this! I can't think of a single place for it in my home, and yet...
Karin Schueller (not verified)
Tue, 03/02/2010 - 10:31
I am so excited to get
I am so excited to get building... just found your site a few days ago. What a wonderful gift you have! Not just for creating... but for teaching!!!
I am wondering about using a 'brad' nailer for some of the products? Is that not deep enough? Or does it work?
Annalea (not verified)
Tue, 03/02/2010 - 10:52
This is awesome. I've been
This is awesome. I've been in love with square cubbies for a long time, and I love to seem them used everywhere.
One note: the West Elm photo shows a fifth caster in the middle of the bench (I think it's just centered from front to back and side to side). So, you might want to include that, as there's not much diagonal bracing, and we don't want sagging benches!
Abigail Carter (not verified)
Tue, 03/02/2010 - 11:33
HiMy name is Abigail Carter.
Hi
My name is Abigail Carter. I've just visited your website http://knockoffwood.blogspot.com/ and I was wondering if you'd be interested in exchanging links with my website. I can offer you a HOME PAGE link back from 2 of my Home Improvement Guide websites which are:
http://berkleyhomes.org/ pr4
http://www.aitong120.com/Links.html pr2
If you are interested, please add the following information to your website and kindly let me know when it's ready. I'll do the same for you in less than 24 hours, otherwise you can delete my link from yoursite.
Title: Coffee Table
URL: http://www.uk-contemporary-furniture.co.uk/pesado-trio
Description: Big brother of the Pesado Duo, this coffee table adds a bit of drama and adventure to your room!
I hope you have a nice day and thank you for your time.
Best regards;
Abigail Carter
Web Marketing Consultant
abigail.carter@berkleyhomes.org
PLEASE NOTE THAT THIS IS NOT A SPAM OR AUTOMATED EMAIL, IT'S ONLY A REQUEST FOR A LINK EXCHANGE. YOUR EMAIL ADDRESS HAS NOT BEEN ADDED TO ANY LISTS, AND YOU WILL NOT BE CONTACTED AGAIN.IF YOU'D LIKE TO MAKE SURE WE DON'T CONTACT YOU AGAIN, PLEASE FILL IN THE FOLLOWING FORM: HTTP://WWW.NOMOREMAILS.COM; OR WRITE AN EMAIL TO STOP@NOMOREMAILS.COM.PLEASE ACCEPT OUR APOLOGIES FOR CONTACTING YOU.
Melody (not verified)
Tue, 03/02/2010 - 11:50
I'm very new to woodworking,
I'm very new to woodworking, and I realize that using screws will make it stronger, but I'm curious as to how sturdy this will be with nails. I'm NOT questioning the general integrity of it, but I have a 1 year old and a 2 year old who are all over everything. Would it stand up to that?
Denise (not verified)
Tue, 03/02/2010 - 12:08
Ana,you have done it again!
Ana,you have done it again! Another fabulous project! http:www.extremepersonalmeasuresmcom
Ashley (not verified)
Tue, 03/02/2010 - 12:17
Thank you so much for showing
Thank you so much for showing some more modern furniture.
Ana White (not verified)
Tue, 03/02/2010 - 14:18
Hi Annalea, thanks for
Hi Annalea, thanks for noticing the extra wheel! If you are planning on using alot of weight, the wheel is a great idea.
As far as nails go, I've used nails for quite a few pieces. Screws are defintely stronger. But this piece has a frame on both sides. The frame reinfoces everything, so it's completely different than just nailing two boards together.
However, if you have kids and this could actually become a manned vechicle around your kitchen island, you may wish to screw the box together. My favorite way to build is to screw the box together and then add the trim with finish nails. That way you get the strength of screws where it counts, but the hidden nails on the frame.
Callie (not verified)
Tue, 03/02/2010 - 14:30
LOVE this Ana! Thank you for
LOVE this Ana! Thank you for tiptoeing into the modern style world. =)
Anonymous (not verified)
Tue, 03/02/2010 - 17:39
I am so excited to see this
I am so excited to see this post. I can't wait for the bigger one! It is so going in my craft room! I am going to make 2 of the small one, one for each of my sons! You rock!
livelaughscrap88 at gmail dot com
Gen (not verified)
Tue, 03/02/2010 - 20:10
Love this! I bought this from
Love this! I bought this from IKEA about a year ago and I am kicking myself now! Can't wait for the big one!
Sarah (not verified)
Wed, 03/03/2010 - 02:16
Oh yay MODERN plans! Thank
Oh yay MODERN plans! Thank you thank you!
Qycone (not verified)
Wed, 03/03/2010 - 03:23
This is the kind of stuff I
This is the kind of stuff I adore! I was hoping one day you would do some cubbies! I can't wait for spring so I can have the room to make these! I am looking forward to the plans for the bigger ones too!
Anonymous (not verified)
Wed, 03/03/2010 - 09:20
Hi Ana,Long time woodworker
Hi Ana,
Long time woodworker here and I just came across your site. It's awesome!
I was wondering if you could post plans for the larger cubbie unit?
thanks,
Hank
Melissa (not verified)
Wed, 03/03/2010 - 12:03
OOOO!! I'm waiting for the
OOOO!! I'm waiting for the bigger one and then I'm going to try to make this!! Can't wait!!
jrwarfield (not verified)
Fri, 03/05/2010 - 17:26
I Love these more modern
I Love these more modern cubies. Thanks for sharing, I can't wait to try making some myself!
Sarah (not verified)
Tue, 03/09/2010 - 18:09
omg, love at first site
omg, love at first site visit! I've been wanting just such a pair of versatile benches and this looks like a perfect starter project. thanks for starting such an awesome, femme friendly DIY blog!
Jennifer (not verified)
Thu, 03/11/2010 - 12:52
Hi Ana! Would it be easy to
Hi Ana! Would it be easy to simply add 2" feet rather than casters? I am thinking of doing this design (http://images.landofnod.com/is/image/LandOfNod/5004022%5FCubeCollection…$) from Land of Nod for my youngest's bedroom. I think your rolling bookcase plans would be easy to adapt.
I want to do the cubby bench in the middle (under her window) and then put DOUBLE-wide, tall cubby bookcases on each side of her window. But I definitely don't want any of the pieces to roll........... :)
Thoughts?
Jess (not verified)
Thu, 03/11/2010 - 16:01
Hi Ana, Love the blog! Like
Hi Ana, Love the blog! Like you, I love farmhouse style. I love the simplicity of this cubby, but it doesn't have the exact look I like. What do you think about adding colonial moulding or something around the edges to give it more of a farmhouse look? Would it be too much?
Ana White (not verified)
Thu, 03/11/2010 - 18:00
Jennifer, it would be very
Jennifer, it would be very easy to do what you are talking about. Just trim the top out first, then extend the side trim down as far as you would like, then trim the bottom and cubbies out.
Jess, if you would like to add base mouldings, do what Jennifer above is doing. You should be able to easily add standard 3 1/4" moulding to the bottom edge and the sides. Actually have the DIY mag, and they do something very similar to this with the IKEA (TM) stuff.
Ana
Natty (not verified)
Sat, 03/20/2010 - 19:03
Oh my! I cannot even tell you
Oh my! I cannot even tell you how happy I am to have happened upon your site! You do truly amazing work. I actually found you while doing a google search for "how to build a bench". My parents are going away for a week and I am planning on redecorating (or rather decorating for the first time) their entryway. I REALLY wanted a bench for under their window with some storage and this is absolutely perfect. Will certainly send some photos once it's finished. Thanks!
aklatina (not verified)
Sat, 03/27/2010 - 19:57
OH MY GOSH! thank you so much
OH MY GOSH! thank you so much for these I just got the catalog and was Drooling over these, although they looked simple in the catalog, I would have never thought to attempt them without plans, and getting anything similar even here in anchorage is impossible.! Cant wait to try these thank you again! Love your blog!
teamshield (not verified)
Fri, 04/30/2010 - 01:17
Ana: I made this as my first
Ana: I made this as my first project and my family(and husband) was so impressed. I painted mine glossy black and I am using it as a bench next to our indoor artificial ice rink. I put rubber floor tiles in the bottom of each cubby so that skates could be stored inside. It's the perfect spot to sit while putting on skates. Before I built this, my husband had a folding, ripped plastic lawn chair. :)
I did predrill holes for my nails and left off the casters. I had my big blue store cut the wood for me and it honestly took longer waiting for the wood than it did to put it together!
Thanks so much!!
i (not verified)
Thu, 08/12/2010 - 07:20
LOVELY! I was wondering if
LOVELY! I was wondering if you have plans for the same thing w/ 9 cubbies?
Eric and Jessi (not verified)
Wed, 08/25/2010 - 12:28
Where did you get/How did you
Where did you get/How did you make the cushion? This is my first project and so far it's great!
Ana White (not verified)
Fri, 09/17/2010 - 11:53
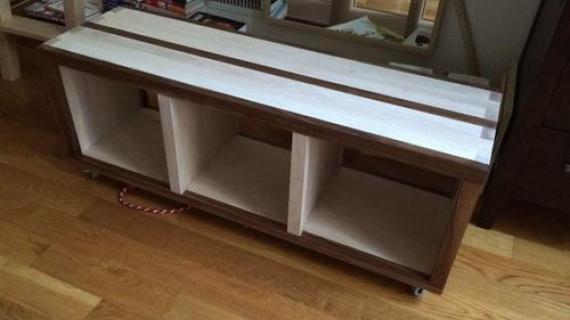
Check out Mike's rolling
Check out Mike's rolling cubbies!
Linda (not verified)
Thu, 10/07/2010 - 17:25
Hi, can't wait to make my
Hi, can't wait to make my first knock off wood project, but which ONE to pick?! Would this rolling cart need to have the cubby dividers underneath? Could it be left open? I'd like to make this for my laundry room and store 2 rectangular baskets underneath and 2 round baskets on top. Just want to make sure it would be sturdy enough. Thanks!! Love all of your plans!! They're great!
liz (not verified)
Mon, 11/15/2010 - 16:35
I was wondering if it would
I was wondering if it would be possible to build this with 4 cubes, a bit wider? If so, could you please send me the new dimensions and cut list?
Thanks so much for the wonderful site-I can't wait to get started!!!
Can it be spri… (not verified)
Mon, 11/22/2010 - 16:07
[...] Project #10: Rolling
[...] Project #10: Rolling Cubbies [...]
Cubbies and Lo… (not verified)
Thu, 12/02/2010 - 20:06
[...] love the lockers and
[...] love the lockers and cubbies set up in the picture below. Ana White provides bench with cubbies here And the locker with cubes plan is here Both furniture pieces are were inspired by West Elm Read [...]
Cubbies and Lo… (not verified)
Sat, 12/04/2010 - 19:17
[...] Cubbies and Locker
[...] Cubbies and Locker Bench Plans via Better Homes and Gardens I could really use this storage bench on rollers in an area where we enter into our home. This is a great way to store shoes, etc out of the way! I also love the lockers and cubbies set up in the picture below. Ana White has the plans for this bench with cubbies go here [...]
Janeen (not verified)
Thu, 01/06/2011 - 09:13
Hi Ana Your designs offer
Hi Ana
Your designs offer really great solutions that leave me wanting to try them all! What is the recommended paint finish? Is there a special type that should be used so I can avoid a tacky or sticky surface?
Thanks again for all of your great designs and inspiritation.
Design Inspira… (not verified)
Sat, 01/29/2011 - 17:27
[...] hooks & a storage
[...] hooks & a storage ottoman. We’re also considering building a rolling storage unit using Ana White’s instructions. I love the look of this unit with the storage for mittens & scarves, [...]
jennrsnow
Wed, 03/30/2011 - 13:13
(No subject)
Jaci Lapointe (not verified)
Thu, 12/01/2011 - 07:08
LOVE IT!
I love it, I am going to make this for my sons room!
bubble shooter (not verified)
Fri, 02/17/2012 - 04:20
bubble shooter
This webpage was added to my bookmarks. I can not wait to learn more about this subject.
Sandy R. (not verified)
Tue, 01/15/2013 - 19:57
Building a cubby bench
Hi Ana, I love your website!! I am looking to build a 5 space cubby bench. I really like the expedit bookcase by IKEA laid on it's side to make a cubby bench so that is what I am trying to do. Your cubby bench is perfection! Can I just double your measurements for a 5 cubby bench and add 2" to the height since I won't be using wheels? Also what kind of wood do I buy? And what is the measurement of each cubby?
lisaluvschuck
Fri, 07/17/2015 - 16:50
interior dimension?
Does anyone know the interior dimensions once completed? i would like to know if the baskets i have will fit
distybug
Thu, 07/23/2015 - 20:46
Rolling cubby bench
Would this be sturdy enough for a couple of people to sit on?