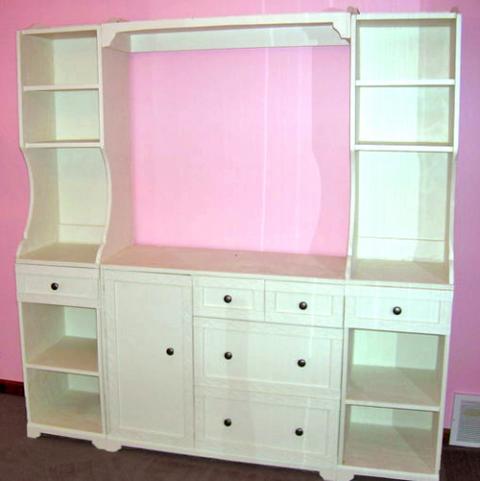


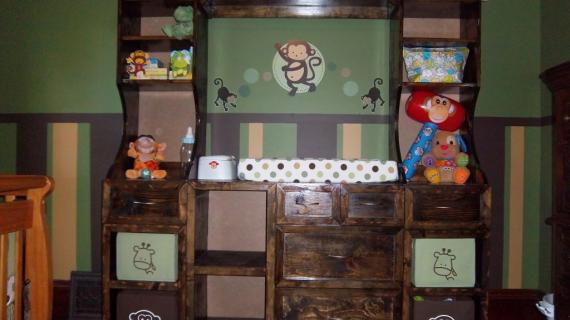
With two shelves and a drawer, necessities for baby like diapers, wipes, and lotions, can be kept within reach. A beautiful footer adds charm to this piece. Works with the rest of the Madeline Collection of plans.
Pin For Later!

Preparation
1 Sheet of 3/4″ MDF or 3/4″ A1 Plywood, cut into 1×16 boards 1 – 1×6 Board (you only need about 5′ feet) 1 – 1×2 Board (you only need about 3′ feet) 3 1/4″ Floor trim or base moulding 3/4″ Edge Trim (3/4″ wide) 1 – Wood Knob 2″ Nails 1 1/4″ Nails Wood Glue Wood Filler Sand Paper Finishing Supplies Optional 12″ Drawer Slides, side mount, 1/2″ overall clearance on the sides Knob for drawer
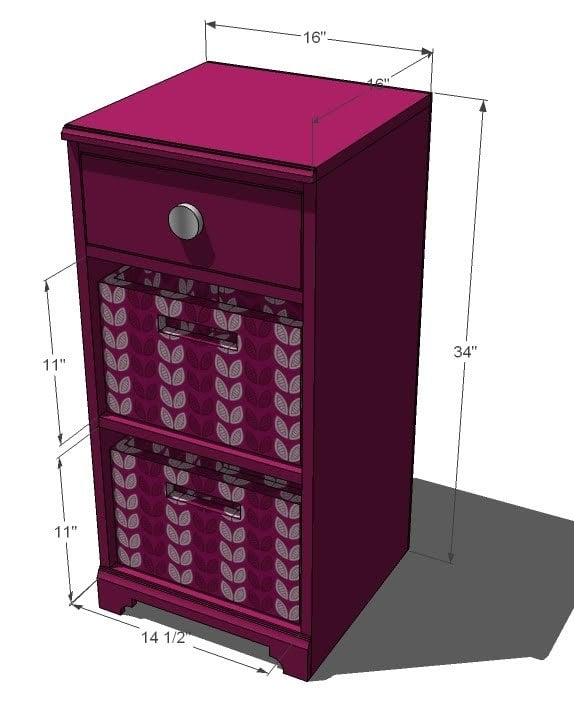
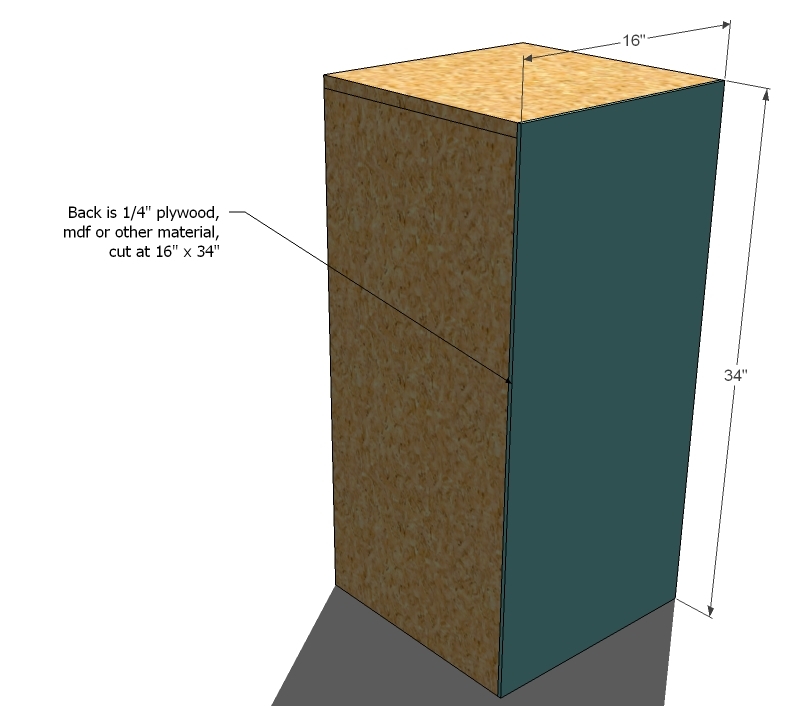
Please note that I choose to build these plans 16″ deep as opposed to 19″ to conserve building materials (you can get 50% more 1x16s out of a sheet of plywood or MDF than you could get 1x19s out of the plywood or MDF). Changing pads are tradditionally 16″ wide. You can modify these plans for a wider depth by using a wider width plywood or MDF strip. And yes, the cubbies will fit the Pottery Barn Kids storage boxes. Cutting List for the Box 2 - 1×16 @ 33 1/4″ (Sides) 3 – 1×16 @ 14 1/2″ (Shelves) 1 – 1×16 @ 16″ (Top) Cutting List of Trim 2 – 1×2 @ 14 1/2″ (Inner Trim) 1 – 3/4″ Edge Trim @ 16″ (Front Edge Trim) 1 – 3 1/4″ Base Moulding or Floor Trim @ 16″ (Base Moulding) Cutting List for Drawer 2 – 1×6 @ 14 1/2″ (Drawer sides) 1 – 1×6 @ 12 3/4″ (Drawer back) 1 – 1×6 @ 14 1/4″ (Drawer Face) 1 - 1×16 @ 12 3/4″ (Drawer Bottom, trim the width down to 12 3/4″ x 13 3/4″)


Instructions
Step 1
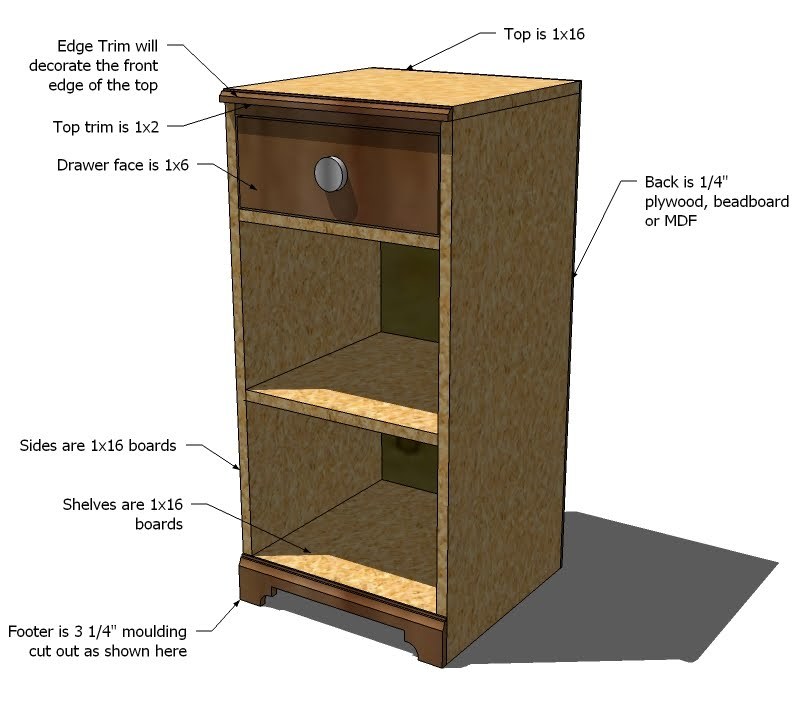
Composition is shown above. Use 3/4″ MDF for painting with pine boards, 3/4″ A1 plywood for staining, with hardwood boards (boards are shown in dark brown above)
Step 2
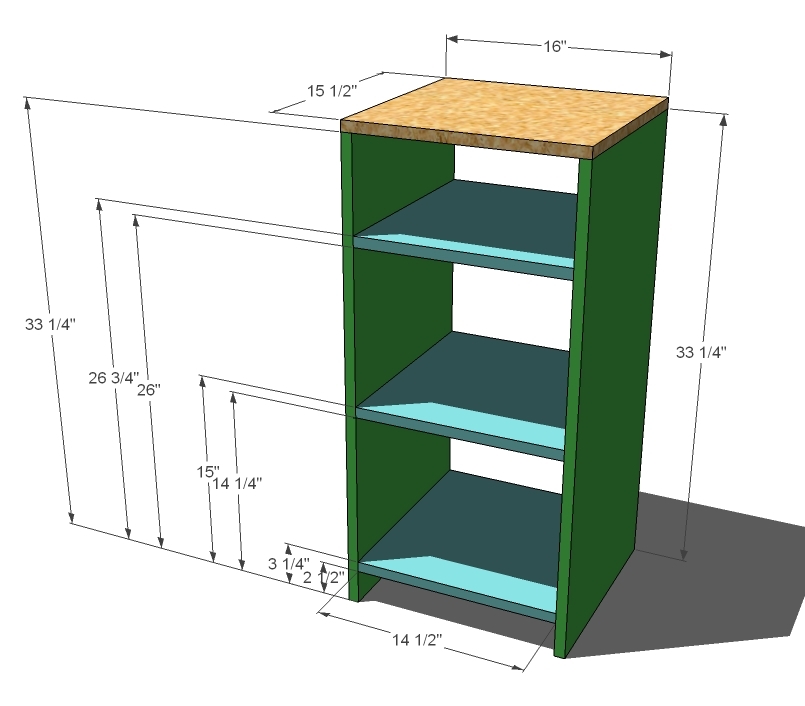
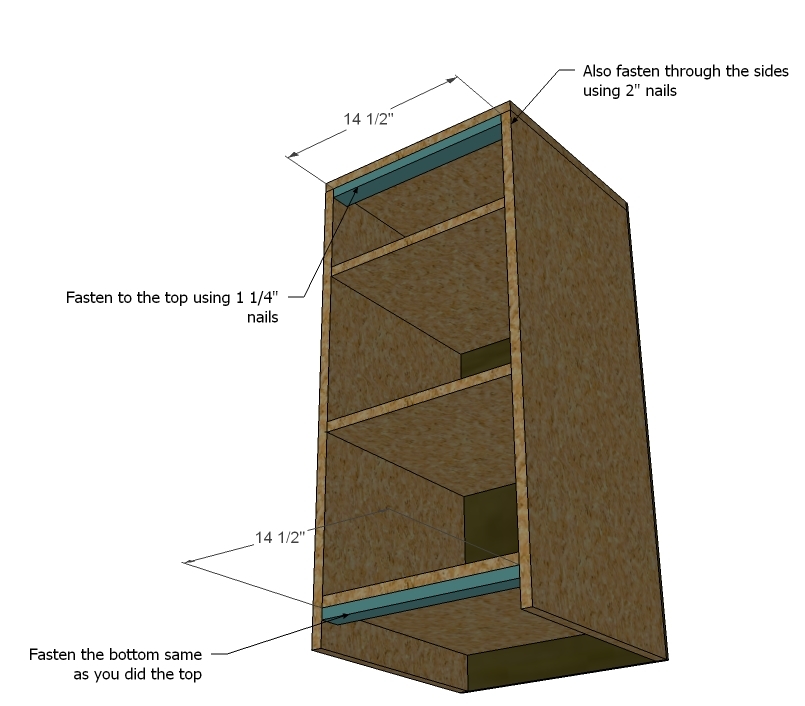
Build the Box. Start by marking your sides as shown in the left of the diagram above. Mark both the inside and the outsides of the side boards so you know where to fasten and where to line the boards up at. With the sides marked, fasten the shelves in place, keeping the front edges flush. Then fasten the top in place.
Step 3
Back. Square your project up. Then using glue, fasten the back to the cabinet using 1 1/4″ nails. Make sure you fasten to the shelves too.
Step 4
Inner Trim. Fasten the inside trim pieces as shown above. Check for square and fasten to both the shelves and sides to reinforce your joints. Use glue.
Step 5
Step 6
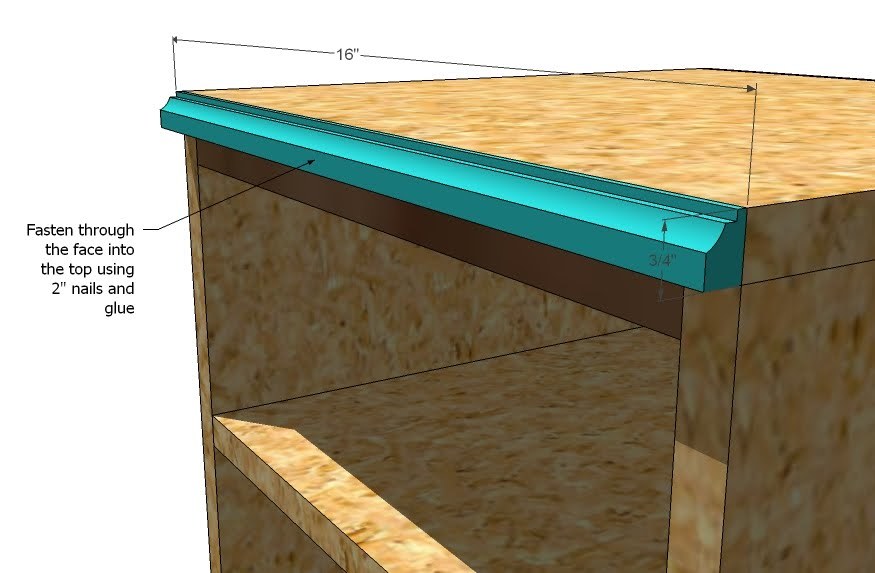
Top Edge Trim. With glue and nails, fasten the top edge trim as shown above. Keep outside and top edges flush. You could aslo use trim up to 1 1/4″ wide here.
Step 7
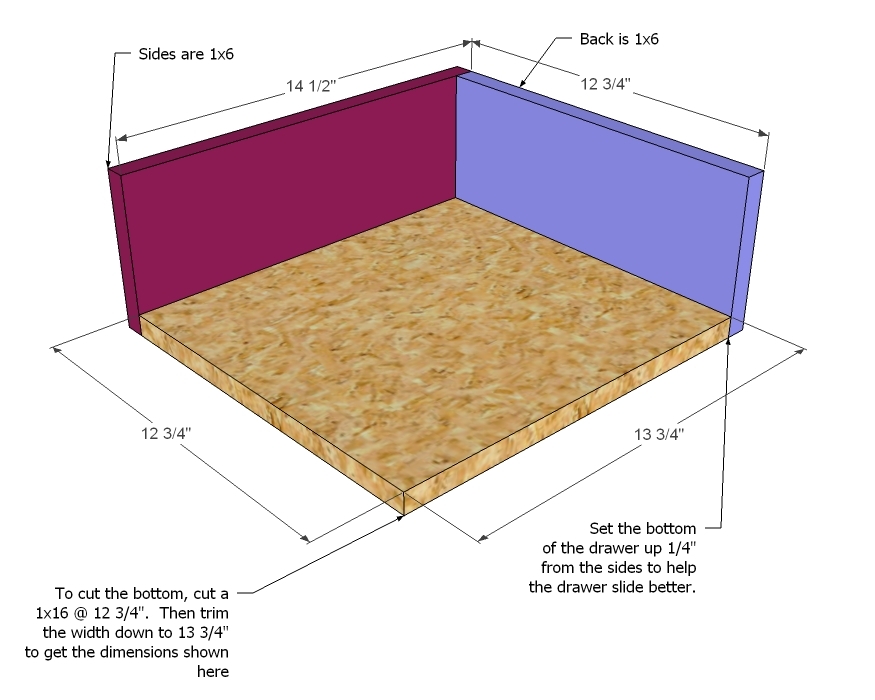
Drawer Construction. First cut your drawer bottom from the 1×16, length of 12 3/4″. Then cut the width side down to 13 3/4″ (completed dimensions should be 12 3/4″ x 13 3/4″). You must cut the drawer bottom perfectly square. Then fasten the drawer back to the bottom. Then the sides to the back and bottom. Use 2″ nails and glue. You may wish to inset the bottom up 1/4″. The easiest way to do this is use a scrap piece of plywood 1/4″ and rest the bottom on the scrap. Then fasten the sides. Make sure you build a square drawer.
Step 8

Drawer Face. Insert the drawer into the drawer housing in the cabinet (without the face attached). Then center the face on the drawer and attach the face to the drawer, leaving a 1/8″ even gap around all edges, including the bottom edge. Use glue and 2″ nails
Step 9
Finishing. Fill nail holes with wood filler and sand and finish as desired. Add the front knob.
Comments
Goings on at t… (not verified)
Thu, 03/04/2010 - 08:53
OH perfect! When I am
OH perfect! When I am expecting another I am soooo going to build this! Can't wait to have all the plans!
Michaela at Th… (not verified)
Thu, 03/04/2010 - 09:09
Wow. Ana. Amazing as usual. I
Wow. Ana. Amazing as usual. I want to build this for my sister and sweet nephew. Me? Hmm. It looks like a lot of work, being a mom. I guess I am still trying to make up my mind...
xo
Anne (not verified)
Thu, 03/04/2010 - 09:27
Oh gosh.......... we're
Oh gosh.......... we're trying for #2, and this almost makes me want to build it NOW before we even get pregnant...... just have to figure out how to convince the hubby considering we're in the middle of the Cameron wall unit project right now :)
I love it!!!!!!!!
Matt and Rache… (not verified)
Thu, 03/04/2010 - 09:28
Gorgeous! You're almost
Gorgeous! You're almost making me want to have a baby to use it.
TracyD (not verified)
Thu, 03/04/2010 - 10:40
By the way, for those of us
By the way, for those of us without babies, this would make a CUTE nightstand!!
Anonymous (not verified)
Thu, 03/04/2010 - 10:48
Love you, Ana!!! ;-)"Groeten
Love you, Ana!!! ;-)
"Groeten uit Amsterdam!!!"
Palma
Curried Cupcakes (not verified)
Thu, 03/04/2010 - 12:12
This is WONDERFUL! It has
This is WONDERFUL! It has officially been put on my to do list. Right after my kitchen island and headboard. Love your work!
Kiama Dawson (not verified)
Thu, 03/04/2010 - 12:46
OOOHhh!!! This almost makes
OOOHhh!!! This almost makes me want to have another baby. It is perfect!
Heather - Doll… (not verified)
Thu, 03/04/2010 - 12:50
Cool, this piece might be a
Cool, this piece might be a great nightstand for our GINORMOUS bed (the Stratton King size) - we just got the mattresses today (my husband wants to use the box spring with the mattress because he likes a TALL bed)... I'll have to write it up for you because you'll laugh at how huge the bed is... but anyway, this taller piece could be used for a tall nightstand! :)
Megan (not verified)
Thu, 03/04/2010 - 12:56
Yay!!! I didn't realize I
Yay!!! I didn't realize I needed a new changing table until I saw these plans. Sure, I knew I WANTED one, but this is the coolest changing station I've ever seen. And I will totally paint it a fun color.
New priority list: send final eviction notice to Baby Boy (due in a couple weeks), finish Masters degree, move across the country, buy power tools, build bed for mommy and daddy, build bed for little girl, build dining room table, build changing system for baby boy!
Katie (not verified)
Thu, 03/04/2010 - 12:57
Oh my gosh, Ana, bless you.
Oh my gosh, Ana, bless you. Can't wait to make it (and I really need it!). I have to finish the simple bed for my son first...
Nick and Terryn (not verified)
Thu, 03/04/2010 - 12:57
Yay! I am so glad you posted
Yay! I am so glad you posted this. In fact I searched your blog for a changing table this morning! Imagine my suprise when I saw this perfect changing table this afternoon! I am hoping you post the plans for the center changing table portion soon, because that is all I will have room for in my baby's room. And I only have 30 days left until baby will be here! Thanks for all of your wonderful plans! I tell everyone I know about your site!
K (not verified)
Thu, 03/04/2010 - 13:02
No babies in my future but I
No babies in my future but I could see putting a mirror in the middle area and making this into a vanity extraordinaire!
I've been reading your blog daily for a while now, but this is the first time I have commented. Just wanted to thank you for all the work you have put into this. I can't wait to find the space to take on one of the many projects I have been eyeing!
-K
bundle#1 (not verified)
Thu, 03/04/2010 - 13:15
OMG I have wanted plans for
OMG I have wanted plans for this!!! My husband and I are TTC and this is the one I want! Thank you so much Ana. :)
Kristen (not verified)
Thu, 03/04/2010 - 17:01
AWESOME!!!!!!!!!!! Thanks so
AWESOME!!!!!!!!!!! Thanks so much!! Can't wait to get started
Serena (not verified)
Thu, 03/04/2010 - 18:18
This is amazing! No little
This is amazing! No little babies in our house at the moment, but I am filing this away for when there is.
Can't wait to see the rest of the plans.
Tosha (not verified)
Thu, 03/04/2010 - 19:42
We're trying right now and
We're trying right now and this is *so* going in our baby folder! This would actually make a really cute desk system too with a few modifications. I have so many of your plans on my to-do list. Now... all I need is power tools... hmmmmm
Aly (not verified)
Fri, 03/05/2010 - 04:41
HURRAY!! I saw that this was
HURRAY!! I saw that this was on your TO DO list and didn't want to bother you about it, but I am SO SO SO excited about this project!! :) We are building a new home and move in 2 weeks, so I have a big list of your amazing projects I want to do to add a little something to our home. Thanks so much! You are completely AMAZING!!
Brooke (not verified)
Fri, 03/05/2010 - 08:59
When you have another little
When you have another little one they will be so lucky to have you for a mama. Its so fun that you and your little girl work together in the shop. You can have more helpers :)
Ellie Cutler (not verified)
Fri, 03/05/2010 - 11:35
OH...MY...GOSH!!!!!!! I've
OH...MY...GOSH!!!!!!! I've been waiting and waiting for this plan! Thank you sooooooooo much! My daughter just turned one but it's such a cute station that I'll put it in her room anyway!!! Plus...there's always the next baby! Thank you thank you!!!
Erin W. (not verified)
Fri, 03/05/2010 - 19:18
I love this. Wish I had it
I love this. Wish I had it when my kids were younger. No problem my brother and his wife are going to have a baby so I am gonna convince my mom to make it with me as a joint gift, to go along with everything else we get. LOL. I should make one for my room too though, I could put the tv in the center. HMM....
Rob and Amy (not verified)
Sat, 03/06/2010 - 03:31
YAHOOOOOOOO!!!!!!!!!!!!!!!!!!
YAHOOOOOOOO!!!!!!!!!!!!!!!!!!! I LOVE IT!!!!!!!
Anonymous (not verified)
Sat, 03/06/2010 - 19:23
I don't have any children but
I don't have any children but this is PERFECT for an entertainment center for me! The TV will fit nicely in the middle, the computer tower in the tall door, turn the horizontal doors into open shelves for the dvd player and surround sound and still have more than plenty of storage space for the movies, music, and games! Love it! Can't wait for the whole set of plans.
Emily (not verified)
Sun, 03/21/2010 - 03:03
LOVE this project, I'm almost
LOVE this project, I'm almost 15 weeks pregnant and I've been scouring the internet looking for furniture. Fortunately, another mama online pointed me to you!
I've already shown the plans to my best friend, and we're each going to make one! My husband even likes it, but said he won't have time to help me...won't he be surprised? :)
What I love about this set is that it's a changing table, dresser, and bookshelf all-in-one!
Thanks for all the plans, keep up the great work!
Erin I (not verified)
Tue, 03/23/2010 - 08:39
I'm (patiently!) awaiting the
I'm (patiently!) awaiting the center part of this system. I just had my 3rd girl and finally getting girly. I'm thinking of doing this in a pale pink. The side units are perfect for nightstands if you take off the bottom cubby. Thank you so for the plans!
Lorielsmith
Sat, 09/20/2014 - 17:48
Looks like a charm
Ok so I'm relatively new at DIY projects and your blog (which I adore btw). I can see the Madeline Side Hutches for the Nursery Changing Wall and the side bases but I don't see plans for the center section or the top shelf. Will someone post the link? Thanks!
JoanneS
Sun, 09/21/2014 - 08:33
Links to Madeline collection Center base and upper section
These are the links to the center and upper sections of the Madeline collection nursery wall:
Center base
http://ana-white.com/2010/04/plans-changing-table-for-scallopped.html
center bridge
http://ana-white.com/2010/03/plans-scalloped-edge-changing-bridge.html
Happy building!