
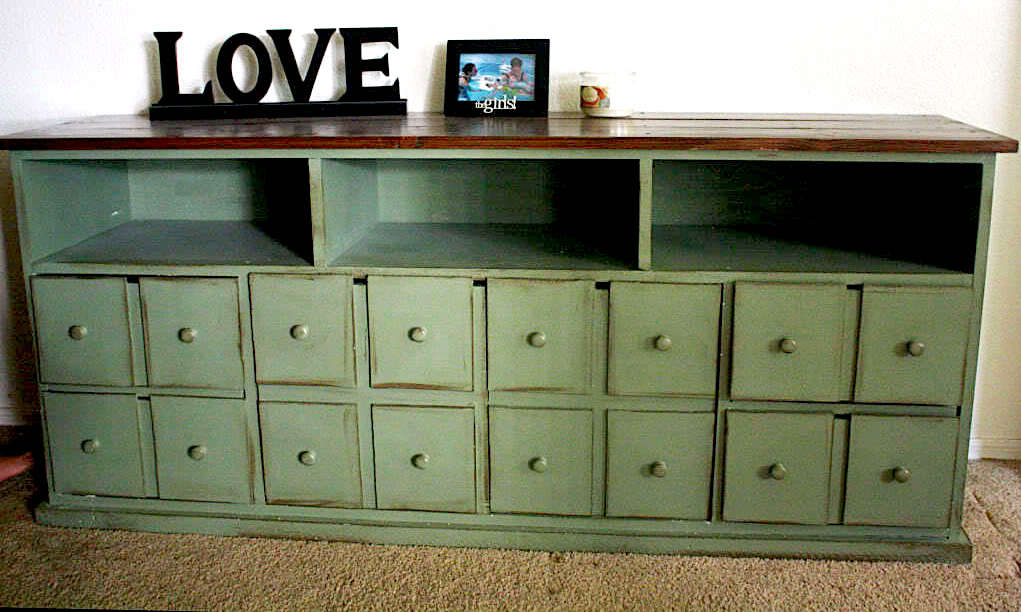

This beautiful apothecary console features three open cubbies perfect for storing entertainment controllers, four drawers and two cabinets, all concealed by door fronts that look like an apothecary cabinet. Loved by so many, this console is easy to build and can add that touch of character to your family room.
Preparation
- 2 – Sheets of 3/4″ MDF or Plywood, cut into 15 1/2″ wide strips, 8′ Long
- 1 – 1/4″ Plywood or Lauan or MDF (for the back)
- 1 – 12′ long 1×6
- 1- 8′ long 1×6 Boards
- 2 – 1×2 Boards
- 2″ self tapping star bit screws
- 1 1/4″ self tapping star bit screws
- Wood Glue
- Wood Filler
- Finishing Supplies
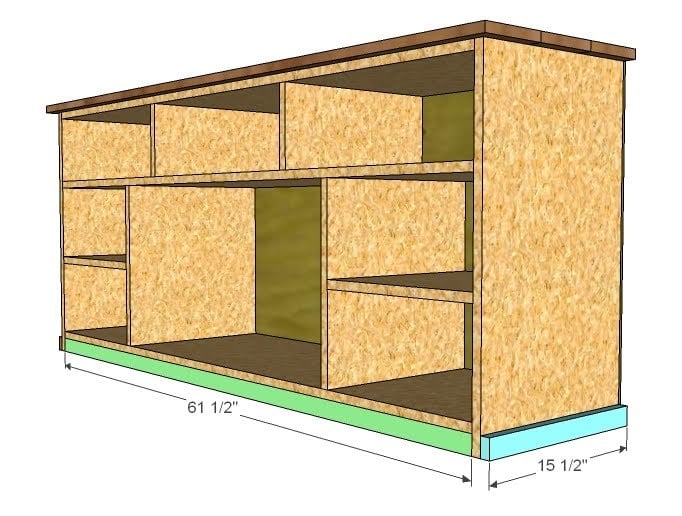
- 3 – 1×16 @ 61 1/2″ (Shelves)
- 2 – 1×16 @ 16 1/4″ (Bottom Dividers)
- 2 – 1×16 @ 14 3/4″ (Drawer Dividers)
- 2 – 1×16 @ 7″ (Top Dividers)
- 2- 1×16 @ 27″ (Sides)
- 1 – 1/4″ Plywood @ 63 x 27″ (Back)
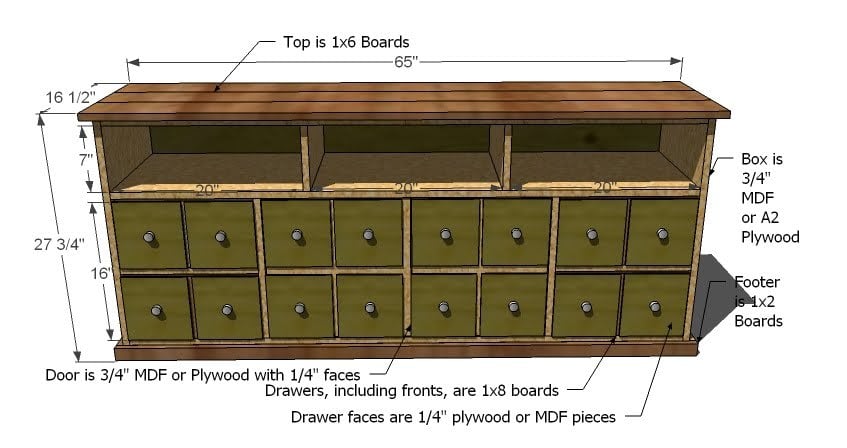
- 3 – 1×6 @ 65″ (Top)
- 1 – 1×2 @ 61 1/2″ (Inset front footer)
- 2 – 1×2 @ 15 1/2″ (Side Footer)
- 1 – 1×2 @ 64 1/2″ (Front Footer)


Instructions
Step 1
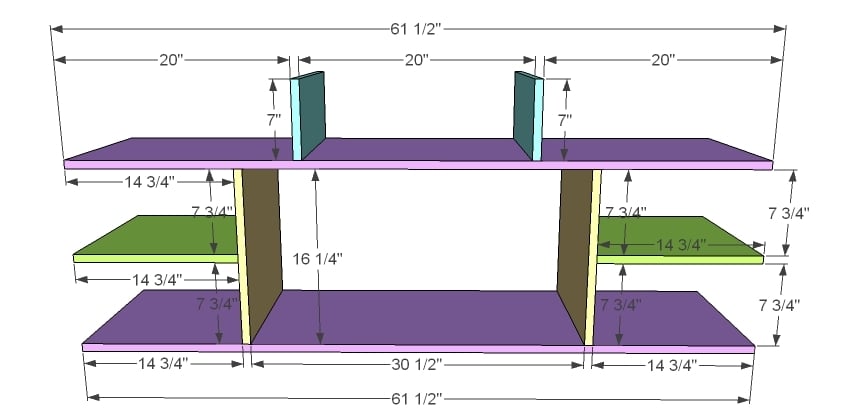
Box Partitions Begin by marking out all the joints on both sides of the boards as shown above. Don’t forget that the boards are 3/4″ thick. Then beginning on the bottom partition (yellow) attach the green partition. Now attach the yellow boards to the purple. Finally, attach the blue boards to the purple. Use 2″ screws and glue. Remember, you can click on images to see a full size view.
Step 2
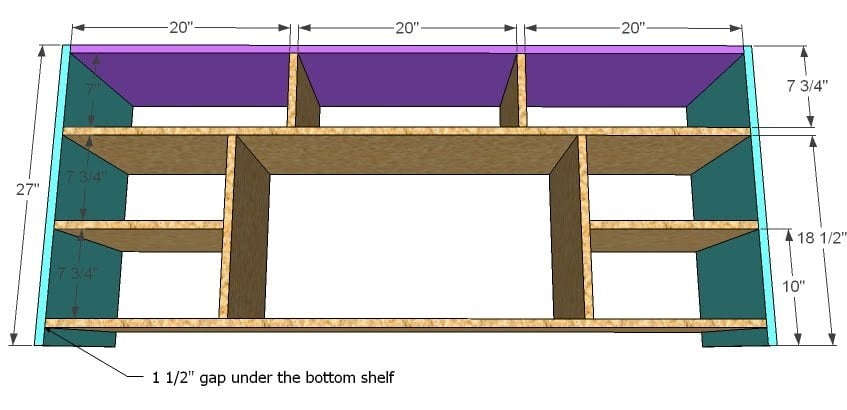
Finish the Box Begin by marking joints on both sides of the boards. Then attach with 2″ screws and glue the top to the top partitions. Then attach the sides to all of the shelves and the top, ash shown above.
Step 3
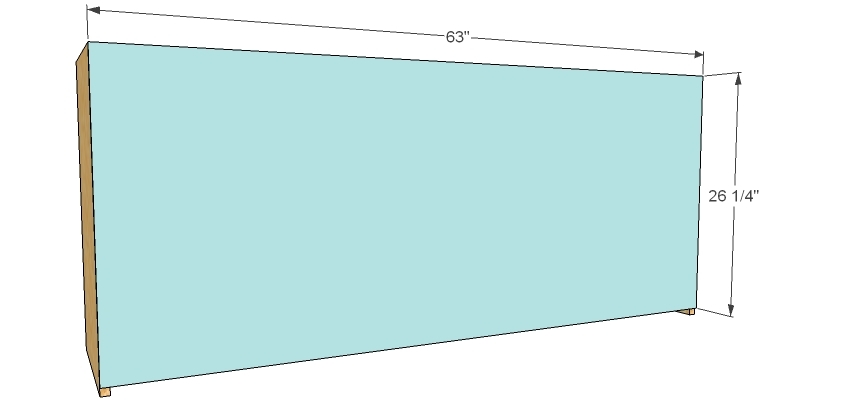
Back Cut your 1/4″ plywood as shown above. Then use 1 1/4″ nails and glue to attach the back to the box. Don’t forget to fasten to all of the partitions and shelves. Make sure your project is nice and square before attaching the back. The measurements shown here are slightly different from the cut list because I choose to make the cabinet slightly taller for drawer reasons, but either measurement would work just fine.
Step 4
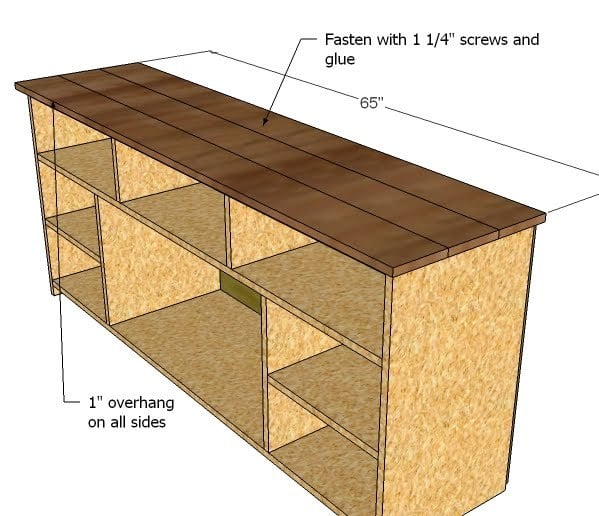
Top Using 1 1/4″ screws and glue, fasten the top boards to the top. Notice that there is a 1″ overhang on the front and the sides, but the back rests flush with the back edge of the sides.
Step 5
Step 6

Footer, Front Using 1 1/4″ Screws or nails and glue, fasten the front footer to the pieces from step 5. Keep outside edges flush.
Step 7
Drawers and Doors: Click here for Part 2

Comments
MarlaC (not verified)
Thu, 12/06/2012 - 06:00
I am looking for part 2 of
I am looking for part 2 of these plans. The wedsite says "click here" for part 2, but has no link to click on.....help please...I LOVE this website. Have already made a doll bed for my grand daughter :-)
mallory (not verified)
Tue, 12/18/2012 - 22:17
part 2 link
I am in love will this console and wish to build it. The part 2 "link page" doesn't work. Is there any way you could link it to me or fix the bug. Maybe its my Mac but Ill try on a pc as well. thanks!
RusticCharm
Sun, 02/10/2013 - 08:23
I LOVE THIS TABLE!
I absolutely love this console table & think it would look amaz-za-zing in my entryway! I can not wait to get started!!!
Carrie
cdejea1
Sat, 03/30/2013 - 21:59
Step 2, Anyone?
I saw that someone else had posted this as well, but didn't see an answer. There doesn't seem to be a link under Step 7 to be able to get the directions for part 2. Help, please!
cdejea1
Sat, 03/30/2013 - 21:59
Step 2, Anyone?
I saw that someone else had posted this as well, but didn't see an answer. There doesn't seem to be a link under Step 7 to be able to get the directions for part 2. Help, please!
Rob Phillips
Wed, 05/15/2013 - 06:42
Step 7 (Part 2) Link
here's the link to step 7 aka Part 2. I wish that more of the links on this site weren't broken.
http://ana-white.com/2010/05/furniture-plans-doors-for-apothecary.html
tferm78
Tue, 05/21/2013 - 11:05
drawer and door plans
Hi - new to this site and i LOVE it! however, in looking at the plans for this console, it says to click 'here' for part 2 which would be directions for the drawers and doors, but there's no link to part 2 - i click on it and nothing happens. where can i find part two? thanks!
Christopher S
Mon, 10/21/2013 - 16:38
Part 2 Drawers & Doors
For those looking for the part two heres the link. Multiple people have posted this link.
http://ana-white.com/2010/05/furniture-plans-doors-for-apothecary.html
suswan
Tue, 02/25/2014 - 18:15
Step 7
I am looking to start this project in the next week. However, the link for step 7 doesn't seem to be there. Am I missing something?
Alhgonzalez
Wed, 02/04/2015 - 17:04
Attachments
Hello in just wondering how you attached the insides together. Did you just screw them together or use pocket holes? Thanks!
cmwojtko
Sun, 05/17/2015 - 13:02
Step 2 - drawers and doors
The portion of step 2 for drawers and doors in not viewable/printable. Can anybody help?? We have purchased all the wood already and made the cuts on the cut list I just want to make sure we assemble correctly. thank you!
In reply to Step 2 - drawers and doors by cmwojtko
JoanneS
Sun, 05/17/2015 - 13:23
Link for Apothecary doors and drawers
here's the link for apothecary doors and drawers:
http://ana-white.com/2010/05/furniture-plans-doors-for-apothecary.html
good luck with your project!
hmckinney34
Thu, 06/11/2015 - 11:23
Link to part 2?
For some reason there is no link to part two. Can anyone provide?
In reply to Link to part 2? by hmckinney34
Ana White
Thu, 06/11/2015 - 12:30
http://ana-white.com/2010/05
http://ana-white.com/2010/05/furniture-plans-doors-for-apothecary.html
hmckinney34
Fri, 06/12/2015 - 05:46
Thanks!
Thanks!
kristyzed
Fri, 06/12/2015 - 10:31
Awesome
This looks great and I want to try my hand at it. I've never done doors before so this will be my first. For some reason "Part 2" is not hyperlinked and I can't find it anywhere. Can you help? Thanks!
In reply to Awesome by kristyzed
kristyzed
Fri, 06/12/2015 - 10:36
It's now popped up!
It's now popped up! Disregard! :)
Emily Fraser
Wed, 11/25/2015 - 21:41
Cant find step 7
Hi,
I cant find the link to the rest of the steps. It says step 7 click here but there isnt a link. What am I missing?
Thanks!
Emily
In reply to Cant find step 7 by Emily Fraser
JoanneS
Thu, 11/26/2015 - 07:19
Link for Apothecary console step 7
http://ana-white.com/2010/05/furniture-plans-doors-for-apothecary.html
Hi Emily, This is the link for the doors and drawers. Happy Thanksgiving!
In reply to Cant find step 7 by Emily Fraser
Ana White
Fri, 11/27/2015 - 12:00
http://ana-white.com/2010/05
http://ana-white.com/2010/05/furniture-plans-doors-for-apothecary.html
Here it is!
Chorath
Thu, 11/26/2015 - 22:01
Great plan