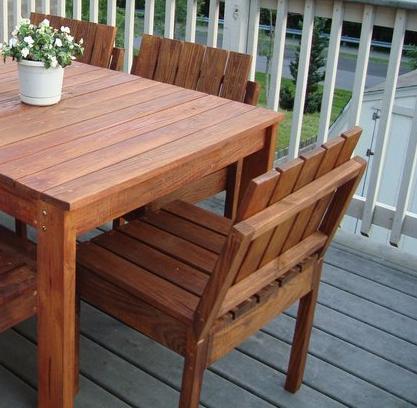


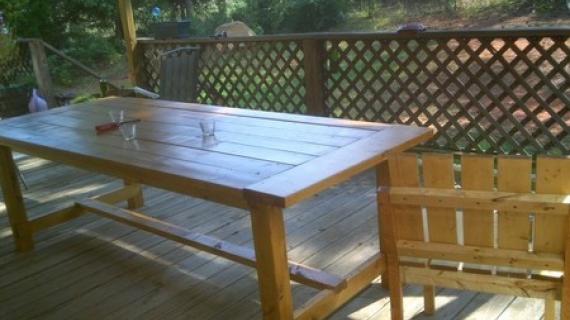
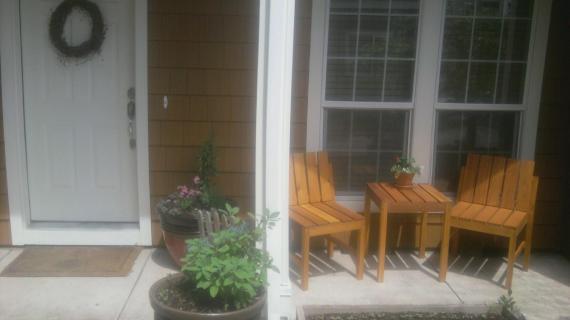
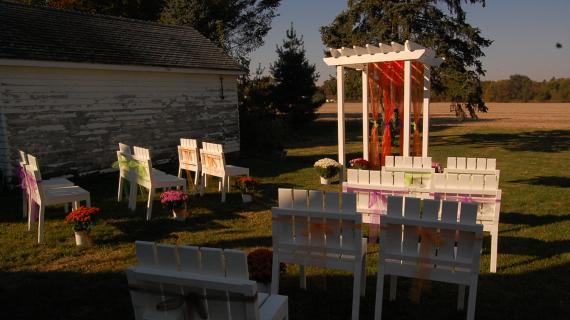
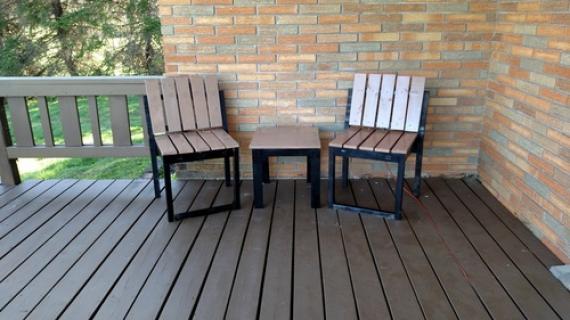
These simple chairs stack! And match our Simple Modern Outdoor Collection. Build a few to match the tables, or just extra seating for outdoors.

Preparation
2 – 1×4 Boards, 8′ Long
1 – 2×2 Board, 8′ Long
1 – 2×4 Board, 8′ Long
1 – 1×3 Board, 8′ Long
2″ Screws
2 1/2″ Screws
Wood Glue
Wood Filler
Paint suitable for exterior applications
2 – 2×4 @ 30″, Chair Backs cut from these boards (see step 1 if you are making multiple chairs)
2 – 2×2 @ 19 1/2″ (Chair Back Supports)
2 – 2×2 @ 18″ (Chair Front Legs)
2 – 1×3 @ 17 1/2″ (Side Aprons)
1 – 1×3 @ 16 1/2″ (Front Apron)
1 – 1×3 @ 18″ (Back Apron)
5 – 1×4 @ 19″ (Seat Boards)
5 – 1×4 @ 15″ (Back Boards)


Work on a clean level surface. Check for square after each step. Use proper safety equipment and precautions. Predrill and countersink you screw holes. Use glue.
Instructions
Step 1

Chair Back Legs. From the 2×4, mark out your chair back legs. Keep in mind that the back legs will be 1 1/2″ wide everywhere, and one leg takes up the entire 2×4. If you are building multiple chairs, it may make sense to use a 2×6 as shown above on the right to get more legs per less board and cuts.
Step 2
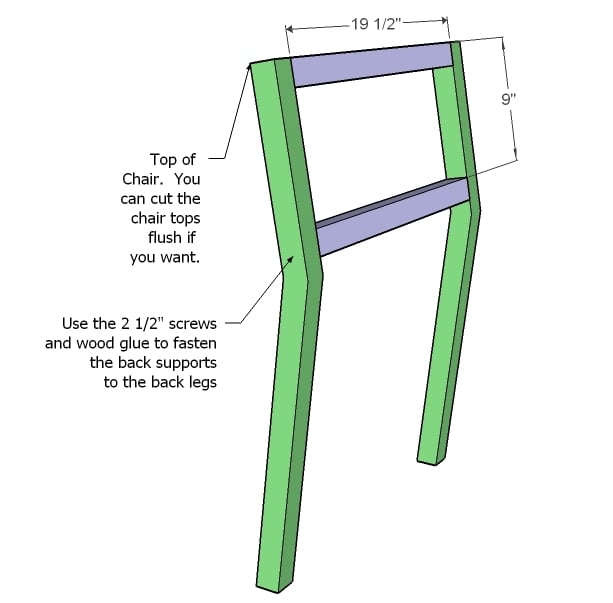
Chair Backs. Build the chair back as shown above. Fasten with 2″ screws and glue.
Step 3

Chair Seat and Front Legs. Build the aprons and front legs as shown above. Start on the back apron and work your way forward. If you have a Kreg Jig™, it would come in super handy here, or else you can just use screws and glue, 2″ screws.
Step 4
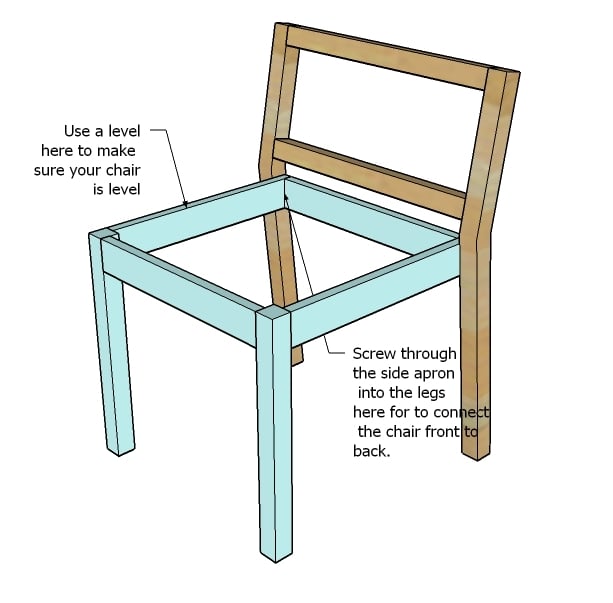
Chair Frame Assembly. Using a level on the side apron, attach the front of the chair to the back, as shown above, using 2″ screws and glue. You may wish to complete step 5, the seat boards first, but the above diagram illustrates how the chair is assembled.
Step 5

Step 6

Back Boards. As you did the seat boards, fasten the back boards to the back supports, as shown above.
Step 7
Finishing. Fill any holes with wood filler and sand and finish as desired.
Comments
Jamie (not verified)
Mon, 04/19/2010 - 03:19
Wouldn't you use the 2x6
Wouldn't you use the 2x6 whether you were making one chair or many? You still need to cut two back legs.Just a thought...
lizlizbobiz (not verified)
Mon, 04/19/2010 - 03:32
Is the shopping list correct?
Is the shopping list correct? It doesn't say anything about a 2x4 or a 2x6?
Guest (not verified)
Mon, 06/13/2011 - 11:02
line 3 1 – 2×4 Board, 8′ Long
line 3
1 – 2×4 Board, 8′ Long
Baker Family (not verified)
Mon, 04/19/2010 - 03:33
I just found your blog last
I just found your blog last night, and I am hooked! Thanks for the amazing ideas! I am your newest follower!
Mrs. G (not verified)
Mon, 04/19/2010 - 04:20
THANK YOU, THANK YOU, THANK
THANK YOU, THANK YOU, THANK YOU for posting a chair plan!! I'm planning on not using slats and upholstering the top and bottoms for dining room chairs! I'm ecstatic!!!!
Chantelle - Th… (not verified)
Mon, 04/19/2010 - 05:37
Yup, I think the shopping
Yup, I think the shopping list needs tweaking - according to the cut list, you should have 2x4, 2x2, 1x3, 1x4 and the shopping list lists 1x4, 2x2, 2x3. However, I still think the plan is fantastic and will certainly be enhanced with some seat pads! Can you imagine a patio with these chairs, some bright chair pads and the wonderful outdoor table you also designed??!!
Ana White (not verified)
Mon, 04/19/2010 - 06:27
Thanks guys, all fixed! I
Thanks guys, all fixed! I guess this is what happens when you are working with a kiddo on your lap way after bed time. Anyone else have a little one that will not go to bed without you?
Linda (not verified)
Mon, 04/19/2010 - 06:38
lol! yes mine is 12 but I
lol! yes mine is 12 but I think that's the age when they finally stop needing you for bedtime. My 17 yr old proved that HAAA Thanks for your chair idea! It's wonderful to have wood here in the windy city and to stack things so they dont blow away!
Michelle L. (not verified)
Mon, 04/19/2010 - 09:35
looks wonderful! how about a
looks wonderful! how about a matching recliner/lounge chair for those that want to get a little more relaxed outside? That would be awesome! :)
The Trees (not verified)
Mon, 04/19/2010 - 10:56
I was hoping for outdoor
I was hoping for outdoor patio furniture. Even better that they're stackable. And I love the beautiful simplistic design.
Thanks again!
*MICHELLE CAUDLE* (not verified)
Mon, 04/19/2010 - 12:15
I'm so excited to see more
I'm so excited to see more outdoor furniture! I've always wanted a patio set but only the cheap ones were in my budget so I'm excited to make these, as well as so many other things on your website!
Carol H. (not verified)
Mon, 04/19/2010 - 13:46
Yeah! Thanks Ana!!
Yeah! Thanks Ana!!
rachel (not verified)
Tue, 04/20/2010 - 09:19
I was looking at crappy
I was looking at crappy plastic patio chairs the other day because they were the only ones comfortable and in my budget. Now I'm really going to have to get crackin' on making some of your plans. These are great. Thank you again for taking the time to write up and post these plans!
natalie a (not verified)
Tue, 04/20/2010 - 18:37
so I'm excited to try this
so I'm excited to try this one out!!! my first wood project... but I wondered, has anyone built this yet? anything advice to look out for?
Jeremy (not verified)
Wed, 04/21/2010 - 14:21
I have one built (sans back
I have one built (sans back slats while I tweaked things). Noticing that the point at which the back legs attach to the apron is a pivot point. If you lean back, the back legs try to tilt inward. Any suggestions?
Ana White (not verified)
Wed, 04/21/2010 - 15:14
try multiple screws from the
try multiple screws from the inside of the apron or if you are using a kreg jig, screws from an angle will not pivot.
Jeremy (not verified)
Wed, 04/21/2010 - 16:47
Thanks Ana. I ended up
Thanks Ana. I ended up finding a spot to put a few more screws to solve the issue for the most part. This project has now justified the purchase of the kreg jig kit though as I think both the quality and ease of assembly will be far superior.
Phil Perrin (not verified)
Sat, 04/28/2012 - 14:46
I made one today out of PT
I made one today out of PT pine. I call it the prototype,because I want to make some out of cedar. I also noticed the "lean". I'm going to add some gussets on the side ti sturdy them up. I'll get my wife to pin them later.
smart outdoor (not verified)
Thu, 05/27/2010 - 08:18
these are some really cool
these are some really cool chairs. i too, have some neat designs on outdoor chairs. if you would to browse my designs you can visit my site http://www.outdoorchairsmart.com/
thnx
Mommy Paauwe (not verified)
Tue, 08/24/2010 - 17:41
I am confused. How do you
I am confused. How do you get the angle on the back seat legs? Please advise :)
In reply to I am confused. How do you by Mommy Paauwe (not verified)
emmarosemc
Sat, 05/28/2011 - 12:23
just look at the pics, you
just look at the pics, you cut the legs - and angle - out of the 2x4
zduchene
Fri, 04/18/2014 - 22:53
Did you guys use a circular
Did you guys use a circular saw or a jig saw to cut the legs out of the 2x4's? What is the best way?
Dennis Walsh (not verified)
Fri, 06/17/2011 - 07:11
arms for the stackable chairs
Hello,
great site. I built the bunkbeds for my girls, they love it.
Is there a way to put arms on the stackable chairs? I know this eliminates the stackable feature, but really want arms for comfort when sitting around the table after dinner.
Love your site and thanks for the great plans.
Dennis
lilone9283
Fri, 07/22/2011 - 10:26
Agreed!
Yes! I would love to see how you would add arms to these chairs as well! I'd like to make 4 stackable and then 2 with arms!
copywriter web (not verified)
Thu, 02/02/2012 - 01:53
Good blog
This post is brilliant and the whole information and the obsessions are seems to be the brilliant one,, good to share!
NikiB (not verified)
Sat, 05/05/2012 - 11:05
Back legs cut
Any tips on what tool to use to make the cut on the back legs? Jig saw work ok? Thanks!
Phil Perrin (not verified)
Sun, 05/06/2012 - 12:30
I used a circular saw to cut
I used a circular saw to cut the back legs and a hand saw to finish the cut.
yogashell
Wed, 06/13/2012 - 10:10
back legs
Wow, just finished the first chair, and it was a lot of work... will be worth it to have my nice patio set, though. My husband used a jigsaw to cut the back legs out, he found it difficult with the circular saw. I will post a brag post when I'm done.
stever (not verified)
Fri, 06/15/2012 - 14:40
More on the back legs
Seems to me that if the back legs were cut out as indicated, that the bottoms would not sit flat on the deck (ground/floor). There needs to be a tiny wedge cut off the bottom so that the the bottom of the legs are perpendicular to the vertical part.
SteveS (not verified)
Sun, 07/08/2012 - 12:17
A few notes after finishing
This project was actually more challenging than I expected it to be -
One of the biggest problems was the rear legs - it turns out that cutting a 2x4 at an angle while keeping the sides at 45deg while using a circular saw is NOT easy. After destroying a fair amount of wood trying, I actually went so far as to try just cutting two pairs of back legs out of 1x4s and just gluing the things together.
In the end, I ended up finding the easiest way to do it was to cut them out of 2x6 boards with additional boards along the sides to support the saw (and a sacrificial board underneath). I cut as close as I could to the corners and then finished the job with a jigsaw (I also tried cutting the whole thing with a jigsaw, but the saw couldn't handle it).
This was also the first project I've built using the pocket hole jig, and I HIGHLY recommend it. A couple of my prior projects would have been SO much easier if I had just broken down and bought one. Just be careful about screw sizes - I wasn't as careful as I should have been at first and ended up breaking out of the other side...
Anyway I'm planning to make one more to have a pair of these to go with the matching table I did last year... hopefully the second one will go much smoother :)
ted1735
Sun, 12/01/2013 - 17:34
Chair pivot point
Ana, I desperately need your help. This chair has caused be great grief. I did the bench and table with no problem. The problem I am having is where the frame attaches to the 2x2 post in the front. I use the Kreg and regardless of how I tweak the jig, it splits the 2x2. So I cut down a 2x4 (much sturdier) and tried it that way. It still split but not as much. I also tried to drill a few more screws from the inside to the outside without much luck as the pine is just truly hard to work with in this design. I ended up doing most of the chair at mortise and tenon joints in all the structural areas and of course it doesn't get any stronger than than. But the Kreg jig or pilot and screw has not worked for me :( Mortise and tenon is ages longer of time compared to Kreg or other suggestions not considered. Any help is appreciated. Thanks Ted Moyer.
lisaspears
Thu, 06/18/2015 - 11:48
DID YOU GET HELP
Hi Ted, did you get any help from Anna? I posted two comments after yours and got no response. There's a pivot point where the back legs attach to the front frame and the chairs fall apart when we sit in them. I have materials cut and stained for six of these chairs in my storage room and I'm trying to find a way to put them together so we can use them. I don't want to waste these materials. I used a Kreg Jig and also had splitting of the 2x2's in the front legs, but not on both legs of the one put together. It just split on one side.
stevec
Mon, 12/26/2016 - 20:37
prevent pivot point
to prevent the pivot point, In step 2,shorten the 2 back cross supports by 3" each. This will make the back sit flush behind the base instead of the base being inside the back legs. Add a 1x3 cross support between the back legs even with the base rear and join. No more pivot point. I am planning on building 4 of these chairs and reworked the plans to my needs.
lisaspears
Sat, 06/13/2015 - 12:44
I built one of these
I built one of these today and sat down in it and it fell apart. So I built it just like your instructions but where the screws attach the back frame to the front, it did not hold. I have built both the table and the bench and had no problems but the chair is not stable. I'm not sure what I did wrong. I leveled the front part of the chair and attached it to the back frame with 2 inch crews, and when you lean back in the chair it does not hold. I put two screws on each side.
lisaspears
Sat, 06/13/2015 - 19:31
Help
I posted the last comment, then I went back and read some of the previous comments. I now realize that I am not the only one who has noticed that these chairs pivot and fall apart. What really sucks is that I have cut and stained enough materials for six of these chairs. Now I'm stuck. I have a Kreg Jig and I used it as well as added screws to the inside when I attached the back leg portion to the front portion. I also screwed those screws at an angle. There has to be a better way to do this.
bmstrain
Wed, 07/22/2015 - 12:05
help reply
just finished a chair and it seems to sit fine. When attaching the back legs to the frame, I inserted the screws from the inside of the frame. This pulls the legs to the frame. Rather than from outside and pulling the frame to the legs. Not sure if this matters.
Playswithsaws
Mon, 08/10/2015 - 15:45
I made two prototypes and
I made two prototypes and varied the length and position of the screws that I installed into the back legs. No matter what, the legs are unstable with a soft wood like pine. Instead, get 1/4" metal, threaded dowels and drill two holes from the inside apron of the seat-base into the back legs. Install the two dowels in place using gorilla glue coating the dowels and twisting slightly as you slide them in to get good coverage on the glue. Let it sit for a few hours and then use a razor to clean up the gorilla glue once it expands. The expanding glue will help lock everything in place and prevent a pivot point.
jck_photos
Wed, 07/13/2016 - 05:00
Built four, liking them a lot
I had some cedar boards left over from a demolition project, so decided to use them for a these chairs and an outdoor table for a deck we have near our lake home. After reading the comments, I modified the design just a bit and built one as a test, then built three more to complete the set. They are working out very well. Here are some things I did which may be of help to others.
First off, I used 2x4 cedar lumber for everything but the slats. The additional of the apron around the chair seat is hidden, and provides considerably more strength and glue area at the front leg joints. This also allowed me to use Kreg HD screws which, again, adds strength. I used two screws from the side aprons into the front leg, and one screw from the front apron to avoid splitting. The back apron has to be shortened to 16.5 incches to fit between the rails. I used two HD screws from the side aprons into the back legs, and one HD screw for the back apron to avoid splitting. I also used one HD screw for each joint in the chair back supports.
There are a number of places in this design where end grain is butted to side grain. There's a trick to gluing end grain. UsingTightbond III, the manufacturer's recommendation is to mix a little glue with water, spread it on the end grain to soak in for a couple of minutes. This 'sizes' the end grain. Then glue up and kreg screw as usual. The additional glue area combined with the HD screws provide nice, strong joints for the front legs.
Be sure to use glue between the side rail and back legs. Together with the 2 HD screws in each joint (from the inside), this provides for a joint that has held up well so far. I was holding my breath as our 230lb son rocked back in the chair, but the chair survived.
For the first chair, I cut the back legs with a jig saw. That was painful. For the other three, I used some scrap 2x6's, cut one at a taper of 2 inches per 12 inches, and the other at 2 inches per 18 inches. Then set up a fence and use the tapers to cut the outside angle of the legs. Remove the tapers and repeat to cut most of the inside angles finishing with a handsaw. That went pretty fast with repeatable results.
I attached the slats with kreg micro screws and glue. That's probably overkill. With 2 x 4 rails there's plenty of glue surface, so brads from the top would be enought to hold the slats in place until the glue sets.
Hope that helps. These are fine chairs, but benefit (imho) from a few construction tweaks.