Wow! I don't even know where to start with my poor backyard, but I'm already picturing lounging in a sectional like this. Encouragement makes DIY home improvement (like the misadventure at my house) possible. Thanks Ana!
Thanks for all the wonderful plans. I am currently building all the furniture for our first house because of your blog, but big thanks for BEING A MOM. Kiddo's need their mom and it is easy to get distracted. Thanks for letting everyone know that it is still important to you with all the other things you could be doing instead. :)
I modeled this up with an addition - a couple of end tables that could serve as extra seating, tables, or if you built them to size, they could fit into the empty part of a "U" shaped configuration to make a giant outdoor "daybed/lounger" - at least that is how I'm planning on configuring my sectional!!! You can check out my idea (there are two pictures) on the suggestion board of the KOW flickr group:
Wow Ana, you've read my mind. 2 weeks ago I was in PB ;) and was hoping you would come up with plans. I was even planning on posting a suggestion, (you may have had a million of those already!) I'm so excited. I'm planning an outdoor party this summer for a friend's birthday. This will be great!!! and the first project I will takle! Hopefully I can post some pictures.
I so LOVE all of these plans, but I'm running into the problem that some just aren't stout enough for my family. Is there a chance the plans could be modified to use heavier materials? Maybe there are modifications already posted for this, so sorry if this is a redundant comment/question - thanks!
Thanks all! Aggie, the best way to make the chairs more stout would be to add more supports under the table, and maybe using a 2x2 for the front apron. The legs should totally be fine, but if you are concerned, you could double up the legs, or use 2x4s. I personally prefer to use 1x4s in this type of application because they tend to be "prettier" boards than a 2x4.
I think you would be surprised at exactly how strong these pieces actually are. Again, think about where the weight will be (the seat) and then add your supports there.
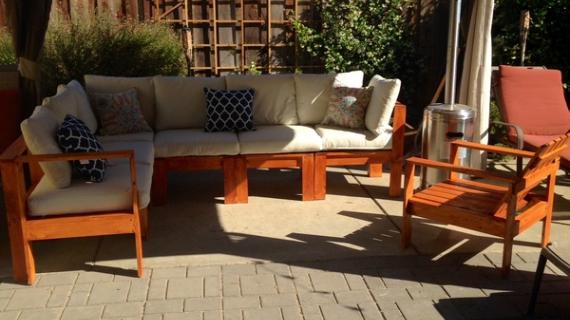
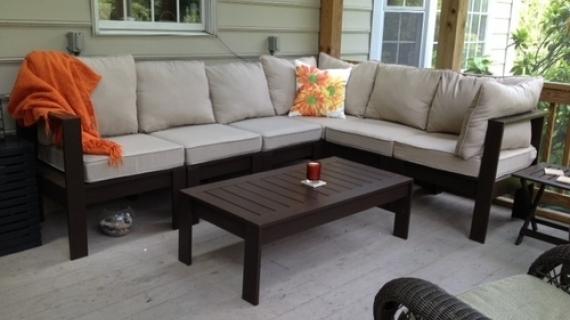
My husband built us this lovely sectional! We found cushions that fit the bottom perfectly at Lowes, I remade the top ones to fit. The only thing he did differently than the plans is to add horizontal slats to the backs and he added 1"x1" under to be able to screw pieces from the back or underneath so no screw heads show. He also made a coffee table. Really professional looking! Thanks for the plans!
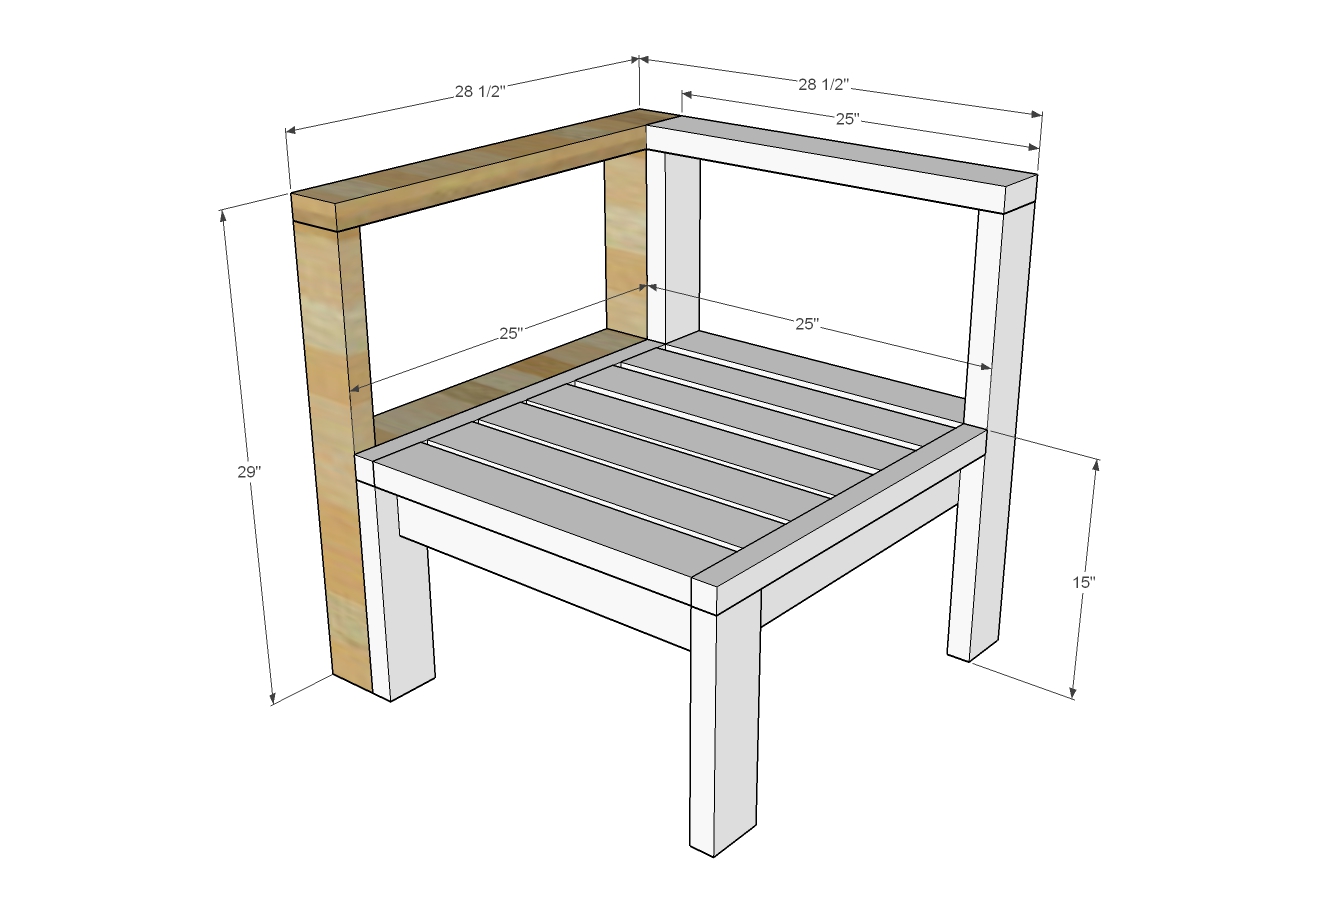
I am in the process of building this but having some issues with the length specified for the Back, Long Top Apron and Seat End which says it should be 23 1/4". Shouldn't it be 22 1/2" just like the other apron? The long top is 27 1/2" and the instructions say it is supposed to overhang the back legs by 3 1/2". So that leaves 24" when measuring to the outside of the back legs. Now I take 24" and subtract 1 1/2" for the width of the board and I am getting 22 1/2".
I absolutely love this plan! We're going to build this sectional with 3 corner pieces and 5 seats (and we're using 2 x 4's instead of 1 x 4's). I'm trying to estimate costs and want to know how much varnish would be needed for this project. Anyone have any idea how many gallons?
It will depend somewhat one what varnish you're choosing to use (varnish is a generic term that covers a host of sins). Some are thicker than others, with differences in coverage. But assuming that this will be used outdoors, you'll need to stick to one of the outdoor finishes like a desk stain. A lot of finishes like polyurethane degrade very quickly when left outdoors.
My initial guess would be that one gallon would probably cover you, but if you're going to have a custom color mixed, get two gallons. That's assuming one of the acrylic based deck stains and my own coverage experience.
The penetrating oil stains probably apply at a different rate, but I can't tell you what it is. One of the nice features on modern finishes is that they tend to give you a coverage estimate on the can, in square feet. Square footage calculations for furniture can be a bit tedious, but you can make a good first-guess and work from there.
I would like to make this sectional this year. Would you suggest using pressure treated? I was thinking of something like cedar that I think is naturally moisture resistant (?) but I want to keep the costs down as I know the cushions alone will be expensive. Any suggestions would be appreciated.
Cedar would probably be a nice choice. Nearly anything will work if you put a proper outdoor finish on it and keep that finish maintained. I'm not a big fan of using pressure treated wood unless I'm forced to, because the natural tendency of pressure treated wood is to warp wildly unless it's carefully held down.
If you were to put an outdoor finish on southern yellow pine every couple of years, it would hold up very well. Both my dad and I have several pieces made from SYP and it's working quite well.
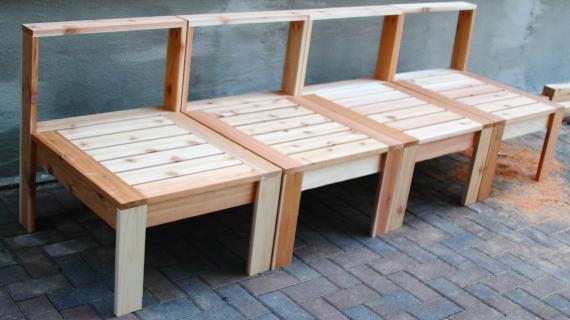
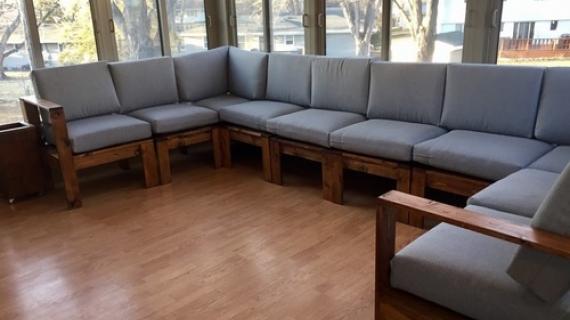
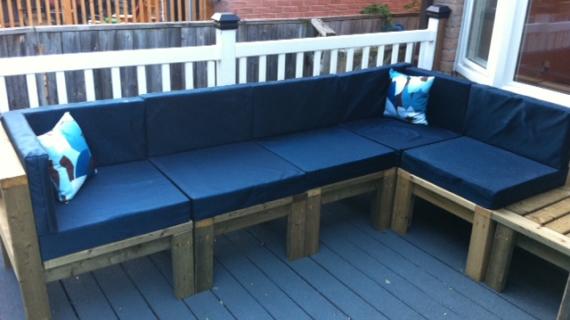
A mum's day present this year, with our four (almost five) year old helping out with measuring, cutting, drilling, and screwing. Took a bit longer, but he had a great time doing it, and mum really appreciated it. This is the second part of the set, and we made three corners and two armless sectionals.
Still need to stain or paint it, but otherwise great!
**Step four should read "The top on the right sits flush with the legs, the top on the left overhangs the back leg by 2 3/4″ as shown above." NOT 3 1/2". **


Comments
Heather (not verified)
Tue, 05/18/2010 - 03:10
I really like the way you
I really like the way you think Ana! Thanks for the encouragement, what a great post!
Sarah @ TheUgl… (not verified)
Tue, 05/18/2010 - 04:34
Wow! I don't even know where
Wow! I don't even know where to start with my poor backyard, but I'm already picturing lounging in a sectional like this. Encouragement makes DIY home improvement (like the misadventure at my house) possible. Thanks Ana!
spinellifamily (not verified)
Tue, 05/18/2010 - 05:15
Thanks for all the wonderful
Thanks for all the wonderful plans. I am currently building all the furniture for our first house because of your blog, but big thanks for BEING A MOM. Kiddo's need their mom and it is easy to get distracted. Thanks for letting everyone know that it is still important to you with all the other things you could be doing instead. :)
Bethany (not verified)
Tue, 05/18/2010 - 06:27
I modeled this up with an
I modeled this up with an addition - a couple of end tables that could serve as extra seating, tables, or if you built them to size, they could fit into the empty part of a "U" shaped configuration to make a giant outdoor "daybed/lounger" - at least that is how I'm planning on configuring my sectional!!! You can check out my idea (there are two pictures) on the suggestion board of the KOW flickr group:
http://www.flickr.com/groups/1333045@N24/?added=2
Lora (not verified)
Tue, 05/18/2010 - 06:48
Wow Ana, you've read my mind.
Wow Ana, you've read my mind. 2 weeks ago I was in PB ;) and was hoping you would come up with plans. I was even planning on posting a suggestion, (you may have had a million of those already!) I'm so excited. I'm planning an outdoor party this summer for a friend's birthday. This will be great!!! and the first project I will takle! Hopefully I can post some pictures.
Roxanna (not verified)
Tue, 05/18/2010 - 07:59
I wonder if you could use
I wonder if you could use this inside LOL
Aggie's (not verified)
Tue, 05/18/2010 - 17:32
I so LOVE all of these plans,
I so LOVE all of these plans, but I'm running into the problem that some just aren't stout enough for my family. Is there a chance the plans could be modified to use heavier materials? Maybe there are modifications already posted for this, so sorry if this is a redundant comment/question - thanks!
Ana White (not verified)
Tue, 05/18/2010 - 19:20
Thanks all! Aggie, the best
Thanks all! Aggie, the best way to make the chairs more stout would be to add more supports under the table, and maybe using a 2x2 for the front apron. The legs should totally be fine, but if you are concerned, you could double up the legs, or use 2x4s. I personally prefer to use 1x4s in this type of application because they tend to be "prettier" boards than a 2x4.
I think you would be surprised at exactly how strong these pieces actually are. Again, think about where the weight will be (the seat) and then add your supports there.
kitcheninspirations (not verified)
Wed, 08/11/2010 - 01:32
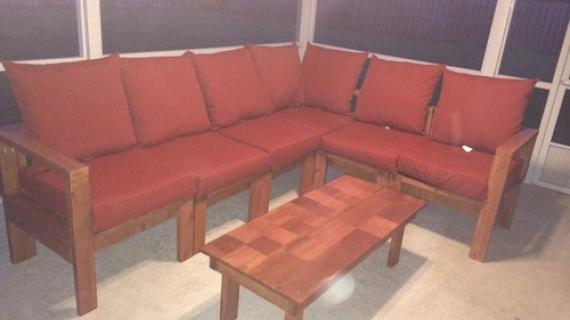
My husband built us this
My husband built us this lovely sectional! We found cushions that fit the bottom perfectly at Lowes, I remade the top ones to fit. The only thing he did differently than the plans is to add horizontal slats to the backs and he added 1"x1" under to be able to screw pieces from the back or underneath so no screw heads show. He also made a coffee table. Really professional looking! Thanks for the plans!
Anthony (not verified)
Fri, 08/13/2010 - 17:13
I am in the process of
I am in the process of building this but having some issues with the length specified for the Back, Long Top Apron and Seat End which says it should be 23 1/4". Shouldn't it be 22 1/2" just like the other apron? The long top is 27 1/2" and the instructions say it is supposed to overhang the back legs by 3 1/2". So that leaves 24" when measuring to the outside of the back legs. Now I take 24" and subtract 1 1/2" for the width of the board and I am getting 22 1/2".
Amanda J (not verified)
Tue, 01/24/2012 - 10:51
How much varnish do you need?
I absolutely love this plan! We're going to build this sectional with 3 corner pieces and 5 seats (and we're using 2 x 4's instead of 1 x 4's). I'm trying to estimate costs and want to know how much varnish would be needed for this project. Anyone have any idea how many gallons?
claydowling
Tue, 01/24/2012 - 11:08
Varnish volume
It will depend somewhat one what varnish you're choosing to use (varnish is a generic term that covers a host of sins). Some are thicker than others, with differences in coverage. But assuming that this will be used outdoors, you'll need to stick to one of the outdoor finishes like a desk stain. A lot of finishes like polyurethane degrade very quickly when left outdoors.
My initial guess would be that one gallon would probably cover you, but if you're going to have a custom color mixed, get two gallons. That's assuming one of the acrylic based deck stains and my own coverage experience.
The penetrating oil stains probably apply at a different rate, but I can't tell you what it is. One of the nice features on modern finishes is that they tend to give you a coverage estimate on the can, in square feet. Square footage calculations for furniture can be a bit tedious, but you can make a good first-guess and work from there.
In reply to Varnish volume by claydowling
spiceylg
Fri, 01/27/2012 - 12:15
Wood type
I would like to make this sectional this year. Would you suggest using pressure treated? I was thinking of something like cedar that I think is naturally moisture resistant (?) but I want to keep the costs down as I know the cushions alone will be expensive. Any suggestions would be appreciated.
claydowling
Fri, 01/27/2012 - 12:36
Choosing Wood
Cedar would probably be a nice choice. Nearly anything will work if you put a proper outdoor finish on it and keep that finish maintained. I'm not a big fan of using pressure treated wood unless I'm forced to, because the natural tendency of pressure treated wood is to warp wildly unless it's carefully held down.
If you were to put an outdoor finish on southern yellow pine every couple of years, it would hold up very well. Both my dad and I have several pieces made from SYP and it's working quite well.
spiceylg
Sun, 01/29/2012 - 03:13
Thanx!
Appreciate the feedback. With all of us asking your advice, you are going to need your own blog soon! :)
Phil O'Connell…
Wed, 07/10/2013 - 18:28
A mum's day present this
A mum's day present this year, with our four (almost five) year old helping out with measuring, cutting, drilling, and screwing. Took a bit longer, but he had a great time doing it, and mum really appreciated it. This is the second part of the set, and we made three corners and two armless sectionals.
Still need to stain or paint it, but otherwise great!
Again, thanks for great, easy to follow plans!
kelly3885
Sun, 08/18/2013 - 14:40
**Correction to step 4**
**Step four should read "The top on the right sits flush with the legs, the top on the left overhangs the back leg by 2 3/4″ as shown above." NOT 3 1/2". **
Nikadu
Mon, 04/28/2014 - 04:28
Sectional
Are the materials listed to build only one sèat of the sectional?
Nikadu
Mon, 04/28/2014 - 04:33
Sectional
Are the materials listed for one seat only