
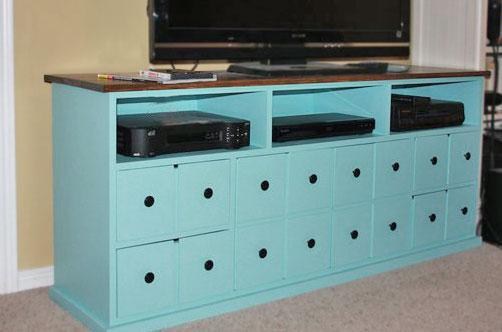

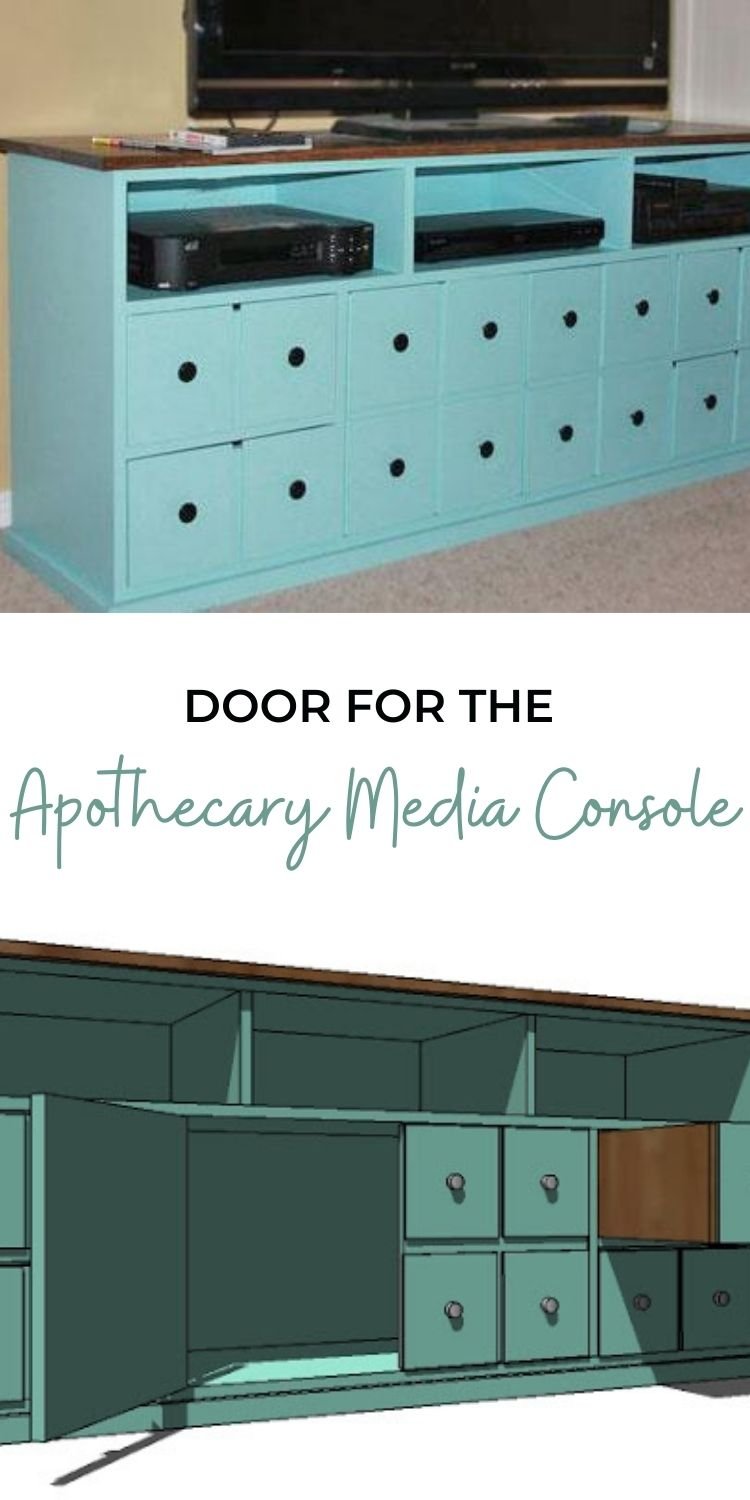
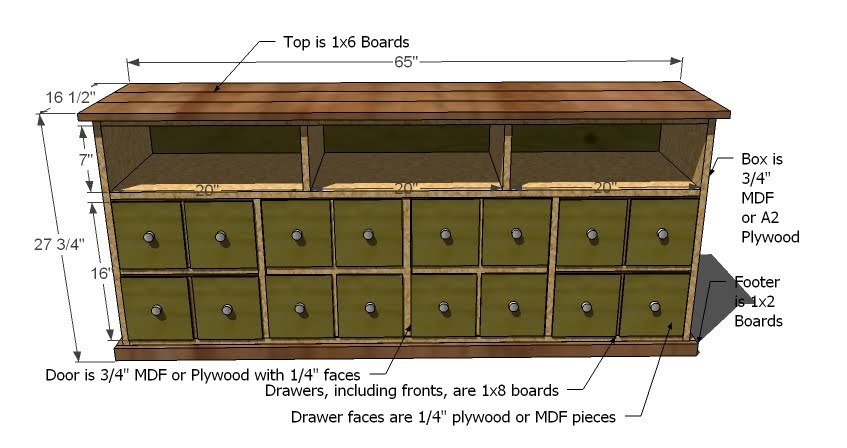
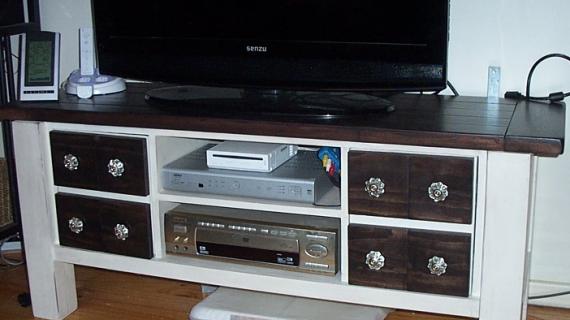
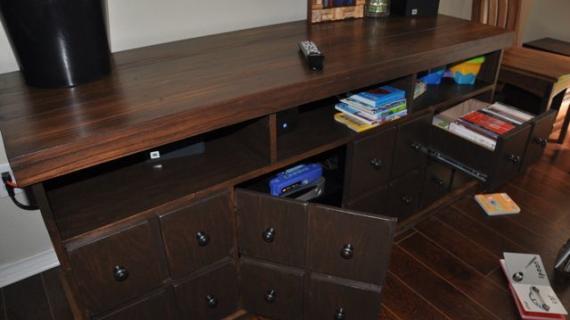
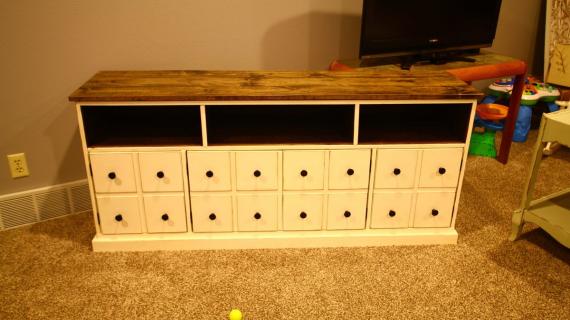
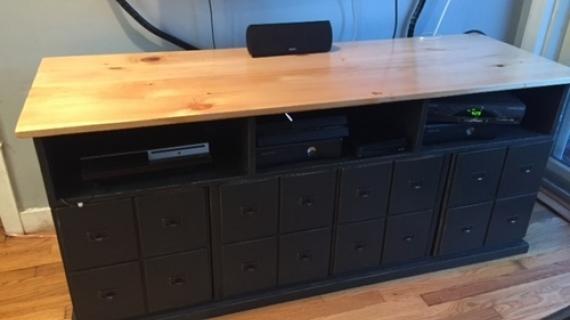
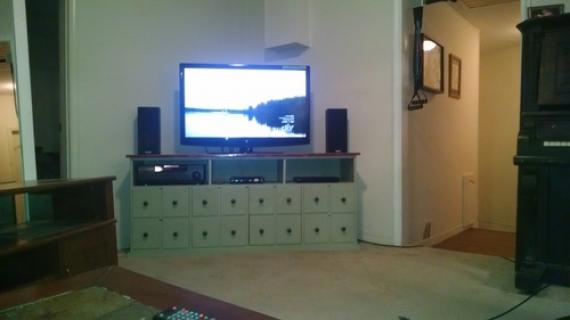
Doors and drawers for the Apothecary Console.


Preparation
2 – 1×8 Boards, 10′ Long 2″ Screws Scrap 1×16 and 1/4″ plywood from the base cabinet 16 Knobs 4 Total Euro Style Hinges, Full Overlay or Inset (see below)
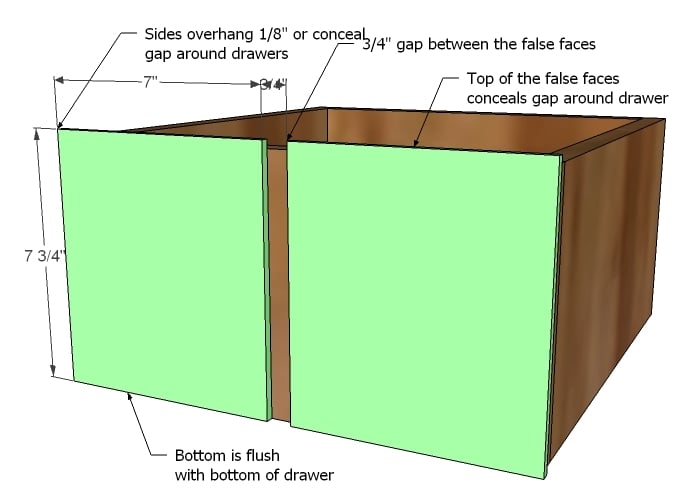
Cut List: For 4 Drawers 4 – 3/4″ Plywood or MDF @ 13″ x14″ (Drawer bottoms, use scrap 1×16 pieces) 4 – 1×8 @ 13″ (Drawer Backs) 8 – 1×8 @ 14 3/4″ (Drawer Sides) 4 – 1×8 @ 14 1/2″ (Drawer Fronts 16 – 1/4″ plywood @ 7″ x 7 3/4″ (False Faces) Cut List: For Both Drawers (Drawers are not the same!) 1 – 3/4″ Plywood or MDF @ 16″ x15 1/2″ (Larger Door, use scrap 1×16 pieces) 1 – 3/4″ Plywood or MDF @ 16″ x14 5/8″ (Smaller Door, use scrap 1×16 pieces) 8 – 1/4″ plywood @ 7″ x 7 3/4″ (False Faces, use scraps from the back)
Please check the comments - really good reader advice in there!


Instructions
Step 1
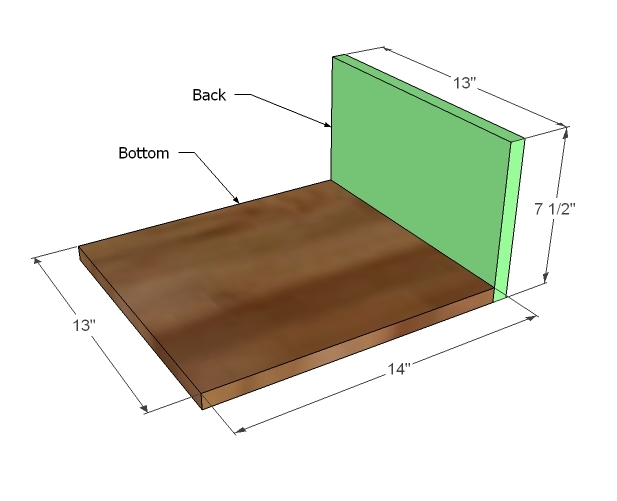
Drawer Backs
Begin by fastening the drawer back to the drawer bottom using 2″ screws and glue. A trick I do to make my drawers slide better without having to buy hardware is rest the bottom (but not the back and sides and front) on a scrap piece of 1/4″ plywood when fastening the backs, sides and front. This raises the bottom 1/4″ and that way your bottom doesn’t drag when the door is opened and closed. After you finish you piece, you can rub vasoline on the sides and your drawers should glide smoothly on the side edges.
Step 2

Drawer Sides
Just like you added the back, now add the sides. Make sure you also fasten to the back piece.
Step 3

Drawer Fronts
Now add the front, making use the drawer is square and the front lines up with all outside edges. Fasten with 2″ screws and glue to the sides and bottom.
Step 4
False Faces
Here is what I would do because I’m a slight perfectionist. I would put all of your drawers into the drawer boxes without the false faces and center the drawers on the opening, with approximately an 1/8″ all the way around (a 1/4″ on the top). Then I would position the false faces over the drawers so that the false faces just covers this gap. Leave a 3/4″ space between the false faces. Glue and if you have your nailer handy, tack a few nails into the corners of the false faces. Clamp and let dry.
Step 5

Step 6

Doors
Cut you doors as shown above. The doors are not the same. Fit in the opening and attach with inset euro style full overlay hinges.
Step 7
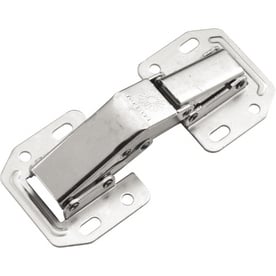
My favorite are these from Lowes:
Step 8

False Faces
As you did with the false faces from the drawers, attach the false faces to the doors, concealing the gap around the doors.


Comments
Annesphamily (not verified)
Sat, 05/01/2010 - 10:41
You are one talented lady! I
You are one talented lady! I love stopping by and drooling at these gorgeous recreations! Your pieces are so full of love and your talent is incredible. My hat is off to youy! Anne
chacha (not verified)
Sat, 05/01/2010 - 15:01
I am excited to do this one -
I am excited to do this one - it'll be used as a buffet - since I need something around 16" deep to save space.
I've never made one of your plans but I have plenty of experience with nailers, saws, and renovation in general so *hopefully* that qualifies me as advanced and I won't screw it all up :o)
Thanks for such an awesome plan!
Laura PARING DOWN (not verified)
Sat, 05/01/2010 - 16:18
This is beautiful. Love the
This is beautiful. Love the plans!!!
Andrea (not verified)
Sat, 05/01/2010 - 16:34
How how HOW did you know this
How how HOW did you know this is exactly what I have been looking for!!! I am so excited! Your website is the BEST part of my day :)
kikicraig (not verified)
Sun, 05/02/2010 - 02:59
Okay, Ana, so yesterday I'm
Okay, Ana, so yesterday I'm at Lowes looking for hinges for doors to work on something inspired from you....I am standing there with another lady and her husband that are also looking at hinges. We started talking and came to realize that they too were working on something from you!! What a small world...after I left with THE EXACT HINGES you just mentioned, I wished that I would have asked for that lady's contact info to get together to "talk shop", but as an adult felt kinda silly asking. Just had to share.
Felicia (not verified)
Sun, 05/02/2010 - 17:12
Ana- Love your site! Quick
Ana- Love your site!
Quick question, if I wanted to make all doors and no drawers, how different would my shopping list look?
Ana White (not verified)
Sun, 05/02/2010 - 17:13
Felicia - just skip the 1x8s
Felicia - just skip the 1x8s :)
Firefly Haven (not verified)
Mon, 05/03/2010 - 04:49
Thanks so much. I've been
Thanks so much. I've been working with two master-craftsmen on my new TV cabinet which has drawers(never made any before)...and they keep telling me they're easy...just do this that and the other thing and you'll be good. But actually SEEING the process is VERY helpful. I feel MUCH more confident and able to finish my project. Thank you!
Susan (not verified)
Fri, 05/07/2010 - 10:35
Ana, these plans look
Ana, these plans look AMAZING. I have a quick question - on the doors, if the false faces hang over, will the doors open? It seems that if they overhang on the edge where the hinge is placed, the faces will prevent the doors from opening. Am I missing something? Thanks for your help!
Ana White (not verified)
Fri, 05/07/2010 - 11:24
Susan you are so smart! Yes,
Susan you are so smart! Yes, you are correct, unless you use butterfly hinges to the actual false faces, on the hinge sides of the doors, you will need to line the false face up with the edge of the door. I will make note of this in the plan too.
Susan (not verified)
Sat, 05/08/2010 - 09:28
Thanks Ana!
Thanks Ana!
QuackMeHard (not verified)
Fri, 05/21/2010 - 00:16
I'm wanting to do only doors,
I'm wanting to do only doors, too, so I'd skip the 1x8s, but do I need to get more plywood or 1x16s (you said to use scraps, but would there be enough..?).
Thanks!
Cam (not verified)
Sun, 02/19/2012 - 17:38
QuackMeHard - how did it turn
QuackMeHard - how did it turn out doing all doors? I am doing this myself right now and sitting here thinking the best way. Any tips that you would be willing to share would be appreciated.
crander8 @ gmail . com
Allery (not verified)
Fri, 06/04/2010 - 09:51
Love this blog!!! Have been
Love this blog!!! Have been on it for three days straight!!! Thanks so much!!
kikicraig (not verified)
Sun, 06/06/2010 - 08:20
Anna, I need help with these
Anna,
I need help with these hinges!!! It's the last step in my project and it's not working!
I am doing a full overlay and the doors are not lining up on the front, they are about 1/8 inch from the outside of the frame. Do you have any suggestions for me?
Thanks!
Ana White (not verified)
Tue, 06/08/2010 - 06:58
Kikicraig, we tend to leave
Kikicraig, we tend to leave 1/8" around doors (it's standard) because the door needs some space to open and close. I would make sure the gap is even around the door. You need somewhere for the door to "go" when opened, if I'm making any sense. Would love a picture to get a better idea of the problem. Ana
The Vandermydes (not verified)
Tue, 06/08/2010 - 14:11
I'm almost done! Since I'm
I'm almost done! Since I'm not advanced in woodworking and my dad is, we had a lovely father daughter project! It is turning out great. We had to do a few changes. The drawer fronts were too short and made noticable gaps, and I don't know if we are just tall, but we made a platform to make it 3 or 4 inches taller. We also had many advanced tools at our disposal, so we took advantage of that. I can't wait to put it in my house! Thanks for the great plans!
Shane Ellis (not verified)
Thu, 06/17/2010 - 05:51
Ana, love the plans and am
Ana, love the plans and am almost finished with this project for a TV stand. I just thought I would point out that a 1x8 is typically 7-1/4" wide not 7-1/2" wide as your plans show. This makes the gap in the top of the drawers 1/2" instead of 1/4" which is much more noticeable (not in a good way). If I had realized this before I probably would have made the drawer boxes a bit shorter (7-1/2" instead of 7-3/4" tall). And of course the 1x8 boards I got were actually only 7-1/8" tall so the gap is even bigger.
Robin (not verified)
Wed, 07/14/2010 - 08:58
How much did this project
How much did this project cost for those that built it? Ana, how much for you? I'd love to build it but I'm on a very small budget.
Clint (not verified)
Thu, 11/18/2010 - 15:56
Hey! Love this design. I
Hey! Love this design. I actually just finished building it myself.
I have a couple of questions -
1 - Where did you get the baskets that are in the picture at the top of the page?
2 - Do you have any suggestions on faux finishing this piece?
Thanks!
Erika Smith (not verified)
Sun, 11/21/2010 - 18:28
In step one you state that
In step one you state that you place the bottom on a 1x4 to raise it when attaching the sides, front and back. To make sure I am properly understanding this, does that mean your bottom piece is not flush with the sides, front and back? So when I finish the drawer, if I turn it over, there would be a 1/4" inset?? I'm sorry to ask two separate questions, just want to make sure I do it right. Thank you-I am very excited to build this!!
Erika Smith (not verified)
Sun, 11/21/2010 - 19:01
I feel horrible, I have one
I feel horrible, I have one more question and I promise it's the last one. I had to modify the unit for my home. I changed the width and height. My cabinet area measures 26" wide x 24.75" tall. I know the doors are different sizes and I am trying to figure out what my doors should be. Right now I have 24.5" x 13.75" and 24.5" x 12.25". My concern is if I don't do this right my false fronts will not line up properly. Thank you again!
christy (not verified)
Sun, 11/28/2010 - 13:50
I'm in Ohio... and bought all
I'm in Ohio... and bought all my supplies for building from Lowes.
It was around $150 for all the lumber, hinges, and drywall screws.
I bought all my drawer pulls from Ikea in NJ, & they were $1.50 a piece.
I bought my paint as a mis tint for $8.
... This cabinet is on sale for $899 @ PB right now ... $200 or less is a steal!
Just an idea too, you can always get a 10% off Lowes coupon from the Post Office.
Just ask them for a change of address kit, it has the coupon in it <3
Apothecary Con… (not verified)
Thu, 12/02/2010 - 20:02
[...] Cabinet plans – step
[...] Cabinet plans – step one are here The Apothecary Cabinet plans – step two are here Read more from Living Room Furniture, Woodworking Patterns Click here to cancel [...]
Apothecary Con… (not verified)
Sun, 12/12/2010 - 00:07
[...] Cabinet plans – step
[...] Cabinet plans – step one are here The Apothecary Cabinet plans – step two are here Read more from Do It Yourself, Handmade Gifts, Storage Furniture, Woodworking, Woodworking [...]
Modified Apoth… (not verified)
Sun, 01/02/2011 - 16:37
[...]
[...] http://ana-white.com/2010/05/furniture-plans-doors-for-apothecary.html [...]
sarah norman (not verified)
Mon, 01/03/2011 - 09:02
Ana, I loved to make this as
Ana,
I loved to make this as a dresser. How hard would it be to add drawer sliders inside the system, and how hard would it be to make the doors section into additional drawers?
sarah norman (not verified)
Thu, 01/06/2011 - 16:50
about how long does this
about how long does this project take to build and stain?
Alecia O'Byrne (not verified)
Wed, 02/02/2011 - 16:58
That's what I want to know as
That's what I want to know as well. This is just what I need to replace my husbands dresser drawer and TV stand that takes up too much room in our bedroom.
[email protected]
Thu, 04/14/2011 - 11:20
(No subject)
tamararenea
Thu, 07/28/2011 - 14:34
Modify for corner?
I love this and want to use it in our small living room so would need to modify it both to be smaller and to fit a corner. Does anyone have any suggestions? I have never built a "corner unit" before and cannot seem to find much in the way of a tutorial yet. Thanks!!!
pcole6765
Mon, 08/01/2011 - 06:37
Hinge help
I have the cabinet all finished and the doors ready to hang but I'm so afraid to mess up the hinges. Can someone please explain how to measure and install the hinges. I have the same ones Ana suggests.
Thanks so much
Patricia
rhinehart11 (not verified)
Thu, 09/20/2012 - 08:54
color
I am trying to find what color green paint that is. Please help!