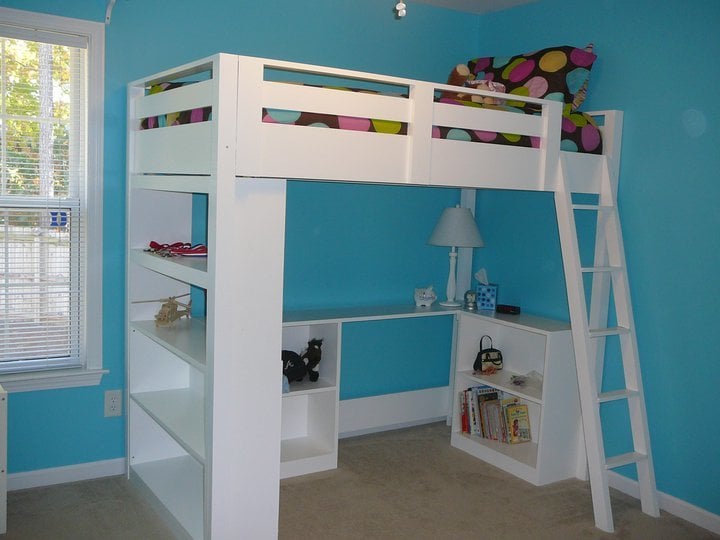


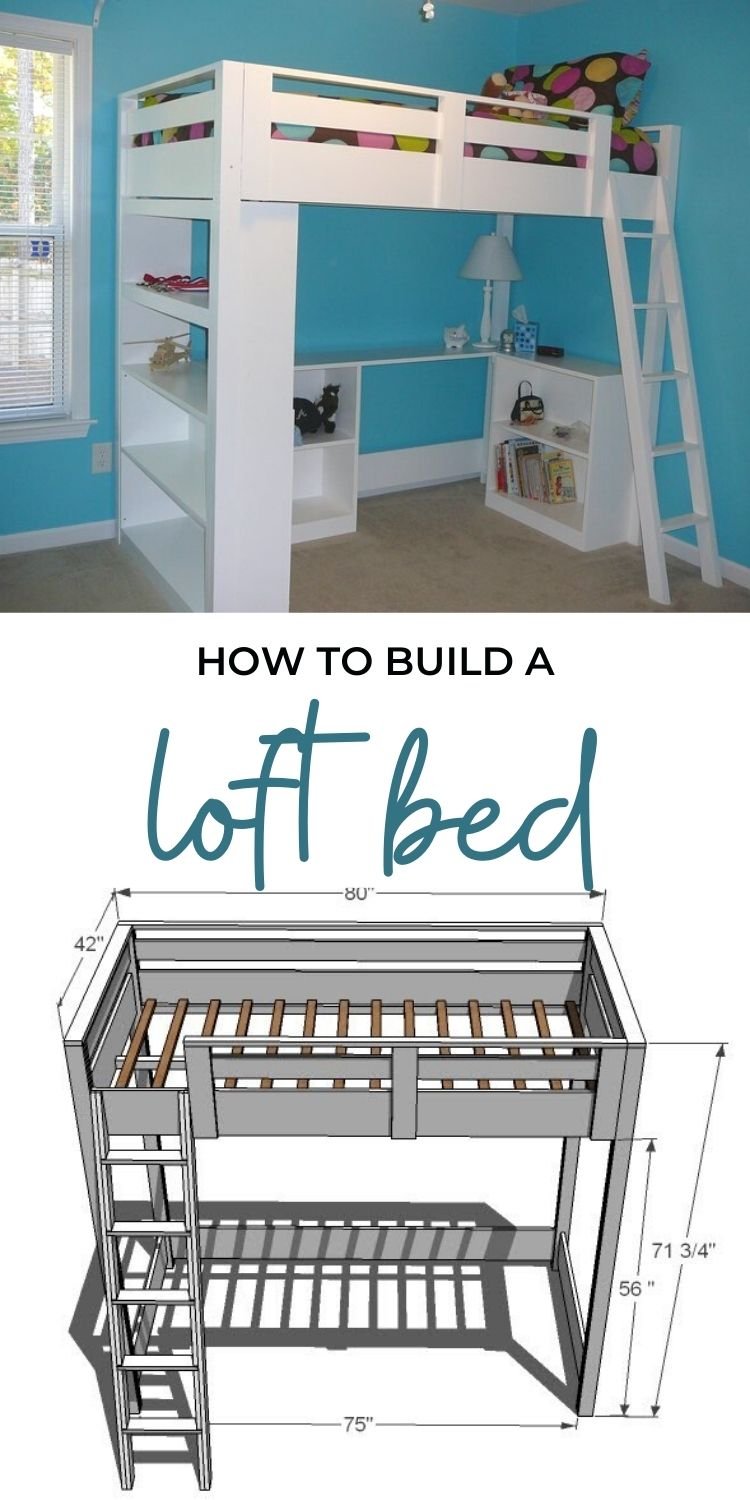
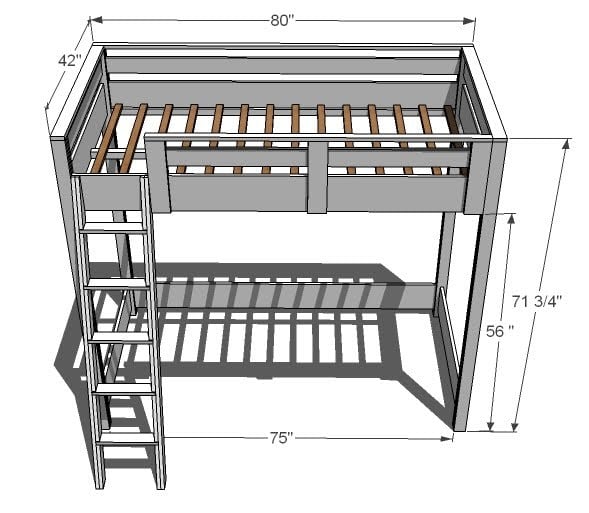
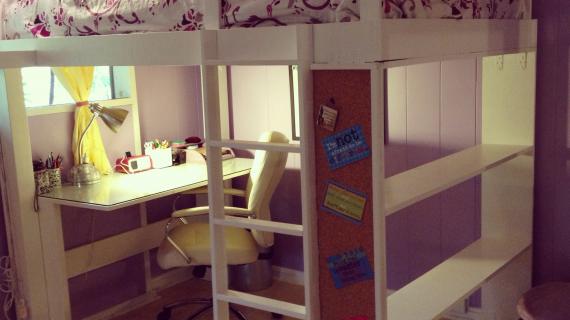
A loft bed that works with an entire system of plans to get your teen more space and storage in their room. Step by step plans from Ana-White.com
This plan works with our Loft Bed tall bookcase plan and our Loft Bed desk and small bookcase plans.
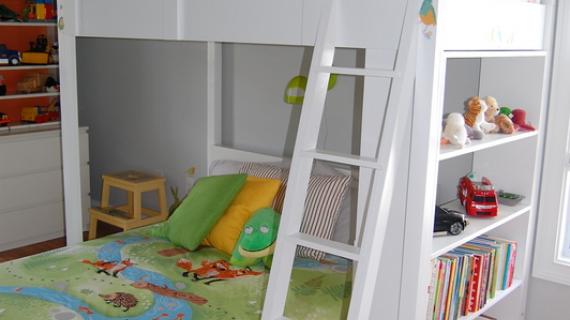
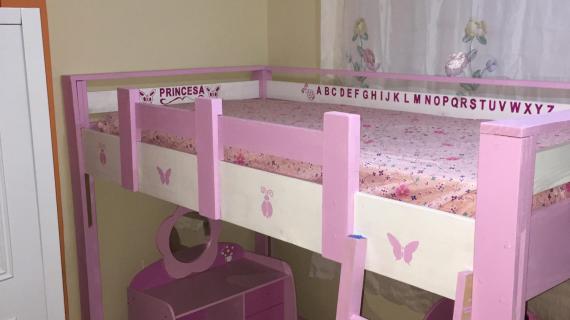
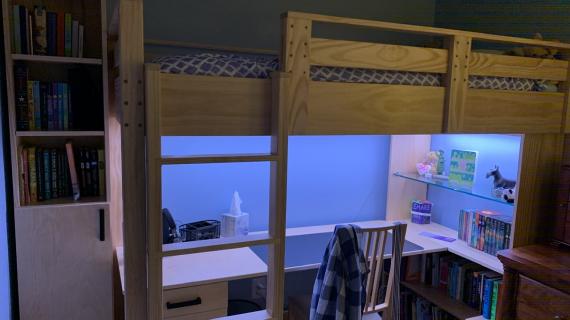
 Special thanks to Anne for sharing her photos from this plan.
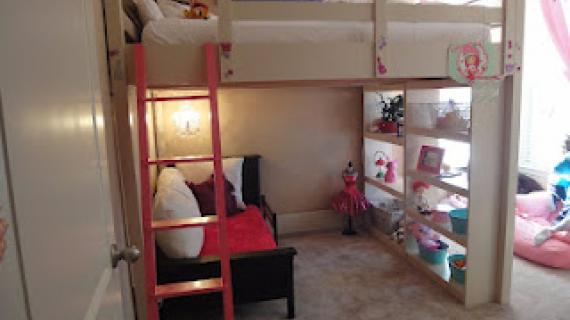
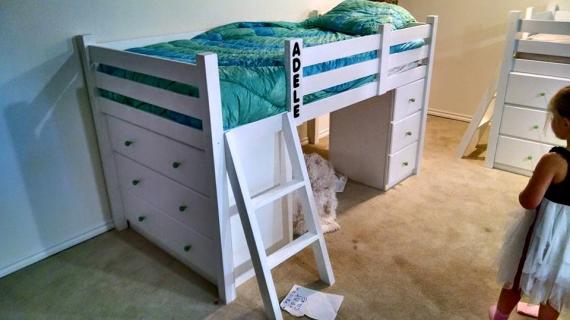
This plan is just for the loft bed. You can customize the storage underneath by adding a tall bookcase and a desk system. (plans linked)
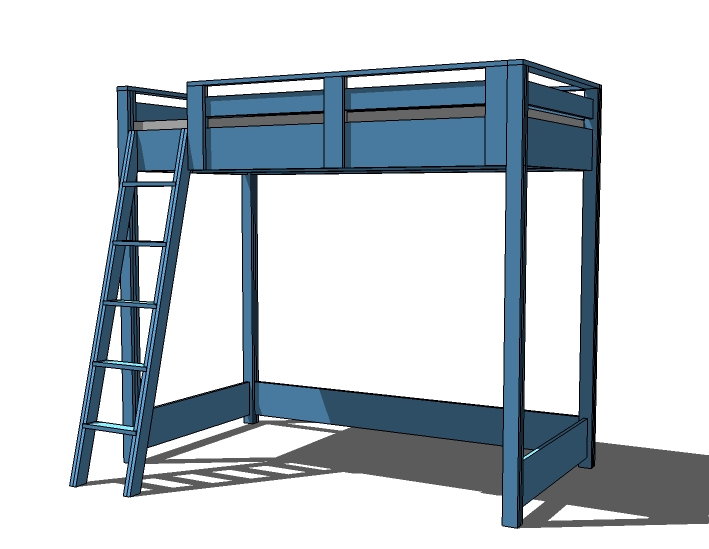
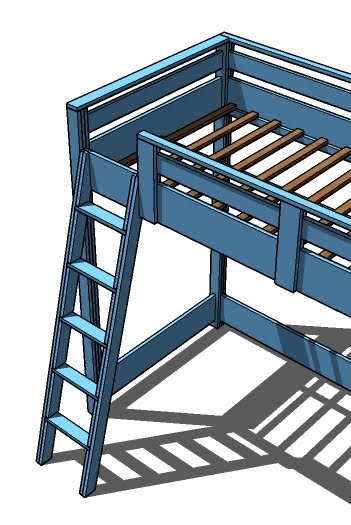
This plan uses a built in slat system as shown. You can use any type of 3/4" material - check your mattress recommendations for slat spacing. I usually will burn up scrap wood here.
Pin For Later!
Preparation
- 15 – 1×3 Boards, 8′ Long
- 3 – 1×8 Boards, 10′ Long (cut one long and one short cut from each)
- 1 – 1×8 48″ Long (cut 1 short cut from this one)
- 3 – 1×4 Boards, 8′ Long
- 1 – 2×2 Board, 8′ Long
- 11 – 1×2 Boards (Less if you have a bunkie board or box spring), 8′ Long
- 1 1/4″ self tapping screws (can also use brad nails and glue)
- 2″ self tapping screws
- Wood Glue
- Finishing Supplies (Wood Filler, Sand Paper, Paint, Brushes, etc)
Cut List for Loft Bed
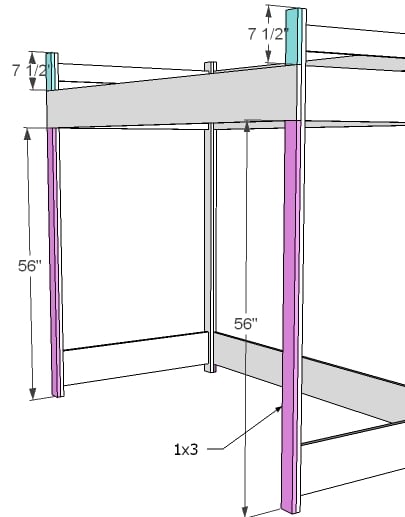
- 8 – 1×3 @ 71″ (Inner Legs and Outer Legs)
- 4 – 1×8 @ 37 1/2″ (Large Planks, Ends)
- 2 – 1×4 @ 37 1/2″ (Top Planks)
- 3 – 1×8 @ 80″ (Front and Back Rails)
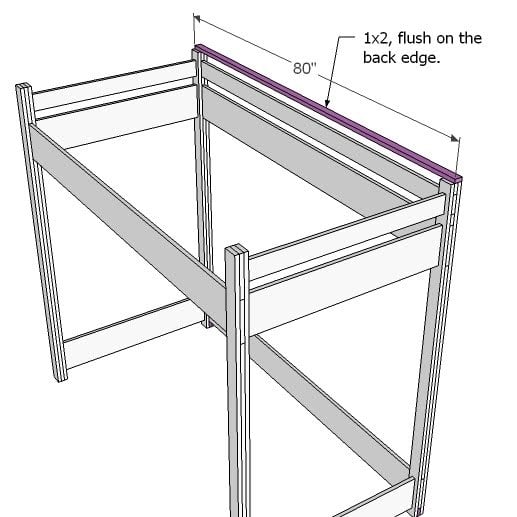
- 1 – 1×4 @ 80″ (Top Back Rail)
- 2 – 1×3 @ 46 1/2″ (Back Filler Piece, Long)
- 6 – 1×3 @ 2″ (Back Filler Piece, Short)
- 2 – 1×3 @ 56″ (Front Filler Pieces, Long)
- 2 – 1×3 @ 7 1/2″ (Front Filler Pieces, Short)
- 1 – 1×2 @ 80″ (Back, Top Piece)
- 2 – 1×3 @ 40 1/2″ (End, Top Pieces)
- 2 – 1×2 @ 75″ (Cleats)
- 1 – 2×2 @ 76 3/4″ (Center Support)
- 14 – 1×2 @ 39″ (Slats)
Cut List for Guard Rail
- 1 – 1×4 @ 61” (Rail)
- 1 – 1×2 @ 61” (Top)
- 3 – 1×4 @ 15” (Uprights)
- 6 – 1×4 @ 2” (Filler Pieces)
Ladder Cut List
- 2 – 1×3 @ 65 3/4″ Overall (Bottom end cut at 15 degrees off square, top at 75 degrees off square)
- 10 – 1×3 @ 10 3/8″ (Spacers, ends cut parallel at 15 degrees off square)
- 5 – 1×3 @ 12 1/2″ (Treads)
- 2 – 1×3 @ 10″ (Top Spacer, cut to match top sides)
Converting to Full Size This bed can easily be converted to full size. You will simply need to add 15″ to all boards that run parallel to the ends. This includes the planks, end top pieces and the slats. Shopping list will need to be adjusted as well.


On a large project such as this one, it is crucial that you build straight and square. To do this begin by working on a clean level surface. Select boards that are straight and free of cracks or other imperfections. Check for square after each step. Predrill and countersink all of your screw holes to avoid splitting the wood and to hide your screw heads. Use glue unless otherwise directed. Of course, you should be safe and have fun! Remember, you can click images for larger views.
Instructions
Step 1
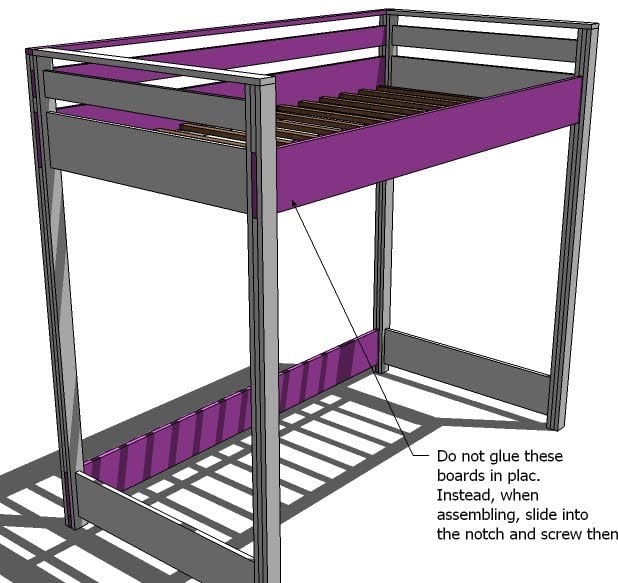
UPDATE: If you have narrow door opening (or are building the bed in a full size) you may need to assemble the bed in the room or not use glue so that the bed can be assembled and disassembled. The boards shown above in pink are not to be glued to the bed, and will be inserted in the slots on assembly. You will then on assembly use screws to fasten the rails to the bed ends.
Step 2
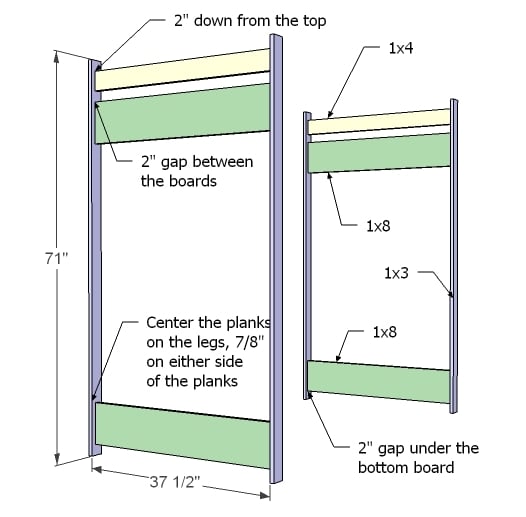
Ends Begin building the ends by screwing with 2″ screws and glue the planks to the inside legs. Center the planks on the inside legs, leaving 7/8″ on either side of the planks. Use the measurements above to guide you. Glue these pieces.
Step 3
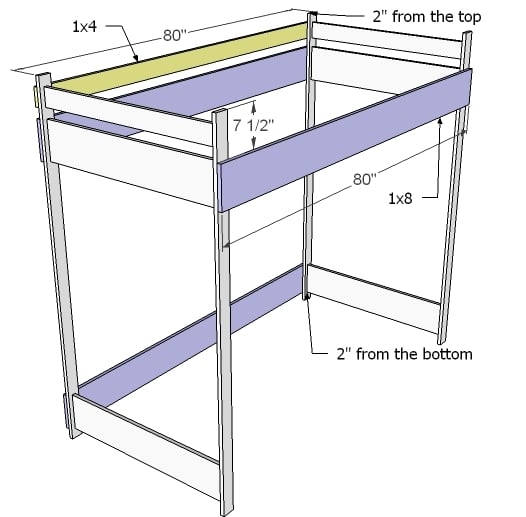
Front and Back Rails Instead of fastening the front and back rails, mark their positions on the ends, as shown above. You can use one or two screws to fasten each board in place temporarily.
Step 4
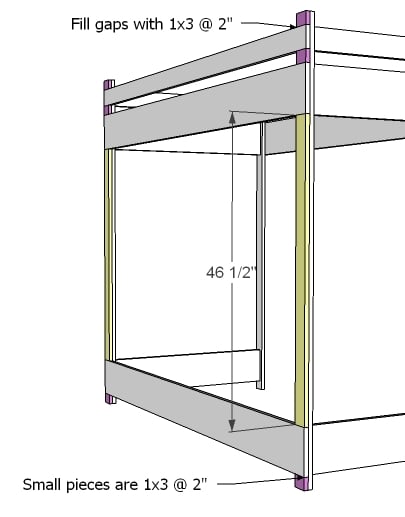
Back Filler Pieces Measure and cut your filler pieces to fit the back as shown above. You can save yourself quite a bit of time by gluing and clamping these pieces in place. When you fasten the outer leg on, it will secure these pieces with screws. If your nailer is handy, a few 1 1/4″ nails would hold everything in place. You can use glue in this step. The filler pieces will hold your rail boards (the one’s you did not glue down in step 2) in place for now.
Step 5
Step 6
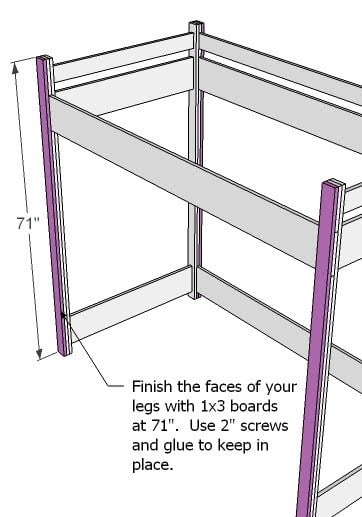
Outer Legs Pieces First unscrew the rail boards that you loosely screwed in step 2, and remove. Then, using 2″ screws and glue, predrill and countersink your screws as you fasten the outer leg boards to the inner leg boards. If you are staining or leaving natural, I highly recommend using a measured bolt pattern or screwing from the inside of the legs on this step.
Step 7
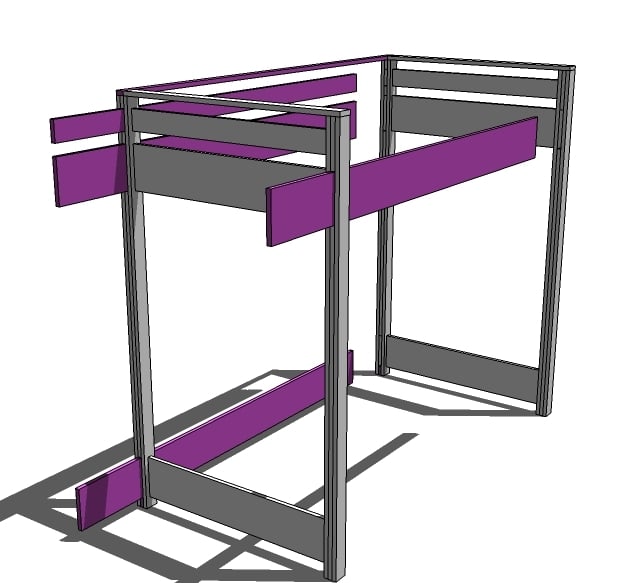
DO NOT FASTEN in the gaps left for the rail boards. Test fit your rail boards to make sure they fit in the opening. The diagram above shows how the rail boards should be removable.
Step 8
Back, Top Using 2″ screws, fasten the back top piece to the tops of the legs. The back top piece will be flush with the outside of the legs, but not the inside. Do not use glue. This board will be removed to move the bed through a doorway.
Step 9
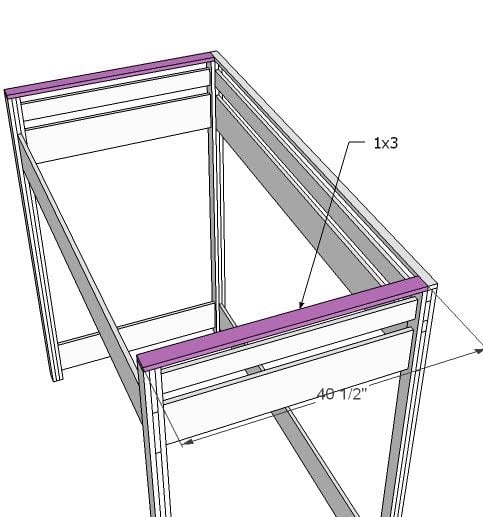
Top, Ends Using 2″ screws and glue, fasten the top end piece to the top of the ends, as shown above.
Step 10
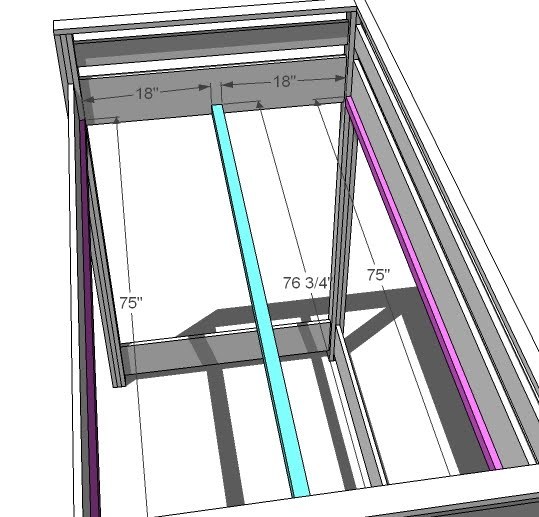
Cleats On assembly, fasten your side cleats to the side rails, flush with the bottom edge. Use 1 1/4″ screws. Then fasten your center cleat to the end planks, flush with the bottom of the 1×8 plank, using 2″ screws and NO glue. Center the support on the plank.
Step 11
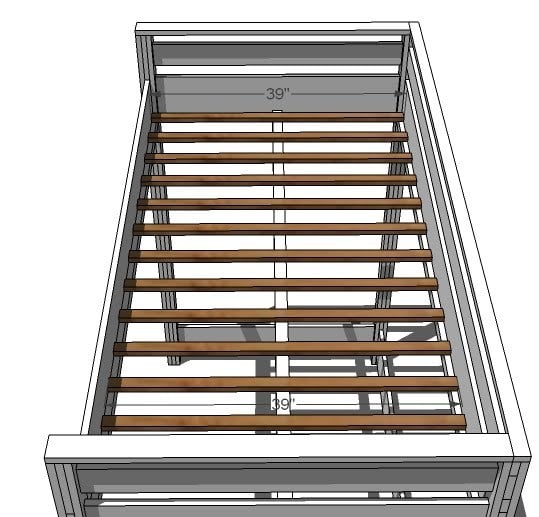
Slats Position your slats with approximately 4″ gap between the slats. TIP: Cut 2 1×2 scraps at 4″ and uses as a spacer between the slats as you are assembling. Screw the slats down with 1 1/4″ screws. For extra support, you can also screw a couple of the center slats from the outsides of the 1×8 rails using 2″ screws.
Step 12
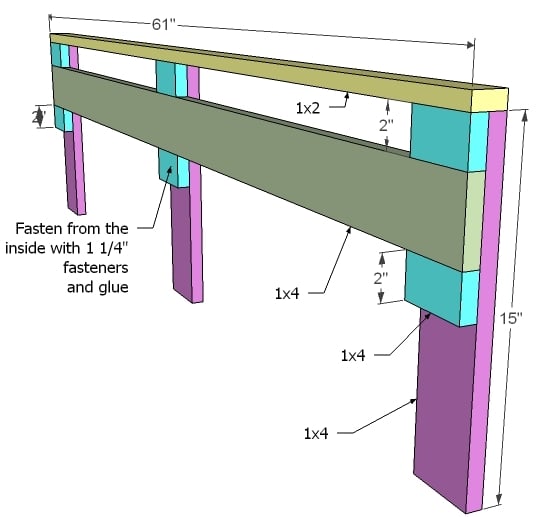
Guardrail Use 1 1/4″ fasteners (nails would work just fine) to build your guardrail. Fasten from the inside to hide holes. Then add the 1×2 top, keeping all outside edges flush.
Step 13
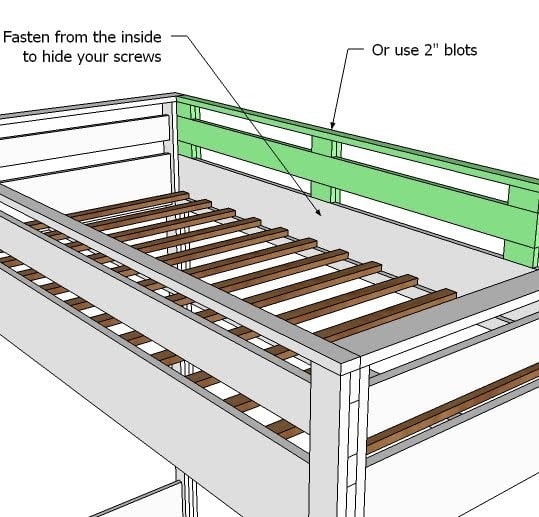
Guardrail Attachment Attach the guardrail to the bed as shown above. From the inside, use 1 1/4″ screws. Don’t use glue so you can remove it.
Step 14
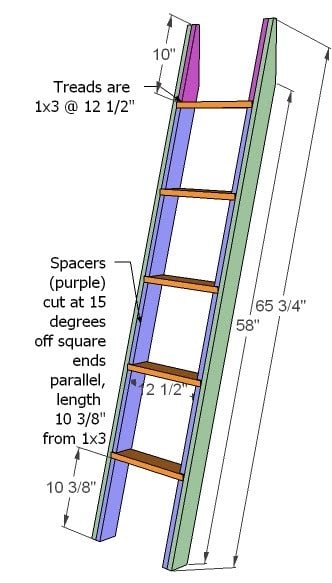
Ladder So cutting the top of the sides is going to be a little tricky. Think of it this way, you are leaving a 15 degree angle on the top of the board, then trimming off the top 2 1/4″ to remove the sharp pointy end. The best way to do this is FIRST cut your top angle at 75 degrees off square (leaving 15 degees on the board). You will need to use a jigsaw or circular saw. Then snip off the top 2 1/4″ at a right angle (90 degrees) from the back of the top (where the leg rests against the bed. THEN measure down the leg 65 3/4″ and cut your 15 degree angle on the bottom of the leg. Then use the top as a pattern when cutting the top filler pieces. Construct your ladder as shown above, using 1 1/4″ screws when joining the filler pieces to the leg sides, and 2″ screws to join the treads to the leg sides. Don’t forget your glue. See an exploded view below.
Step 15

Step 16

Assembly The boards shown in pink above are removable and are not glued down. You should be able to slide the boards out of the notches to disassemble the bed and move. Slide the boards back into the notches to assemble and use 2″ screws to screw from the outside of the leg into the rail boards. Also screw the back top to the top as show above. In this method, you should be able to easily assemble and disassemble the bed without destroying the finish.

Comments
Melissa (not verified)
Wed, 05/05/2010 - 21:00
I want to make this bed for
I want to make this bed for my daughter! The only thing I can see wrong is that when we move to a bigger house (it will happen eventually, at least I hope), there is no way to get the bed out the door, so we would have to leave it.
Ana White (not verified)
Wed, 05/05/2010 - 21:05
Melissa, you have a really
Melissa, you have a really good point! What you can (and probably should) do is to attach the rails to the bed with screws (and not glue). Then you can assemble and disasemble. It would be like assembling an IKEA bed (or even the Pottery Barn Teen bed that this bed is inspired by).
For those of you with small door openings, you will need to assemble the bed in the room.
ShezAGeekess (not verified)
Wed, 05/05/2010 - 21:31
My wedding cake was a smaller
My wedding cake was a smaller version of yours, with pale-pink edged roses. Mine also had a bit of a lean, because it was also home made-- I made mine myself. :)
Krie (not verified)
Wed, 05/05/2010 - 23:07
Ana, thanks for your awesome
Ana, thanks for your awesome projects and all the hard work.
I have awarded you with the sunshine award along with other friends of mine (the only exception is that I don´t know you personally) who inspire me to be creative and have fun!
Keep up the great work :)!
Love,
all the way from Germany!
Tru (not verified)
Thu, 05/06/2010 - 00:41
For not being able to sew, it
For not being able to sew, it looks pretty darn good. I also made my own wedding dress, 'cause I'm in agreement with you; you shouldn't go into debt for a wedding.
Kana (not verified)
Thu, 05/06/2010 - 02:39
Are you still using the
Are you still using the Youngster's mood board to redo your office?
Jess (not verified)
Thu, 05/06/2010 - 03:05
YYIIPPPEEEE!!!! This is the
YYIIPPPEEEE!!!! This is the bed that I have been waiting for to make for my son!!!! I will be making it this summer. WOO HOOO!!
Since you already have all the hard work done, when you have time (yeah right) could you show us how to put a desk insert in? I think that after looking at your other projects I could wing it but.....
Thanks for everything.
Branwen (not verified)
Thu, 05/06/2010 - 03:56
OH WOW!!! Did I say WOW?!
OH WOW!!! Did I say WOW?! That is awesome Ana!! You ROCK! I don't know why I never thought of this but my 2 little ones share a room and bunk beds didn't work. I need to change my build plans!! Thank you sooooo much, we love u and appreciate all you do!! Oh and your wedding pictures are great! I love knowing that I'm not the only person who didn't go into debt for my wedding. We DIY'd the entire thing! Do you ever feel overwhelmed when you go to a wedding? Some have GOT to be pocketbook nightmares. Anyway, thank you so much for sharing and I thought your dress and cake were beautiful! You obviously CAN sew, you just have no confidence...right? ;)
Jennifer (not verified)
Thu, 05/06/2010 - 05:02
Awesome!!! Both of my girls
Awesome!!! Both of my girls have been asking for loft beds for the past two years. I'm going to be making each of them a full size bed sometime in the next few months, just need to decide WHICH bed plan of yours to use!!!
Couldn't agree more about going into debt for a wedding. I didn't make my own weddig dress, but we did keep the whole wedding inexpensive and had a family friend make our cake.
Seriously cannot believe you made your own weddig dress (thinking you couldn't sew well) and it turned out that beautiful!!! You look beautiful in that photo!!
PS: I've heard it's recommended to fasten loft beds (top heavy) to the wall for safety. is that true, or does the ladder help with some of that?
Heather (not verified)
Thu, 05/06/2010 - 05:05
Ana, another fabulous plan
Ana, another fabulous plan you've blessed us with!!! Thank you. My DH is currently building the simple bunkbeds from your plans and is excited to receive confirmation about using the 1x2 slats versus the bunkie board. I think he's caught the building bug - he wants to go buy more wood so we can outfit the house with projects you've made possible for us to make ourselves.
How to thank you?
Megan (not verified)
Thu, 05/06/2010 - 05:16
omg!!! I was at a friends
omg!!! I was at a friends house recently and her oldest 2 share a room- they both have beds like this (that she probably paid an arm and a leg for) with desks underneath. I immediately started thinking about how cool it would be to have a bed like that for my oldest... Its like you read my mind! Thank you!!!
Gwen (not verified)
Thu, 05/06/2010 - 05:26
Hi!I read your blog and love
Hi!
I read your blog and love it :) I just wanted to let you know I am having a Mother's Day giveaway on my blog. Come play :)
xoxo,
Gwen
Kirsten (not verified)
Thu, 05/06/2010 - 05:27
YES! I was planning on
YES! I was planning on designing/building (and no, I don't know what I'm doing!) a loft bed for my daughter--we're moving her out of her brother's room into her own this summer, and it's TINY. I thought about doing the playhouse bed, but due to the size of the room, I think I'll do this one and hang some gauzy, princess-y fabric around the bottom of it:). And I'm all over the bright colors!!
Heather Ann (not verified)
Thu, 05/06/2010 - 05:58
Your dress was beautiful,
Your dress was beautiful, Ana! And I LOVE your office chair - where did you get it??
Urban Dragon (not verified)
Thu, 05/06/2010 - 06:15
Thank you for another amazing
Thank you for another amazing set of plans Ana!!! And thank you for sharing a bit of your life with us also. I am finding myself so connected mentally to other women on the internet these days and it's stories like this that are giving me that feeling. Yesterday I followed some of your sponsors links and spent the whole day being inspired by other brilliant women.
Monique (not verified)
Thu, 05/06/2010 - 06:35
LOVE IT! My husband is
LOVE IT! My husband is thinking of attempting to conquer this for our kids' room! We just never have enough room in there! As we are huge budgeters (not a word) how much would you guestimate this costs? (guestimate apparently isn't a word either)I am so impressed! My husband just showed me your blog a few days ago, and I can only aspire to the DIY skills... and I thought I was handy!
Brittany@Superwoman (not verified)
Thu, 05/06/2010 - 06:48
Oh my gosh Ana! I was JUST
Oh my gosh Ana! I was JUST talking to my step son about building this! I said, "I could probably build you a loft bed to stick your bed under, but I would have to wait until Knock Off Wood makes the plans."
Isn't that so ironic?
Keri-Anne (not verified)
Thu, 05/06/2010 - 07:35
the wedding cake looks
the wedding cake looks gorgeous and it looks spiraling not leaning. and i agree a wedding is one day a marriage is alot longer! and the dress looks great too if you hadnt said it was home made i would never know!Its designer one of a kind!
AllenKll (not verified)
Thu, 05/06/2010 - 08:31
STABILITY! I don't think this
STABILITY!
I don't think this plan has it... There's no cross bracing!
I don't think those stacked 1x3s with simple wood screws and a little glue would be strong enough to handle lateral shear for anything other than a docile 10 year old or smaller...
Please be careful with this plan.
So Bella (not verified)
Thu, 05/06/2010 - 08:43
I love your wedding dress!!
I love your wedding dress!! Simple but perfect - I sew and that's better than I think I could do!
Ana White (not verified)
Thu, 05/06/2010 - 08:44
Thanks all! Hi Allen, this
Thanks all!
Hi Allen, this bed is actually inspired by this bed from Pottery Barn Teen http://www.pbteen.com/products/girls-stuff-your-stuff-loft-bed/popup/mo… and is very close dimensionally (and this bed is also made of pine boards) to this bed, which also lacks cross supports.
However, if you would like to make your bed stronger and more stable, cross bracing would definitely help and would be easy to add. Also, like the Design DIR photo shown in the post, adding more rails will help considerably.
I find myself on a balancing act between overbuilding and creating a plan that is too expensive or too difficult for a non-woodworker to build, yet also creating projects that are sturdy and last longer than a comparable piece from a retailer.
And for those of you standing by to add desks, bookcases and other "accessories" for under the bed, by attaching, like done in this bed http://www.pbteen.com/products/girls-sleep-and-study-loft/?pkey=cgirls-… will only create more stability.
Kirsten (not verified)
Thu, 05/06/2010 - 10:42
Just a note regarding
Just a note regarding stability: my dad built me one that looked just like this when I was in my 20's and renting a 9x9 room in a house. The only difference is it looks like the braces around the bottom were up a foot or so higher and the ladder was flat against the bed. Oh, and he just used single 2x4's for the legs. It was perfectly stable enough for me as an adult. And, like someone else said, you could always attach it to the wall if you were worried about it.
Thanks for the plan, Ana!
Catherine Hans… (not verified)
Thu, 05/06/2010 - 10:42
Awesome plan as always! Your
Awesome plan as always! Your office space would look so good with some hot pink photo frames up on the shelves....
Jennia Hart (not verified)
Thu, 05/06/2010 - 10:49
I have wanted to have a loft
I have wanted to have a loft bed for my teen boy for several years now. The money is always what gets in the way.... now I think we can make it happen. What a great project this will make for our summer vacation which starts in just a month.
I want to create a double size version, so THANKS!, for the included instructions. I also want a desk underneath, would that be a short under one hour project for you to draw up??? (I'm hoping so!)
Jen @ Sunshine… (not verified)
Thu, 05/06/2010 - 11:47
Are the 1x2s 8 feet?
Are the 1x2s 8 feet?
Mindy (not verified)
Thu, 05/06/2010 - 12:14
I just discovered your blog
I just discovered your blog last week from a friend who posted about building a bookcase from one of your plans. I have already taken over a corner of my husband's shop to make my very first project (from your coffee table design with the flip up top).
No joking, last night as we were watching tv I showed him a picture of the PB Teen Sleep & Study Loft & said, "I want to build this for Wesley next. I just need the plans." It's like you read my mind, or at least my comment on the Flickr suggestion page where someone else had posted a picture of the PB bed.
Thanks a million times over, Ana!
I've always been a crafter (scrapbooks, quilts, knitting) & have wanted to build furniture (like my awesome mom who has built me a cedar chest, a nightstand, among other things) - I just never had a 'recipe' to go by.
Thank you for sharing your talents.
Ashlee (not verified)
Thu, 05/06/2010 - 16:26
HOORAY!! Thankyou Thankyou!!
HOORAY!! Thankyou Thankyou!! I am SO looking forward to this..it may be a month or so before I can get to it, but my son will LOVE it!! It will open up some floor space for playing in his room too, so that will be GRAET! Thanks!!
Katie (not verified)
Thu, 05/06/2010 - 17:24
THANK YOU! I've been waiting
THANK YOU! I've been waiting for these plans and hope to help my hubby build them for 2 of my 3 kids. I think I'm going to add a book case to one end and a cork board to the back because we're always looking for more storage and a space to display artwork.
Janey (not verified)
Fri, 05/07/2010 - 18:34
Thank you, thank you, thank
Thank you, thank you, thank you!!! I was planning to redecorate my daughter's room while she was away at camp a month or so from now, and I was reeeeeeally hoping you would have the plans for this up before then. Yay! I'm so excited! Now I need to go find the money for the lumber... (while doing the happy dance!) You rock, Ana!
Crazy Easton Family (not verified)
Sat, 05/08/2010 - 13:37
Funny that you said plum high
Funny that you said plum high gloss! I made a loft bed for my two oldest about 5 years ago... one of them was high gloss purple :) The other was bright green. I think you would have liked them! Wish I had your plans then too, would have helped a LOT !!
Creating for you (not verified)
Tue, 06/08/2010 - 04:51
I love this, we're in a small
I love this, we're in a small place, hopefully temporarily, but even without that, kiddo needs a big girl room with plans to have (yikes) friends over sometime. We're thinking of a bed like this, put a futon under it, so its a bed when needed, a reading or tv watching couch when not, a desk on one side and yes, maybe bookcases (or a dresser) Question? is there any way to make steps as opposed to a ladder?
Hagen and Mason (not verified)
Tue, 06/15/2010 - 16:38
Thank you so much for the
Thank you so much for the plans, Ana! My husband made two beds for our twin boys. They are 3, so we made the legs shorter. They LOVE the beds!!! My husband is also a 'beginner', but he had no trouble at all. Here is a link to our blog to see his wonderful work (thanks to you)!!
http://hagenandmason.blogspot.com/2010/06/our-new-beds.html
Leslie Stanfield (not verified)
Wed, 06/16/2010 - 05:32
Do you think it would be easy
Do you think it would be easy to make this for a full size mattress on top or would it need to be twin?
Ana White (not verified)
Sun, 06/20/2010 - 22:09
Hi Leslie, you can easily
Hi Leslie, you can easily convert to a full size. There is actually a paragraph in the plan that talks about how to customize. Good luck with your project!
Hagen and Mason, love your new beds!
specialbekah (not verified)
Thu, 06/24/2010 - 05:17
Are there plans to make this
Are there plans to make this into a bunk bed? If so could you post or link to post or make them, since you apparently have TONS of spare time? :)
Sharon (not verified)
Sun, 07/04/2010 - 05:42
I'm starting this bed today!
I'm starting this bed today! We're doing a modified loft bed and playhouse loft. I want the longterm usefulness of the loft bed and the front ladder--the alcove we're placing it in can't accommodate the side ladder on the playhouse loft. But...I want the cuteness of the playhouse front design! Therefore, the plan is to modify the playhouse loft facade to get a gap for the ladder. It may not be ideal, but hopefully it will work!
Thanks for the ideas!!
Kyle and Kelly Jones (not verified)
Sun, 07/18/2010 - 07:22
Hi Ana!Your blog is awesome!
Hi Ana!
Your blog is awesome! Thanks so much for creating it. I am wondering if you have any or know of where I could get plans to build a loft bed that has stairs that are drawers instead of a ladder. I am looking to build something similar to Berg furniture's Utica collection. I can't find plans for anything like it anywhere? Any ideas?
Thanks!
Kelly
LoriR (not verified)
Sun, 12/04/2011 - 09:39
Find plans?
Kelly,
Did you ever find plans for a loft bed with stairs? I love the Berg bed you mention, but it's quite pricey.
Lori
Frugal Momma (not verified)
Fri, 08/06/2010 - 09:38
This looks awesome! Does
This looks awesome! Does anyone have an idea of how to modify it for a double loft? (An "L" shaped one?) Thanks!
Jenny (not verified)
Tue, 08/10/2010 - 04:56
Thank you for this plan! I
Thank you for this plan! I want to make this for my son but first need to prove to my husband that I'm not insane - so I bought the wood yesterday to make the simple kids' bench. If that goes well, this loft bed is next!
Tania (not verified)
Thu, 08/12/2010 - 01:12
Love the plan and would love
Love the plan and would love to build for my son, just wondering if you have any plans for a set of small stairs that could be built for this. I would love to do what you do!!
The meandering… (not verified)
Mon, 08/23/2010 - 17:51
Oh My GOODNESS!!! This blog
Oh My GOODNESS!!!
This blog has become my favorite. I love love love love all these projects.
These loft bed plans are fabulous.
My husband has been given notice. Either he shares the garage & lets me buy the woodworking tools I want or I'm divorcing him. Ha! ;)
teamstan (not verified)
Fri, 09/10/2010 - 04:22
Hi Ana, What are your
Hi Ana,
What are your thoughts on putting a storage bed underneath the loft? Something we could remove later, and put in desks/book cases if we preferred.
Ana White (not verified)
Fri, 09/10/2010 - 08:00
Hi! The only thing I would
Hi! The only thing I would recommend is adjusting the width/height of the loft bed to the dimensions of the storage bed. There should be plenty of headroom as the storage bed is only 15" high (approximately). Good luck! Ana
Easton Women W… (not verified)
Wed, 09/15/2010 - 00:30
[...] How to Build a Loft Bed
[...] How to Build a Loft Bed — Ana White The boards shown in pink above are removable and are not glued down. You should be able to slide the boards out of the notches to disassemble the bed and move. Slide the boards back into the notches to assemble and use 2″ screws to screw I am finding myself so connected mentally to other women on the internet these days and it's stories like this that are giving me that feeling. Yesterday I followed some of your sponsors links and spent the whole day being inspired . [...]
Easton Women S… (not verified)
Fri, 09/17/2010 - 04:11
[...] How to Build a Loft Bed
[...] How to Build a Loft Bed — Ana White { 1 trackback }. Easton Women Wht Pink Previous post: Reader Projects: A Hutch, A Living Room, and a HOUSEful of Projects! Next post: Project Photos: A Pretty Bed, A Round Table AND a Office Storage Wall. Page 1 of 11 . [...]
teamstan (not verified)
Tue, 09/21/2010 - 06:41
Hi Ana, Is there any worry
Hi Ana,
Is there any worry about the stability using just screws? Someone suggested using wooden dowels, but drilling two holes exactly right seem rather daunting. What are your thoughts? I'd hate for screws to snap. Thanks!
Green Baby Nur… (not verified)
Wed, 09/22/2010 - 13:12
[...] How to Build a Loft Bed
[...] How to Build a Loft Bed — Ana White [...]
tyler (not verified)
Fri, 11/26/2010 - 14:55
So wait... do these
So wait... do these dimensions make a twin or full size bed?
Sandra Clark (not verified)
Sun, 12/19/2010 - 00:47
Hi Ana, This loft bed plan
Hi Ana,
This loft bed plan is awesome! But I think what would make it even that more awesome is if it had a slide ladder to get up into the bed. I had been looking at prices on these types of beds for my son but they are outrageously priced. I found a website that people submit written instructions to IKEA's pictograph instructions, and one of the manuals they had was for a loft bed with a slide. I thought that just the slide/ladder part added to this bed would be SO cool. (And not to mention more affordable than those super fancy over priced slide beds.) So please if you could, if you have time that is, create a plan for this optional add on slide/ladder to your already awesome loft bed plan.
<a href="http://www.ikeafans.com/forums/ikea-instructions/21448-vradal-loft-bed-slide-instructions-annotated.html" Thank you so much!