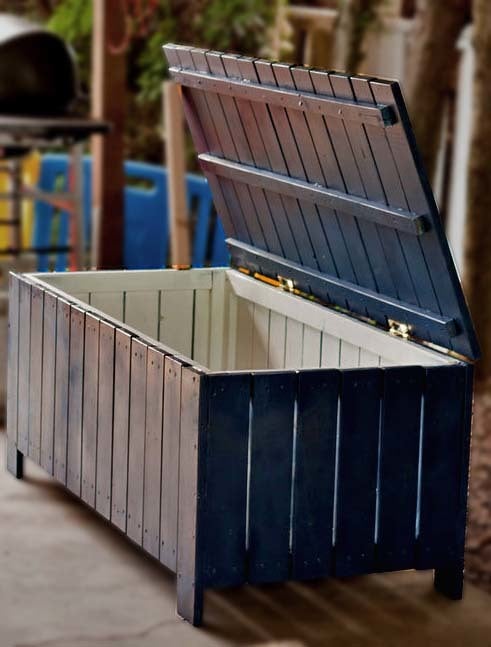


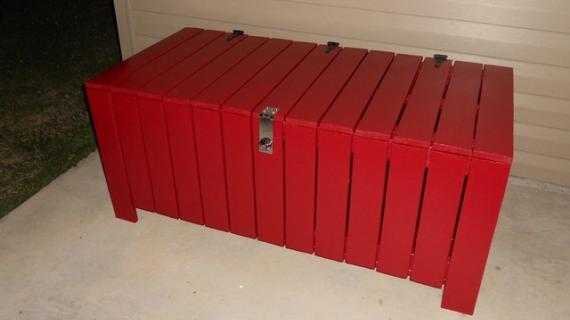
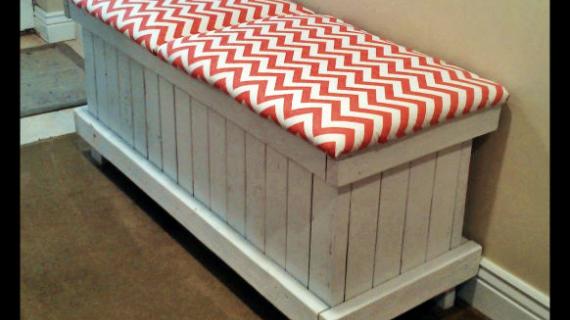
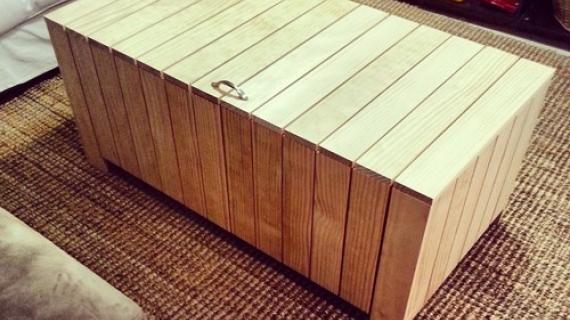
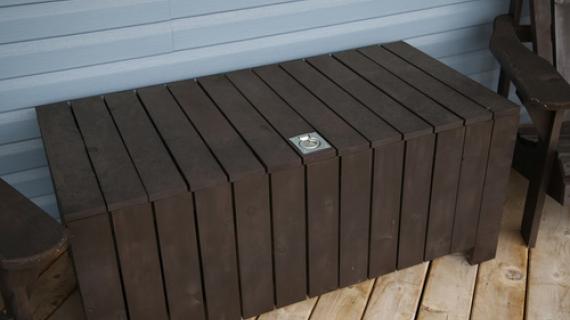
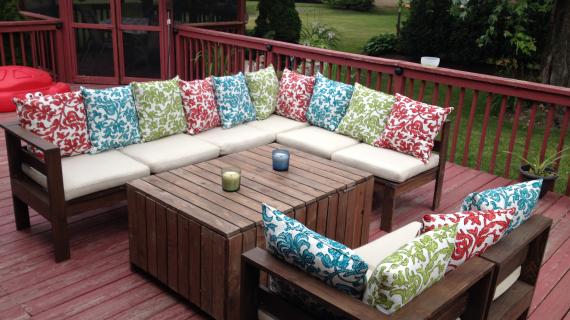
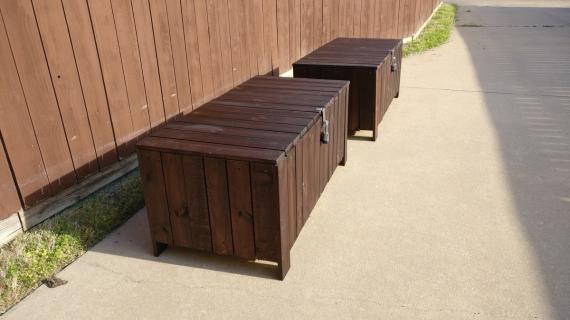
DIY Outdoor storage bench - free plans by ANA-WHITE.com
Preparation
15 – 1×4 Boards, 8′ Long
6 – 1×3 Boards, 8′ Long
2 – 1×2 Board, 8′ Long
2 Door Hinges for exterior use
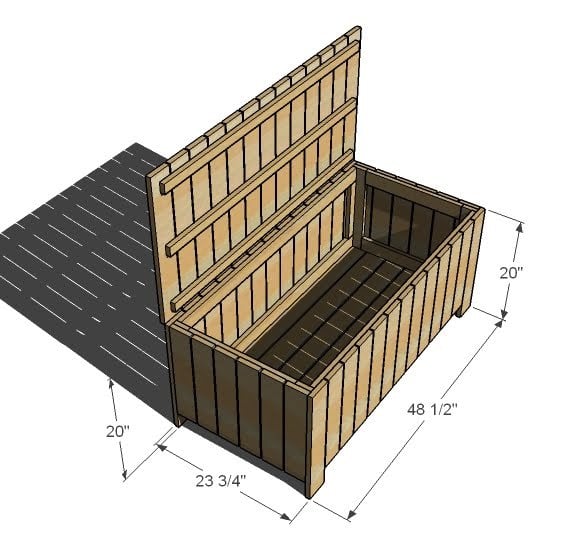
CUT LIST FOR SIDE PANELS
4 – 1×4 @ 20″ (Legs)
22 – 1×4 @ 17″ (Side Slats)
4 – 1×3 @ 45 1/2″ (Frame Boards, Top and Bottom)
4 – 1×2 @ 11 1/4″ (Frame Boards, Ends)
CUT LIST FOR END PANELS
12 – 1×4 @ 17″ (End Panel Slats)
4 – 1×3 @ 16 1/4″ (Frame for the ends)
4 – 1×3 @ 17 1/4″ (Frame for the tops and bottoms)
CUT LIST FOR THE BOTTOM
6 – 1×4 @ 47″ (Bottom)
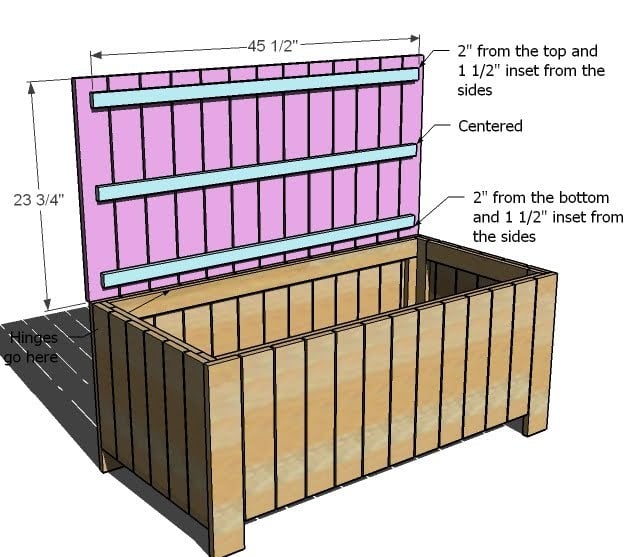
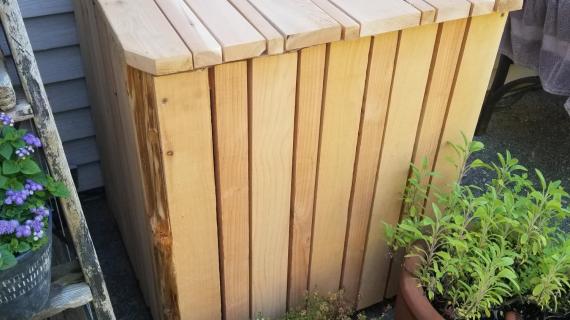
CUT LIST FOR THE TOP
13 – 1×4 @ 23 3/4″ (Top Slats)
3 – 1×2 @ 45 1/2″ (Top Frame Supports)


GENERAL INSTRUCTIONS I decided to break this plan down into sections because I know that you are probably a busy mom just like me and only have one naptime a day. I’m certain that you could build a panel a day, and have a bench by the weekend! Same rules apply when you build this bench, make sure you are using straight boards, working on a level surface that is clean (even a tiny bit of sawdust can throw you off). Make sure you check every panel for square as you are building it. To save you some time, round up a piece of 1/4″ plywood and use it as a spacer when screwing your slats down. Be safe and have fun!
Instructions
Step 1
1: SIDE PANELS
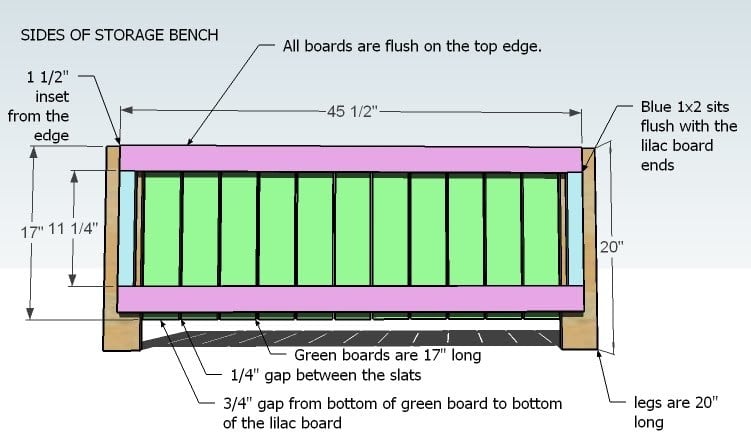
Build two side panels as shown above. The easiest way to do this would be to start with one of the legs. Mark the leg 1 1/2″ in (you could just use a 1×2 since it’s 1 1/2″ wide) from the outside. Then attach the pink board to the top corner, as shown above. The space a green board 1/4″ from the leg and attach to the pink board. For now, I would just use 1 screw. Attach all of the green boards and the remaining leg to the top pink board. Then carefully adjust all of the boards unitl the outside corners of the legs are square with each other. Then add the blue boards to the legs, and then the remaining pink boards. Go back and add more screws to the top frame board. Use 1 1/4″ screws and glue. Build two side panels.
Step 2

END PANELS
The end panels are going to be super simple. Start by screwing a blue board to a green board to create your ends. Then lay your all of the green boards down, including the two with the blue boards screwed to the tops, and lay the pink boards on top. Screw the pink boards to the green boards using 1 1/4″ screws and glue. Make sure you are checking for square and there is a 3/4″ gap under the bottom pink boards. All other outside edges are flush. You will need to construct two end panels.
Step 3
ASSEMBLY
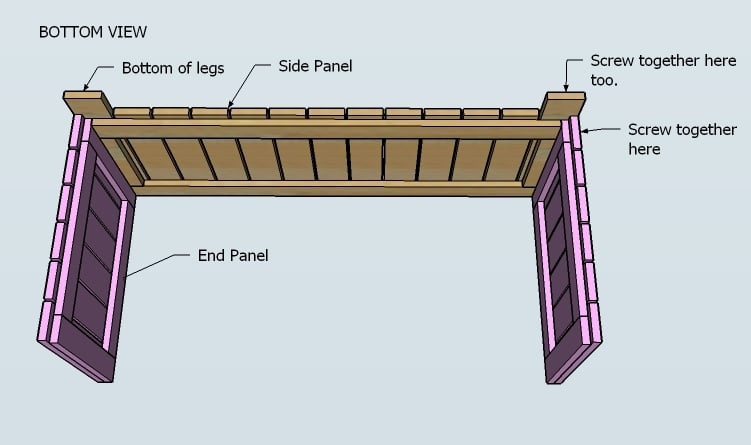
When your panels are complete, attach the panels as shown above. Use 2″ screws and you can skip the glue if you plan to disassemble at some point.
Step 4
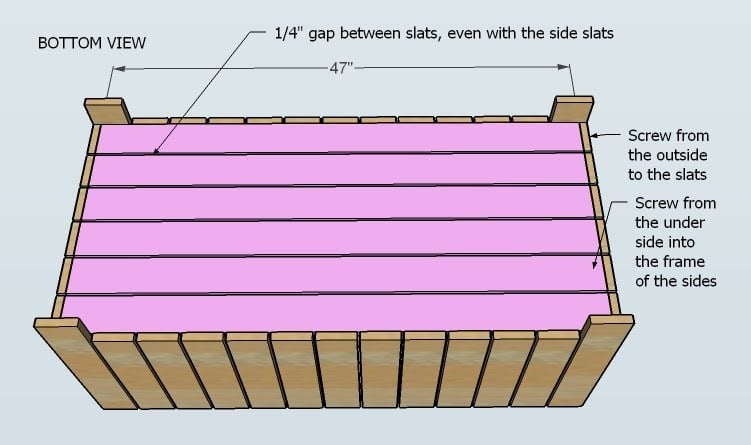
BOTTOM
Attach the bottom boards as shown above using 2″ screws. Use glue if you want a stronger more permanent joint, no glue if you wish to disassemble at some point.
Step 5
Step 6
FINISHING
You probably already finished the pieces (or at least each panel) so just add paintable silicone to any exposed screws or imperfections, lightly sand, and apply a touch up coat. You may also wish to spray on a clear coat for added protection from the elements.


Comments
Crazy Easton Family (not verified)
Thu, 05/27/2010 - 14:47
I would suggest hinges
I would suggest hinges http://www.rockler.com/product.cfm?page=410&Max=999 like these so you don't get bitty fingers (or big ones!) slammed in the door :)
Natalie (not verified)
Thu, 05/27/2010 - 15:30
Please don't say that this is
Please don't say that this is all to the collection. Please make a canopy daybed, too!!! Like this one, but not wicker and in the style of the rest of your collection: http://www.potterybarn.com/products/palmetto-all-weather-wicker-daybed/.
Bethany (not verified)
Thu, 05/27/2010 - 16:43
Midwest cedar lumber
Midwest cedar lumber prices(cedar, for outdoor usage):
1x4 $6
1x3 $5
1x2 $4
Everyone always asks about the price so I thought this would help to give an idea. The wood is about $130. Not bad compred to the W.E. price of $330!
StressTheSeams (not verified)
Fri, 05/28/2010 - 02:43
Wow. I can just hear my hubby
Wow. I can just hear my hubby already planning how to add all of this to his to do list! :) We LOVE your stuff. Please keep it coming!
By the way, you won an award! Drop by http://stresstheseams.blogspot.com/2010/05/10-things-i-need-to-share-be… to check it out!
Janae (not verified)
Sat, 05/29/2010 - 22:12
I just made the storage
I just made the storage bench. I'll post picture on facebook after I finish painting it and add the hinges.
I just want to say that a few of the measurements on the cut list were wrong. Luckily, I like to go by the pictures (which were right) and measure as I go.
Also, it only cost me about $30-$40. I found a local recycling store. It's basically a cross between goodwill and lowes. It was an amazing discovery. They didn't have all the sizes, but what I got was cheap.
Ana White (not verified)
Mon, 05/31/2010 - 13:12
Janae, thanks for stopping
Janae, thanks for stopping back by to comment on the cut list errors. All fixed! And super smart to cut as you go, following the diagrams, I am definitely human! Ana
Mr. B (not verified)
Wed, 06/09/2010 - 08:01
Any thoughts on how to make
Any thoughts on how to make this bench water tight?
GREAT site (in my best Tony the Tiger voice...).
Mary (not verified)
Sun, 06/20/2010 - 11:52
I agree with Mr. B. Any ways
I agree with Mr. B. Any ways to make this water tight? We get A LOT of rain and it is always a downer to have to sit on a wet cushion.
JJennings (not verified)
Sat, 09/04/2010 - 14:42
When I was pregnant with our
When I was pregnant with our first son, I got my husband to build something very similar to this for babyproofing the cat's litterbox. He built it with a solid plywood bottom, and he made a opening for a door in the back panel. We positioned it about 5-6 inches away from the wall and put the litterbox, extra litter, scooper, etc inside. The cat walks around to the back and enters to take care of business. Our oldest is now 7, and we are still using the box because it hides everything so well.
jphiggins2
Mon, 05/02/2011 - 21:40
what a great idea to use this
what a great idea to use this for the litter boxes! I have been trying to come up with something to keep my dogs out of the 'all you can eat buffet' as my husband calls it.
MrsM (not verified)
Thu, 09/09/2010 - 06:29
This is just what I was
This is just what I was looking for to build for storing wood next to the fireplace.
Christy B (not verified)
Wed, 10/20/2010 - 12:05
My husband is building this
My husband is building this to replace our $160 toy box that fell apart after 1 year! :-/ Can't wait to send pictures of the finished project.
Rae (not verified)
Thu, 10/28/2010 - 05:10
I'm also interested in how to
I'm also interested in how to make this watertight. I actually just posted a bench on the facebook site that I was hoping to make but looks like these plans are already done but the gaps between the boards would make it a problem... any ideas?
How to Build a… (not verified)
Fri, 11/12/2010 - 23:32
[...] Full reference
[...] Full reference (Copyright acknowledge) This entry was posted in Wood Furniture Plans. Bookmark the permalink. ← Do It Yourself Woodwork – Woodworking Tips For Beginners [...]
Marie (not verified)
Fri, 02/18/2011 - 12:26
To make it watertight - or
To make it watertight - or close to it:
When building the panels, don't make the frame flush with the top. Drop it down a half inch or so. Put weather stripping in that space.
For the sides, top and bottom, instead of using individual boards, just have the lumber yard cut you a piece of redwood plywood. It looks like paneling.
Just stain or paint!
jphiggins2
Mon, 05/02/2011 - 21:43
trunk
I think this would be great to make it look like the trunk coffee table that is so popular now. Maybe adding some kind of buckles, I don't know, but I can see it possibly being made to look like a trunk.
pmsandagun
Wed, 05/11/2011 - 13:57
Water Tight Deck Box
While tooling around on the Kreg Jig forum, I found plans and videos for this similar box/bench : http://kregjig.ning.com/forum/topics/lowes-shop-class-deck-box
Looks fairly easy, and if you're worried about water, I think this would do the trick, though I'm still planning on making Ana's. I think tongue and groove is probably out of my price range.
asustachek
Fri, 05/20/2011 - 10:16
Bug Free Box
Someday when we move back home to San Diego, CA (currently active duty Coast Guard in Sitka, AK) I plan on building this box for our backyard patio with screen material attached to the inside to keep the bugs and spiders out. Just an idea for those of you with the same problem.
Teresa H. (not verified)
Thu, 11/22/2012 - 13:06
I need this box!
I have a small dog that chews everything in the back yard into tiny little pieces, especially flip-flops! We need something like this to store all that stuff in! (Don't worry about the dog, he doesn't actually eat any of the stuff, he just likes to make a mess for us to clean up!)
Home Design
Sun, 08/03/2014 - 21:04
Furniture Design
In designing patio furniture, don’t forget to think about the function of your patio design. Do you like it so serve as dining are on warm summer nights? Do you want to use it to host your birthday party or your outdoor dinner party? Or, do you want to use it as outdoor family room to serve a place to enjoy reading and gathering with your family? source this in Precioushomedesign.com
AndyG
Mon, 08/18/2014 - 13:31
Any suggestions on the best
Any suggestions on the best hinges to use for outdoors? Any specifics appreciated!
AndyG
Mon, 08/18/2014 - 13:32
Where do you use the Kreg
Where do you use the Kreg Jig? I don't see it in the directions.
Runfar
Tue, 05/26/2015 - 07:25
Side panel top and bottom frame pieces
Fun project! Building one from pallets. One design change suggestion is to have the top and bottom frames on the end panel go all the way across similar to the side panel.
Barbarab
Tue, 07/26/2016 - 07:07
Got some beautiful cushions
Got some beautiful cushions for a dining table on the new deck we built last yr. Covered and stored as best we could over the winter. Was very close to tossing leftover pieces of composite and now we have a plan. This project will be a perfect use for them, will match AND will cost nowhere near the storage offered in the marketplace. Very excited, thanx
haileyjane1233
Sun, 06/28/2020 - 11:11
Step 5 instructions
I don’t see the instructions for Step 5, for attaching the top with hinges. I only see the picture. Are there instructions for this step?