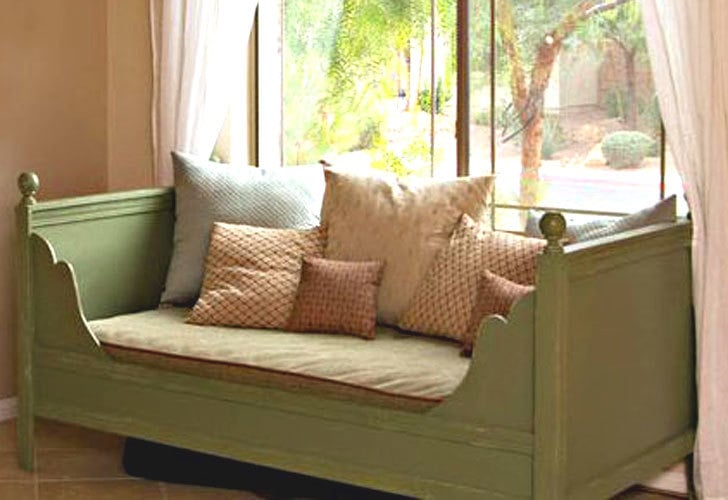


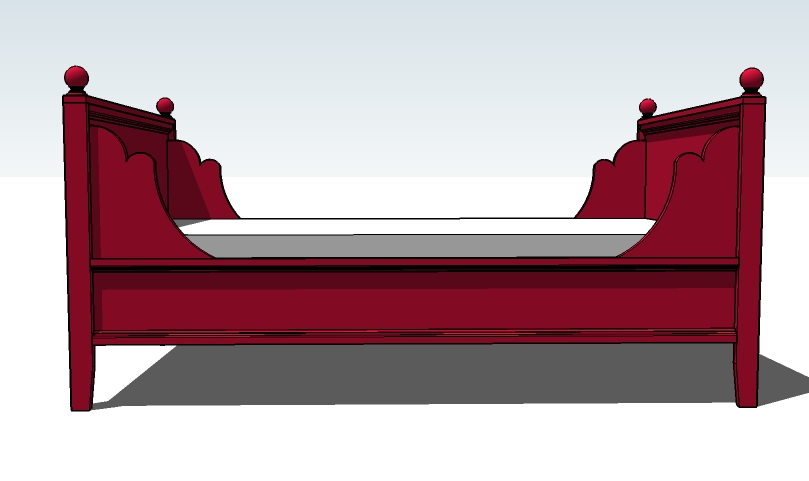
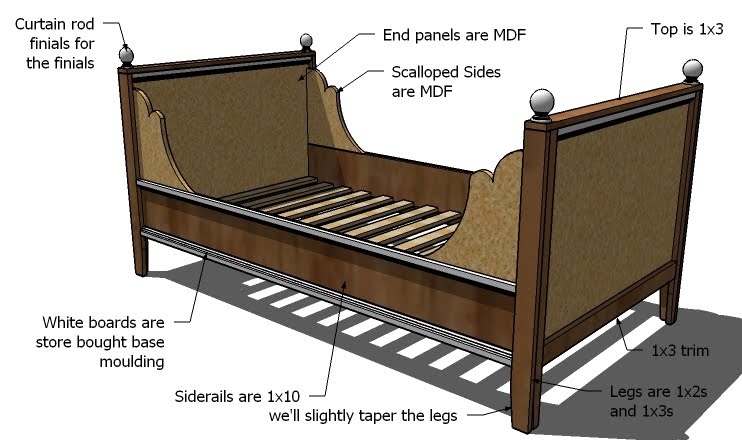
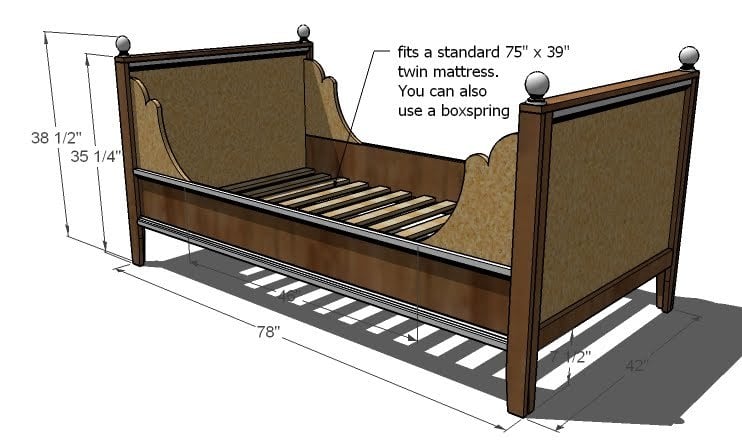
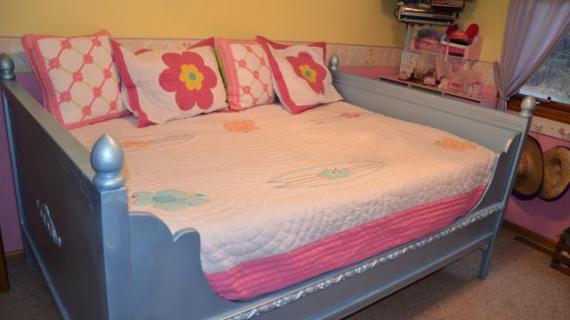
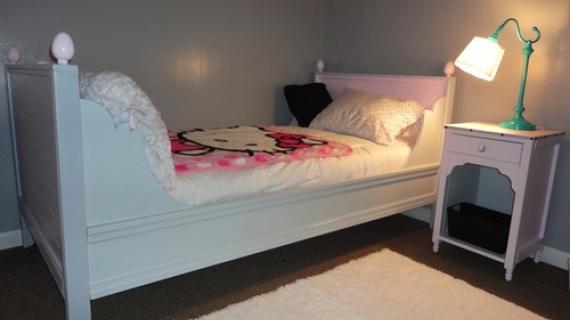
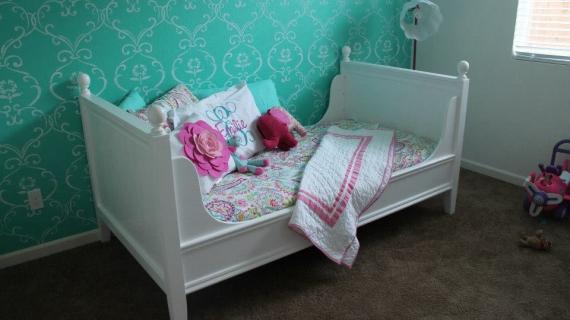
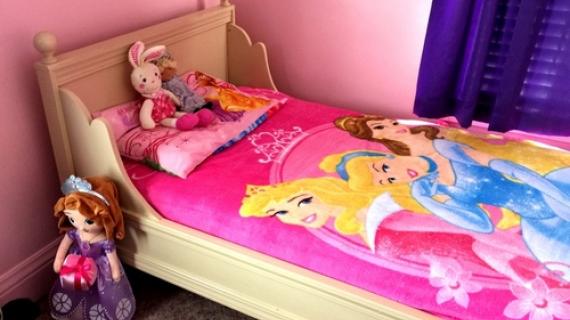
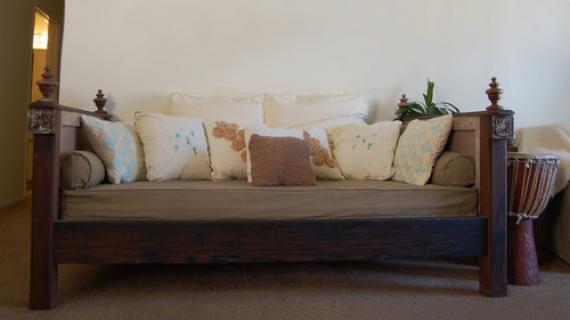
This beautiful daybed will surprise you with it's easy to build plan. Features scalloped edges, moulding on the inside and out and finials. Easy to modify to a full size.
WHAT YOU CAN'T BUY As you probably know, Pottery Barn used to sell a beautiful Priscilla Dayed, but the bed is discontinued. And I have for years wanted to redesign the bed, to make in "buildable." And today, I think I have.
DREAMING OF THIS BED After putting together the post for the Swedish planked bed, then putting Grace to bed, I dreamed about scrolling with a jigsaw and using a Kreg Jig to build this bed. Because the major issue before having a Kreg Jig in my tool belt was connecting the beautiful scalloped corners to the side rails. Now we can easily do that!
IT'S EASIER THAN IT LOOKS Please don't let this bed intimidate you. If a jigsaw doesn't intimidate you, you, yes YOU, can build this bed. It's amazingly easy. For the trim, we are going to use store bought moulding, and then for the finials . . .
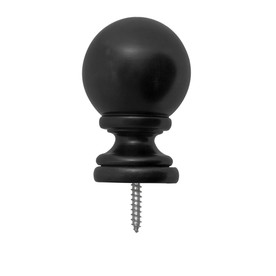
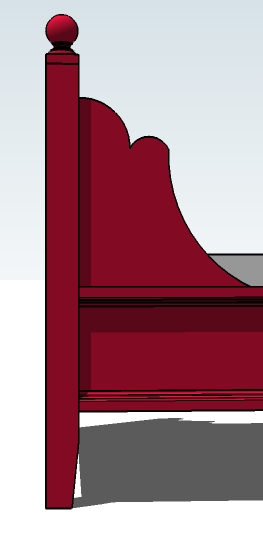
FINIALS? YEAH, WE'VE GOT A HACK FOR THAT For the finials, simply pick up a four curtain rod finials next time you are out shopping (unfinished preferred, but if you are painting, a spray coat of primer can get these babies ready for your bed). It will be easy to drill a simple hole on the tops of your daybed tops and screw these in.
Go ahead, click for a larger view. It's much easier than it looks, eh? Now I'm just going to put this out there, since I know most of you are Moms just like me. If you can figure out how to raise a baby, if you took a baby home from the hospital and the baby not only survived, but they thrived, then you can do this. This is NOTHING compared to the major project of raising kids. You've got the ability. Let's get building!
Preparation
- 6 – Pieces of 2 1/4″ moulding, 8′ Length
- 2 – 1×10, 8′ Length
- 1 – Sheet of 3/4″ MDF or plywood
- 4 – 1×2 Boards
- 11 – 1×3 Boards
- Wood Filler
- Wood Glue
- 1 1/4″ Nails
- 2″ Nails
- 1 1/4″ Screws
- 2 – 3/4″ plywood @ 40 1/2″ x 27″ (Panels)
- 4 – 1×2 @ 34 1/2″ (End Legs, ends tapered in step 1)
- 2 – 1×3 @ 37 1/2 (Bottom Panel Trim)
- 4 – 1×3 @ 34 1/2″ (Side Legs, ends tapered)
- 2 – 1×3 @ 42″ (Top of Ends)
- 2 – 2 1/4″ Base Moulding @ 37 1/2″ (Trim for outside of panel)
- 2 – 2 1/4″ Base Moulding @ 40 1/2″ (Trim for inside of panel)
- 4 – 3/4″ MDF @ 15″ x 15″ (Scalloped Sides)
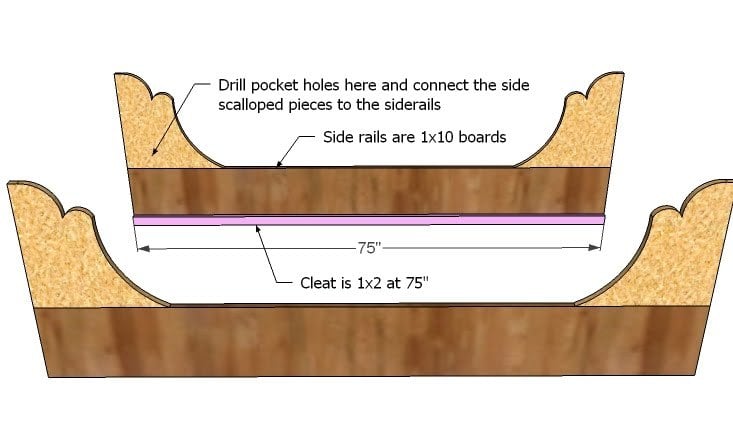
- 2 – 1×10 @ 75″ (Siderails)
- 2 – 1×2 @ 75″ (Cleats)
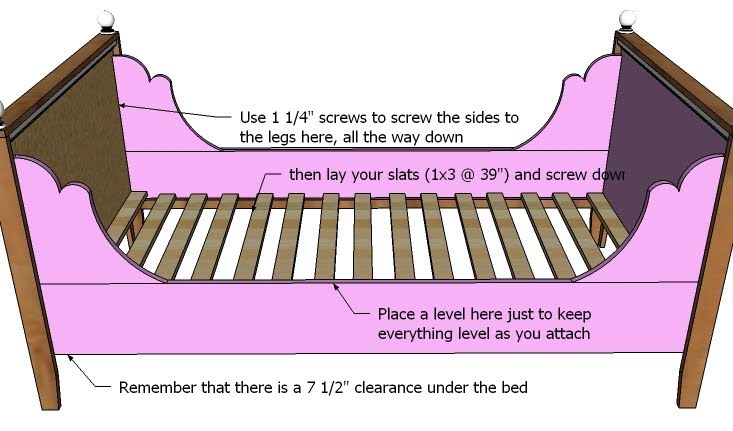
- 14 – 1×3 @ 39″ (Slats)
- 4 – 2 1/4″ Moulding @ 73″ (Siderail Trim)


You can click any of the images for a larger view. Work on a clean level surface. Be careful as you are working with a nailer. Check for square and level after each step. When nailing into MDF, avoid fastening too close to the edges on the end grain side (practice on a piece of scrap MDF first). Use glue and be safe. BUILDING THE BED FOR NATURAL WOOD FINISH This bed is designed to be painted. You can create a stainable bed by using A1 plywood for the panels and joining two 3 – 1×6 @ 30″ together, then cutting the panel in half to get two panels, approximately 15″ x 16 1/2″ (use a Kreg Jig™ to join the panels). Then cut your scalloped shape from these panels. Do not attempt to iron on edge banding to the scalloped edges and use plywood, you will not be able to get your iron in the scalloped parts. You will also need to purchase wood moulding instead of primed MDF moulding.
Instructions
Step 1

END PANELS
Use 1 1/4″ nails and glue to fasten the 1×2 leg pieces to the end panel. Keep side edges flush, and top edge. Taper the legs as shown above. Just a tiny taper will show up, remember, the side legs will also be tapered. Taper with your jigsaw.
Step 2

BOTTOM PANEL TRIM
Use 1 1/4″ nails and glue to fasten the bottom panel trim in place. Keep bottom edges flush.
Step 3

SIDE LEGS
Use glue and 2″ nails to fasten the side legs to the panel and the end legs. Fasten all the way down the end leg.
Step 4

TOPS
Attach the tops with 2″ nails and glue. Keep edges flush with the side legs.
Step 5

Step 6
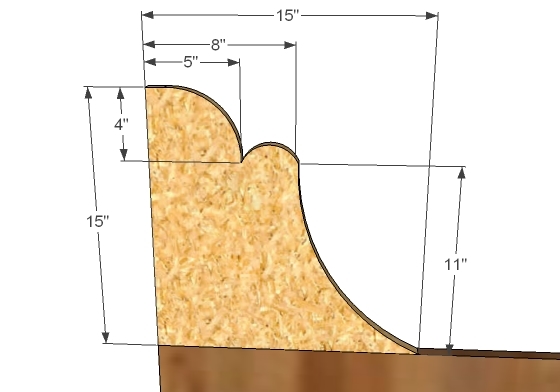
SCALLOPED SIDES
Use the points given above to guide drawn the arched shapes. Cut out with a jigsaw. Once you have one side done, use it as a pattern for the remaining sides.
Step 7
ATTACHING THE SCALLOPED SIDES
Drill pocket holes in the scalloped sides and attach to the siderails as shown above. Then use 1 1/4″ nails and glue to attach the cleats to the siderails.
Step 8
ASSEMBLY & SLATS
Assemble your bed as shown above. Then lay your slats on top of the siderails and screw down with 1 1/4″ screws.
Step 9

SIDERAIL TRIM
Measure and cut your siderail trim to fit the siderails. Glue and nail with 1 1/4″ to the siderails.
Comments
FlossyMaeRDA (not verified)
Fri, 05/21/2010 - 09:03
oh my oh my oh my No I was
oh my oh my oh my No I was wrong I waannnt this bed!! Thank You it is going to be great!!
Lura (not verified)
Fri, 05/21/2010 - 09:12
This is my favorite bed that
This is my favorite bed that you've done! I want to build this now.
Foote Family (not verified)
Fri, 05/21/2010 - 09:19
This is fantastic!! My
This is fantastic!! My daughter would love this for her room!
Janae (not verified)
Fri, 05/21/2010 - 09:19
I want this bed! I just need
I want this bed! I just need some new tools.
Melissa (not verified)
Fri, 05/21/2010 - 09:23
Is there enough clearance for
Is there enough clearance for a trundle under this one? It is so pretty! Great job. LOVE IT!!!!!
Ali (not verified)
Fri, 05/21/2010 - 09:43
I love this plan! I can't
I love this plan! I can't wait to build it- thanks so much! now I just need to go buy the Kreg Jig that I've dreamed of having for so long now :)
Heather (not verified)
Fri, 05/21/2010 - 09:54
the more you post, the more
the more you post, the more in awe I am. Unbelievable. Thanks!
Jolanda (not verified)
Fri, 05/21/2010 - 09:54
I gasped when I saw these
I gasped when I saw these plans!! Awesome! I have been hoping you would post plans for beds that have scrolls and arent' just straight (though I love the farmhouse bed too)!
Jenny Hillman (not verified)
Fri, 05/21/2010 - 09:57
Ana, I have to thank you for
Ana, I have to thank you for posting these plans. I requested this bed on facebook, and you not only came through, you made it amazing! I am so, so, so excited now, I am bouncing off the walls, ready to make this one. Thank you, thank you, thank you, for making something like this attainable for someone like me. I wish I could give you a hug!!!
xoxoxo Jenny
Jolanda (not verified)
Fri, 05/21/2010 - 10:06
Would it be possible to
Would it be possible to convert it to the toddler size?? Thank you for all you do! you have given me a wonderful new hobby and my hubby is just starting to get excited about all the possibilities and he is even more excited that I want to do it instead of begging him to do it!
Nathan, Julie,… (not verified)
Fri, 05/21/2010 - 10:08
I love this bed!!! Thank
I love this bed!!! Thank you!
betsyhwilson (not verified)
Fri, 05/21/2010 - 10:18
Gorgeous. I have downloaded
Gorgeous. I have downloaded the Google Sketchup 7. But was very confused on how it works. Will watch the tutorial. I love the bed and want to be able to get my ideas out of my head and on paper.
Kristen (not verified)
Fri, 05/21/2010 - 10:35
Oh, I love this. But I am
Oh, I love this. But I am running out of beds in my house to redesign- guess it's time to have more kids ;)
Susan (Between… (not verified)
Fri, 05/21/2010 - 10:49
What a beautiful bed,
What a beautiful bed, Ana...love it!
Connie (not verified)
Fri, 05/21/2010 - 10:50
Hi,I love your blog and have
Hi,
I love your blog and have been inspired. My son recently made me a rolling cart/work table for my craft room. He used a picture from your blog as his inspiration and took it from there.
Here is a link to a post I did about it if you would like to see.
http://mylifeatmidlife.blogspot.com/2010/04/sneaky-peaky.html
Rebecca (not verified)
Fri, 05/21/2010 - 11:43
If my Lydia didn't already
If my Lydia didn't already have a daybed I'd be all over this. But I may give it a shot in the future.
Heather Melzer (not verified)
Fri, 05/21/2010 - 12:30
WOW, Ana! WOW!!!!
WOW, Ana! WOW!!!!
Hilary (not verified)
Fri, 05/21/2010 - 13:22
Your new banner is so sweet!
Your new banner is so sweet!
Now, I have some catching up to do here!
Jen (not verified)
Fri, 05/21/2010 - 14:09
droooooling, now I just need
droooooling, now I just need a girl!
Vicky (not verified)
Fri, 05/21/2010 - 14:45
I am speechless and 'bow' at
I am speechless and 'bow' at your excellence!
Natasha (not verified)
Fri, 05/21/2010 - 15:01
you are a genius!
you are a genius!
*MICHELLE CAUDLE* (not verified)
Fri, 05/21/2010 - 15:38
I just got a kreg jig and
I just got a kreg jig and these are definitely the beds I must make for my girls!! I'd love to see it in a toddler bed, too...but even if you don't get to it...I'll just have to put my toddler in a twin because these are too perfect!!!
Shannon @ Posh… (not verified)
Fri, 05/21/2010 - 15:39
Oh Ana... I love you. I cant
Oh Ana... I love you. I cant wait! I need a new bed for my daughter like mad! Thanks!
bizzyangel (not verified)
Fri, 05/21/2010 - 18:12
How awesome is this pallet
How awesome is this pallet reading bed...
http://ashleyannphotography.com/blog/2009/06/29/diy-pallet-reading-bed-…
I saw it and automatically thought of Knock Off Wood
Green Gracie Home (not verified)
Sat, 05/22/2010 - 00:37
LOVE it! My little angel is
LOVE it! My little angel is ready for a bed and her crib is beautiful, but not really re-saleable because of the whole side rail regulation change. I thought of hacking the crib, but she also has a wonderful full size mattress set in her room. I wanted something for her that felt little girl-ish and yet still sophisticated. Then I saw this and it is like you read my mind! I cannot wait to start building a full size version next month and will share!!! Thank you thank you for all you do.
Jodes (not verified)
Sat, 05/22/2010 - 01:10
The cutest bed! I'd love to
The cutest bed! I'd love to see a bunk bed plan. My girls are wanting a mermaid room and I think this would make the cutest bunk beds in turquoise.
Yolanda (not verified)
Sat, 05/22/2010 - 05:32
Gorgeous, gorgeous, gorgeous.
Gorgeous, gorgeous, gorgeous.
ArtSnark (not verified)
Sat, 05/22/2010 - 15:21
fantastic! Very romantic
fantastic! Very romantic
Wendy (not verified)
Sat, 05/22/2010 - 16:43
I've been looking to build
I've been looking to build bunk beds for my boys and I haven't been able to find a plan like the one I want on you blog... A twin-over-full with stairs up the side. http://www.rcwilley.com/Furniture/Bedroom/Kid%27s-Room/Bunk-Loft-Beds/1…
or
http://www.livingincomfort.com/betwovfuspsa.html
Maybe your next project? I'd be grateful!
I See Badgers (not verified)
Sun, 05/23/2010 - 16:51
I love the new layout of your
I love the new layout of your site! It is awesome!!!!!
So, I built 4 of the easy bookshelves, a cubby bench, and a coffee table from your blog and it all turned out awesome! I love it. Thank you for the help. You saved me bundles of time and money. Feel free to slow it down a bit. I don't want you to burn out :)
missmarble (not verified)
Sun, 05/23/2010 - 18:55
For some neat finials, you
For some neat finials, you can also check out the deck and fence section at Lowe's or Home Depot. $4-5 each rather than $10-20 in the moulding and trim aisle. Prime and paint, then attach!
Desiree (not verified)
Sat, 06/12/2010 - 08:47
Beautiful! I wonder if it
Beautiful! I wonder if it can be changed to accomodate cubbies underneath or a trundle? I wonder if it could be made king sized, too. I want one for *me*! lol
Our old house has only 2 small closets for a family of 7 so storage is sorely needed. I wonder if I could add in the cubbies. Might not look as pretty, but it would be useful!
kzoe (not verified)
Sun, 06/20/2010 - 10:11
This bed is beautiful! It's
This bed is beautiful! It's a child's twin bed, yes? I'm hoping to make into an adult queen bed, and have never DIY before...
chelsey (not verified)
Sat, 06/26/2010 - 08:46
I just build this bed and it
I just build this bed and it looks great. However,the sides are ripping out from the headboard and footboard. I used 1 1/4 screws with the kreg jig to connect the pieces, but they keep coming apart and separating the sides from the two ends. Please help! What am I doing wrong?
Ana White (not verified)
Sat, 06/26/2010 - 09:33
Chelsea, what I would do is
Chelsea, what I would do is attach the side pieces to the ends too, not just the side rails. If this still isn't working, I would add a 1x2, the length of the siderail that splits the scalloped sides and the siderails, so 3/4" on the siderails and 3/4" on the scalloped pieces.
chelsey (not verified)
Sat, 06/26/2010 - 17:12
Ana, thanks for the advice. I
Ana, thanks for the advice. I switched to 1 1/2" screws and it seems to be holding now. I'll post a picture once I decide what color to paint it!
Jessica nan (not verified)
Sun, 08/08/2010 - 11:34
Do you think you could make
Do you think you could make this a hanging bed ?
mommy2jadzia (not verified)
Wed, 09/01/2010 - 17:44
im thinking of adding a back
im thinking of adding a back to the day bed and a canopy. sort of a madeline day bed canopy combo. this is a great starting point for me to get the idea of how to do what I want thanks. all i need to do is show them to hubby and tell him i want the back different and make the canopy and presto a bed fit for a princess. I cant wat to do it and i bet it will be mich cheaper than the 1500 potterybarn kids wants for the bed and it isnt even the bed i want. now i can just make what i want for a fraction of the cost.. thnak you, thank you, thank you.!!!!
TwiddleLee (not verified)
Thu, 09/30/2010 - 11:43
I love this bed! I want to
I love this bed! I want to build it for my daughter who is graduating to a twin. I'm a little confused by step 8 though... I'm not sure where I would be screwing in the sides to the legs. Do you use a kreg jig to screw it into the back, or do you screw the sides directly into the side legs that you assembled in step 3? I love your easy plans, but I wish they had the screws and such drawn in the photos so I can see exactly what to do, I'm a beginner at all this! ;0)
heavenlypennies (not verified)
Tue, 10/05/2010 - 21:08
Wow! I LOVE this bed! I would
Wow! I LOVE this bed! I would really like to attempt to make this for my daughter, but she is a little tall, so I am thinking ahead a little and looking for a bed with twin xl dimensions, and maybe a trundle too. Would it be possible to alter this bed like that? I appreciate any advise you have! Thanks!! :)
#12 of 30 B4 30 « (not verified)
Mon, 10/11/2010 - 21:38
[...] coming when Rory was
[...] coming when Rory was going to outgrow her toddler bed that we made her. I fell in love with the Lydia daybed. So stinking [...]
The Lydia Dayb… (not verified)
Sat, 11/13/2010 - 08:22
[...] Full reference
[...] Full reference (Copyright acknowledge) This entry was posted in Wood Furniture Plans. Bookmark the permalink. ← Plans To Build Your Shed – Start Building a DIY Shed Today! [...]
Paula (not verified)
Sun, 11/21/2010 - 11:55
My son and I made this bed
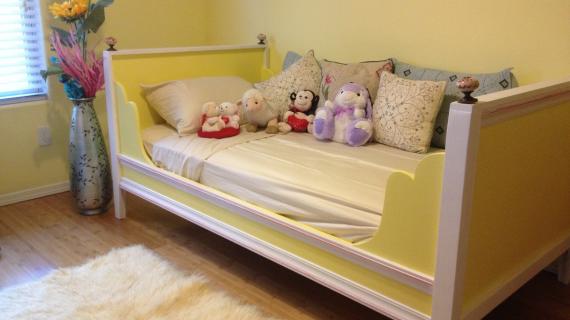
My son and I made this bed for my two year old granddaughter. She loves it and it is perfect for a child transitioning from a crib because it is low to the floor. The plans were great but we wanted to add a trundle underneath so we added two inches to the legs. Unfortunately when my son tried to get the bed into her room, his hallway was too narrow and he had to remove the two inches we added to the legs. We could have removed the finials, I guess, but we had had the bed professionally spray painted and the finials were glued and caulked. I think we will still be able to add a trundle if we use a four inch foam matress on a plywood platform with two inch rollers. That's our plan anyway. I highly suggest a professionsl spray paint job. That made the difference between a Pottery Barn quality piece and something home made.


Lydia Daybed P… (not verified)
Sat, 12/04/2010 - 19:29
[...] but her plans look like
[...] but her plans look like designer pieces right out of a catalogue The Lydia Daybed plans are here You can visit Pottery Barn for a similar looking bed. Read more from Bedroom Furniture, Kids [...]
Gerri (not verified)
Wed, 01/05/2011 - 13:58
Ana, I'm interested in
Ana,
I'm interested in making this bed in a doll size. I'm curious if you might have some suggestions for adjusting the measurements and/or materials for that. It is adorable!! I would love to make it about 30" long.
Ana White (not verified)
Wed, 01/05/2011 - 19:14
Gerri, I would use 2x2s as
Gerri, I would use 2x2s as the post, maybe 1x6s or 1x8s as the headboards and footboards, 1x3s cut out in a scalloped shape as the sideboards. Sounds so cute!
Gerri (not verified)
Thu, 01/06/2011 - 17:33
Thanks so much for your
Thanks so much for your response Ana!!
I was thinking the same with the 1x6/8s I'm HORRIBLE with the math and adjustment parts so I really appreciate everything you do here. I was just told about your site two days ago and I have been on it ever since...literally. lol. Already have a HUG list of "to-build" items so I had better get started! :)
Thanks again!
Miss Grace (not verified)
Sun, 01/23/2011 - 08:40
I wish you'd been around when
I wish you'd been around when my girls were growing up!
Christine (not verified)
Mon, 01/24/2011 - 15:44
Ana, hands down, this is my
Ana, hands down, this is my favorite website. Thanks so much I made it a "Favs" icon on my dad's desktop and now he is making all kinds of plans. He is currently making the Lydia bed for my girl. We just bought the materials(wood) and the cost was $220. (twin size, LOWES)
I would just love to know the paint maker and the name of the green they used in the picture that was submitted by one of your readers. Do you have any more info on that particular picture. Much thanks in advance. Love your work.
Christine
Mary (not verified)
Sun, 03/20/2011 - 14:13
Canopy Version?
Ana -
I would love to be able to add a canopy to this. Like on the toddler sized version! How would I do that since these legs are not actual posts?