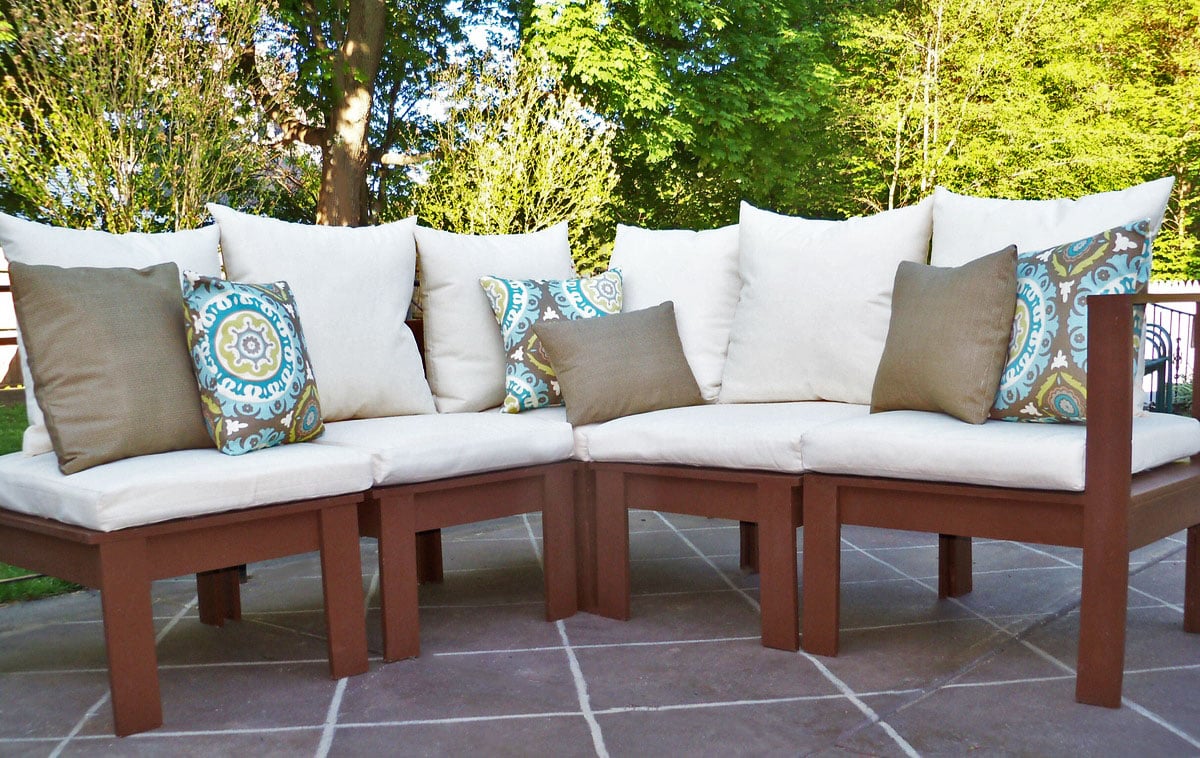


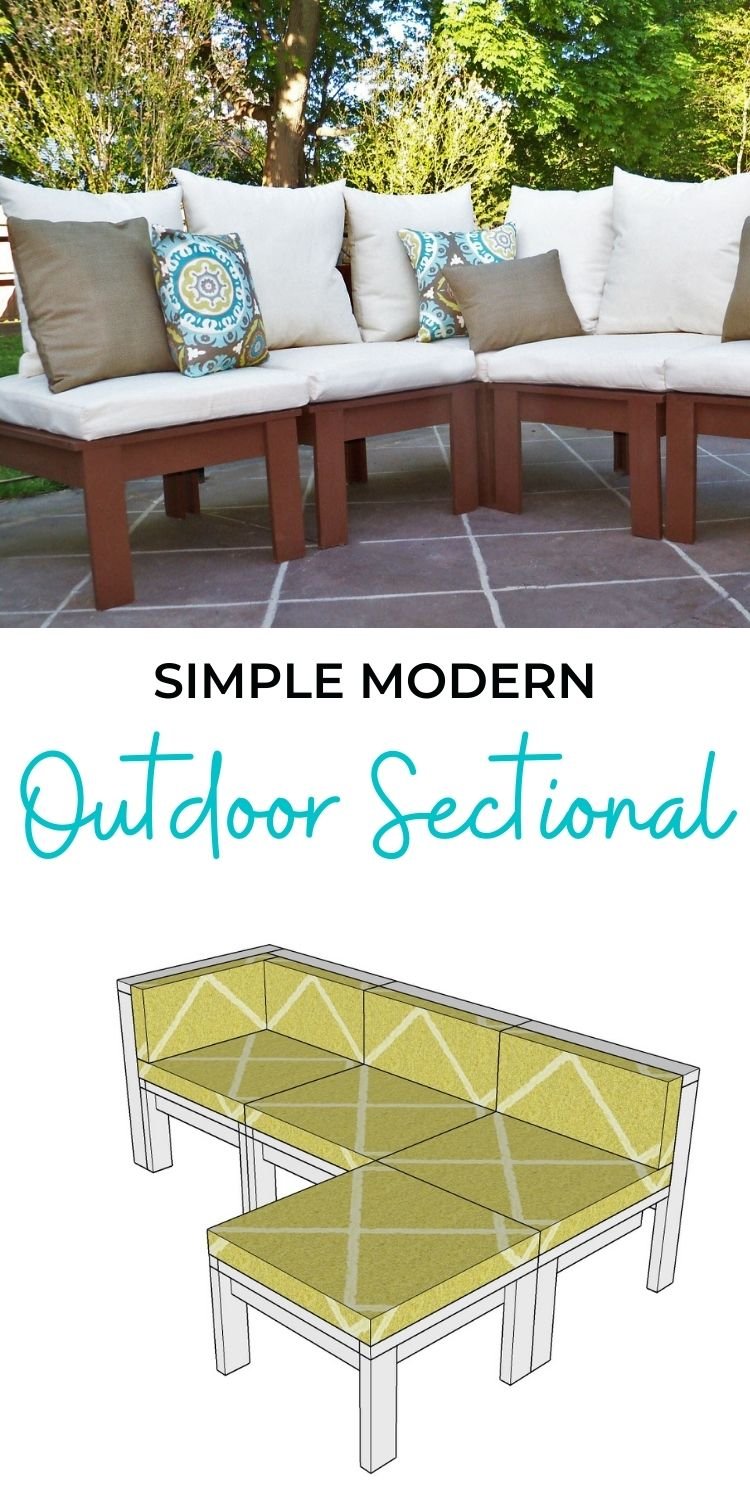
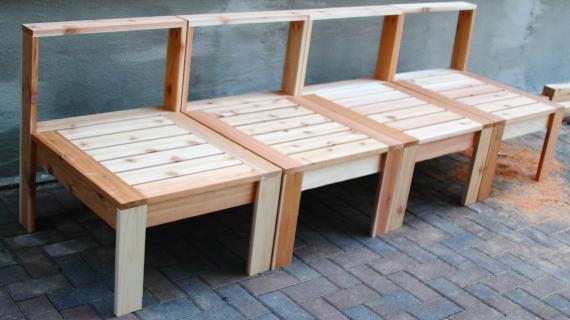
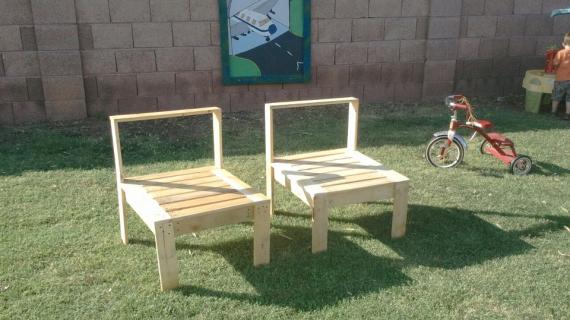
Build your own outdoor sectional with 2x4s and customize your outdoor space. These free plans are easy to follow and you won't need any special tools - just a drill and a saw!
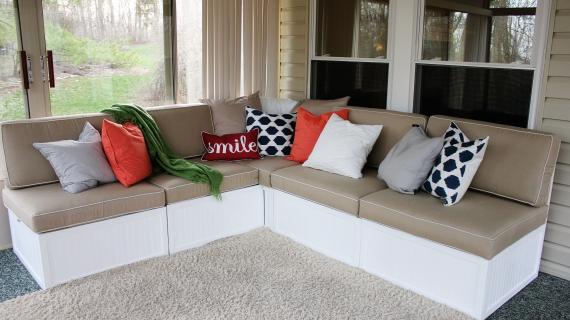
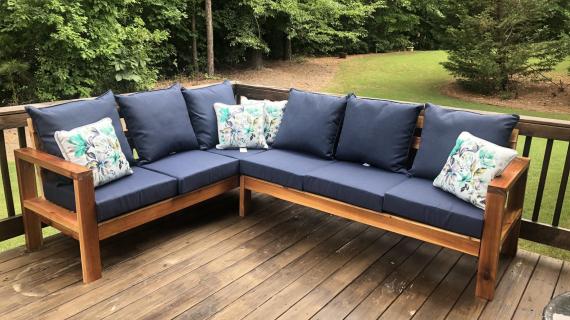
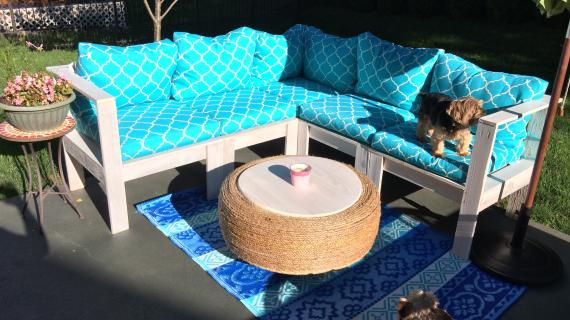
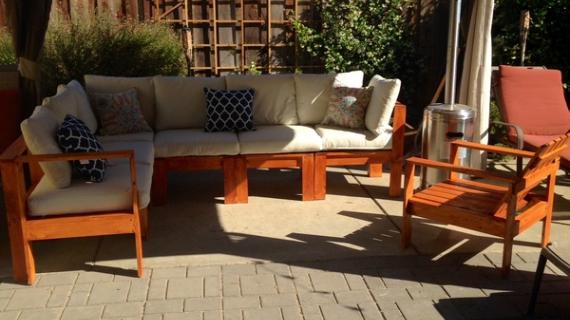
Reader submitted photo by TammyLinskey
Start small... go big! With this simple outdoor sectional piece plan, you can make an outdoor sectional as big (or small) as you need, as your budget or schedule allows. Build a couple sectional pieces this year, add on next year - the options are endless.
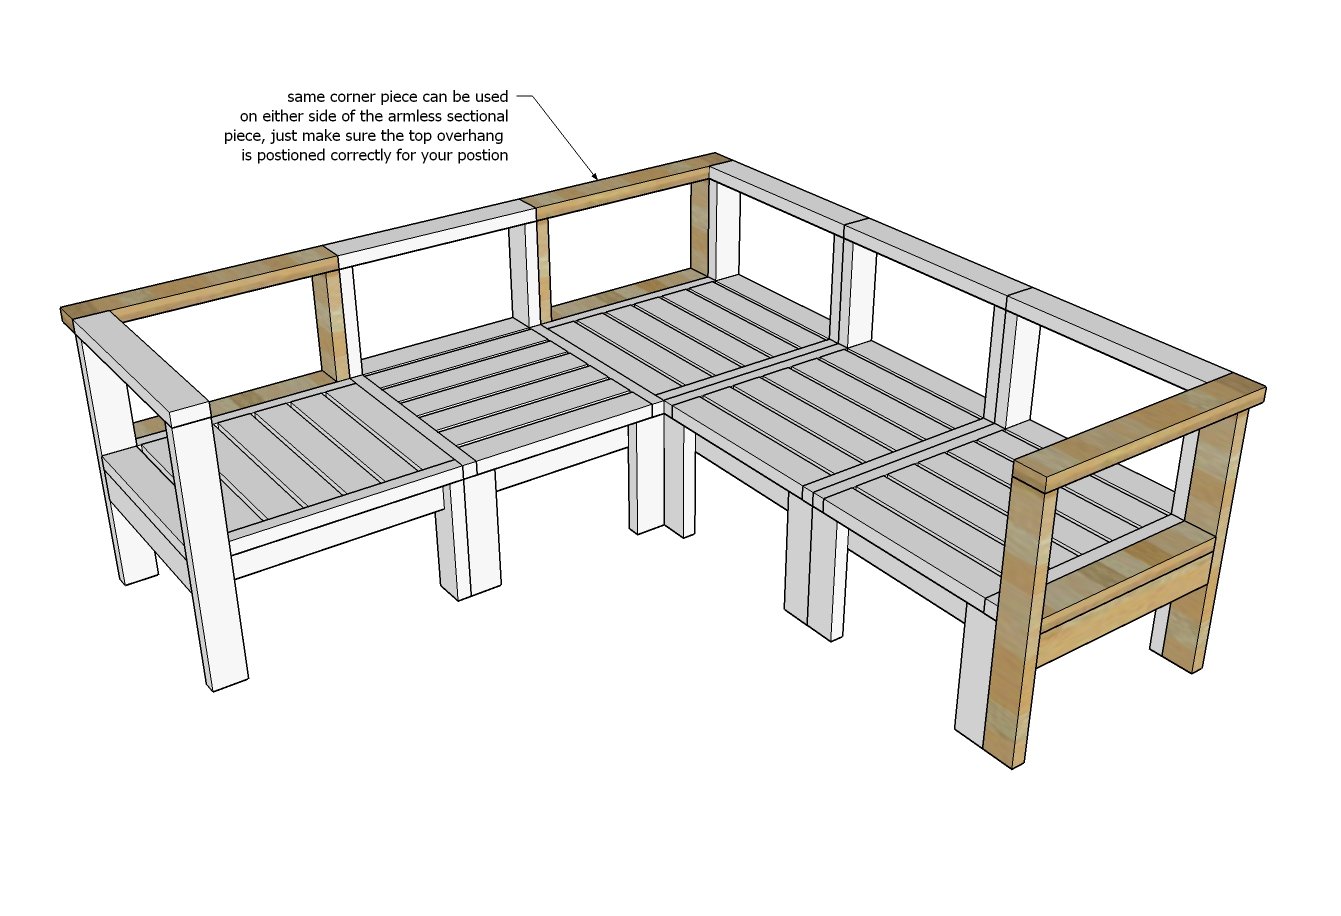
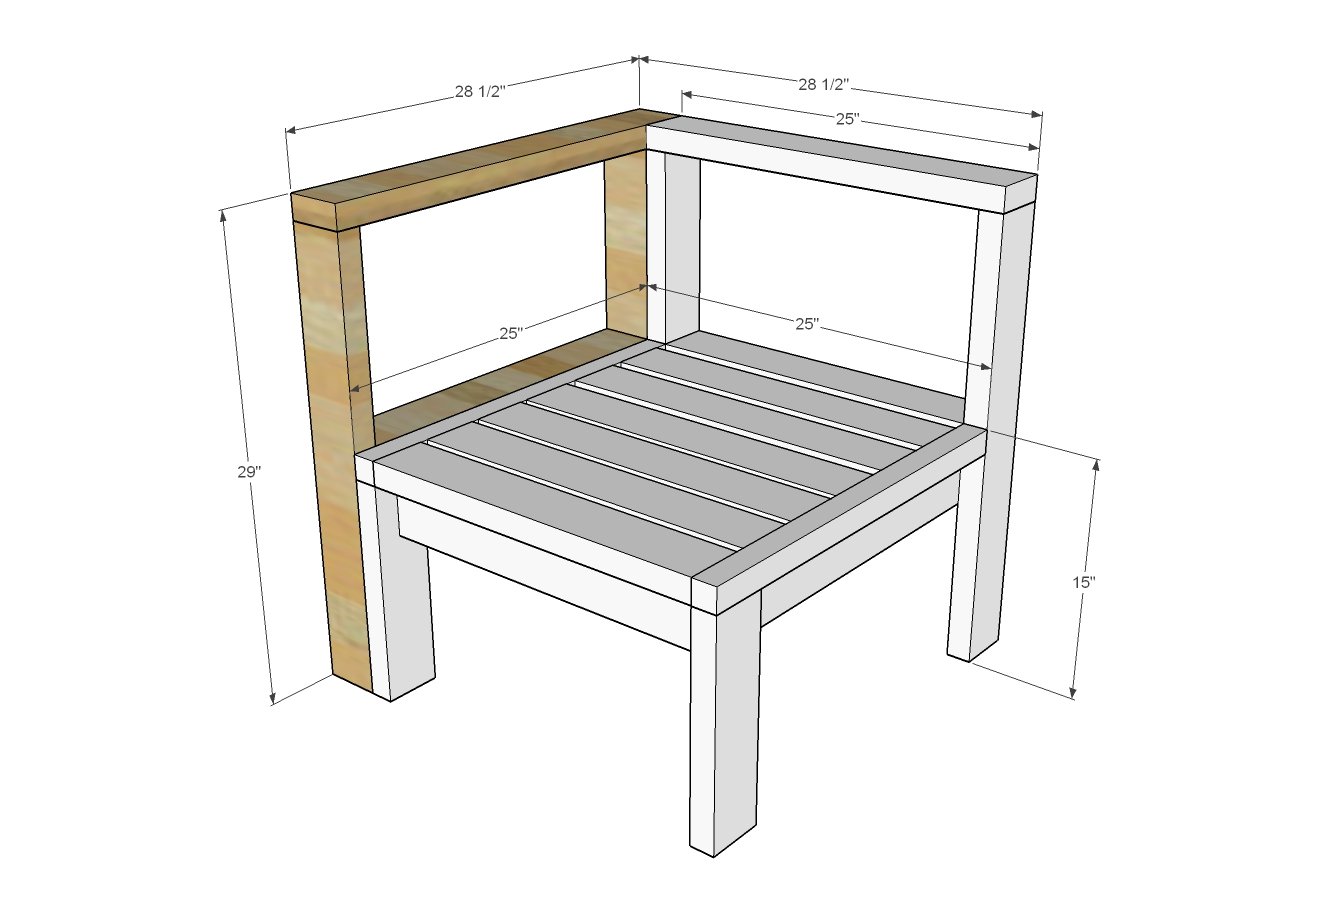
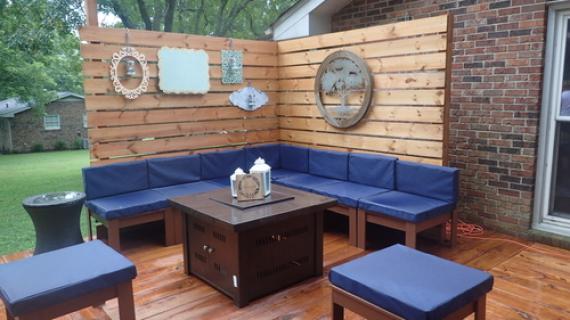
Easy to Build Corner Piece
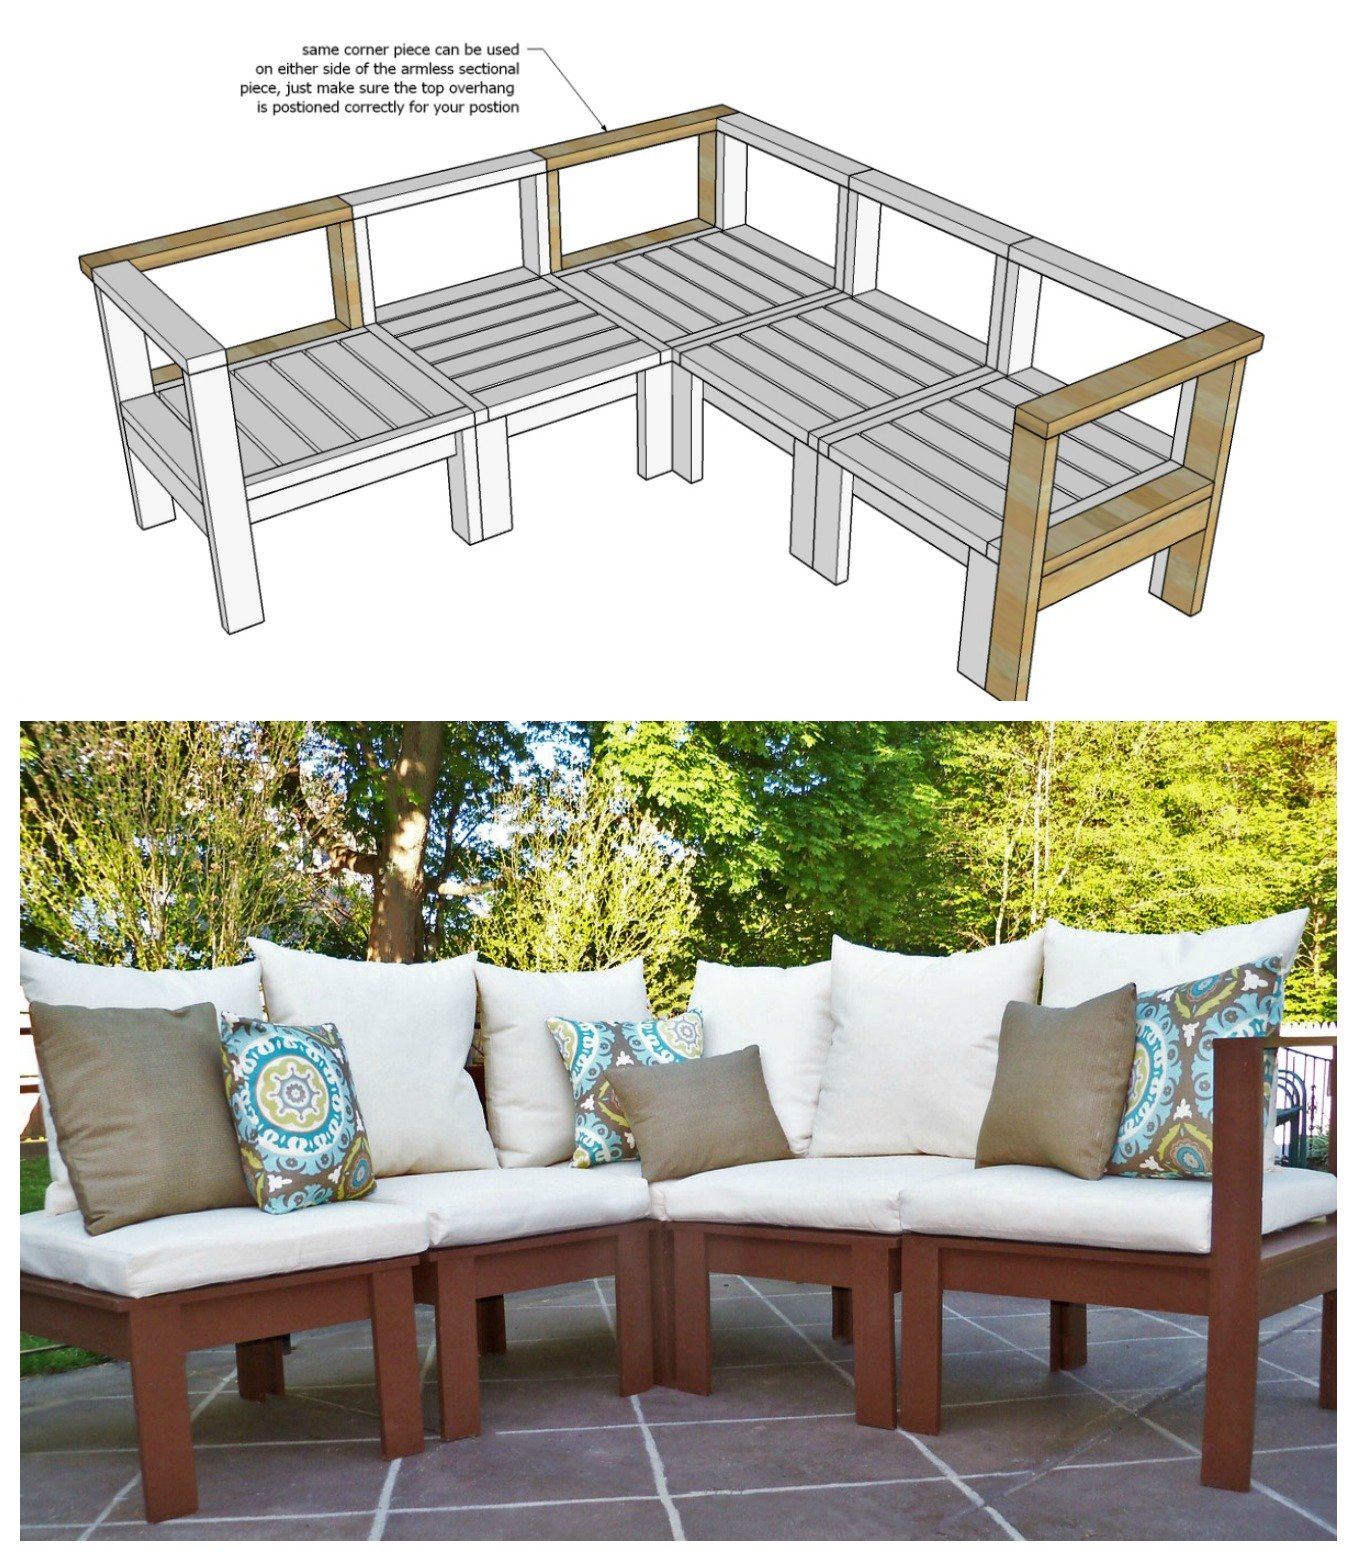
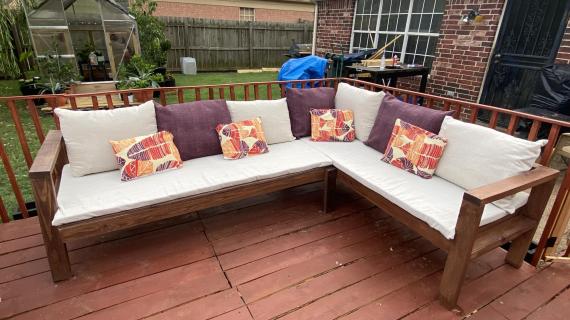
It's easier than ever to turn corners! We've updated the plans so all you have to do is add an arm piece to the basic sectional piece to create corners for your sectional.
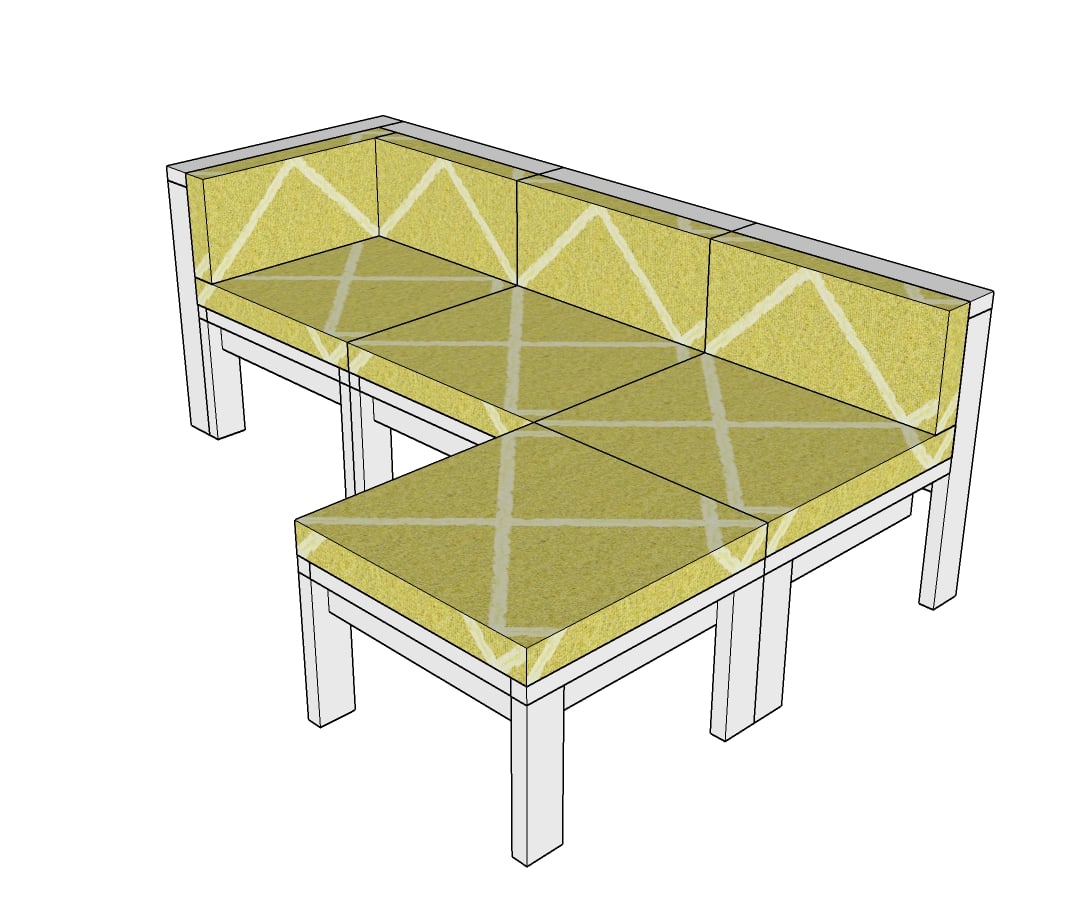
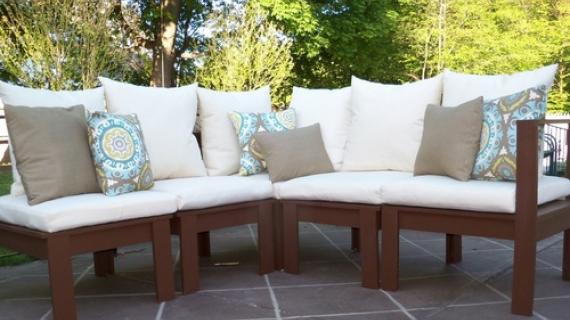
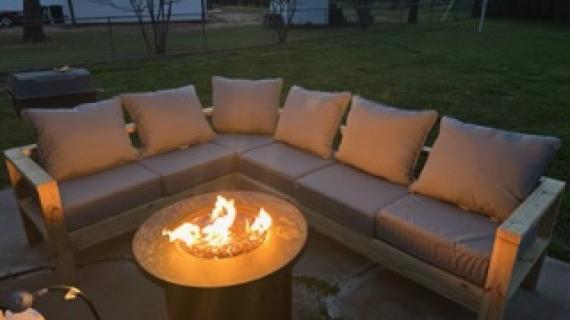
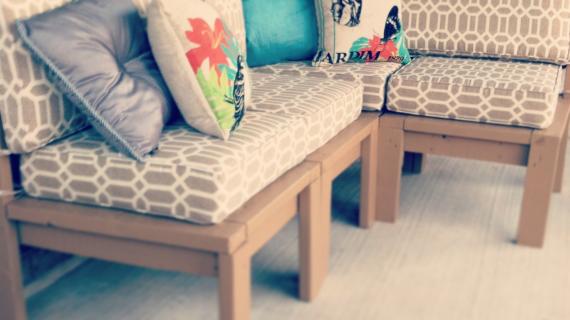
Standard Outdoor Cushions
Each sectional piece (including the corner) fits a standard 25" x 25" deep seat cushion, up to 5" thick. For corners, you may need two back pillows.
If you purchase the cushions in sets with both backs and seats, consider purchasing another set, and using the spare seat cushion on an ottoman.
The plans for this matching ottoman (can also be used as a coffee table) are here.
Updated Plans
This plan has been updated to include all 2x materials and a simplified design. If you need the old plans you can find them here:
The new, updated plans are below.
Pin For Later!
Preparation
We recommend exterior suitable wood
SHOPPING LIST FOR ONE SECTIONAL PIECE
- 3 - 2x4 @ 8 feet long
- 1 - 2x2 @ 50" long
- ~65 - 2-1/2" long exterior self tapping wood screws
SHOPPING LIST FOR ONE CORNER LEG PIECE
- 1 - 2x4 @ 8 feet long
- 1 - 2x4 @ 4 feet long
- ~15 - 2-1/2" long exterior self tapping wood screws
CUT LIST FOR SECTIONAL PIECE
- 2 - 2x4 @ 24" - seat frame
- 2 - 2x4 @ 22" - seat frame
- 2 - 2x4 @ 13-1/2" - front legs
- 2 - 2x4 @ 27-1/2" - back legs
- 1 - 2x4 @ 25" - top
- 7 - 2x4 @ 22" - seat slats
- 2 - 2x2 @ 25" - seat trim
CUT LIST FOR CORNER LEG
- 2 - 2x4 @ 27-1/2" - legs
- 1 - 2x4 @ 28-1/2" - top
- 2 - 2x4 @ 23-1/2" - seat and seat apron


Make sure you are working on a clean level surface. Predrill and countersink you screws. Take a square after each step. Be safe and have fun. And use glue.
Instructions
Step 1

Use 2-1/2" self tapping wood screws to assemble the seat frame, two per joint. Exterior wood glue is recommended.
Step 2

Attach legs to the frame from the inside, two screws per joint and glue.
Step 3

Attach top to sectional piece with 2-1/2" screws.
Step 4

Lay outside and center seat slats down and screw down, two screws per joint, with 2-1/2" screws.
Step 5

Evenly space remaining seat slats and screw down.
Step 6

Attach 2x2 trim to the seat slats and legs (where possible) to finish off end of seat.
Step 7

The corner can be used on either side (pay attention to the seat apron board being placed on the inside or outside).
Build the corner, then attach to the sectional legs with 2-1/2" screws.

Comments
Capella Kinche… (not verified)
Mon, 05/17/2010 - 01:03
I don't know how you do it!
I don't know how you do it! Amazing. Now I wish I wouldn't have bought those four chairs for my screen porch. This could have doubled as a sleeping porch now that its getting warmer.
Christine (not verified)
Mon, 05/17/2010 - 01:18
We have been trying to find
We have been trying to find something that would work for our screened porch. I think we just found it. Thank you so much!
Christine (not verified)
Mon, 05/17/2010 - 01:27
I also wanted to add that
I also wanted to add that www.denverfabrics.com often has an inexpensive selection of outdoor fabrics.
Jeannine (not verified)
Mon, 05/17/2010 - 02:16
A couple comments on the
A couple comments on the cushions. There are different types of foam - make sure if your sectional is going to be outside (not inside a screen porch) that you buy OUTDOOR foam. It cost more, but it will dry quicker and will not mold or rot after repeated times getting wet and air drying. Same with the fabrics. If it will be outside, invest in outdoor fabric. Regular "indoor" fabric will mold rather quickly and will fade and wear out from sun, wet, dry, weather.
The cheapest place to buy foam is from ebay. Do a search for it and you will find many places that sell it. I bought 2 types of foam (harder foam and memory foam) off ebay and made my own tempurapedic mattress last year. The whole thing cost me about $200 as opposed to a $1200 tempurpedic mattress.
Also, if you make cushions, make sure you add zippers. They do take an extra step, and there is the cost of the zipper, but when your cushions get dirty and you want to wash them you will be happy! Otherwise you will have to take them apart to get them off and then when you wash them that edge you had to take apart will probably fray and you will have a hard time putting them back together (I am telling you this from experience!!!).
Love the plan though and can't wait to see a finished project.
In reply to A couple comments on the by Jeannine (not verified)
Juanita_r
Tue, 10/16/2012 - 00:30
press stud closure on cushions
If like me you hate sewing zippers in... the i suggest press studs. they can be found in any craft/sewing store and usually have the whole kit & they are easy!!!
MikkiC306
Fri, 04/24/2020 - 16:08
To add to this many years…
To add to this many years old comment. I work for a furniture upholstery shop. If you pay for an outdoor foam but cover the foam in an outdoor fabric without holes on the bottom the foam will not drain and will sit in the water inside the fabric cover. Your best bet is to either have the bottom of the cushions be a mesh fabric with nothing covering the foam underneath so the water can drain through to the ground or to skip the outdoor foam entirely as it will get moldy and nasty as quickly as regular foam so save the money. Another option would be to unzip the cushions and hang them to dry zipper side down. Or simply bring them indoors though that isn't always possible. Outdoor foam is not coated any differently than regular foam to prevent mold and mildew it just has more holes to allow for quicker draining but it can not drain any faster if it is sitting in water that won't leave the fabric cover.
Catherine Hans… (not verified)
Mon, 05/17/2010 - 02:43
Wow, this looks fantastic! I
Wow, this looks fantastic! I love how thoughtful you are with your plans (like making sure we could all get the best deal on the cushions).
Elisabeth (not verified)
Mon, 05/17/2010 - 02:52
Thank you thank you! And one
Thank you thank you! And one question for anyone who makes this or owns something similar: Do you think it would be comfy enough for frequent indoor use? I'm debating between something like this vs. twin daybeds to replace our living room sofas. I'm guessing a solid back would make it more comfortable. This sectional is beneficial over the daybed because it's more narrow and would save some space.
Erica (not verified)
Mon, 05/17/2010 - 04:01
Great plan! I'm also
Great plan! I'm also thinking about making this for my living room...we need a new sofa really bad! Can't wait to see if someone else does it first though :o)
bequi (not verified)
Mon, 05/17/2010 - 04:10
I have a giant giant patio
I have a giant giant patio with nothing on it because putting out a table and chairs would look ridiculous. So: Aaaaaaaaaahhhhh!!! Thank you!
How would you recommend keeping the pieces together so they don't slide all over the porch?
Denise (not verified)
Mon, 05/17/2010 - 05:25
A-maze-ing!!!!!! How do you
A-maze-ing!!!!!! How do you do it? Never mind, I'm just glad that you do. Thanks again and again.
Christine (not verified)
Mon, 05/17/2010 - 05:34
Another thought I had on the
Another thought I had on the foam is look at foam mattress toppers that you could cut to size. Sometimes buying the whole thing and cutting yourself can save some money!
Fishing413 (not verified)
Mon, 05/17/2010 - 05:45
Thanks for the great plan! We
Thanks for the great plan! We are going to put in a paver patio by the pond and I was trying to think what would go well on there. BINGO! I see the corners are larger to accomodate for the side cushions and arm rest. Will those plans be made avauilible as well? Thanks so much.
Tanya (not verified)
Mon, 05/17/2010 - 08:30
Yes! Please someone make this
Yes! Please someone make this for indoor and post pics!!! I would love this for our family room:)
Virginia's Loo… (not verified)
Mon, 05/17/2010 - 10:49
ANA- you know how much I love
ANA- you know how much I love you and your blog BUT this is a hate mail comment!!! COULD YOU NOT HAVE POSTED THIS PIECE prior to me buying a set for my screened porch ............... I BEGGED for a sectional for our screen porch but it wasn't in the budget. I have already made several of your pieces and know for a FACT I could build this for less than I paid for my furniture out there now..... Do you think if I craiglisted the furniture the hubby would notice.... OH well...I have my wishlist prepared for next year!!!! Thanks for all you do...You have inspired me to go beyond where I feel safe! As I say never underestimate a woman who thinks she can!
LilyWest (not verified)
Mon, 05/17/2010 - 10:54
When your directions say to
When your directions say to use the 2" or the 1 1/2" screws - how many am I using at a time? I know this may sound like a ridiculous question, but if I drill pocket holes - do I use one pocket hole or two and what is the spacing between the two? I am just curious about making it as sturdy as possible. Thanks!
Ana White (not verified)
Mon, 05/17/2010 - 11:05
Thanks all for your comments!
Thanks all for your comments! Make sure you read the last two steps, I talk about how to connect sectional pieces and also a simple modification if you are worried about your back cushions falling through (trust me, that was a concern of mine too!)
As far as screws go, I don't give specific information because I trust that you are smart and that you can use your best judgment. You always need at least two screws, and often that's plenty. Your pocket hole jig (at least the Kreg Jig) has two holes on the jig correctly spaced for drilling two at the same time.
Gotta say, I'm dying to build this myself! Ugh!
Ana
deborah (not verified)
Mon, 05/17/2010 - 14:58
I am going to build this for
I am going to build this for our family room soon..my husband is having severe back pain and needs a taller higher? seat (from the floor to the cushion) I don't think it would be hard to add a couple of inches to the height would it? I'm gonna paint mine black and cover the cushions in drop cloth fabric :)) It will be next month, but I'm going to get this done. Thanks so much!!!
Bethany (not verified)
Tue, 05/18/2010 - 06:28
I thought I'd post this on
I thought I'd post this on both parts of the sectional posts:
I modeled this up with an addition - a couple of end tables that could serve as extra seating, tables, or if you built them to size, they could fit into the empty part of a "U" shaped configuration to make a giant outdoor "daybed/lounger" - at least that is how I'm planning on configuring my sectional!!! You can check out my idea (there are two pictures) on the suggestion board of the KOW flickr group:
http://www.flickr.com/groups/1333045@N24/?added=2
jill (not verified)
Wed, 05/19/2010 - 04:43
Ana, I must say, YOU ROCK!!:)
Ana, I must say, YOU ROCK!!:) I posted something like this on your facebook page for plans request and never thought you would get around to it after seeing all the other plans people had posted. You must feel overwhelmed!! I just wanted to say thank you. I know you hear it all the time but you are so inspiring! I have been thinking about the outdoor cushion thing and someone had mentioned to buy only the outdoor foam to prevent mold and help to dry quicker after rain. I think you could also buy regular foam and then purchase an inexpensive vinyl table cloth and make a cover out of that for cushion first then proceed to make the regular fabric cover. Also, you could sew 3 sides and sew velcro on the end and close up like that. Kinda like wrapping a present... Then they would be easy to remove to throw in wash when they needed it. Just a couple ideas:))
Thanks again for all you do:) I HAVE to check you blog daily. I'm addicted!
ewins.com (not verified)
Wed, 05/19/2010 - 08:16
You can get affordable
You can get affordable cushions at :
www.ewins.com
Lacking Productivity (not verified)
Fri, 07/30/2010 - 11:31
I just finished my first
I just finished my first armless chair for the set...this has been my first project and it came out perfect! (I was worried that my lack of perfect angles was going to result in an unintentional rocking chair, but it is as sturdy as I'll get out).
How to Build a… (not verified)
Sat, 11/13/2010 - 08:21
[...] Full reference
[...] Full reference (Copyright acknowledge) This entry was posted in Wood Furniture Plans. Bookmark the permalink. ← Cabin Plans Free | Cabins Balmoral Flexibel Outdoor Sofa Furniture by Habour Outdoor → [...]
Jenna (not verified)
Sun, 12/12/2010 - 18:25
This is going to be my first
This is going to be my first build, then the outdoor storage benches (we're planning on placing two back-to-back to make a table for the center of the c-shaped sectional)! I told my husband about this website, and he fell in love with it almost as quickly as I did! We have a Sunroom in our new place and this will be PERFECT! Thanks, Ana!
Summer (not verified)
Sun, 01/09/2011 - 19:09
Wow, I love this idea! Take
Wow, I love this idea! Take a look at the style and pricing of similar sets on this website - Outdoor Sectional Patio Furniture.
By following the instructions on this page you could save thousands of dollars and end up with the same functionality and a very similar feel! Excited!
Not a Handy Man (not verified)
Thu, 02/03/2011 - 08:41
I made a couple chairs
I made a couple chairs working on a few more now. Really not to difficult. I'm not handy by an strech but I did it. I had to alter some of the cuts a bit and measuring out the peices really is the only pain in the you know what of the project. After doing the first one it was smooth saling. I'm going to stain it and buy cushions. Thanks great idea, the directions were good, and it's so basic you can really alter it to fit your needs taller longer ect. This will be much nicer to sit on if the snow ever goes away on ym porch and is a nice change fro mthe traditional patio set.
jane (not verified)
Wed, 02/16/2011 - 11:51
We're ready to shop & start
We're ready to shop & start on this project, but can't seem to find the "READ MORE" section that shows the complete plan for sections with arms. My husband will figure it when he gets to that point, but would rather have all the details beforehand.
jane (not verified)
Wed, 02/16/2011 - 12:00
Never mind, found it! NOW
Never mind, found it! NOW we're ready to go!
kruizin21
Wed, 03/16/2011 - 16:46
type of wood
hi, what type of wood do you recommend since it will be going outdoors?
Guest (not verified)
Mon, 03/21/2011 - 08:43
(No subject)
Guest (not verified)
Mon, 03/21/2011 - 17:07
working on the second one!
Thank you, thank you, thank you!!!!!! You've inspired me not only to make this sectional instead of buying it, but now I have so many ideas floating around. The kreg jig is AMAZING!!!! Somehow it ended up a little off in the seat...but maybe the next one will work out better.
Went to several stores looking for cushions, and while home depot had one that fit, I went with the ones at Target. (Nice and thick!! Good fabric)
Jolene (not verified)
Tue, 05/10/2011 - 08:35
Yippee!!!!!!!!!!
Like everyone else, I have been frustrated by the cost of outdoor sectionals. I have been contemplating how to build my own but you have saved me a huge amount of time and trial and error. Thank you.
Susannah (not verified)
Thu, 05/12/2011 - 10:44
armless?
But there is an arm on at least one chair. Where is the step on adding an arm? I'd like to add arms on either end of the sectional. Thanks.
DarlingGirl
Sat, 06/11/2011 - 18:19
Just Starting
My husband just built the first piece for this amazing sectional (I was at work so couldn't help). I can't wait to see it all built and painted.
These plans were so helpful getting the ball rolling!
aria_dia
Sun, 06/12/2011 - 00:53
foam and batting
Im looking into building a few things that require both foam and batting; the parson's chairs and the padded bench to name a few.
I'm working on a pretty tight budget right now, so I cant dish out the big bucks for the really good stuff; but I dont want to be sitting on just wood either. We're moving and in the move we need to sell our current table and chairs (which lets face it were too small for my family of 5 anyways); and we really dont want to have to eat on the floor until I can afford the foam for the chairs!
Also, what kind of batting do you guys use? I'm only really familiar with quilters batting, is that what you guys are using? (can you tell I've never had to make my own furniture before? lol I've only just changed the fabric!)
Ashleigh (not verified)
Thu, 05/03/2012 - 10:39
I've ordered from
I've ordered from thefoamfactory.com before, and thought their prices were really reasonable. You can also do a dacron wrap for not much extra, so no need to purchase batting on your own.
emmarosemc
Tue, 06/21/2011 - 11:04
OK, i found these cheap
OK, i found these cheap outdoor cushions/seats pads at home depot for $5!!
http://www.homedepot.com/h_d1/N-5yc1v/R-202071456/h_d2/ProductDisplay?l…
Now they measure 18x21, should i just go ahead and build the sectional as per plan or shouldI try to mod it to the specs of the cushions? Any suggestions for the modding?
Guest (not verified)
Mon, 08/08/2011 - 20:21
Sitting up too straight?!
Any ideas on angling the back slightly? I've built one armless chair as my test one, but find I sit up so straight it's not as comfortable as I would like - with or without cushions. I'm debating whether to cut off the back legs at a very slight angle or trying to modify the back legs to be more like the "Simple Stackable Outdoor Chairs". Any thoughts?
luckyapril828 (not verified)
Fri, 03/02/2012 - 11:56
Just one question?
Just one question before I try my best to tackle this amazing project! I keep thinking to myself this is probably a rediculous question but I have to ask...is says that you need 5- 1x4 boards, so is the 5 boards just for the one piece? I'm pretty sure it is seeing as you get to choose just how many chairs you want to make for your sectional, but like I said just had to ask?
Thanks!
Julz (not verified)
Wed, 03/07/2012 - 10:50
Re: Just one Question
hi luckyapril828,
that's not a ridiculous question. I was asking myself the same thing.. and then I did the math. You are correct, 5 - 1x4 boards is just for one piece. I'm planning on starting this project sometime next week but I wanted to budget myself. I might be a little ambitious, but I'm planning on building 10 pieces! I hope it won't be too expensive. I don't even want to think about the cushions just yet.
Hope that helps answer your question.
Good luck!
luckyapril828 (not verified)
Wed, 03/07/2012 - 14:17
Thank you!
Thanks for the reply! What kind of wood do you plan on using? I priced for pine wood and it's pretty pricey considering I wanted to do a larger piece also. Trying to find different options. Let me know how it goes!
Thank you, and good luck as well!
Guest (not verified)
Thu, 03/08/2012 - 09:05
These look awesome and are
These look awesome and are the perfect answer for my new deck. I'm wondering if the Google Sketchup model is available so I can play around with the layout on my deck and see how many sections I should make.
spiceylg
Fri, 03/09/2012 - 04:58
Cushions
I have yet to build this, (waiting for warmer weather,) but I just bought my cushions last night and I'm quite excited. I priced around and they aren't cheap for sure and sometimes are made so cheap. I bought what are considered floor cushions at Costco for $20 a piece for the seats. Can't remember if they were 25" square or 24" square, but they are nice and thick (4-5"). Then for the back, they had a pkg of two cushions for $15. Not sure of the size, but they are smaller. Still after looking around in the stores and on-line I'm very excited! I'm a novice at sewing and didn't want to tackle this as a sewing project (doll bedding only, ha!). I have to look again, but I'm pretty sure these cushions did say they were for outdoor use. Can't wait to build and post pics!
Guest (not verified)
Thu, 04/12/2012 - 14:12
found cushions but need to modify for them to work...HELP!
S, this sections is just like one for sale at West Elm with cushions specifically made to fit it! The back cushions have a triangular profile, it mimics a recline back, and looks super comfy. My problem is that the dimensions are 27.5"w x 31"d x 29"h on the west elm single unit which is obviously very different from 24"w. I really want these cushions but have little idea how to modify this plan to make them work. Some help would be so wonderful! I want to build them with my father before my hubby gets home from Afghanistan in June as a surprise! Thanks so much!!!
New here and l… (not verified)
Thu, 05/03/2012 - 07:43
Kreg Jig Pocket Locations
I'm planning out where to drill kreg pockets and I'm getting a little hung up. I'd like to have as many non-visible screws as possible so I altered how I would build it. I'm leaving the seat supports for the last step so I can attach the back with kreg pockets on the inside of the side apron and screw into the back legs from the side apron (STEP 7).
The question is, could this work? And how can i get Kreg Pockets in that corner of the side apron connecting to the back that screw into both the back apron and the back seat top. Would I have room to put pockets in a corner vertically and horizontally? If so, would I also have room to put ANOTHER screw through that same corner of the board into the legs?
This would also apply to STEP 2 where I'm attaching the front apron, that already have pocket holes attaching them to the side apron, to the seat sides (3/4" overhang). It also to the installation of the seat supports to the back as my final step.
In summary How close is too close? Is there enough room? If all else fails I can do a test on some scrap boards before starting. I don't own a kreg jig yet however so that's where my ignorance on the subject comes from.
I hope this isn't as confusing to read as I think it is.
Any help or opinions would be much appreciated. LOVE the site!
Thanks!
New here and l… (not verified)
Thu, 05/03/2012 - 09:31
Would Something Like This Work?
Link to Diagram:
http://tinypic.com/r/swfjwj/6
Adam B. (not verified)
Wed, 07/18/2012 - 23:57
Cheap Cushions
First off, let me start by saying this was my FIRST EVER ATTEMPT at BUILDING anything!
These plans were super easy to follow and made woodworking so much less intimidating. Believe me, if I can do it - anyone can do it. You can see my progress through the project on my blog.
Secondly, for everyone looking for cushions to fit these benches I found the best deal to be at Improvement Catalogs: http://www.improvementscatalog.com/outdoor-cushions/shop-by-color/
They have a Deep Seat Cushion Set (17"x24"x4-1/2" back; 24"x24"x4" seat) for $55!
Compare this to Target ($70+), Walmart ($70+), and any other store selling outdoor cushions.
I have tested out Improvements' cushions and they are comfy, fully padded (not thin like some others), and have just withstood their first SF summer rainstorm.
I hope this helps and I look forward to building more things from this amazing site.
New here and l… (not verified)
Mon, 07/30/2012 - 06:35
These look great!
Have been looking for cushions for a month or so now. Just ordered these!
Thanks!
rfay818
Fri, 02/15/2013 - 12:13
Confused about the Overhang
HELP - i'm sure that i'm just overlooking something totally obvious, but in step 4 it says to attach the legs flush with with side seat boards. How is that possible if the over hang is only 3/4" but the legs are 1"?? Am i missing something really obvious?? Wont the legs stick out awkwardly?
Fundy
Sun, 03/24/2013 - 13:51
Corner Seat
I love the project and the step by step in instructions are awesome. I do have a question: is there a detailed step by step for the corner seat or did I somehow overlook it?