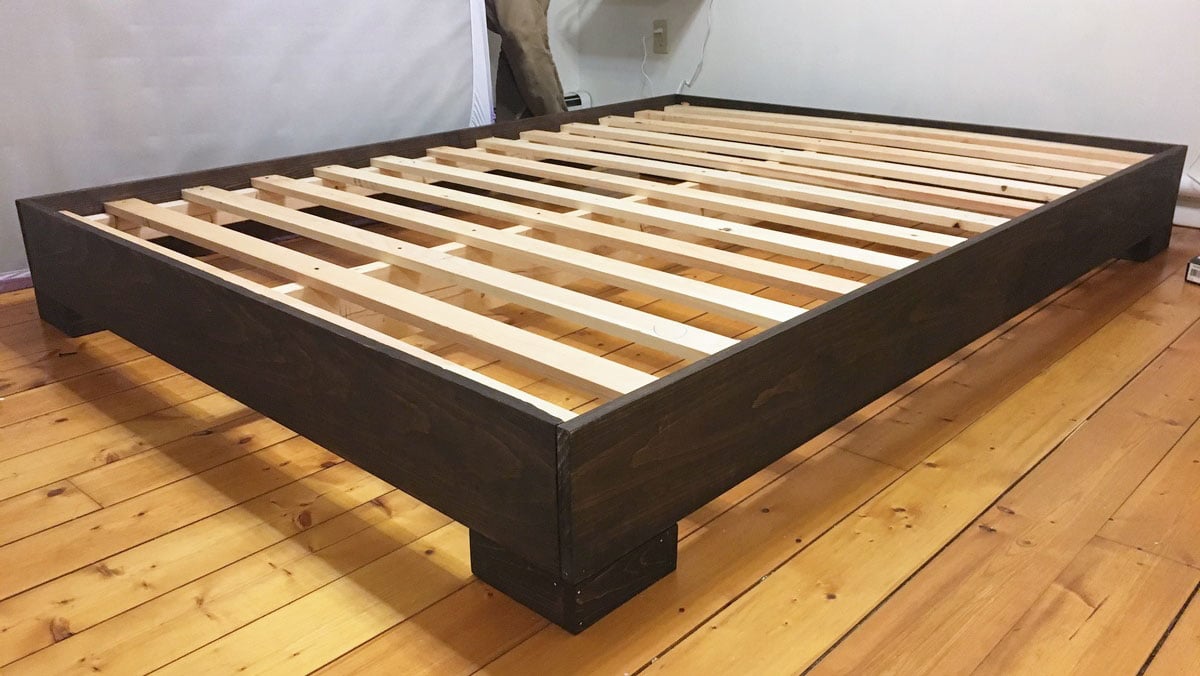


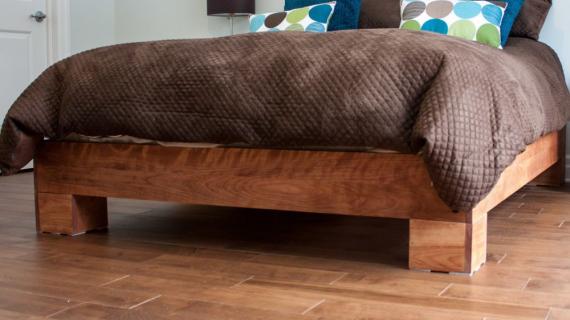
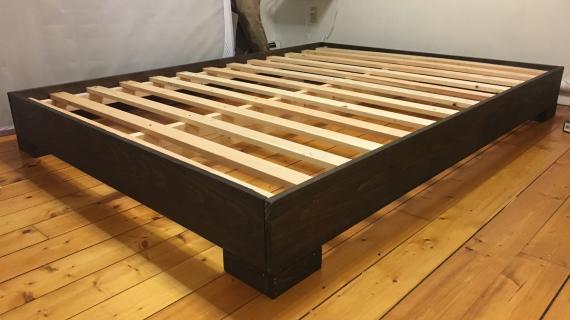
For about the price of a box spring you can build your own modern platform bed frame. You'll just need a few basic power tools and off the shelf lumber to build - and our free step by step plans with diagrams and shopping list.

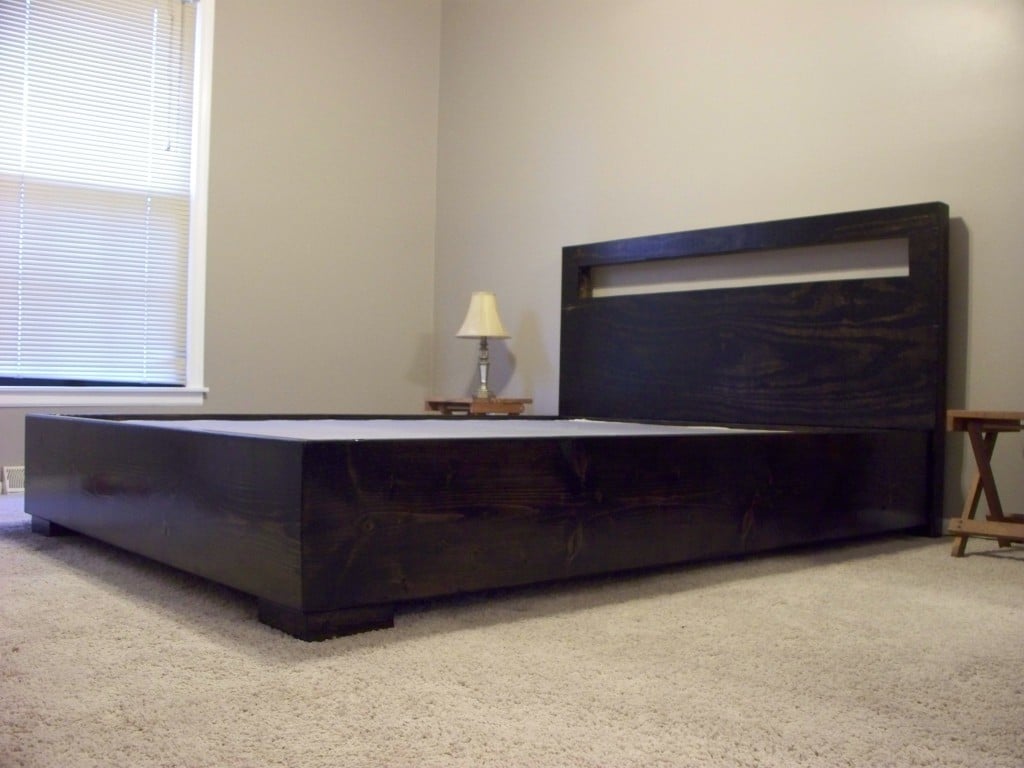
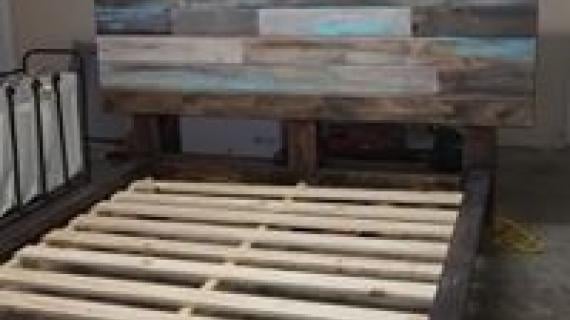
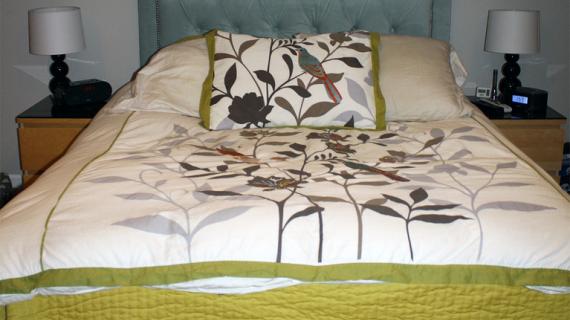
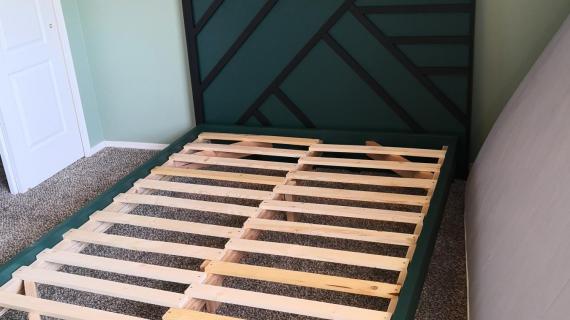
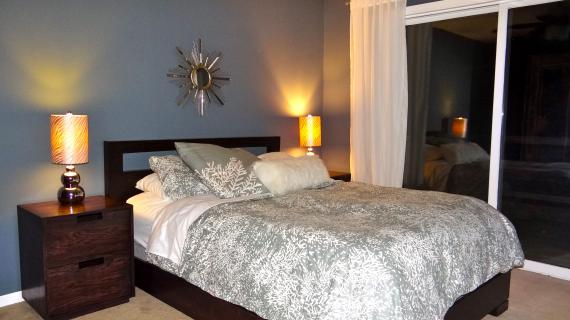
This bed frame can be paired with this headboard
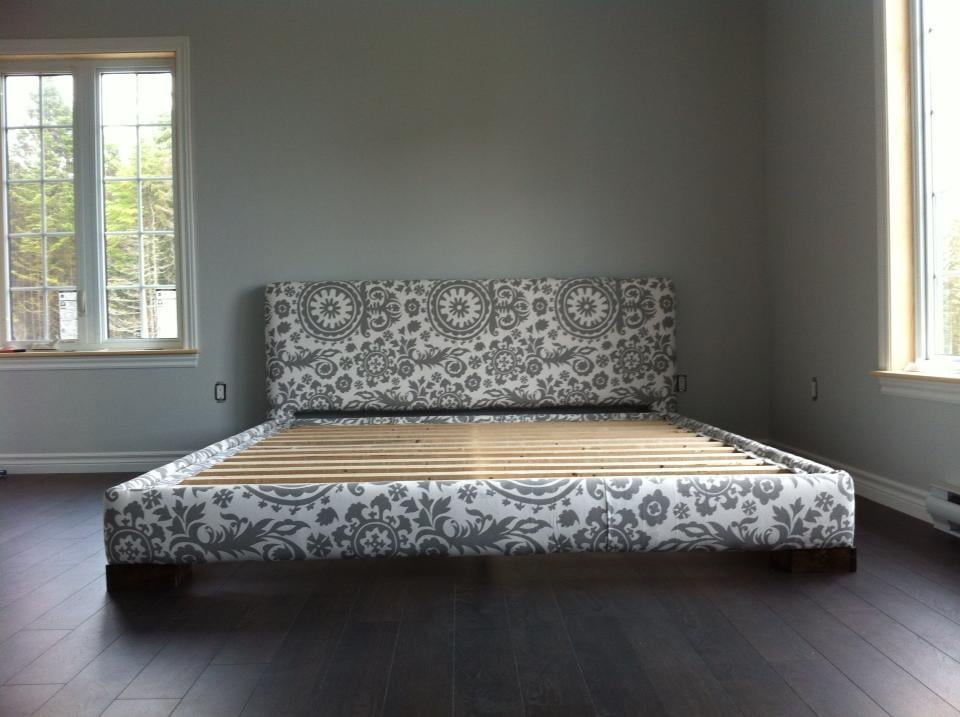
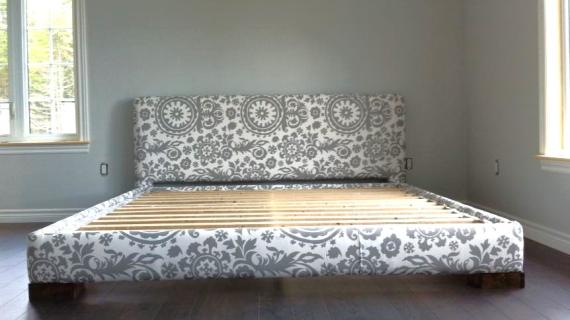
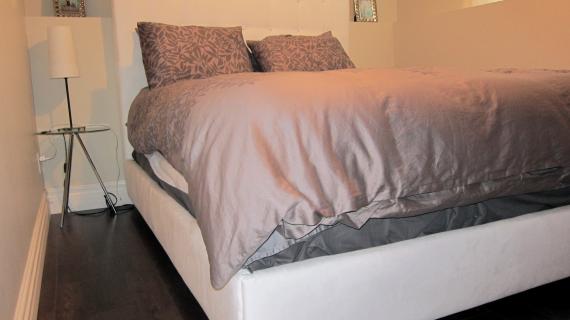
This bed frame can also be upholstered as done here
Preparation
2 – 1×8 Boards, 8′ Long
1 – 1×8 Board, 12′ Long
2 – 2×2 Boards, 8′ Long
2 – 2×6 Board, 8′ Long or Stud Length
13 – 1×3 Boards 2″ Screws Wood Glue Wood Filler Sand Paper Finishing Supplies
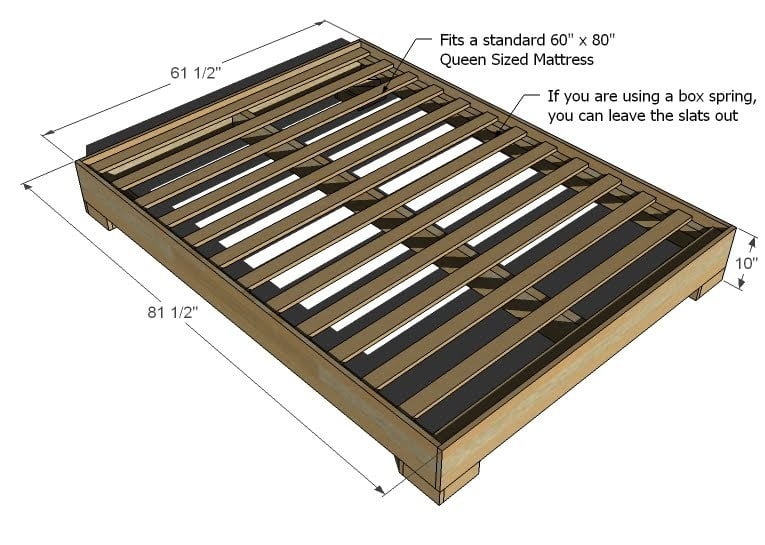
2 – 1×8 @ 60″ (End Rails)
2 – 1×8 @ 81 1/2″ (Side Rails)
4 – 2×6 @ 5 1/2″ cut at 45 degree angles (Corner Supports)
1 – 2×6 @ 80″ (Center Support)
2 – 2×2 @ 80″ (Cleats)
4 – 2×6 @ 5 1/2″ (Leg Bases)
16 – 1×3 @ 6 1/4″ (Leg Trim)
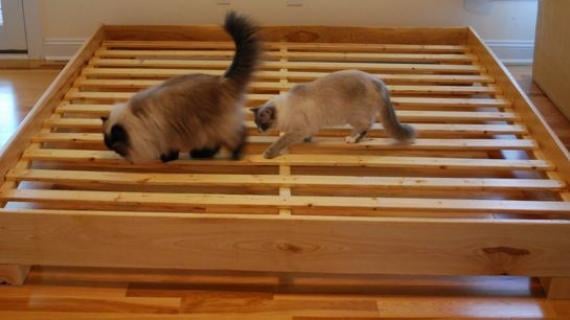
13 – 1×3 @ 60″ (Slats)


Instructions
Step 1

BOX
Build the box out of the 1x8s as shown above.
Step 2

CORNER SUPPORTS
Adjust the bed frame for square and fasten the corner supports in the corners as shown above. Keep the top edges flush. This will be the bottom of your bed frame.
Step 3
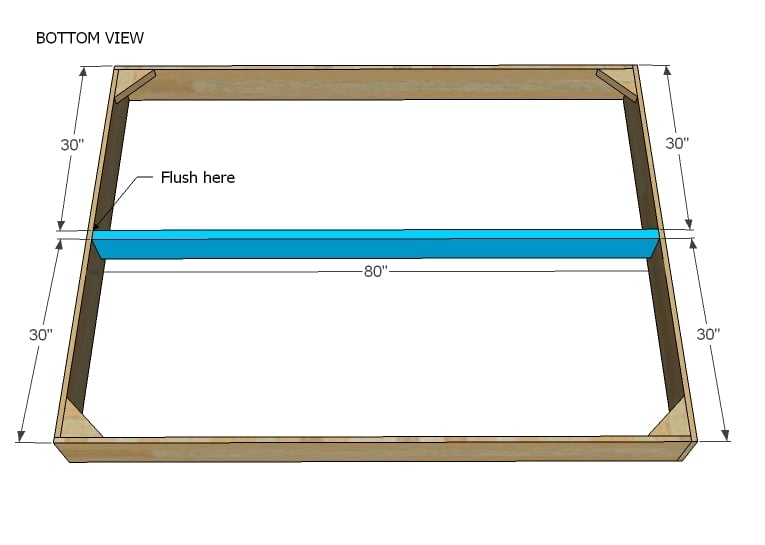
CENTER SUPPORT
Mark the end rails 30″ in and fasten the center support to the end rails using 2″ screws and glue or pocket holes from the inside. Keep top edges flush. This will be the bottom of the bed.
Step 4
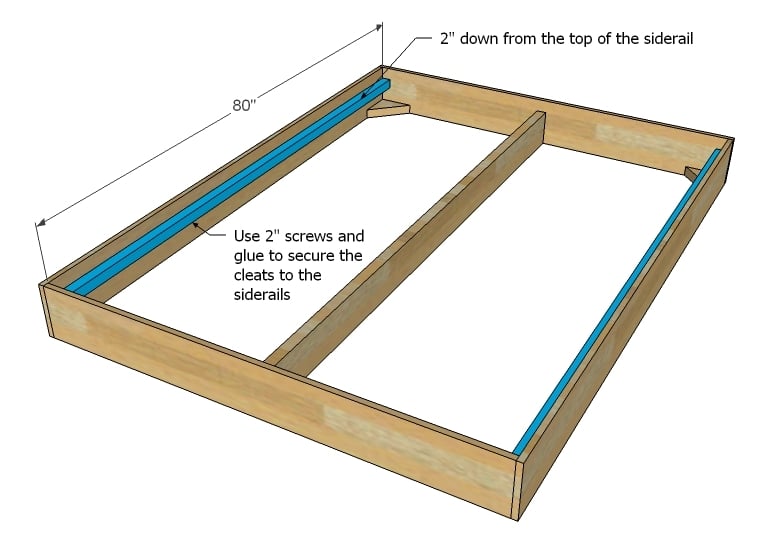
CLEATS
Flip the bed frame over and mark the side rails down 2 inches on both sides. Attach the cleats with 2″ screws and glue, screwing every 6 to 8 inches.
Step 5

Step 6
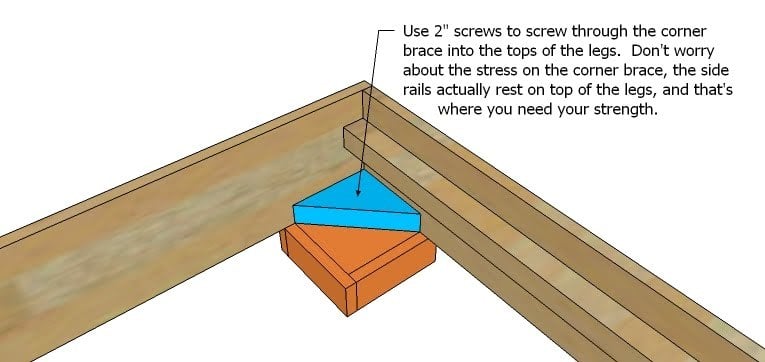
ATTACHING THE LEGS
Attaching the legs is easy. Simply line up the legs with the outside corners of the bed frame and screw through the corner supports into the top of the leg blocks. Use at least 2 screws. You could easily attach a different type of foot to the bed in the same manner.
Step 7

SLATS
Lay your slats on top of the cleats and screw down. Also screw to the center support. Space slats approximately 4″ apart.
Comments
bookladydavina (not verified)
Wed, 06/23/2010 - 20:08
I have a question regarding
I have a question regarding weight limits on these type of slat board bed frames. Anyone have any idea what they are? Would a 300+ pound person be in trouble of breaking the boards? We love some of these plans but have some larger relatives who would likely be using them.
Also, love the site! I'm also up here in Alaska and it's great to see some great craft ideas for up here where it's hard to get stuff! :)
Joe (not verified)
Wed, 06/23/2010 - 20:45
Please don't stop with the
Please don't stop with the modern or simple furniture. That's the reason I found, subscribed, and check your site daily!!!
Karen P (not verified)
Wed, 06/23/2010 - 23:34
thank you soo much for
thank you soo much for posting this bed! while I like your rustic, farmhouse style furniture plans, I love the simple, modern style furniture. I can not wait to make this bed. I showed my husband the plans and he's dubious that I can pull it off on my own.
Beth (not verified)
Thu, 06/24/2010 - 00:41
Question about the
Question about the modification for a king size. When you say to add a center leg--do you mean one just like the other four chunky ones? Or something else entirely? I need a visual for that one! I love this plan--we have been looking at platform beds for a while now, and this one is almost exactly what we need!
Catherine (not verified)
Thu, 06/24/2010 - 02:48
You read my mind! I was
You read my mind! I was about to try to design something simple like this myself because the "captain's bed" was a little involved for us, & lo & behold, look what I found when I opened my Google Reader!
My own alteration on the plan will be to raise it up twice as high, so I can fit some of those long plastic storage boxes underneath. And there might be a linen dust ruffle with inverted knife pleats to cover it all, so I can have another place to indulge my love of fabric!
Thanks, Ana! This is just what I needed. (Plus, I love the mix of modern & farmhouse. Variety is the spice of life!)
T Ennis (not verified)
Thu, 06/24/2010 - 03:25
This is what I have been
This is what I have been dreaming of for a bed and night stands! Thank you so much. There is no way we would be able to afford this suite.
orange sugar (not verified)
Thu, 06/24/2010 - 04:37
I absolutely love the modern
I absolutely love the modern furniture you have been posting. I'm hoping you will post a modern dresser to match the nightstands.
Barrette (not verified)
Thu, 06/24/2010 - 05:27
Yahoooo don't stop with the
Yahoooo don't stop with the modern furniture. I LOVE this bed and can't wait to make it for myself. I thought I'd go with the farmhouse bed but have held off waiting for time to do it. But now this, this bed!! This is what I've held off for!!! THANK YOU :) Can't wait to post 'done' photos
orange sugar (not verified)
Thu, 06/24/2010 - 08:56
Would be very cool if you
Would be very cool if you added a modern dining table to the collection
http://www.westelm.com/products/g039/?pkey=cdining-tables-chairs
Lexsmommy (not verified)
Thu, 06/24/2010 - 22:02
Ana, If I am using a box
Ana, If I am using a box spring do I still need the corner supports?
Suki (not verified)
Fri, 06/25/2010 - 10:09
I LOVE this bed!! Something
I LOVE this bed!! Something has been holding me back in making a bed despite loving other styles that have been posted. Hubby and I both love this style.
Mia (not verified)
Fri, 06/25/2010 - 14:13
I'm in love with the modern
I'm in love with the modern furniture too, I'm so glad you've shared these ideas too!
Were you ever able to do the plans for that credenza from (I think) last month that you'd shown with the modern desk? If not, I understand- you must be super busy, and I'm definitely willing to wait :)
Ana White (not verified)
Sat, 06/26/2010 - 07:26
Lexsmommy, I would still add
Lexsmommy, I would still add the corner bracing because it will keep your bed square and give you a support to screw your legs too. :)
Nancy (not verified)
Mon, 06/28/2010 - 06:22
I need to make a raised dog
I need to make a raised dog bed & I'm thinking of using this design.
Currently, my dog's bed sits on top of a large ottoman. He lays on it all day long & stares out the window.
I'm thinking of modifying this design, so it holds a dog bed rather than a mattress.
Do you think there's anything I should specifically consider when modifying this to a dog bed?
Katie (not verified)
Fri, 07/16/2010 - 20:28
Forget Craigslist, I am going
Forget Craigslist, I am going to make my girlie a bed! I want to make a full size - can you help me with the dimensions? I am VERY beginner.
cr8ivrose
Thu, 08/01/2019 - 08:27
I would like a full size…
I would like a full size dimension also
Vicky T (not verified)
Fri, 07/23/2010 - 12:30
I would like to make a full
I would like to make a full size and a twin size. Does anyone know how to adjust the measurements? I recently purchased a home and have never made any furniture or anything for that matter.
mcgoo (not verified)
Fri, 08/13/2010 - 11:13
I love love this bed! its
I love love this bed! its almost exactly what I have been looking for! i would like to do a few modifications so that it looks like the colette bed from c&b
http://www.crateandbarrel.com/furniture/beds/colette-bed/f1480
would the legs be safe if they were smaller like that?
also would the nail trim go through all the layers or should i just make sure it is cut off properly? thanks
jasi (not verified)
Tue, 08/24/2010 - 11:00
i would also love the full
i would also love the full size measurement adjustments. thanks!
jspotts23 (not verified)
Wed, 09/29/2010 - 07:17
I'm thinking of making this,
I'm thinking of making this, but king size. Has anyone worked out the changes in dimensions yet? The west elm website lists the queen sizw as 62"wx83"dx9.25"h, and the king size as 78"wx83"dx9.25"h.
McKay (not verified)
Fri, 11/19/2010 - 02:50
Thanks so much for these
Thanks so much for these plans! I was totally stalking West Elms site for the narrow leg bed and bedside table. Thanks to the confidence I got doing the storage cubes, I shall now attempt to make my bedroom FAB-ulous with modern-style furniture! (love your simple modern designs!)
My question is about how to make the legs from the narrow leg collection? Should I use 2X4s? or 2X6s? I'm having a hard visualizing their dimensions - is the top 3 1/2"? What do you think? Would love some professional guidance!
http://www.westelm.com/products/narrow-leg-wood-bed-frame-f828/?pkey=ch…
orangesugar (not verified)
Wed, 12/01/2010 - 06:55
mcgoo here is someone that
mcgoo here is someone that built a Collette bed and an accompanying tutorial
orangesugar (not verified)
Tue, 12/28/2010 - 05:53
OK I don't know why that link
OK I don't know why that link didn't work. Here is the DIY Colette bed.
http://high-heelfootinthedoor.blogspot.com/2010/08/diy-colette-upholste…
Makin' Birdhou… (not verified)
Sat, 01/08/2011 - 03:02
[...] Much More than a Chunky
[...] Much More than a Chunky Leg Bed Frame — Ana White. [...]
shanestric (not verified)
Mon, 01/10/2011 - 11:25
Hey guys! I noticed that a
Hey guys!
I noticed that a lot of you were looking for the dimensions for a full sized bed, and I just made this over the weekend. Here is what I made for a full:
End Rails: 2 1x8 @ 55 1/2"
Side Rails: 2 1x8 @ 76"
Center Support: 1 2x6 @ 78 1/2"
Cleats: 2 2x2 @ 78 1/2"
Slats: 13 1x3 @ 55 1/2"
Kept the same:
Corner Supports: 4 2×6 @ 5 1/2″ cut at 45 degree angles
For the legs, we ended up just getting an extra 4x4 and cutting that @ 5" a piece to give it an extra 2" of height than Ana's plan.
Onto the headboard next weekend! Will post pictures when I'm done. Hopefully this helps!
Thanks for the great plans, Ana! You made this easy!
In reply to Hey guys! I noticed that a by shanestric (not verified)
mamalecia11
Thu, 01/26/2012 - 08:37
Full size measurements
Thank you for putting these measurements on. I was trying to figure them out and I just got frustrated until I found your comment. Making this bed this weekend!! Will put on pics when finished. Not sure about what to do for the headboard but would love to see yours if you finished it!
Ana White (not verified)
Mon, 01/10/2011 - 11:53
You are awesome! Many thanks!
You are awesome! Many thanks!
shanestric (not verified)
Mon, 01/10/2011 - 13:21
Oops, just realized one typo.
Oops, just realized one typo. The cleats and center support cuts are 74 1/2". Happy building!
cr8ivrose
Thu, 08/01/2019 - 08:31
Thanks so much for the full…
Thanks so much for the full size! Please post when you do the headboard!
Closet Under C… (not verified)
Wed, 01/26/2011 - 13:09
[...] new duvet. And I am not
[...] new duvet. And I am not buying bedding for a non-existent bed. I can not wait to build the west elm knock off featured over on Ana-White’s site. I have been eyeing this bed for months. And to make it [...]
Shana (not verified)
Wed, 02/02/2011 - 10:43
I am a very beginner does
I am a very beginner does anyone have dimensions for the twin size bed plan for this bed?? i want to start on it but worried i will mess up measurements. Thanks!
Upholstered Be… (not verified)
Mon, 02/14/2011 - 09:45
[...] in Brag Blog,FEATURED
[...] in Brag Blog,FEATURED Put on my TO-DO List Save as PDF Print this PostShare/Bookmark Builder: Kristen Holm Blog or Website:http://www.bigboxdetox.com/diy-make-own-upholstered-bed/ Experience Level: Some Experience Estimated Cost: $200 Estimated Time Investment: One Weekend From Plan: http://ana-white.com/2010/06/furniture-plans-much-more-than-a-chunky-le… [...]
Sarh (not verified)
Tue, 02/15/2011 - 07:29
Can this bed be torn down for
Can this bed be torn down for easy moving? I really want to make this design and upholster it but wouldn't know how to make it easy to move. Any ideas?
Teener (not verified)
Tue, 02/15/2011 - 12:52
Ana, I like everything that
Ana,
I like everything that you offer on your site, thanks. This perticular bed is the style that I am looking for. However, I would like to make this into a twin size and raise it off the ground. Is there anything wrong with making the legs longer? My intention is to purchase a trundle, or heck make a trundle, that will roll under. Then when I have guests, I have a king for two adults to sleep comfortably. Your response is appriciated.
Thanks, Christine
Tristina (not verified)
Thu, 03/17/2011 - 20:25
Has anyone tried this in a
Has anyone tried this in a twin size? If so, I would love the modified plans! I really have no idea how to begin to modify them.
Thank you!
Guest (not verified)
Tue, 05/31/2011 - 12:48
PDF not working :(
Could you email me the PDF for this plan please?
jamilwest
Sun, 07/03/2011 - 17:45
Transitioning to King size
Okay, I just looked really closely at the plans and transitioning to king size looks to be REALLY simple.
My mattress measures 76 inches wide, so if I understand correctly, the ONLY measurements I need to change are the end rails and the slats. I ONLY need to change those to 76 inches. I don't need to think about it, they just need to be the width of the mattress, just like the original plans are simply the width of a queen mattress.
Is this correct? It's just too simple and I tend to want to overthink things. I'd like to have some confirmation BEFORE I go buy a ton of wood and commit to having it cut.
Thanks for the plans and the help!
Maureen K
Fri, 07/29/2011 - 09:37
First Project
My daughter and I made this bed last weekend and it came out great! It was a great bonding experience for us and very empowering! She loves her new bed! Thanks for the plans and all the encouragement found on your site!
gruurly (not verified)
Mon, 04/23/2012 - 09:22
This will be my first
This will be my first project, and I'm incredibly excited to find a bed style I LOVE meant for a beginner. However, I can't seem to download the plans. I've tried a few ways, but an error comes up. Suggestions?
rick b (not verified)
Wed, 01/02/2013 - 20:03
shopping list question
what is the 12' board intended for? it can't be for the side rails as they are 81.5"each and two of them would be 163" and the 12' board is only 144"
Jeremyallen (not verified)
Wed, 01/02/2013 - 20:47
I think they are for the end
I think they are for the end rails , (head and foot) because they are shorter than the side rails I think you can get 2 of them out of a 12 foot section...
My problem is that I can't find 12 foot ones in the right woods at lowes or hd.
JA
EW (not verified)
Sun, 01/20/2013 - 12:29
modification to fit up narrow stairs
My husband made this bed yesterday and it turned out great! It was intended for the second floor of our home, but will not fit up the stairs (with feet detached). Is there any way to modify this plan to get it finished (I would like to upholster it) and bring it up the stairs in a few parts? Or are there plans for a similar style of bed that could be assembled once finished?
EmmeW (not verified)
Sun, 01/20/2013 - 12:33
modification to fit up narrow stairs
My husband made this bed yesterday and it turned out great! It was intended for the second floor of our home, but will not fit up the stairs (with feet detached). Is there any way to modify this plan to get it finished (I would like to upholster it) and bring it up the stairs in a few parts? Or are there plans for a similar style of bed that could be assembled once finished?
cathleenmr
Tue, 07/09/2013 - 08:34
Cal-King Dimensions
Does anyone know the dimensions for turning this into a cal-king? And if I want the frame to come apart at a later date, how should I put it together?
beau_beashore
Sat, 10/26/2013 - 07:08
Wood Type
Hello Ana
I'm looking at making a bed very similar to this one and then upholstering it and was curious what type of wood you recommend?
Turkswill
Thu, 01/09/2014 - 14:01
King Size Measurements
Ana or anyone that can help,
can you please provide the cut measurements for a King size bed? I would love to start this soon and I am not too savy with figuring out how many inches I will need to add this queen size plan.
Thank you so much.
mb31725
Sun, 05/11/2014 - 08:41
CHUNKY LEG BED FRAME
My family and I built this bed last weekend. We adjusted the plans to fix a olympic queen bed. It turned out perfectly. We did add legs to the bottom to increase the height. We used deck post toppers for the legs. Now trying to decide if we will stain the wood or if we will upholster. Thanks so much for the plans. My daughters and I have NEVER built anything nor did we have any idea how to use the power tools. My husband liked the project so much he jumped in and help us to finish. He isn't a hany man either but this was a great family project. we are ready for the next project.
ajwhite2578
Sat, 05/11/2019 - 11:18
Attaching the headboard
This an awesome bed! We are making two full sized beds for our girls as we speak including the low modern headboard. Do you have instructions on how to attach the headboard? Thanks!
avegro
Sat, 11/14/2020 - 04:33
Mattress adjustment advice
Hey Ana, I'm dying to build this bed but unfortunately I'm not in the US and don't have enough experience to easily make adjustments myself - wood sizes are different here, but more importantly mattress sizes are different here and I don't know how to make the adjustments (mattress size 140cmx190cm is what I would want to build it for most likely).. :( any tips?