


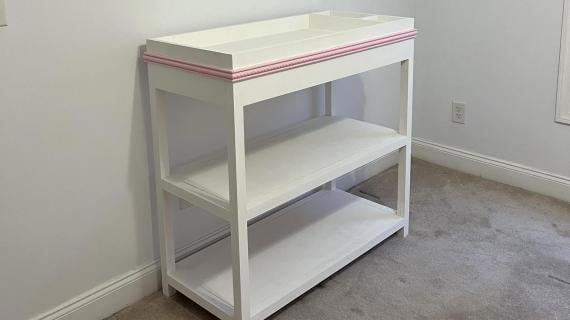
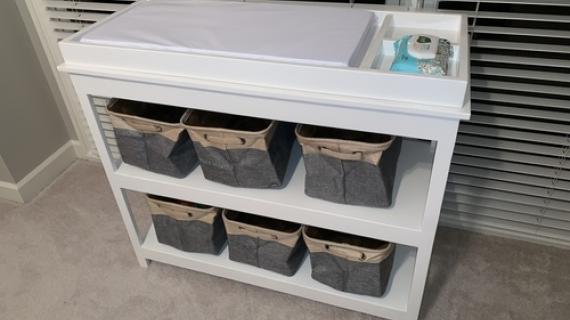
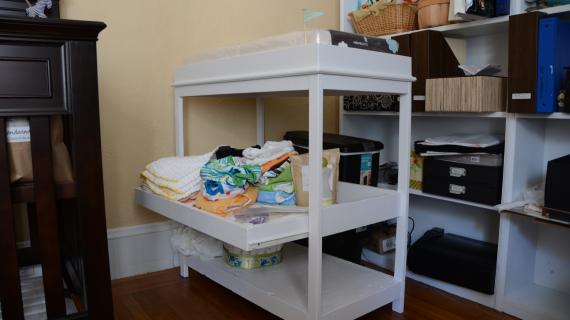
This simple changing table features is basically a bookcase with a removeable topper, enabling you to convert back to a changing table. Features two large shelves and a divided topper, perfect for a changing pad and keeping baby necessities at hand.

Today, when I checked the mail, there were two baby shower invites. Two. Time for some changing table plans. Simple ones.

Like this one from Pottery Barn Kids.

That fits a standard changing pad and has a little space on top for those items that you must grab when you don't have a free hand. I remember when Grace was a baby, we lived in the garage, slept on a mattress on the concrete floor, and an old card table served as a changing table. And the changing table kept me sane. I'm so glad that you might be able to have something better for your baby.

Preparation
2 – 1×2 Boards, 8′ Long
1 – Sheet of 3/4″ MDF or Plywood, cut into 15 1/2″ wide and 8′ long strips (these strips will be referred to as 1×16 boards)
1 – 10′ 1×4 Board
4 – 1×3, 8′ Long
12′ of edge beading, 3/4″ thick
2″ Screws
1 1/4″ Screws
1 1/4″ Nails
Wood Glue
Wood Filler
Sand Paper
4 – 1×2 @ 34″ (Legs)
2 – 1×4 @ 15 1/2″ (Top Trim, Ends)
4 – 1×3 @ 15 1/2″ (Shelf Trim, Ends)
4 – 1×16 @ 40″ (Shelves)
4 – 1×3 @ 38 1/2″ (Shelf Trim, Sides)
2 – 1×4 @ 38 1/2″ (Top Trim, Sides)
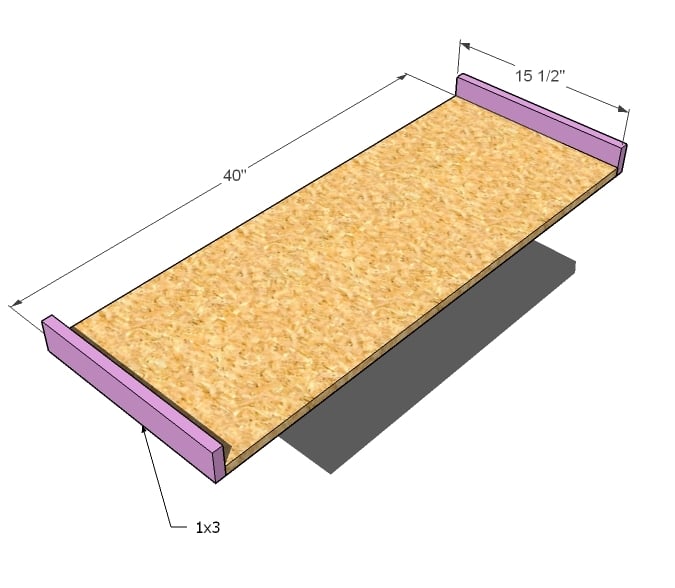
2 – 1×3 @ 15 1/2″ (Topper Trim)
2 – 1×3 @ 41 1/2″ (Topper Trim)
1 – 1×2 @ 7 1/4″ (Topper Partition)
1 – 1×2 @ 15 1/2″ (Topper Partition)


Work on a clean level surface. Measure out all joints and mark before fastening. Be safe and use glue. Have fun! And predrill all screw holes before fastening.
Instructions
Step 1
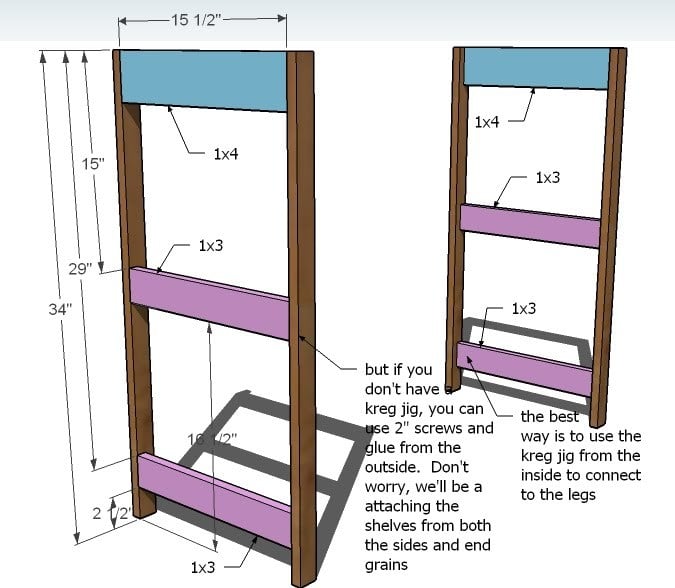
ENDS
Build your ends as shown above. Use 2″ screws and glue unless you have a Kreg Jig™ and you can fasten the end trim from the insides.
Step 2

SHELVES
Fasten the shelves to the end trim pieces as shown above. Again, 2″ screws and glue or use the Kreg Jig™ from the underside of the shelves. Keep the top edge flush on the shelves.
Step 3
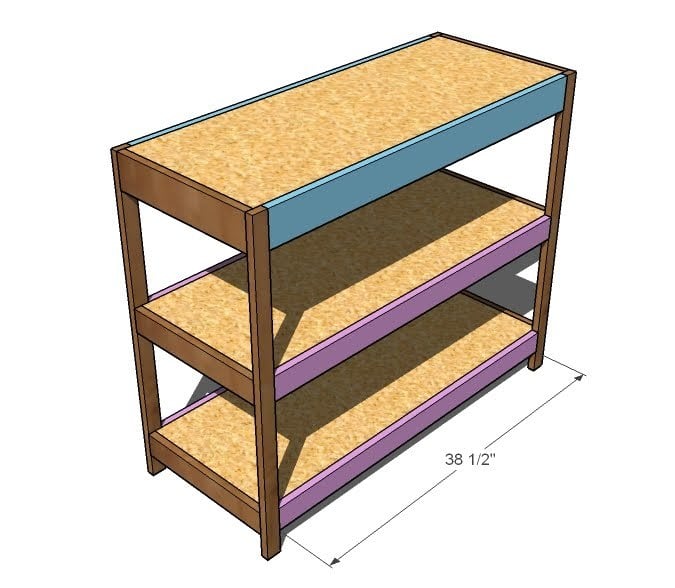
SHELF SIDE TRIM
Trim out the shelf sides as shown above, use 2″ screws and glue. Fasten the trim to the legs to for extra support on the shelves from the outside of the leg or use a Kreg Jig™.
Step 4
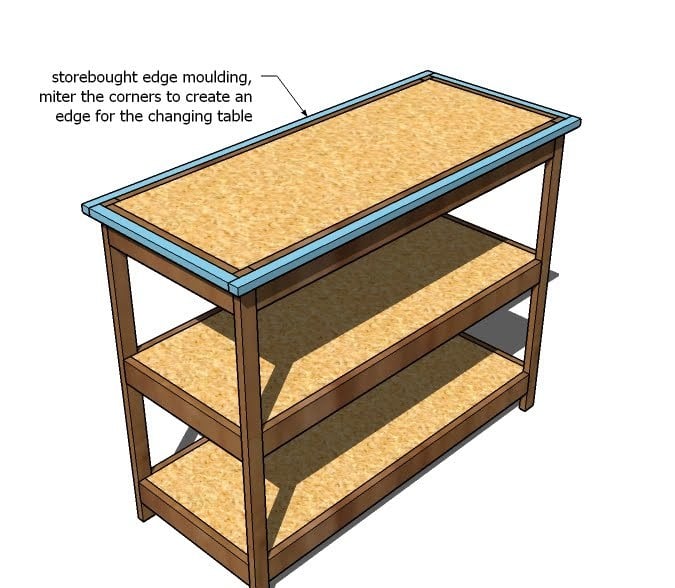
Edge Trim
Use 1 1/4″ nails and glue to fasten edge trim around the top of the table, as shown above. Miter your corners at 45 degrees for a neat edge. Cut the edge trim to fit, as dimensions are not shown in the above diagram.
Step 5
Step 6

TOPPER SIDES
Attach the side trim to the topper as shown above. Also attach to the end trim from step 5. Use glue and 2″ nails or screws.
Step 7

PARTITIONS
Attach the partitions to the bottom of the topper, and to the side and end trim pieces as shown above. Use glue.
Step 8

ASSEMBLY
From the underside of the changing table, attach the topper with 1 1/4″ screws. Omit the glue if you wish to remove the topper at a future date.

Comments
Laura (not verified)
Tue, 06/29/2010 - 01:54
Love this! I never had a
Love this! I never had a changing table with either of my kids, so if I ever have another, I'm building this for sure!
Katherine (not verified)
Tue, 06/29/2010 - 02:58
This is perfect! I am hoping
This is perfect! I am hoping to have a baby soon, and I am definitely going to build this table.
casicola (not verified)
Tue, 06/29/2010 - 03:18
I cant wait to see pics
I cant wait to see pics too!!! its gonna be adorable!
Please forgive me if I am doing this wrong and please tell me how to do this.... but I have a wine rack/book shelf from crate and barrel that i just know you can design and I can build...here is the link..http://www.crateandbarrel.com/family.aspx?c=913&f=30710
Can you help? We have no kids and really would love to make something for our house:)
merideth (not verified)
Tue, 06/29/2010 - 03:48
that is great! we have a LOT
that is great! we have a LOT of babies coming in our family and circle of friends. surely somebody needs a changing table! :)
Sarah (not verified)
Tue, 06/29/2010 - 04:49
So clever how this can turn
So clever how this can turn into a book shelf!
Lissa @ MyThri… (not verified)
Tue, 06/29/2010 - 06:16
LOVE THIS! I am having our
LOVE THIS! I am having our first baby soon and have been wanting a changing table without spending $200. I'm looking forward to making this on a Saturday with my hubby!
Paula (not verified)
Tue, 06/29/2010 - 06:50
I'm done having babies, but I
I'm done having babies, but I think this would make an awesome shower gift! Thanks for yet another set of awesome plans, Ana!
spinellifamily (not verified)
Tue, 06/29/2010 - 09:44
YES! I've never bought a
YES! I've never bought a changing table because they were way too expensive, I'm totally doing this for the next kid. Thank you thank you!!
Mindy (not verified)
Tue, 06/29/2010 - 12:07
Bless you! I was just
Bless you! I was just thinking last night as I considered selling my 2 yr. old's changing table (because we need the cash for me going back to school), "Maybe I should hold on to it for the next kid" (who will be at least 3 years down the road). Now, no worries, I've got plans to make one.
So, thanks, for outfitting my family now & helping with my future plans, too.
Rebecca (not verified)
Fri, 07/02/2010 - 08:44
I think you must have been
I think you must have been reading my mind. I've been looking to purchase a changing table for a couple of months, but I couldn't justify the cost of a sturdy one and the ones I can afford seemed so unstable. I kept thinking I wish Ana would post plans for a simple one (the scalloped wall system is a bit too ambitious for a very pregnant lady like me...although its still something I want to build). THANK YOU for posting these!!! You and your site are such a blessing.
Alicia (not verified)
Fri, 08/06/2010 - 09:25
What type of wood would you
What type of wood would you use for this? Thanks, want to be sure it is sturdy enough.
Amy (not verified)
Mon, 10/25/2010 - 14:42
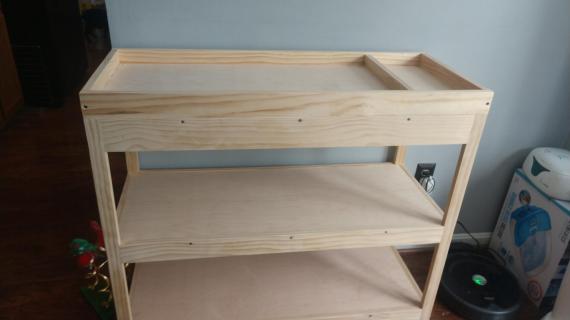
my friend and I just finished
my friend and I just finished this table (thanks for the plans by the way!). We did have some issues with wood splitting, even with pre-drilling and countersinking the screws. Are 2 inch screws really necessary for all the pieces? We built it with pine. It seems really sturdy though!
Phillip (not verified)
Tue, 12/14/2010 - 12:09
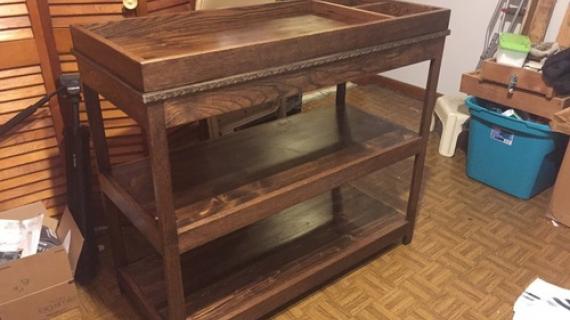
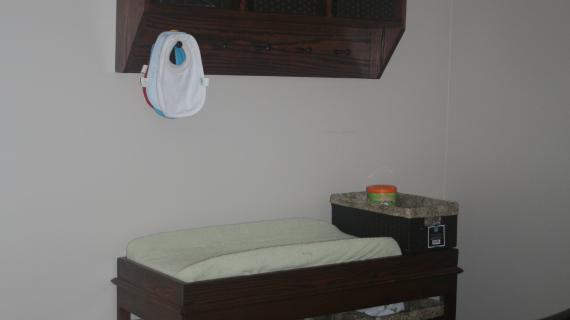
F:\DCIM\100KZ712\100_1723 I

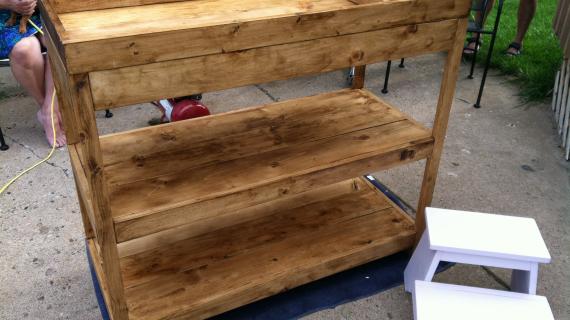
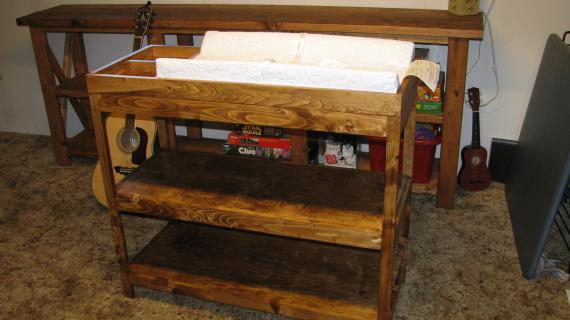
I built this one with pine. Cost right around $70 compared to a store bought. I stained it with two coats of cherry stain, and two coats of polyurethane. I got it done in a week. I would suggest omitting the edging. My wife and I feel that it looks fine with out it, also I did mess up the edging trying to cut it.
Phillip (not verified)
Tue, 12/14/2010 - 12:11
I built this one with pine.
I built this one with pine. Cost right around $70 compared to a store bought. I stained it with two coats of cherry stain, and two coats of polyurethane. I got it done in a week. I would suggest omitting the edging. My wife and I feel that it looks fine with out it, also I did mess up the edging trying to cut it.
Kathy (not verified)
Sun, 12/26/2010 - 17:03
We wanted to get a changing
We wanted to get a changing table for our grandson for Christmas. The selection for ready made is dismal, and the prices ridiculous for particle board and paper veneer, so I was very pleased to find theses plans. We had the wood pre-cut by the lumber yard, and had it together and painted in a few evenings. We made it out of pine and also had some splitting even with pre-drilling. Had to adjust the compartment on the topper to accommodate a 33" changing mattress - could not find a 32" one, but that was easy to do. Cost @ $130.00 including the building supplies, primer, paint, and mattress. The table is very sturdy and my daughter and son-in-law are thrilled with it. Thanks!
January Preggo… (not verified)
Fri, 01/07/2011 - 13:52
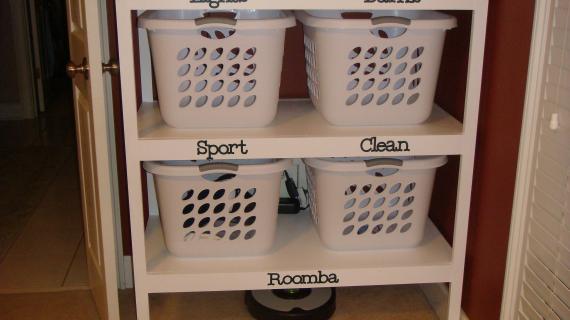
[...] build a changing table/
[...] build a changing table/ dresser. This one could work as a dresser with some baskets to hold clothes How to Build a Simple Baby Changing Table — Ana White __________________ [...]
Gift for new b… (not verified)
Wed, 01/19/2011 - 08:22
[...] in Brag Blog,FEATURED
[...] in Brag Blog,FEATURED Put on my TO-DO List Save as PDF Print this PostShare/Bookmark Builder: marla Blog or Website:http://www.williamandmarla.com Experience Level: Some Experience Estimated Cost: $50 Estimated Time Investment: 1 day From Plan: http://ana-white.com/2010/06/furniture-plans-simple-changing-table.html [...]
Brandon (not verified)
Sat, 02/05/2011 - 09:07
I am confused as to why this
I am confused as to why this says to cut the "1x16" boards only 15 1/2" wide, because 15 1/2" shelves do not fit a standard 16x32 changing pad. You know when I discovered this? When the entire table was assembled. Now I have a changing table with a bunch of time and money invested, that absolutely does not work as a changing table. Which is not awesome.
In reply to I am confused as to why this by Brandon (not verified)
brookifer86
Tue, 03/15/2011 - 10:35
It Still Works...
Why don't you just cut down the pad? Seems like a simple solution to me. I plan to make my own pad with some 2 or 3" foam from Hobby Lobby, and waterproof fabric. It's still going to be a great piece for your home, and you can always re-use it as a bookcase by removing the top, as Ana suggests at the beginning of the post. I plan to just tack down the top so it's stable, but easy to remove and patch the holes later.
Guest (not verified)
Fri, 01/20/2012 - 20:11
Agreed, dimensions should be changed
I too agree with your concern for the incorrect dimension. Because of your post, I made a sample top before anything, got out the changing pad and gave it a shot. It really doesn't fit very well. I am using a 16x32 changing pad from Babies R Us...pretty standard. So, I've decided to make the depth 16 1/4" after measuring the changing pad and also accounting for having the cover on it. This will obviously change the other dimensions as well. Thanks for your comment!
austin (not verified)
Wed, 03/30/2011 - 01:13
baby changing station
As it is the subject matter of one's childs requirements one should prefer the best Baby Changing Station
tkaufman
Wed, 03/30/2011 - 13:02
This is so cute!!
I love this. Any plans for a crib in the near future?
marlaandwilliam
Sun, 07/31/2011 - 11:53
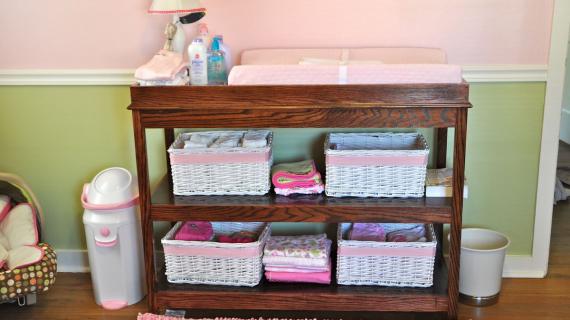
Thank you!
Ana, thank you for using our changing table for the main photo for this!!
matthew (not verified)
Thu, 05/03/2012 - 06:41
Finish Suggestions
Just completed this project, I'm wondering what you would suggest for a safe primer and paint. Need to get this done ASAP. Babies coming quick.
Thanks
matthew
Jimmi (not verified)
Wed, 08/15/2012 - 20:14
We installed a commercial unit.
It worked great, but it wasn't exactly pretty. I wish I had seen these plans. It would have looked better and been a lot cheaper to. Thanks for posting.
Jessie Tobey (not verified)
Mon, 09/24/2012 - 11:03
Crib
Is there any chance you might come out with plans for a mini crib? My husband and I are planning another baby but we don't have a lot of space, and my daughters old crib is waaay to big to put in there with her toddler bed. I love your site and I can't wait to get started on a few of your space savers!
Shannon Gould (not verified)
Sun, 10/14/2012 - 16:34
I can't wait to build this
I can't wait to build this for my nursery!
Orman
Sun, 01/13/2013 - 02:13
Severely flawed plans!
So I've seen a few people post on this project, that they've built it and it works great. I don't know how that's possible since these plans are seriously flawed.
I was really excited when I saw this changing table. It's simple in construction and looks great. I was excited until I made all my cuts, put my ends together and found that something was seriously amiss. I thought I had done something wrong, cut everything wrong. My motto is measure twice and cut once. It took three adults an hour measuring the pieces three, five, eight times, and looking at the plans over and over to finally realize that the error was not in how I cut the pieces. The error is in the plans themselves. I learned a valuable lesson. Never assume the plans you get are accurate (even if they're made is Sketchup).
Anything that says it should be 15.5" long in the cut list should actually be 16" long. The shelves themselves are 16" wide which makes it necessary for all the end pieces to be 16" wide as well.
Ana, this is a great site with lots of great ideas. I'm very appreciative of that fact. If this is the first you've heard of this problem with the plans for this particular project I can understand. But now you know it's a problem and should either correct the plans and re-upload them or take them down. I originally spent a little more than $80 on materials for this project. I was able to make it work after I had to use additional lumber to make new ends with the correct dimensions. It cost me more money, more time, and a lot of frustration.
Your site is great. Keep up the good work. Please fix this problem so others don’t have the same experience I did.
Mandy Rae
Sun, 01/13/2013 - 14:24
READ twice, cut once :)
The instructions clearly state from the beginning that the 15.5" wide length of MDF would be referred to as 1x16. The authors notes mention & I assumed it was because you could alternatively go by a length of 1x16 which would actually measure smaller.
Be sure to always read through ALL the instructions before cutting anything. I also like to cut as I go to be sure I haven't goofed a half inch here or there.
Glad you got it worked out but wanted to point out the solution in case someone else had the same issue.
Orman
Sun, 01/13/2013 - 19:36
Now I see
Mandy Rae Thank you for your kind response. I now see that I was in error.
Thank you for making it clear to me. And my apologies to Ana. I'm still a fan.
Gary Fields
Thu, 01/31/2013 - 17:02
Changing Table
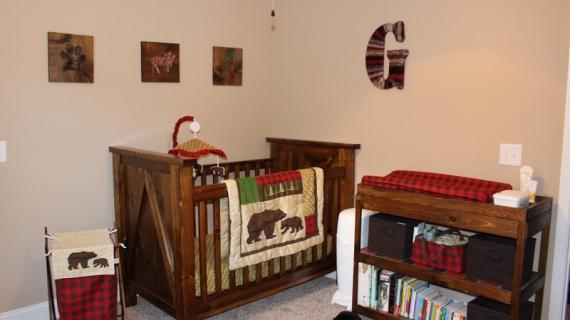
I made this table but it took two attempts. I am a beginner and made more mistakes than could be overcome so I had to start again. But, once I finished it the second time it was AWESOME! Made it for my first grandchild that as of this writing is 3 days past due I wish I could add a picture as I did make a couple tiny tweaks that I really like. And I did use expensive sanded plywood that added quite a bit to the final cost but the smooth, shiny finish (painted high gloss white) makes it well worth it.
PamC03
Mon, 12/18/2017 - 17:45
Adaption
How does this adapt to a bookcase? Arent you left with holes on the top surface?
JoshS
Fri, 10/01/2021 - 18:24
From an amateur woodworker...
As a woodworker, I should have seen the red flags, (like the author using the term "Kreg Jig" to refer to a pocket hole jig) but I liked the pictures so much, I decided to ignore my instincts and give it a try. Beware, the entire strength of this design relies on screwing into end grain. That's not strong at all, but even worse when it's plywood endgrain, which is very frail. You should never, ever rely solely on screwing into the edge of plywood. It will split and fall apart. Plywood is not made to work in that way. I would suggest screwing another piece of wood under the plywood for it to rest on.
The beginning of the plans say it will fit a standard 16" wide pad. This is incorrect because the designer didn't account for the width of the boards. As a result, the pad won't fit. After having the screws strip out of the endgrain if boards and the entire unit collapse 3 times, I will not put my new son on it until I've fixed the flaws in this design.
The designer does a good job making the plans in SketchUp, but those shelves are not going to hold up over time designed the way this is designed and if the shelves go, the structure of this becomes dangerous to place your baby onto.