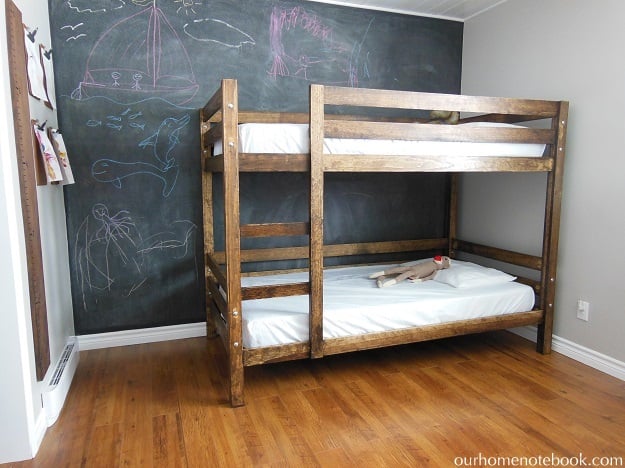


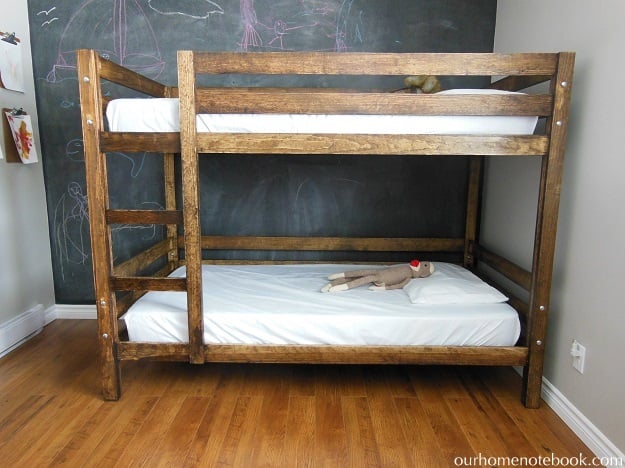
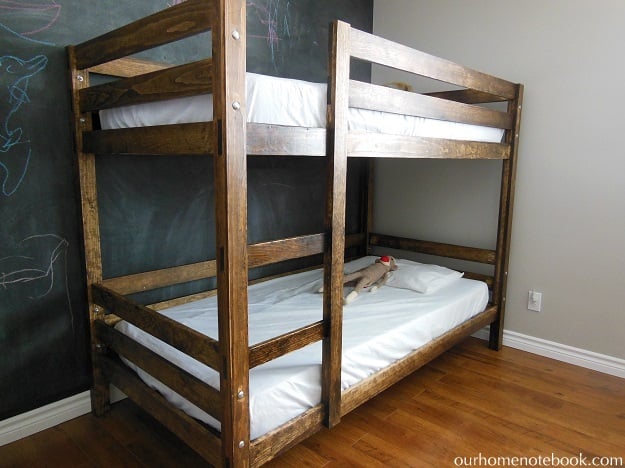
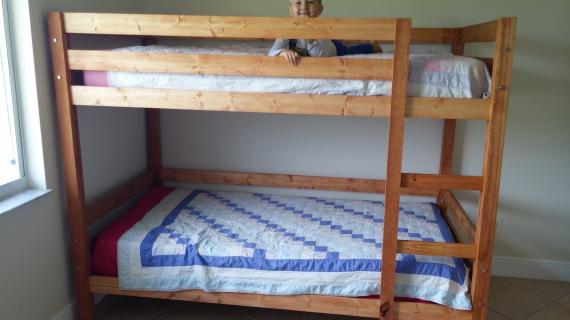
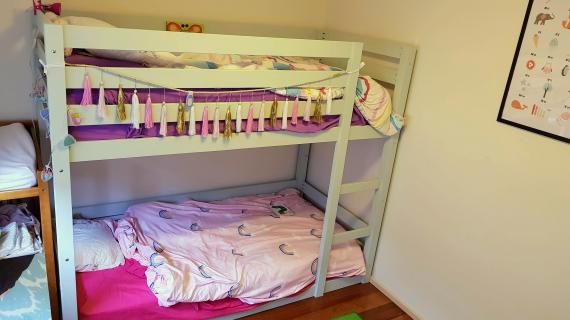
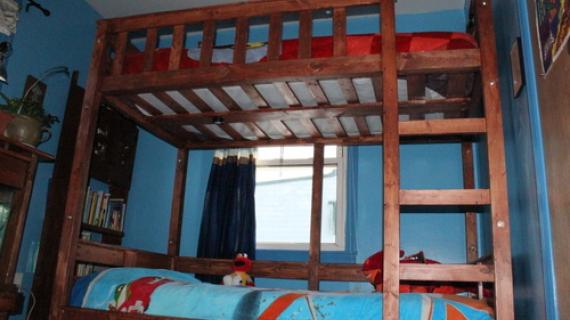
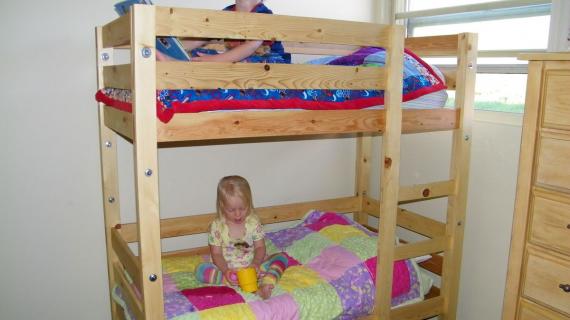
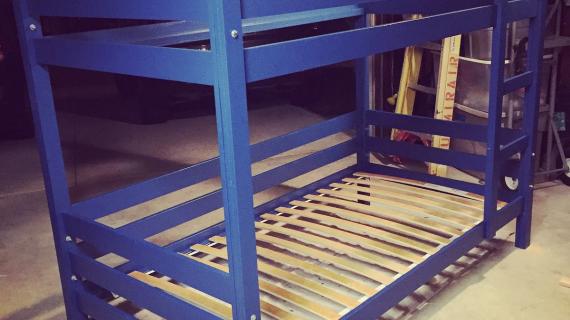
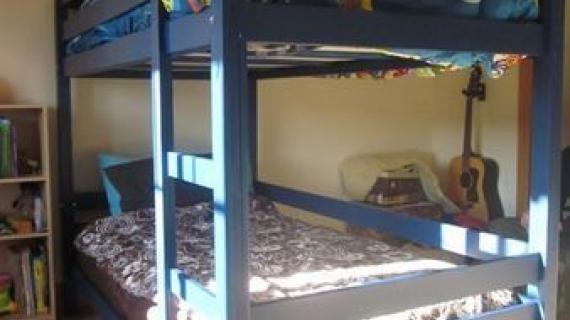
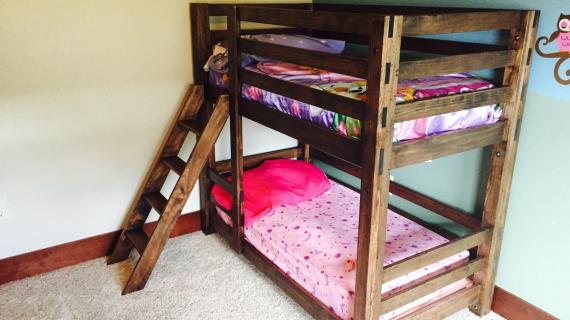
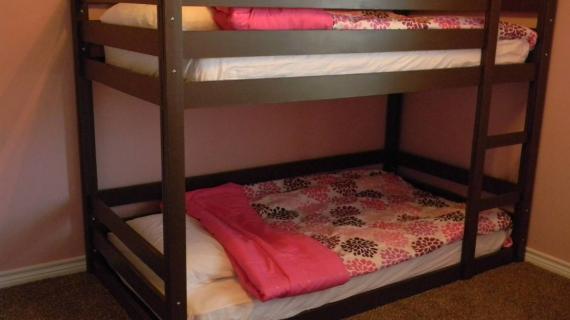
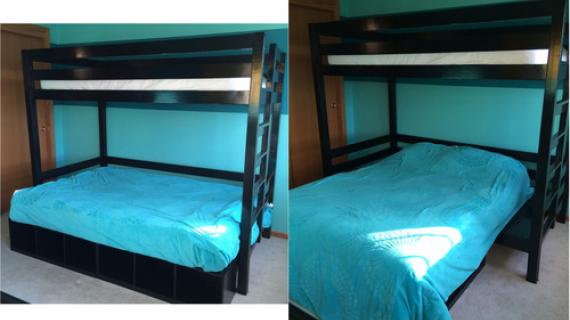
These bunk beds are unique because they are easy to build and can be assembled and disassembled easily. Ladder is integrated into the design.
Preparation
- 11 – 10′ 1×4 Boards
- 4 – 8′ 2×2 Boards
- 9 – 8′ 1×3 Boards (not including wood slats)
- 2″ Self Tapping Wood Screws
- 1 1/4″ Self Tapping Wood Screws
- 1 1/4″ Brad Nails
- Wood Glue
- Wood Filler
- Finishing Supplies
- 16 – 3″ Bolts with washers and nuts
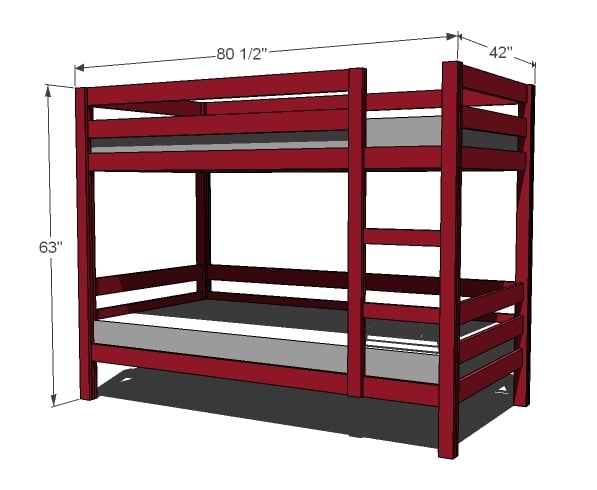
- 12 – 1×4 @ 37 1/2″ (End Rails)
- 8 – 1×3 @ 63″ (Solid Leg Pieces)
- 8 – 1×4 @ 80 1/2″ (Back and Front Rails)
- 2 - 1x4 @ 64" (Front Rails)
- 12 – 1×3 @ 3″ (Trim Pieces between Rails)
- 2 – 1×3 @ 22″ (Trim Pieces between Rails)
- 4 – 1×3 @ 8″ (Bottom Trim Pieces)
- 4 – 2×2 @ 75″ (Use Metal braces for a stronger bed)
- 1 – 1×3 @ 55″ (Ladder Side)
- 2 – 1×3 @ 19″ (Ladder Rungs)
- 1 – 1×3 @ 13″ (Ladder Front Trim Piece)
- 6 – 1×3 @ 10″ (Ladder Trim)
- 1 – 1×3 @ 35″ (Front Leg Trim Piece)
- 1x3s @ 39″ (Bed Slats, as shown with 34 total slats)


Instructions
Step 1

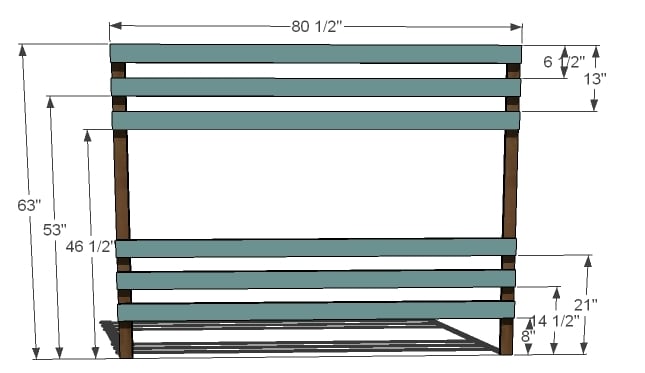
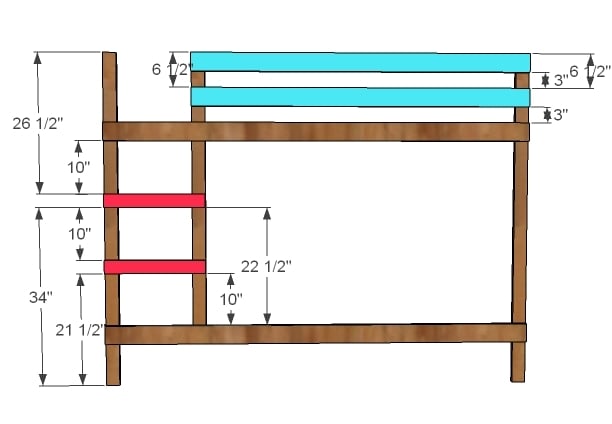
Build the Ends
Build two of the ends as shown above. Best joining method is to use pocket hole screws from the insides of the rails into the legs. Other option is to use 2″ screws from the outside of the legs, with a countersink bit. Screws are recommended, because bunk bed are going to take lots of movement, and nails joints will eventually separate out.
Step 2
Build the Back
Simply take two of the 1×3 legs @ 63″, and mark as shown in the diagram above. Glue and screw with 1 1/4″ screws the side rails to the legs. On this step it is very VERY important that you check and adjust for square. If the diagonals do not match up, push the outside corners of the longer diagonals together.
Step 3
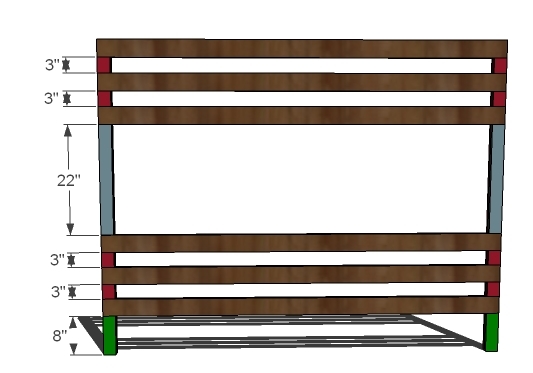
Trim the Back
After you have built the back, cut 1×3 pieces to fit the legs between the slats. You can nail these pieces on with a finish nailer and glue, using 1 1/4″ nails. TIP: Don’t cut these pieces prior to building – measure and cut to the opening, to get the exact fit.
Step 4
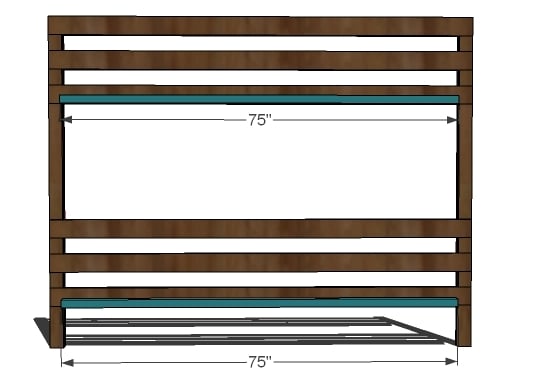
Bed Slat Supports
If your child is heavy or you expect the bed to take a large amout of abuse, I recommend purchasing metal braces, and screwing to the inside of the bed. Otherwise, use 2x2s, 2″ screws and WOOD GLUE to attach the bed slat supports to the back slats, keeping bottom edges flush.
Step 5
Step 6
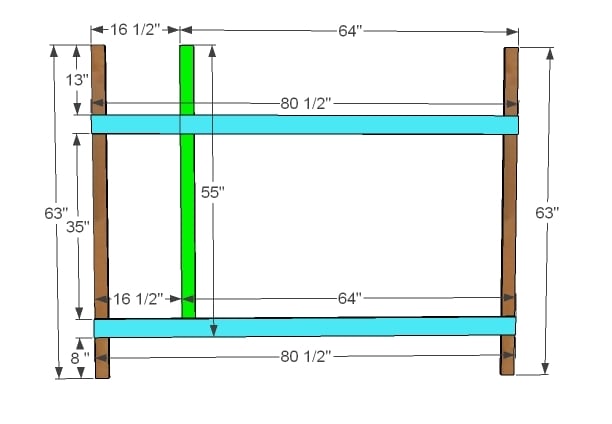
Rails and Ladder Rungs
Mark the sides and the ladder piece as shown above. Glue and screw with 1 1/4″ the top bunk rails and the ladder rungs to the legs and the ladder side.
Step 7
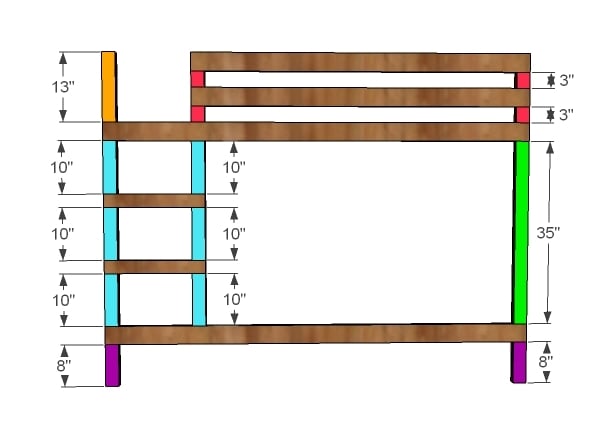
Trim the Front
As you did the back, trim the front, filling in all the spaces with 1×3 boards. Use 1 1/4″ nails or optionally screws and glue.
Step 8

Assembly Assemble the bed by bolting the four pieces together, using 3″ bolts and washer and nuts, four bolts per leg. If you plan on seldom assembly/disassembly of the bed, you could also use 2″ wood screws from the inside of the end legs into the back/front legs.
Step 9
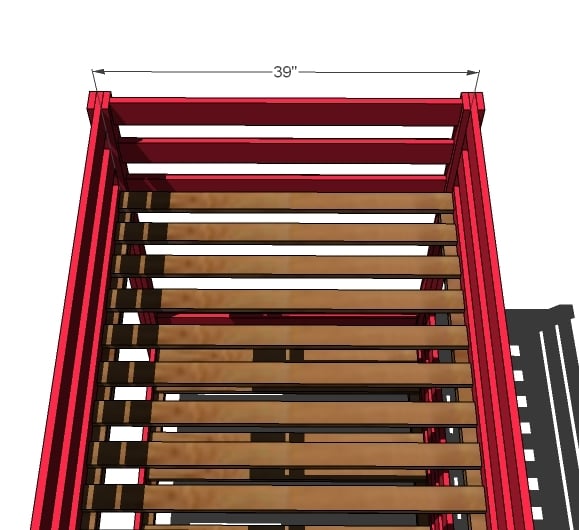
Mattress Slats Your mattress should have recommendations for bed slats. Use 1x3s, cut at 39″, layed on top of the wood slat supports, according to the recommendations of the mattress. Screw down with 1 1/4″ screws.


Comments
Megan (not verified)
Fri, 09/03/2010 - 09:00
You are beyond AMAZING! These
You are beyond AMAZING! These are the bunk beds I have wanted for my boys!!!!! Does your brilliant mind ever stop? I LOVE THESE!
Susan (not verified)
Fri, 09/03/2010 - 09:55
This is awesome, Ana. Of
This is awesome, Ana. Of course, we bought these beds six months ago, spent hours assembling them, days staining them, and paid twice as much. And when we moved this summer it was a total jigsaw to disassemble and move. Glad I found you when I did to avoid stuff like that in the future.
Angela (not verified)
Fri, 09/03/2010 - 10:02
Thank you for adding our
Thank you for adding our pictures to your post. My daughter is home sick today and you just brought the first smile to her little face. We could never have done it without your plans. You just make it sooo easy to build.
Maureen (not verified)
Fri, 09/03/2010 - 10:23
LOVE how simple you made
LOVE how simple you made this!! I think I can handle four ladders! :) Thanks for letting us in the "secret vault" for a peek. I know I will be first in line for any future books!!!
Ana White (not verified)
Fri, 09/03/2010 - 11:10
Angela, thanks for sharing
Angela, thanks for sharing your amazing photos!
Lou (not verified)
Fri, 09/03/2010 - 11:28
Just bought these at the
Just bought these at the ickier(sic) store last weekend. I put it together in about an hour and a half but 30 minutes of that was because the predrilled hole was crooked. If I had these plans and a bit more space who knows?
Amanda (not verified)
Fri, 09/03/2010 - 12:06
Ack! I'm kicking myself for
Ack! I'm kicking myself for buying bunk beds last week! This is exactly what I wanted for my girls but everything like this is way too expensive for what it is!!
maybe next time...
Ronda Roo Simon (not verified)
Sat, 09/04/2010 - 00:58
I just love your blog....I am
I just love your blog....I am actually getting my husband to build these beds for the guest room for the grandkids...thank you...
corinne (not verified)
Sat, 09/04/2010 - 04:36
These are awesome! Thanks
These are awesome! Thanks for sharing from the "vault". They will be in our house soon:)
MeganF (not verified)
Sat, 09/11/2010 - 15:33
Hey Ana- husband printed the
Hey Ana- husband printed the shopping list and bought all the wood for these today. He began putting them together and SWEARS he will need to buy more wood- that the shopping list is off. I told him he was full of it- Ana is NEVER wrong ;). but in case I am wrong- might you take a look at it and make sure? if you have a moment.... thanks!
Crystal B (not verified)
Thu, 02/23/2012 - 12:19
There are two cuts missing from the cut list.
You do need a tad more lumber. The cut list does not include the front top side rails, next to the ladder opening. You need two 1" X 3" X 64" boards to finish the front section. And of course, the lumber for the slats is not included in the shopping list because you are supposed to figure that out based on your mattress manufacturer instructions.
The only problem I've encountered thus far as I'm building it is after I checked and rechecked, I still missed the top two rails that weren't listed. This is my first build, so I'll forgive myself for having to go back to the lumberyard for a second trip this time. ;o) (I'm a perfectionist! Haha.)
In reply to Hey Ana- husband printed the by MeganF (not verified)
claydowling
Thu, 02/23/2012 - 13:09
Never trust a cut list
Never trust a takeoff (a.k.a. shopping list) that you didn't vet yourself. The cutlist is only really useful for production environments anyway. Not one-offs, you'll always have modifications that you make as you build.
mrclever80
Wed, 12/21/2016 - 10:37
You are correct in that your
You are correct in that your husband would be short on the 1x4s. Cant make 8 - 1x4s at 80.5" with only 7 boards.
Ana White (not verified)
Sun, 09/12/2010 - 09:30
Hi Megan, it's entirely
Hi Megan, it's entirely possible that i am wrong :) I'll take a look. Make sure you cut the longest boards first to use up all of your lumber. Can't wait to see this built!
MeganF (not verified)
Sun, 09/12/2010 - 09:47
thanks Ana. Ill let you know-
thanks Ana. Ill let you know- and will post pictures when they get done. the man is working lots of OT in the next month, so I dont know how soon it will be. And speaking of the man- in all his awesomeness, he is even routing out the part on the ends where the cross boards meet the legs so they will fit together!
clarson27 (not verified)
Sat, 09/18/2010 - 09:33
One definitely needs
One definitely needs significantly more wood than is listed in the shopping list. Just an FYI.
Ana White (not verified)
Fri, 09/24/2010 - 19:11
And check out what Megan's
And check out what Megan's husband built and posted on our FB page!
ShellyinWI (not verified)
Mon, 09/27/2010 - 10:20
"Make sure you cut the
"Make sure you cut the longest boards first to use up all of your lumber." Guess we should have read the comments a little more carefully! :)
We built these bunk beds this weekend! Our first project. We learned a lot (above plus... square IS important!) and they turned out great! Two of our boys (we have five) slept in them for the first time last night. I need to stain/paint them and then I'll send in a picture!!
Thanks Ana for such an awesome site!!
Halogen Moon (not verified)
Tue, 09/28/2010 - 15:37
You'll need 5 more 8' 1x4's
You'll need 5 more 8' 1x4's than what are listed to complete the rails. Also don't forget that the list above does NOT include the 1x3's for your slats. You'll need a ton of them!
Halogen Moon (not verified)
Tue, 09/28/2010 - 15:38
Oh, I thought i'd also let
Oh, I thought i'd also let everyone know that this project costs just at $100 including screws, nails, glue, and lumber. Spring for a kreg jig jr to make it even easier, it's only about $40. I used left over paint so that's not figured in to the above costs.
Ana White (not verified)
Tue, 09/28/2010 - 18:38
Thanks so much for taking
Thanks so much for taking your time to come back and give feedback! Much appreciated!
Jodie (not verified)
Mon, 10/11/2010 - 17:21
Can this be made into a
Can this be made into a full/full bunk? Love this and your site!!
magali03050811
Wed, 05/21/2014 - 23:34
Did you ever get a reply?
Hi, I just came across your question. I'm looking into making the full over full bunk beds and was wondering if you ever got any feedback.
Samantha (not verified)
Thu, 10/21/2010 - 08:19
I am IN LOVE with these
I am IN LOVE with these plans. My only problem is my girls have double beds. I am thinking my husband might be able to make the changes, but I thought I would check if you already have those plans somewhere?????
Love your work Ana
Brian and Jody (not verified)
Sat, 10/30/2010 - 03:39
Can you post dimensions/cut
Can you post dimensions/cut list/shopping list for this plan, but tailored for a toddler bed mattress? Great site and we wish you all the best!
Matt (not verified)
Sun, 11/07/2010 - 16:09
I started assembling this
I started assembling this today. The plan calls for 7 1"x4"x10'. You need 10 total. Also the cut sheet does not include the 1"x4"x64" boards required for the front on the upper bunk. Personally, I modified the plans by increasing the length by 2 1/8 inches and increased by bottom height from 8" to 10 3/8". This is to accommodate a trundle (http://images.lowes.com/animate/ExtTrundle.pdf). So far the project is going pretty well. A good mitre saw is a MUST. I'll post back when I'm done.
Chelle (not verified)
Sat, 12/04/2010 - 14:05
I think we are going to be
I think we are going to be tackling this project in January. I'm a bit concerned about the 3" space between the bars, my kids flip and flop like crazy in their sleep. Has anyone tried modifying this for four rails across the top instead of three? And I'm thinking four on the bottom to make it match. By my calculations, that would make the space between the rails 1.25" (I think). Just wondering what it would look like and if anyone else had this concern.
Matt (not verified)
Fri, 12/24/2010 - 17:54
Definitely needed more wood.
Definitely needed more wood. Shopping list only lumber for 7 of the 8 uprights; shopping list and cut list did not include 1X4s for the top bunk bed rails; and also needed 3 additional 1X4s for end pieces. I was also careful to cut the longest pieces first and use the cutaway to make shorter pieces...that part worked out pretty well with fairly little waste.
BethAnn (not verified)
Wed, 01/26/2011 - 07:04
Just quick question. What
Just quick question. What type of bolt is anybody using lag or carriage? I'm hoping to be making these sometime in the next month. So excited.
Erin (not verified)
Sat, 02/19/2011 - 06:38
Do you think this could be
Do you think this could be made into a triple bunk in a standard height room?
Tyler (not verified)
Wed, 03/02/2011 - 08:18
Did you build these bunkbeds?
Did you build these bunkbeds? I came up with the same numbers for wood needed. What type of wood are you using and where did you purchase?
Marcelle (not verified)
Wed, 04/06/2011 - 15:00
definitely need more wood than shopping list
Started these today--bought the lumber yesterday. Getting ready to head back to the big orange store for more lumber to strap to my Ford sedan--my tall, tall husband is gonna love climbing through his window "Dukes of Hazzard" style AGAIN to help me get more wood. I read the list and the comments and have cut carefully, but there's just no way you can get 8 - 80" pieces from 7 10ft boards! It didn't click sooner--this is my second big project on my own and I'm loving it! The site is awesome. Thanks for all the info!
amanda.leonard
Mon, 05/23/2011 - 09:49
Project Completed
I also had problems with not enough 1x4 and had to make additional shopping trips. But otherwise, it went smoothly and turned out perfect.
http://uffdaprojects.blogspot.com/2011/05/project-bunk-beds.html
Brian (not verified)
Mon, 06/20/2011 - 13:22
Materials
Ok, We are getting ready to build these for my son and I have a couple of questions. 1st, What type of wood are you using? and 2nd, what settings are you using on the kreg jig?
Guest (not verified)
Sun, 07/24/2011 - 20:41
doesn't add up
I have triple checked and many of the measurements don't add up. An example is in step 6, do the math? Also if according to the sketch it show an inside measurement of 39 yet the cut list calls for the end slats to be cut at 37.5". Add it up 1" + 1' =+ 37.5 is 39.5", not 39? WTF?
gdayskippy (not verified)
Mon, 07/25/2011 - 14:48
Guest, If you look those
Guest,
If you look those measurements are based on wood not being true 1 x 3 and 1 x 4. Perfect example of this is:
http://mistupid.com/homeimpr/lumber.htm
So 37.5 + .75 + .75 = 39.
I have built a mod of these bunks with steps instead of a ladder and have not ran into issues other than figuring out the wood and cut list since adding steps. Pics to be posted soon.
Guest (not verified)
Mon, 07/25/2011 - 16:44
Right you are.
Like a fool I jumped to conclusions and looked on the net shortly after posting and found out what you are saying. Thanks for your swift response.
Beke (not verified)
Thu, 07/28/2011 - 06:50
Cut List Update
Ana -- could you put the updated cut list in a comment, I understand that people have needed more than you originally put in the initial directions but am unable to decipher exactly what the differences are. This is to be my first project so please take pity on a newbie! Thanks so much, you are such an amazing woman!!!
Adam (not verified)
Fri, 11/11/2011 - 12:16
Hi Ana! Your website is
Hi Ana! Your website is great. Would I be able to download your sketchup model of the classic bunk beds? I, too, am a sketchup fanatic and am looking to build some beds. Thank you!
Ulmcrew (not verified)
Sat, 03/10/2012 - 13:23
LOVE THIS BUNK!!! We made two
LOVE THIS BUNK!!! We made two of your twin size storage beds and now we're planning to make these bunks! Love your site and I love how simple you make these projects look! Such detailed plans and so stylish! Thanks!!!
Guest (not verified)
Wed, 03/21/2012 - 07:03
Super annoyed. After I told a
Super annoyed. After I told a friend I'd help her build these, and gave her a price based on the shopping list and she saved up the money to do it, I went and bought lumber and it's not even close to enough. You say to buy 7 1x4s and the cut list requires 10 just for the long cuts, not even counting the side bars. And not listing the 1x3 slats is annoying too Now I have to break it to my friend that she needs another $30 or so. The first complaints about it being wrong were two years ago! Why was it never fixed? I e run into this on many of your plans and honestly? I think you do it on purpose so you can say " make this for under $100!" or whatever price but really your shopping list may be under $100 but your shopping list omits major components.
--A former fan
dananryan
Wed, 03/21/2012 - 08:13
Wrong attitude!
If you are not able to appreciate the FREE plans Ana posts out of the goodness of her heart and take into account that despite being wonderful and awesome, she is not perfect and may make the occasional mistake, you are not worthy of calling yourself a fan anyway!
In reply to Super annoyed. After I told a by Guest (not verified)
tracysmith
Wed, 03/21/2012 - 08:41
It's also why she states in
It's also why she states in ALL her plans to read through the comments as well. Mistakes happen. We all make them including you. Really bugs me when people complain about the plans, they're FREE!
Wantingtobuild… (not verified)
Wed, 06/13/2012 - 15:12
Love this...want to build it!!
So I have been shopping around for a bunk bed and I found your site. I am very impressed and very excited to build for my first time. I want to build this for my boys. So I have many questions 1) Is the list above corrected based on some of the errors read through out the log? 2) If I want to make the bottom a queen what measurements would I increase?
Hopefully someone can answer my questions. I am very eager to start and take the shopping list to my local home depot to price the entire project out! Thanks!! :)
J (not verified)
Sun, 07/29/2012 - 13:11
HI, I've been following you
HI, I've been following you and am amazed everytime you come up with some amazing idea. I've been thinking about bunkbed for my 2 boys and this just gave me the courage to make my own. Although I had a few questions and wanted to modify this piece a bit. Do you think you'd be able to help me out. I'm looking to get the exact look of the Industrial Loft Twin bunk bed from Restoration Hardware Baby and Child. I know that one is done in metal but I figured I could paint the wood that color to get that 'metal' look. Thanks.
bzzz61
Sun, 09/16/2012 - 09:33
Project Completed
We finished and absolutely love our new beds!
http://haphazardhollingsworth.blogspot.com/2012/09/bunk-beds.html
Jaclyn (not verified)
Sun, 12/30/2012 - 15:05
Made these into triple bunks
I couldn't find a workable triple bunk bed for my low ceiling house, so I took these plans and modified them. I'm sharing the link to my 3D sketch up model, but please be aware:
1) I didn't know sketch up until I made this model. I'm sure there are mistakes.
2) Not everything in this model will complete the bed. We are using Ikea beds parts for the slats and side rails to hold the mattress on top 2 beds. Nothing on the bottom.
3) Details on Ikea parts are: Qty 4 of Part number 117228. Qty 2 SULTAN LADE and Qty 3 SULTAN FLORVÅG
4) I used this mattress to maximum headroom. There is 30" for each bed space. 4" for the this mattress. Adjust as you need.
Link to the model:
http://sketchup.google.com/3dwarehouse/details?mid=e44a671397694471965b…
Jaclyn (not verified)
Sun, 12/30/2012 - 18:52
Made these into triple bunks
I turned this into a triple bunk using some key Ikea parts to support the mattress. Painting the pieces now.
Here's my SketchUp model:
http://sketchup.google.com/3dwarehouse/details?mid=e44a671397694471965b…
Please note, I didn't know SketchUp before I tried this so there *has* to be mistakes. Sorry.
Ikea parts used:
Qty 2 117228
Qty 5 117327
Qty 4 102267, 105163
Qty 2 SULTAN LADE
Qty 3 SULTAN FLORVÅG
**Also need bed rails as used in Malm Bed (http://www.ikea.com/us/en/assembly_instructions/malm-bed-frame__AA-1196…)
Bottom mattress sits on the floor. Final length 82.5" height is 74.5". Each bed has 30" space inclusive of the mattress you use, so that's why we choose this Ikea model lass than 4" tall.
LindsayL
Mon, 03/18/2013 - 13:46
Help Requested with cleats on Bunk Plans (from Book)
Hello!
I LOVE this site, the plans, the new book! I have quite a list of projects in queue!
I built the bunk bed in the book over the weekend... and ran into a problem when it came time for the cleats. After looking at these plans here, I think the same issue would arise... but I don't see any other comments noting this... so perhaps I'm the one missing something.
If you attach the side rails with 2 pocket hole joints per side on each side rail (attaching to the end rail), when you go to add cleats, the cleat would cover the bottom pocket hole on the front rail and the bottom side rail (in the back). If you did this, the bed would no longer disassemble.
Potential solutions include:
1) Not putting a screw in the bottom pocket hole but attaching the cleat as called for with glue and screws (and weakening the bottom - bad idea since the bunky board and weight of the bed's owner will be on this joint every night)
2) Only screwing the cleat and not gluing it to the side rail (weakening the joint and causing a very time consuming assembly of the bed since every screw will need to be removed from the cleat every time the side rails need to come off.
3) Shortening the cleat so it doesn't run the length of the bed but is long enough to allow the drill to get in and out from the pocket holes to remove the sideboard whenever the bed has to be removed (bad idea again for weakening the bottom supports)
So - 3 bad solutions. What am I missing?
My thought at this point is to replace the rails with new boards and drill 2 pocket holes very close together near the top of the board so the cleat can be glued and screwed as called for without interfering with the pocket holes. ?
Thanks for any ideas!
In reply to Help Requested with cleats on Bunk Plans (from Book) by LindsayL
Lady Goats
Mon, 03/18/2013 - 15:21
Cleats
Hi Lindsay! I'm sorry, I didn't read through the whole comment (I swear I have ADD) so I don't know if this was listed as an option, but, why don't you put the pocket holes above where the cleats would go?
I built the Lydia bed for the big kid and created the slat system totally separately (the slats are glued/nailed to the cleats, and the cleats are screwed into the bed), so to take the bed apart I unscrew the cleats, then un screw the pocket holes through the siderails into the head/foot boards.
Hope this helps!