


Modern bookcases that display and store. Works with our Mod Modular Collection.
Preparation
5 feet of 1×10 boards
1 Sheet of 3/4″ Plywood (for Staining) or 3/4″ MDF (for painting), cut into 15 1/2″ wide strips, 8′ long
2 – 2×2 Boards, 8′ Long
4 – 1×2 Board, 8′ Long
2″ Screws or 1 1/4″ Pocket Hole Screws
2″ Finish nails Wood Glue Finishing Supplies Edge banding for staining
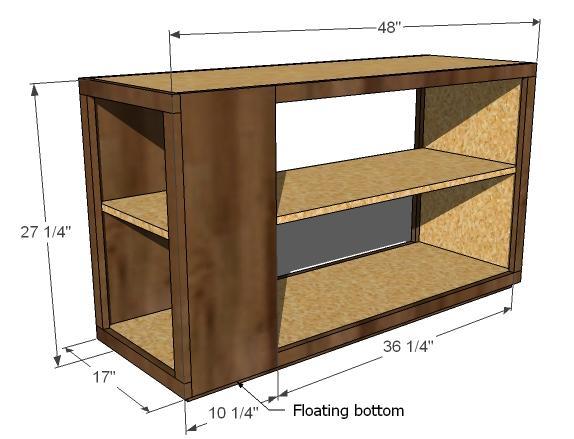
1 – 1×16 @ 47 1/4″ (Top) 1 – 1×16 @ 46 1/2″ (Bottom) 1 – 1×16 @ 24 1/4″ (Middle Divider) 1 – 1×16 @ 25 3/4″ (Closed End) 1 – 1×16 @ 37″ (Long Shelf) 2 – 1×10 @ 26 1/2″ (Small Shelf Sides) 1 – 1×16 @ 8 3/4″ (Small Shelf) 4 – 1×2 @ 37 3/4″ (Side Trim) 4 – 1×2 @ 23 1/2″ (Closed End Trim) 2 – 1×2 @ 17″ (Small Shelf Trim) 2 – 2×2 @ 46 1/2″ (Floating Base Sides) 2 – 2×2 @ 12 1/2″ (Floating Base Ends)
Have your hardware store cut your plywood into three 15 1/2″ wide strips, 8′ long. These boards will be called 1x16s throughout this plan (and this entire site) and all scraps can be used for any plan calling for a 1×16 board.


Instructions
Step 1

Build the Box
Measure the joints and mark out on all boards. If you are using a Kreg Jig™, drill pocket holes (you will need 1 1/4″ pocket holes screws). If you are using 2″ wood screws, predrill screw holes. Add glue and screw together.
Step 2

Large Shelf
The large shelf can be either held in place with shelf pins for an adjustable shelf or you can create a fixed shelf. For shelf pins, drill holes that match your shelf pins. For fixed shelves, attach the shelf with glue and screws as you did the box.
Step 3

Small Shelf Sides
Use 2″ finish nails and glue to attach the small shelf sides to the open end of the bookshelf. Leave 3/4″ under the bottom shelf, as shown in the diagram.
Step 4

Small Shelf
Add the small shelf with either screws and glue or drill shelf pin holes for an adjustable height shelf.
Step 5

Step 6

Closed End Trim
Attach the closed end trim to the closed end. Also, if the shelf is not fixed, attach to the shelf. Use 2″ finish nails and glue. If you are using a Kreg Jig™, build your face frames separately, then nail the entire face frame on as a whole.
Step 7

Small Bookshelf Trim
Attach the bottom and top trim to the small bookshelf. Use 2″ finish nails and glue. If you are using a Kreg Jig™, build the face frame first, then attach the entire face frame using 2″ finish nails and glue.
Step 8

Small Shelf Side Trim
Attach the small shelf side trim with 2″ finish nails and glue. If you choose to use fixed shelves, also nail into the fixed shelves for added support.
Step 9

Floating Base Sides
Use 2″ screws and glue to attach the floating base sides to the bottom.
Step 10

Floating Base Ends
Finish the floating base by attaching the final pieces to the bottom with 2″ screws and glue.
Comments
Dharma (not verified)
Fri, 09/10/2010 - 02:18
Love this bookshelf. Love
Love this bookshelf. Love West Elm. Love everything you do!!! XOXO
safetyglasses (not verified)
Fri, 09/10/2010 - 03:20
Alright - enough pics of
Alright - enough pics of those cute kids. when do we get to see some pics of your RAM?
Dynamic Duo (not verified)
Fri, 09/10/2010 - 03:22
THANK YOU THANK YOU THANK
THANK YOU THANK YOU THANK YOU, Ana!
More modern! More adult! I'm loving your decision to broaden things and look into the West Elm modern-style. Keep these coming! Looking great. Even though I don't have a place or a need for this in my house, I might try to find a friend who really wants it, so I have an excuse to build it!
Leah (not verified)
Fri, 09/10/2010 - 04:24
woot! thanks for such a
woot! thanks for such a stylish modern piece!
Viola (not verified)
Fri, 09/10/2010 - 06:34
I really like this piece Ana.
I really like this piece Ana. Made me think of all sorts of ideas. Thank you again for all that you do.
Ana White (not verified)
Fri, 09/10/2010 - 08:03
LOL! He's pretty cute too :)
LOL! He's pretty cute too :)
Susan W. - MS (not verified)
Thu, 09/30/2010 - 08:09
You have such a wonderful and
You have such a wonderful and inspirational site!!! I just love it....
-susan w - ms
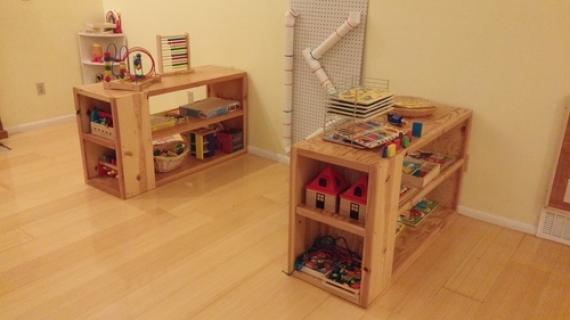
StagsHome
Mon, 01/20/2020 - 09:08
Inspired my sofa table!
Absolutely love these modular plans!
I made some modifications and actually made this into a sofa table or "runner"—not too sure what they call them—for behind the couch. The shelving on the sides stores decor and magazines and the top makes a new home for decor that otherwise had no home.
I opted to make mine out of only solid pine at the expense of being limited to 10 inches wide without additional joinery.
Thank you for the inspiration! The wife was begging for a sofa table for over a year!
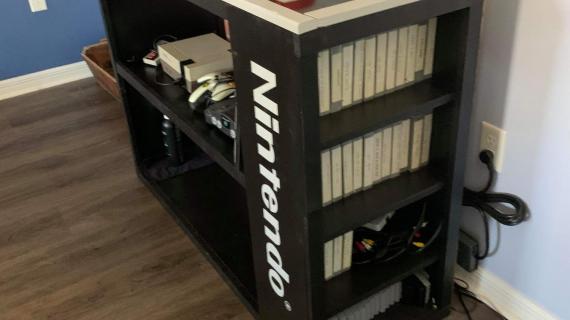
Gena Elmore
Sat, 01/23/2021 - 08:21
The beauty and ease of this makes the possibilities endless
I'm married to a child! Haha he wanted a console to go in his vintage game room after seeing one online. I made it taller to fit his demands 😉 and added more shelves to store more games. It turned out PERFECT! So easy to do, but im def going to paint my pieces before assembly from now on, I did that once on a previous project and it makes a world of difference :) He cant stop bragging about it and that makes me a happy wife :)
P.S. this is my first post even though it was my 6th project from Ana, and I'm not sure how to post pics :)