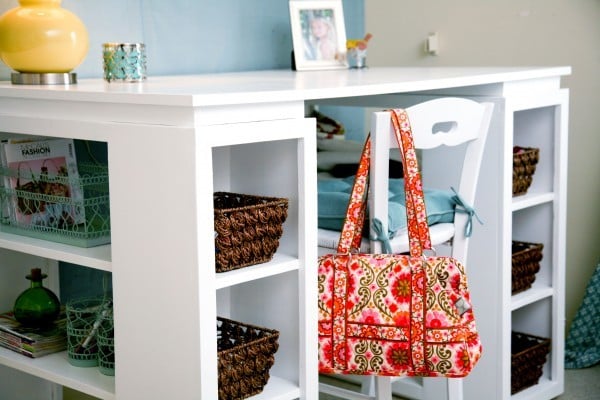


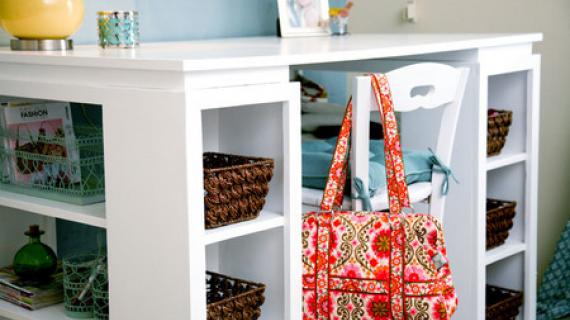
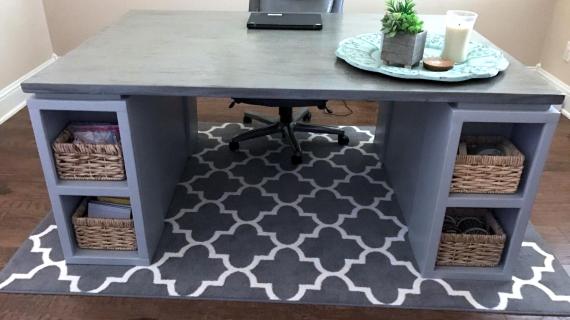
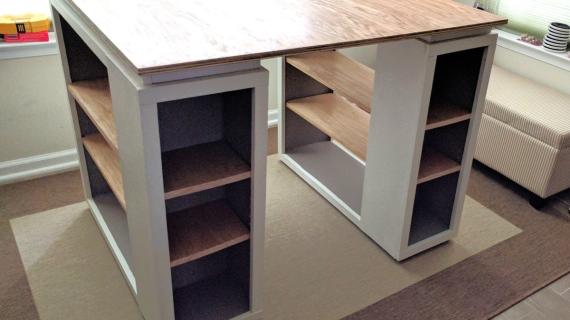
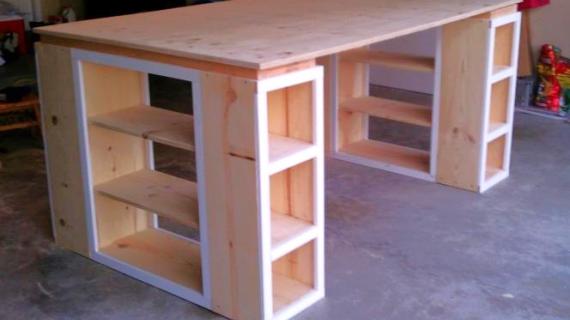
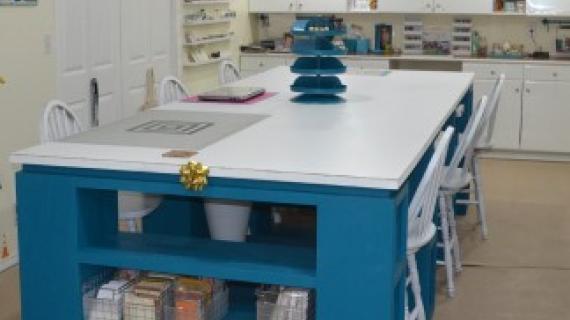
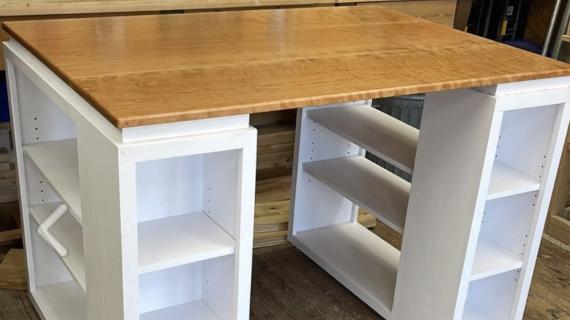
Build your own project table or craft table with free plans from Ana-White.com
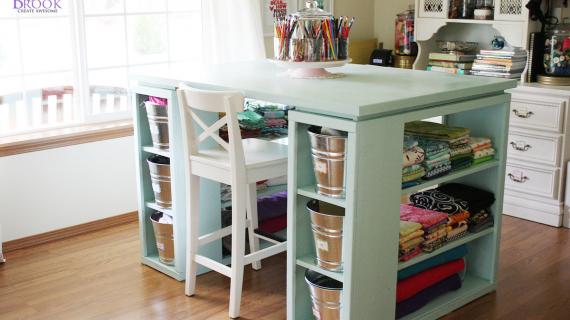
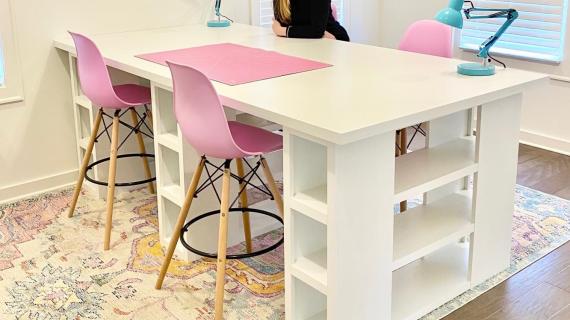
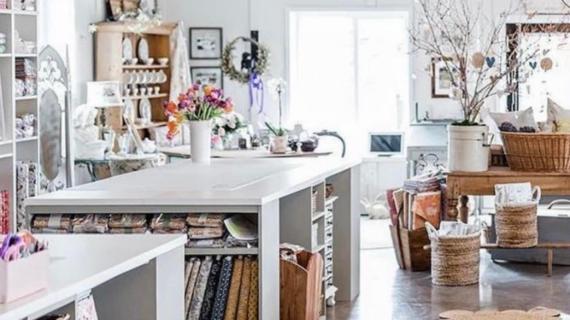
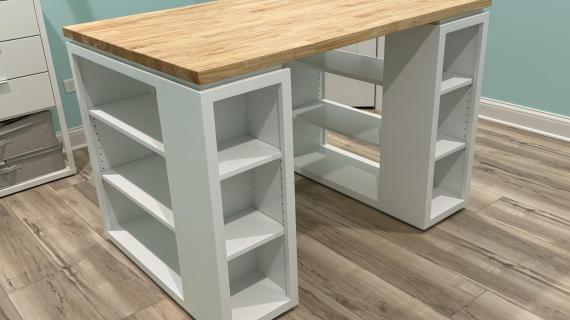
Features lots of open storage, a large desktop perfect for crafts, seating on both sides, and a modern design.
Step by step plans with diagrams, shopping list and cut list, all free!
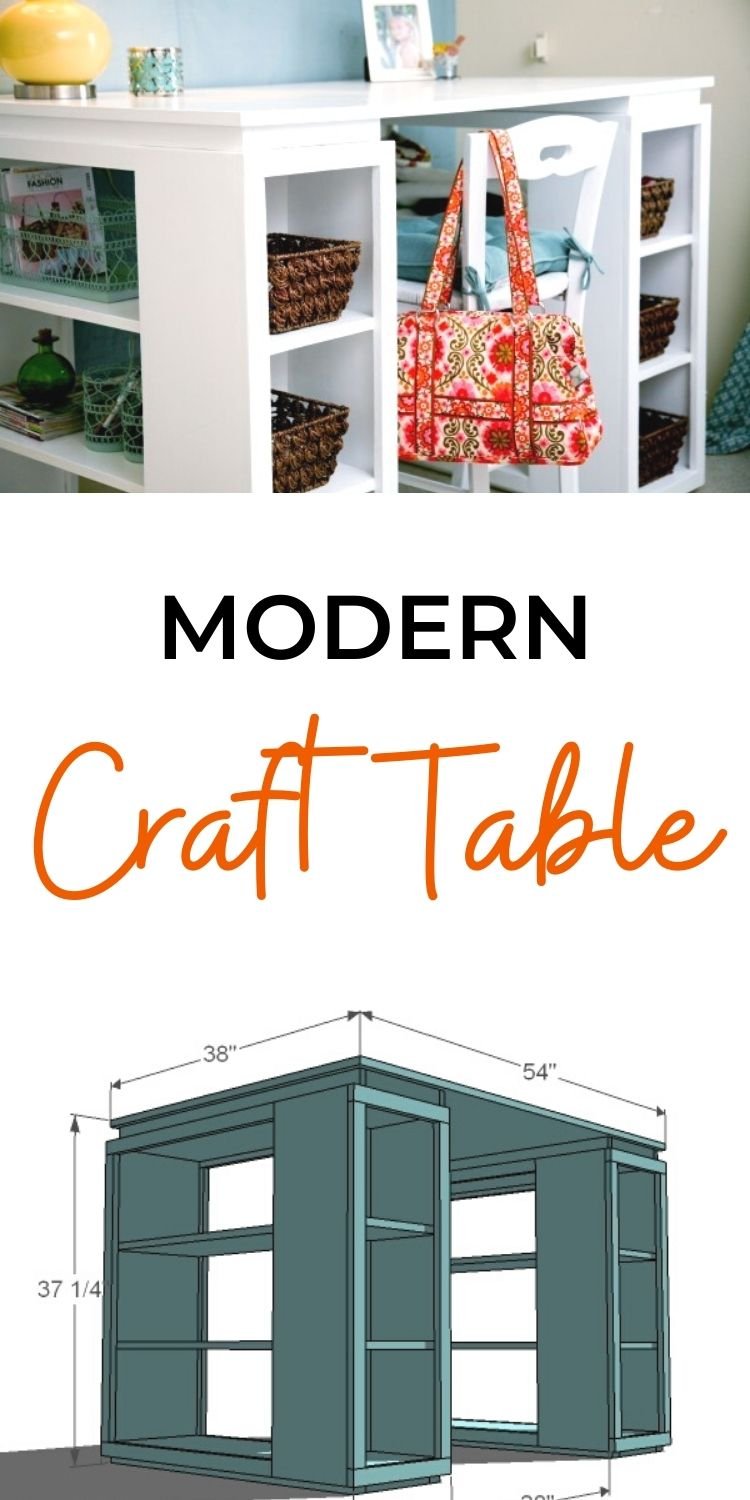
Pin For Later!
Preparation
- 1 – Sheet of 3/4″ Plywood or MDF (Can use 1/2 sheet, tabletop will be 6″ narrower) for the tabletop
- 3- 8′ long 1×12 (Tops and Small Shelves/Two Large Shelves and One Bottom)
- 1 – 12′ long 1×12 (Ends, Dividers)
- 1 – 12′ long 1×10 (Small Bookshelf Sides)
- 7 – 8′ long 1×2
- 2 – 8′ long 2×2
- 1-1/4″ brad nails
- 2″ Screws or 1 1/4″ Pocket Hole Screws
- Wood Glue
- Finishing Supplies
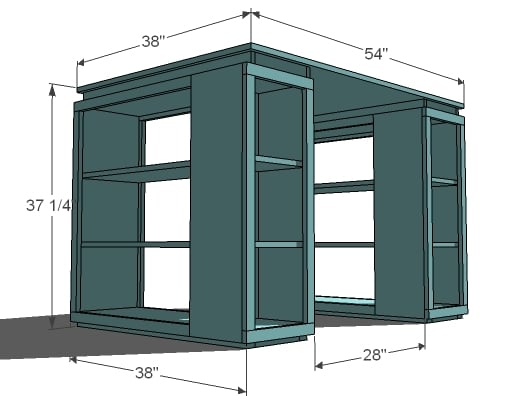
Cut List for Project Table (Two Bookshelf Bases and One Top)
- 2 – 1×12 @ 37 1/4″ (Bookshelf Tops)
- 2 – 1×12 @ 33 1/2″ (Bookshelf Ends)
- 2 – 1×12 @ 32″ (Bookshelf Divider)
- 2 – 1×12 @ 36 1/2″ (Bookshelf Bottom)
- 4 – 1×12 @ 27″ (Large Shelves)
- 4 – 1×10 @ 34 1/4″ (Small Bookshelf Sides)
- 4 – 1×12 @ 8 3/4″ (Small Shelves)
- 8 – 1×2 @ 27 3/4″ (Large Shelf Side Trim)
- 8 – 1×2 @ 31 1/4″ (End Trim)
- 4 – 1×2 @ 13″ (Small Shelf Top and Bottom Trim)
- 4 – 2×2 @ 36 1/2″ (Floating Base Sides)
- 4 – 2×2 @ 8 1/2″ (Floating Base Ends)
- 1 – 3/4″ Plywood or MDF @ 38″ x 54″ (Top) (For 1/2 sheet of plywood, top is 38″ x 48″)
- 4 – 2×2 @ 10″ (Floating Base Ends)
- 4 – 1×2 @ 36 1/2″ (Floating Base Sides)


Instructions
Step 1

Begin by measuring and cutting all your boards. Mark out all joints before any assembly. If you are using pocket holes, drill all pocket holes. If you are using screws, drill pilot holes. Attach the pieces with 2″ screws and glue or 1 1/4″ pocket holes screws and glue. Keep outside edges flush. You can optionally attach the shelves (orange) with shelf pins to create adjustable shelves
Step 2

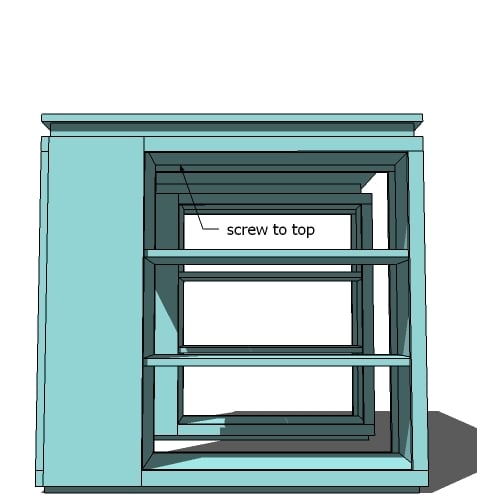
This is where that nailer would be handy. Attach with glue and 2″ finish nails the small bookshelf sides. Leave 3/4″ under the bottom and make sure you also attach to the center divider (Back of small bookshelf).
Step 3
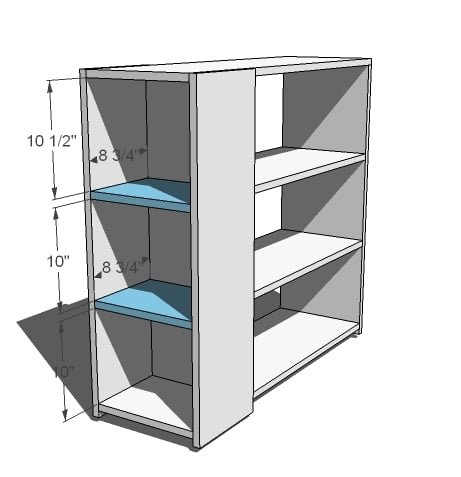
You can either place these shelves with shelf pins or use finish nails and glue to secure in place.
Step 4
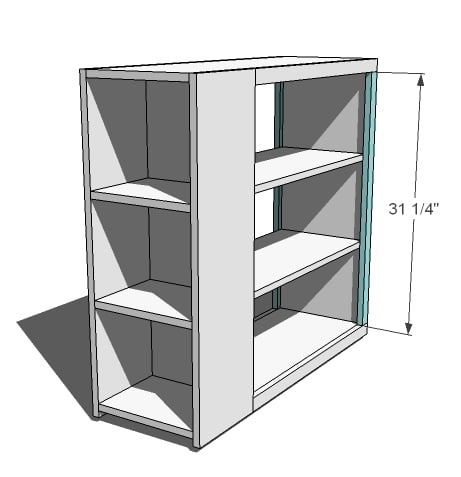
Attach the large shelf trim to the sides, keeping top edges flush, with 2″ finish nails and glue. If you are using a Kreg Jig™, build a face frame separately, then attach with 2″ finish nails and glue.
Step 5
Step 6

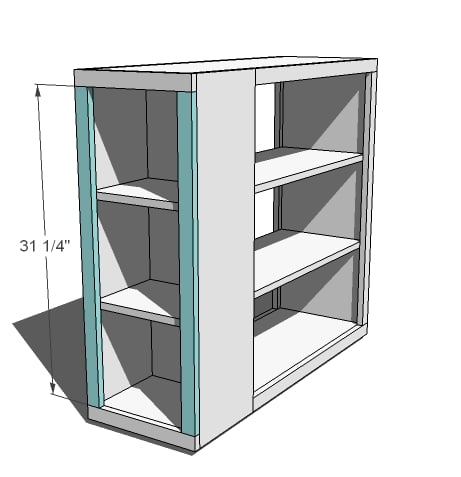
If you are using pocket hole screws, build your face frame separately, then attach with 2″ finish nails and glue. Otherwise, nail the trim on with 2″ finish nails and glue.
Step 7
Attach the small shelf side trim with 2″ finish nails and glue.
Step 8
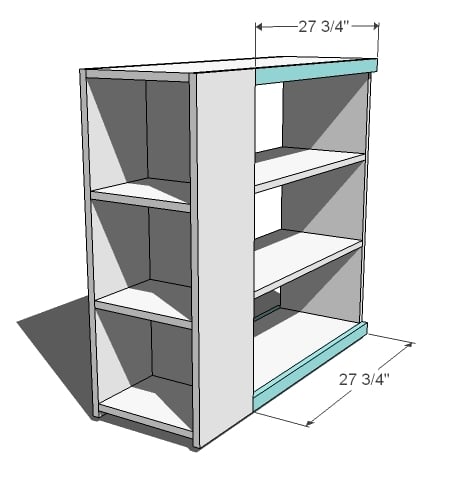
Use 2″ screws and glue to attach the floating base sides to the bottom of the bookshelves.
Step 9
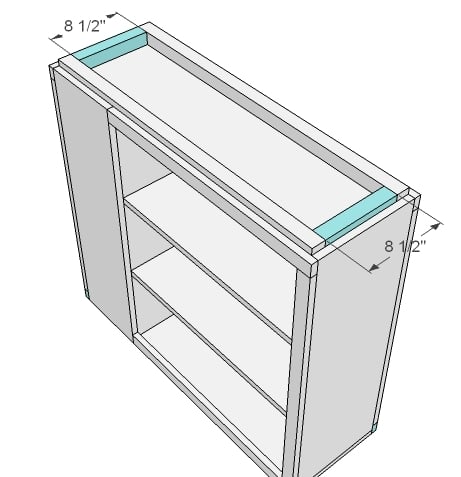
Attach the floating base ends to the bookshelf with 2″ screws and glue.
Step 10

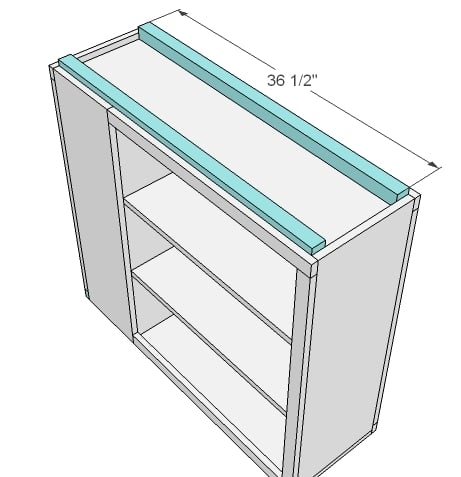
Use 2″ screws and glue to attach the floating base ends to the underside of the tabletop. See measurements above for placement.
Step 11

Attach the floating base sides to the ends with 2″ finish nails and glue.
Step 12
From the underside of the bookshelves, screw into the floating base with 2″ screws. You may wish to finish the edges of the tabletop with edge banding or nosing for a more finished look. Finish as desired.

Comments
jojabis (not verified)
Sun, 09/12/2010 - 22:28
we had been just toying
we had been just toying around with the idea of this very thing for my bother-in-law thank you
rcasbeer (not verified)
Mon, 09/13/2010 - 03:54
After the low bookcase was
After the low bookcase was posted last week, I was trying to think of how I would build it with three shelves and a little shorter. This is perfect. Thanks!
Ana White - Cr… (not verified)
Mon, 09/13/2010 - 04:03
[...] White - Craft Table Two
[...] White - Craft Table Two Has anyone else seen this? How to Build a Modern Project Table Ana is amazing! __________________ Diana Blessinger [...]
megnstuff (not verified)
Mon, 09/13/2010 - 05:29
i wish i had room for a table
i wish i had room for a table like this... maybe the kids wouldn't mind if i took over their play room!
CreativeCarol (not verified)
Tue, 09/14/2010 - 11:16
If I put this on casters
If I put this on casters would I need to reduce the height of the table a bit or wouldn't it matter?
Build The Ulti… (not verified)
Wed, 09/15/2010 - 11:12
[...] today is because a few
[...] today is because a few days ago she shared a project that is a crafters dream! She calls it the Mod Modular Office Collection Project Desk, my sewing friends and I call it The Ultimate Crafting Table! So if you have a handy hubby, dad, [...]
Bedford Projec… (not verified)
Mon, 01/17/2011 - 03:00
[...] of my favorite blogs,
[...] of my favorite blogs, Shanty 2 Chic took the challenge on Ana-White.com (another one of my faves) to make her own craft table for her [...]
Kristen Peterson (not verified)
Mon, 01/17/2011 - 22:04
This is so cool! I have not
This is so cool! I have not done a lot of DIY so this sounds a bit tricky, but with a handy boyfriend and your helpful schematics, I think I can do it! Knock off decor sent me over to this link and I think I'm going to find some amazing projects to do! Thanks for sharing you advice!
Make your own … (not verified)
Sat, 01/22/2011 - 11:17
[...] if Pottery Barn had
[...] if Pottery Barn had their version, the knock-offs had to be out there too. And there were, even plans to make your own from (the possibly a wood-working genius) Ana White. But the knock-offs (even the really cool [...]
Craft desk too… (not verified)
Wed, 03/02/2011 - 08:10
[...] in Brag Blog,FEATURED
[...] in Brag Blog,FEATURED Put on my TO-DO List Save as PDF Print this PostShare/Bookmark Builder: Cherish Fiedler Experience Level: Absolute Beginner Estimated Cost: 150.00 Estimated Time Investment: 1 day From Plan: http://ana-white.com/2010/09/and-the-craft-table-too.html [...]
Liz (not verified)
Thu, 03/03/2011 - 10:30
I love this project and need
I love this project and need a table like this.
I was wondering if there's a way to have a see-thru top?
so I could shine a light up to make tracing patterns easier.
any suggestions?
In reply to I love this project and need by Liz (not verified)
dan-k
Fri, 04/08/2011 - 16:24
tracing table idea
I have three options for ya:
Buy a large smooth glass cutting board and jigsaw out a hole in the desktop to allow the cutting board to sit flush with the top. You'll have to build a ledges around the inside of the hole to support the cutting board at the right height.
A local glass company can sell you piece of 1/4" glass to cover the whole desktop. They will cut it to fit and polish the edges. You could then have a movable piece of the desktop that would allow you to shine a light up from underneath. Think trapdoor on hinges.
Order a small piece of 1/4" tempered glass to use to build a stand alone lightbox.
Yes you could use plexiglass, but it will get scratched and cloudy over time.
JoyofBaking
Wed, 03/23/2011 - 07:34
The New Ana-White.com is AMAZING
I LOVE THE NEW SITE AND I CANNOT BELIEVE YOU TOOK CHARGE AND DID THIS ALL YOURSELF!!!
Seriously, I love this. I finally joined and am now putting together my to-do list. Thank you SO MUCH for providing this wonderful resource. It means so much.
Guest (not verified)
Fri, 04/08/2011 - 15:01
Shelving space
Does anyone know if the fabric drawers that you see at Target, etc. will fit on these shelves?
Guest (not verified)
Mon, 06/06/2011 - 06:05
My New Craft Table!!
Just went to Home Depot yesterday, bought all the materials needed & cut all the boards, can't wait to put it together today! Will post pictures of it later! :) Though we may be making a few modifications on a table I had seen that looks just like it, but with a few different ideas!
CourtsRae (not verified)
Thu, 08/02/2012 - 17:41
Home Depot loves us!!
I see your post was from a year ago. We just went to Home Depot today and bought all the supplies!! Can't wait to get this started. Anyone have ideas of where to get a cute chair like those shown?
townsean
Sun, 08/28/2011 - 17:51
Great craft table plan
I think this is going to be the first project I try to build. I'm super excited, yet very nervous @_@
Guest (not verified)
Wed, 12/21/2011 - 13:56
Craft table
Can you people give me an idea of the cost of all materials to get table finished? my craft room looks like a mess and I think this table and some shelf are going to be the solution to my headaches :)
thx
Margaret Kubiszyn (not verified)
Wed, 01/25/2012 - 16:43
You can take the materials
You can take the materials list and go to lowes.com and price it out pretty quickly!
sewserious
Wed, 01/25/2012 - 13:41
Craft Table -- could I easily make it 30" wide?
Would this be easy to modify to make it 30" wide instead of 38"? I'll be using it for a cutting table, and don't really need it to be 38".
dgwheeler24
Thu, 02/06/2014 - 15:16
width
I know its been a while since you commented, but if you make it at the 54"x38" it will be perfect for the large cutting mats sold at Joann's Fabric. The cutting mats are 54" x 36".
dgwheeler24
Thu, 02/06/2014 - 15:17
width
I know its been a while since you commented, but if you make it at the 54"x38" it will be perfect for the large cutting mats sold at Joann's Fabric. The cutting mats are 54" x 36".
Guest (not verified)
Sat, 03/03/2012 - 13:40
Anyone come up short on boards?
My husband went to Lowe's this morning and got to work cutting. We ended up short on a couple boards. Anyone else have this problem?
claydowling
Sat, 03/03/2012 - 17:19
Happens
The first rule is that you should never trust a cut list/shopping list that you didn't come up with yourself. I also try to add on 20% to the materials buy to account for waste.
MaryT19 (not verified)
Sat, 05/12/2012 - 21:29
THANK YOU SO MUCH!
This is exactly what I wanted for my craft table so I can store my fabric in bins on the sides and maximize my space! Thank you so much!
ShannonCloss
Sun, 10/07/2012 - 20:40
Hi there (Ana maybe!), I am
Hi there (Ana maybe!),
I am an Aesthetician and I love the crafts table. I was wondering if there is a way to cut out a "u" shape or even half moon so that if I were to be working with clients I want it to be comfortable to do manicures and such things. I don't want to lose out on any of that storage under the desk, that is really what caught my eye. I'm new to working with wood (very new) but I found your work inspirational for me and other women out there.
Thanks!
KimberlyS
Tue, 03/12/2013 - 10:13
Measure your 1x10s first!!
I loved this project and it was perfect for my sewing needs. I set out to build it right away. I purchased all the wood and made all the cuts according to the cut list. However when I started piecing it together I realized that my 1x10s measured 1/4"shorter than what the plan accounted for. So I had to go back and re-cut ALL my small shelves, the top and bottom, and the long piece that made the shelves floating. I decided not to shorten the table top and the long floating piece of the table top by 1/4" however. That was my choice, but technically it should have been done! Please be warned of this snafu as I was not too happy having to re-cut all my wood.
Also check to make sure that the purchase amount of wood will be enough. I followed the plans from the book and the amount of wood listed to buy was not enough! I had to go back and buy an additional 2x2, 1x12 and 1x2. I didn't have to purchase the full 8' but when I added up all the inches you needed for each of these sizes the number of inches needed was more than the total I had, not accounting for the loss you get from the saw blade and not being able to use all 8' of the board because of cut lengths, etc.
I hope this keeps at least one person from having to go back to the lumber yard and from having to re-cut your wood! Despite the hassle I love how my craft/sewing table turned out! I'll be doing more projects from this website, and the book for sure!
keithanna.sowell
Tue, 01/21/2014 - 12:42
I love the table but.
I love the table. My fiance and I will be making this table this weekend. I was wondering if you have the plan for that chair too. I love how it goes together. Thank you. :)
papabear
Tue, 07/29/2014 - 20:47
crafters desk
very nice
wannacraft
Wed, 02/04/2015 - 09:26
Help
I want to build this table and I am so green. How do you get the wood pieces so smooth.
Katlin Donnelly
Mon, 03/23/2015 - 20:45
Sanding. The tools listed
Sanding. The tools listed include a sander.
jamiejohnstone
Wed, 02/25/2015 - 11:07
Stool Height
Absolutely LOVE this craft table! How tall of stool would go best with this, Counter Height at 24" or Bar Height at 29-30"?
Apbling
Sun, 03/01/2015 - 12:20
Project cost - am I missing somthing?
Hi all. Just looking at the plans for this desk. The gf loves it so I sat down with a pen and paper and started to figure some things up. I was very surprised to see the actual cost of this desk to be sort of high. Am I seeing this right, but the only plywood piece is the top, the rest is solid wood. I looked today but at HD a oak 1x12 was about $6.50/ft. That puts the total cost of this desk much higher than the estimate. I was thinking of a way to use plywood, but I'd be adding veneer trim or solid wood trim all day long to make the ends look nice.
Anyway, does anyone have any hot tips on where or when to get cheap wood? I'm considering just getting a planer and ordering the wood and cutting it down to size.
scalpel_shredr
Mon, 03/02/2015 - 06:25
Project Cost
Unfortunately, Home Depot does not carry 1x10 and 1x12 in the cheaper wood in stores. You must go to Lowes. Lowes has 1x12x8 for roughly $8 and the 1x10x12 is the only expensive piece at about $23
Katlin Donnelly
Mon, 03/23/2015 - 20:25
You don't have to use oak,
You don't have to use oak, oak is expensive. Try using a less expensive wood, such as pine
Apbling
Mon, 03/02/2015 - 11:12
Ok I will check lowes. I am
Ok I will check lowes. I am assuming by cheaper board you are not talking cabinet grade oak but just what is referred to as "common" board? I'm not opposed to common boards, but they usually are not that straight and I worry about how well they will take stain.
sweet-2nd-chance
Tue, 03/24/2015 - 16:52
You could use select pine
You could use select pine boards or poplar boards. Both are less expensive than oak and much nicer quality than common boards and are readily available at Lowes or Home Depot. We've made furniture pieces out of common boards and structurally they are fine but they did take a little more work to find the straightest board and correct or work around imperfections in the wood. If you use store bought stain, common boards, select pine and poplar all take it just fine. If you are worried, use wood conditioner first. If you are using homemade stain like vinegar/steel wool stain, 2x4s and common boards turn a lovely grayish brown while nicer wood like select pine, Purebond plywood and maple plywood turn a strange black/gray in my experience.
Katlin Donnelly
Mon, 03/23/2015 - 20:22
This is a nice table and I'd love to make it.....
however, I had a couple of questions about it, used the "contact" tab to ask my questions and the e-mail was returned undeliverable.
In reply to This is a nice table and I'd love to make it..... by Katlin Donnelly
Ana White
Tue, 03/24/2015 - 06:30
I'm sorry, please direct
I'm sorry, please direct inquiries to anawhitesite@gmail.com
Katlin Donnelly
Tue, 03/24/2015 - 17:31
Checked on the lumber for this today.
It's going to cost $155 for just the lumber without the top. I'm rethinking this......
In reply to Checked on the lumber for this today. by Katlin Donnelly
Lady Goats
Wed, 03/25/2015 - 09:58
Lumber costs
would it be cheaper to get 2-3 sheets of plywood and rip it down to the sizes listed? What I mean is, instead of getting 1x10s and 1x12s, get a sheet of ply and rip it into 3, 1x12s and a 1x10 (or how many you'd need to get the among of wood listed).
In reply to Checked on the lumber for this today. by Katlin Donnelly
creationsbylarose
Mon, 08/08/2016 - 14:07
Reclaimed Wood
I realize it's been over a year since you posted this, but I couldn't help saying something. When you run into difficulty like this don't forget to check out the possiblities of re-using good pieces of reclaimed wood. I use pallets, barn wood and sometimes scrap wood from our local lumber yard. I then purchase only the large pieces that are needed, such as plywood etc to complete my projects. I really think this project could be done for less than your total of $155 if you could use reclaimed wood. Also, just as a tip, paint can be very expensive if you buy it right off the shelf. Shop around and find all the mistint or return paints at your local hardware or home improvement stores. I have found colors I would never have thought of but absolutetly love for usually 50% of the original price. Another saving tip, when you upgrade your office chair and are going to throw out your old, save the wheels. You may need them for another project down the road and will be happy you saved them. In other words, never stop crafting or building because something is too expensive....just look for an alternate way to build. I guess I'm taking forever to say "think outside of the box" to complete a project that at first glance seems too expensive. I hope this helps you or anyone else who reads this to re-think using new lumber ONLY and will encourage you to reuse that old dresser you were going to throw away, or pick up a pallet on the side of the road. You will be amazed at the results!
kkrummel
Thu, 09/03/2015 - 19:34
PDF not available
Is there any chance you could fix the link to the .pdf plans? Also, do you ever share your sketchup plans?
Thanks!
blanco_negro
Thu, 12/17/2015 - 11:38
no enough wood in directions!
Has noone brought up the fact that the plans tell you to get 2 8-foot 2x2s (196 linear inches) yet the cut list requires you to use 220 linear inches?
4 – 2×2 @ 36 1/2″ (Floating Base Sides) - 146 inches
4 – 2×2 @ 8 1/2″ (Floating Base Ends) - 34 inches
4 – 2×2 @ 10″ (Floating Base Ends) - 40 inches
146+34+40 = 220, which is over 18 feet. You only have 16 feet of 2x2. Has NO ONE noticed this yet? Am I missing something?
Joann6274
Wed, 03/30/2016 - 02:53
Sizes
Hi there Ana,
I was just wondering if you can clarify the sizes for me? You say that we will need 3-8' 1x12 for example... so I am taking this as we need three of the same size wood pieces ... but i'm assuming the 8' 1x12 is equivelent to 8 feet ..but what does the 1x12 mean? Can you please clarify for me? I want to make this but I want to get the right measurements and understand them.
Thanks!
In reply to Sizes by Joann6274
Ana White
Wed, 03/30/2016 - 22:00
Please take a look at our
Please take a look at our getting started, 1 x 12's actually measure 3/4"
thick by 11 1/4" wide. So it can be a little confusing. Please let me know
if you have any other questions after reading through the Get Started post.
http://www.ana-white.com/2012/12/get-started
HapETexanGal
Thu, 05/12/2016 - 15:19
Tweaked Plans
Is there plans for the tweaked version to follow and supply list? Thanks
creationsbylarose
Mon, 08/08/2016 - 13:56
This is amazing!
I love this desk as it has so much storage capability. I think that this desk has many varying uses for all types of crafters, artists, etc. Thank you Ana White for all your amazing and creative ideas! You give inspiration to all of us!
Luis Mezones
Fri, 09/23/2016 - 14:01
One of the best craft blog I've seen on the internet
Hello, God bless you and your beautiful family for being so generous and show as much useful information. Thank you
svandagriff
Thu, 03/07/2019 - 16:08
PDF LINK not working
Hello Ana, Love the YouTube videos!
My wife wants me to build this craft table for her, but I cannot download the PDF. The link isn't working. Is there another place it can be downloaded?