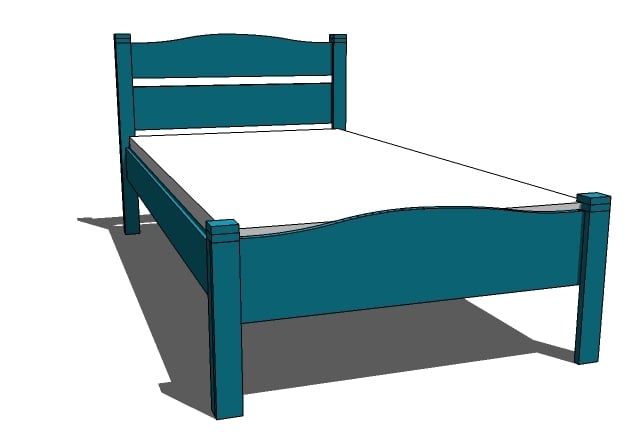


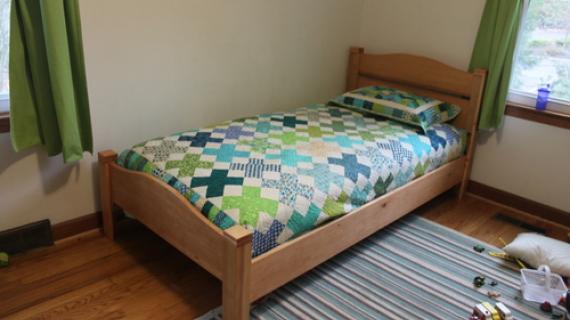
A simple classic pioneer style children's bed.
 The Pioneer Bed was inspired by a trip to a local roadhouse. Inside the roadhouse, a simple bed, much like this one, was on display. It made me think back 100 years, when beds were this simple.

What do you think? Do you love pioneer furniture as much as I do? Would you like to see plans for dry sinks, cupboards, and more simple furnishings? And when something is simple, it's often simple to build.

Preparation
2 – 1×6, 8′ Long
1 – 1×8, 8′ Long
1 – 1×10, 4′ Long
2 – 1×3 (DOES NOT INCLUDE OPTIONAL SLATS)
3 – 1×2
2″ Finish Nails
1 1/4″ Finish Nails
1 1/4″ Screws
Wood Glue
2 – 1×8 @ 40 1/2″ (Headboard Rails)
2 – 1×3 @ 33 1/2″ (Headboard Front Legs)
2 – 1×2 @ 33 1/2″ (Headboard Side Legs)
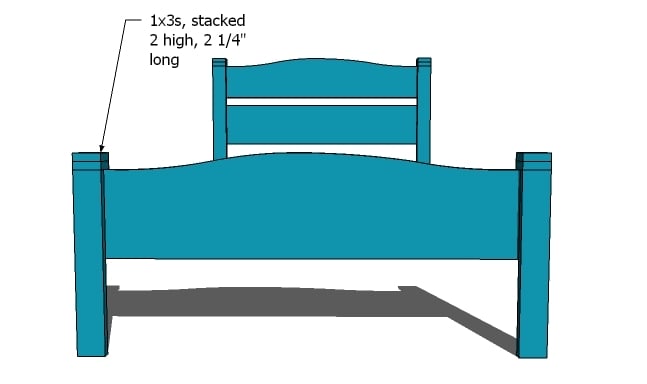
8 – 1×2 @ 2 1/4″ (Headboard and Footboard top trim)
1 – 1×10 @ 40 1/2″ (Footboard Panel)
2 – 1×3 @ 16 3/4″ (Footboard Front Legs)
2 – 1×2 @ 16 3/4″ (Footboard Side Legs)
2 – 1×6 @ 75″ (Siderails)
2 – 1×2 @ 75″ (Cleats)
15 – 1×3 @ 39″ (Optional Slats)


Instructions
Step 1

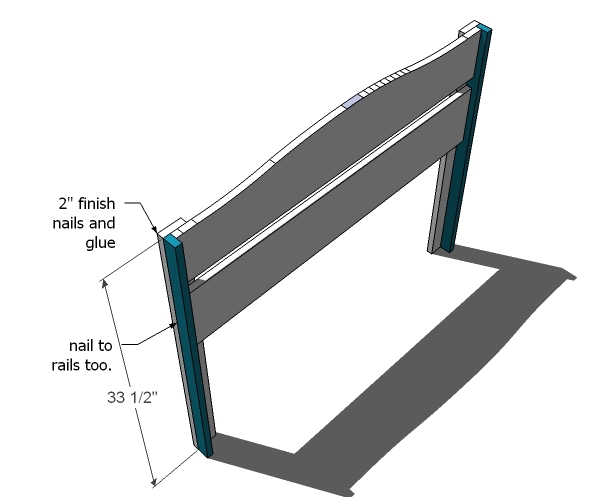
Headboard
From one of the 1x8s, mark out a gentle curved top. Carefully cut the top as shown in the diagram with a jigsaw. Sand the edge smooth, starting with coarse sandpaper, and working to fine sandpaper.
After you have cut out and sanded the top of the headboard, lay the two headboard slats (one is cut and one is not) on top of the 1×3 legs, leaving 3/4″ on the outside of the legs as shown in the diagram. TIP: Use the 1×2 leg board to guide you. Nail on with 1 1/4″ nails and glue. You can also use 1 1/4″ screws and glue.
Step 2
Headboard Sides
Attach the 1×2 legs to the sides of the headboard as shown in the diagram with 2″ nails and glue.
Step 3

Headboard Top Trim
Nail on each piece separately, with 2″ finish nails and gl
Step 4

Footboard
Build the footboard exactly as you built the headboard. Note that the footboard is a 1×10 instead of 2 1x8s.
Step 5
Step 6
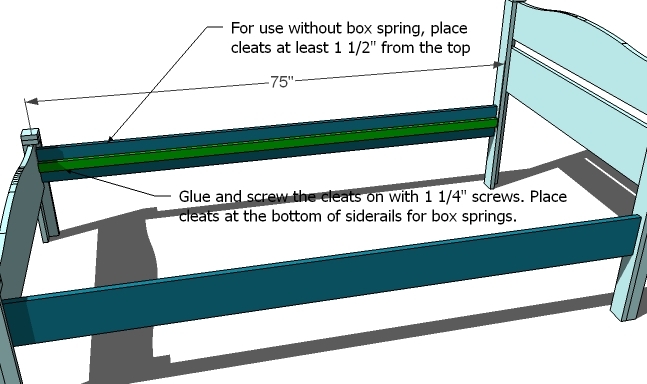
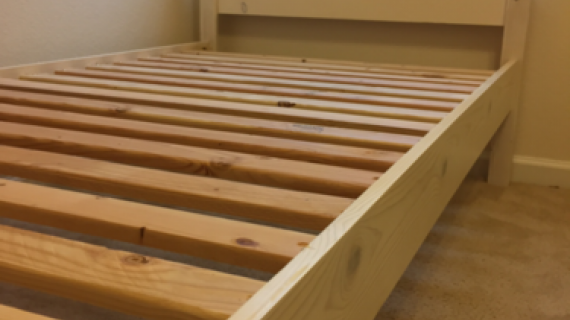
Siderails and Cleats
Use 1 1/4″ screws and glue to attach the cleats to the siderails. Position the cleats at the base for boxspring installation, or 1 1/2″ from the top for slat installation. Attach the siderails to the headboard and footboard with 2″ screws. You can also purchase metal brackets to make assembly / disassembly easier.
Step 7
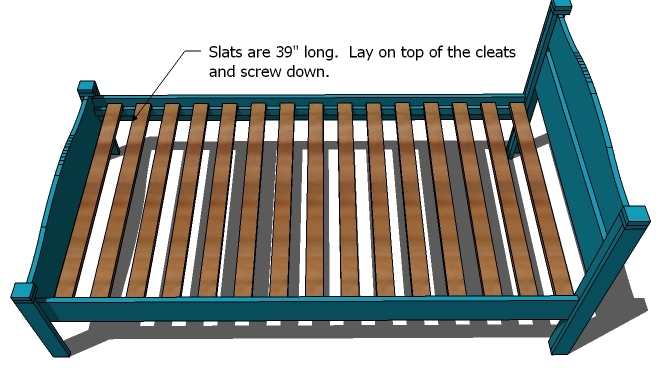
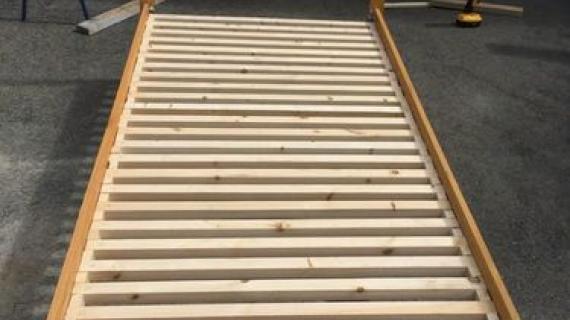
Slats
If you are NOT using a boxspring, lay 15 1×3 slats, spaced 2″ apart, on top of the cleats. Screw down with 1 1/4″ screws. Do not glue.
Comments
ildaura (not verified)
Fri, 09/17/2010 - 10:35
Love it!
Love it!
Megan in PCB (not verified)
Fri, 09/17/2010 - 11:41
We have a winner! I can't
We have a winner! I can't wait to make this for my daughter! I was having a hard time deciding which plan to use for her, but this one is IT. Thank you!!!
Silky (not verified)
Fri, 09/17/2010 - 13:00
I was thinking exactly the
I was thinking exactly the same thing! I've been planning to build a bed for my son when he outgrows his IKEA toddler bed and I was constantly looking at both the simple bed and the farmhouse bed trying to figure out which one is easier to modify.
This one doesn't need a lot of modification to fit our needs.
cjojo43789 (not verified)
Fri, 09/17/2010 - 17:07
You are making it hard to
You are making it hard to choose which bed to make for our twin boys's new beds!
ica171 (not verified)
Fri, 09/17/2010 - 17:52
I'd love to see more plans
I'd love to see more plans like this! This is probably my favorite twin bed plan so far.
Mr Green (not verified)
Sat, 09/18/2010 - 02:04
I really like the bed, simple
I really like the bed, simple clean and very good looking. My main concern is connection between headboard and bed frame looks a little weak. Of course could be beefed up quite easily. Might even suggest fixing headboard to wall.
My 2 cents
lwooters (not verified)
Sat, 09/18/2010 - 04:27
This is fantastic! I would
This is fantastic! I would love to see more plans that are from this era of furniture!
Ana White (not verified)
Sat, 09/18/2010 - 18:28
Hi Mr Green, definitely! If
Hi Mr Green, definitely! If you have a concern about the bedrail/headboard joint, rockler sells amazing bed rail fasteners systems that would do the trick. Thanks for commenting on this, I'm sure others have the same concern. :) Ana
Pam (not verified)
Thu, 10/21/2010 - 17:30
Ana-- We built this bed last
Ana-- We built this bed last week and LOVE IT! We are finishing it now. I'll be sure to post a photo when it's complete. We only had one discrepancy in the plans. In the cut list, it calls for "8 – 1×2 @ 2 1/4″ (Headboard and Footboard top trim)" but it should be 1x3's. We had cut the 1x2's but they were not correct. The 1x3's did the trick. Just wanted to make sure it's corrected for the next person using the plans! Thanks SO much! We are currently trying to decide what to buy with our $50 Lowe's card. So many projects that I want to do but can't decide which to start on! Prioritize, right???
Bianca (not verified)
Mon, 12/20/2010 - 07:37
I was wondering if you could
I was wondering if you could make a plan where the headboard and the footboard would be the same, therefore you could stack two or three of these together to make bunk beds or triple bunk beds.
Dustin (not verified)
Sat, 01/29/2011 - 15:23
READ COMMENTS FIRST :) I
READ COMMENTS FIRST :) I noticed the same thing as Pam...the 2 1/4 cuts should be for the 1x3s. I ended up having to rip out several finishing nails after I noticed the error. Happy building!