


Cute little cubes that stack and store!

For months, I've wanted to post plans for cubes that stack and hold tons of items. But I wanted to build them first, so you can see a photo with the plans. And they are just so adorable, I could use them in my office. But time doesn't allow.
 I really loved these, but I personally could never afford $365 per cube.
 Much less affording three of them to make a window seat.
Good thing we can build them.

This plan makes good use of scraps. So if you have some 1/4" plywood, 1x12s or 1x8s in smaller pieces, get your measuring tape out. If you don't, here is what you need

Preparation
6 feet of 1×12
26″ of 1×8 (for optional doors)
1/4″ Plywood
1×2 – 8′ Long
24″ of 1×3 (for feet, you can use a 1×2 but I like the chunkier look better of a 1×3)
2″ Finish Nails
1 1/4″ Finish Nails
2″ Screws or 1 1/4″ Pocket Hole Screws
2 – 1×12 @ 16 1/4″ (Sides)
2 – 1×12 @ 17″ (Top and Bottom)
2 – 1×3 @ 11 1/2″ (Feet)
1 – 1/4 Plywood @ 18 1/2″ x 16 1/4″ (Back)
2 – 1×2 @ 16 1/4″ (Face Frame Sides)
2 – 1×2 @ 15 1/2″ (Face Frame Top and Bottom)
2 – 1×8 @ 13″ (Doors, Optional
Please be aware that this plan uses 1x8s for the doors, and 1x8s can vary in width. I it is recommended that you measure your 1x8s first, and adjust the width of the interior of your cabinet to fit the doors with even gaps around the doors.


Instructions
Step 1

Handles
These have got to have handles! Measure and cut the handles out with a jigsaw. Prefer a rounded corner on the handles? Visit this post for instructions on how to do that. Just make sure the top of the handle is at least 1 1/2″ from the to
Step 2

Build the Box
I highly recommend using pocket holes to build your box. But if you do not have a Kreg Jig™, you can use finish nails with a nailer or 2″ screws and glue. All joints will be reinforced with a face frame and back.
Step 3

Feet
Use 1 1/4″ finish nails and glue to attach the feet. Notice how the feet do not overlap the sides.
Step 4

Back
Tack the back on with 1 1/4″ nails and glue.
Step 5

Step 6

Face Frame Top and Bottom
Finish the face frame by attaching the top and bottom with 2″ finish nails and glue.
Step 7

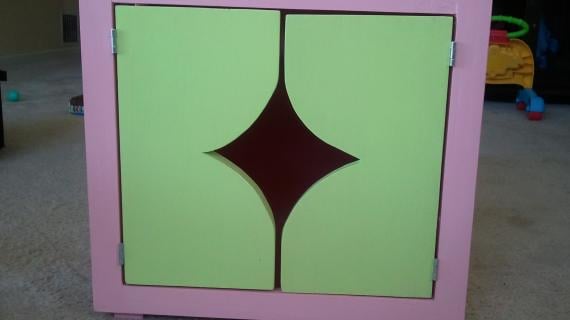
Doors
If you choose to add doors, use hinges to attach doors to face frame. Cut out shape as desired to act as a handle with a jigsaw.
Comments
megnstuff (not verified)
Thu, 09/16/2010 - 09:50
I think my baby girl needs
I think my baby girl needs these in her room- they are so cute. I can already imagine the shade of pink I will paint them... or maybe white on the outside and pink on the inside?! So fun.
lyndyjo (not verified)
Thu, 09/16/2010 - 11:41
Ana -- If you put three
Ana -- If you put three together as a window seat, would you put another board on top to make one continuous seat? Could I just upholster that one before attaching it? I think these are adorable! How can anyone afford to pay that much for cubes?
sydneyroo (not verified)
Thu, 09/16/2010 - 12:04
The same people who can
The same people who can afford a $130 teddy bear, apparently
Ana White (not verified)
Thu, 09/16/2010 - 14:18
Yes - so glad you asked!
Yes - so glad you asked! Just put a board on top and you got a bench. The height would be very close to standard 18" bench (and coffee table) height. Check out this site for more ideas on how you can use these cubes to make storage beds, room dividers, play tables, and so much more!
Ana White (not verified)
Thu, 09/16/2010 - 14:28
For a flat top, try this:
For a flat top, try this:

Silky (not verified)
Fri, 09/17/2010 - 05:07
They are wonderful. Ana, you
They are wonderful.
Ana, you are amazing! Too bad your site didn't exist when we furnished our son's room.
SJC (not verified)
Fri, 09/17/2010 - 13:40
I really want to make these
I really want to make these for my 3 year old's room. I am thinking they would be adorable with a heart cut-out though!
Niki (not verified)
Tue, 10/05/2010 - 10:46
I'm in the process of making
I'm in the process of making these. I've done some basic building myself, but this is my first KOW project, and my first time actually following plans. I've got two built. I was putting the doors on the first one, and saw that they were too narrow. I had almost an inch gap between the doors. I measured my 1x8's, and they were actually 3/4 x 7 1/4 (instead of 7 1/2 as the plans call for) . I was going to take the 1x8's back and complain, but did a quick google search first and everything that I could find said that 7 1/4 is the true measurement for a 1x8. So now I think I will buy a 1x10 and rip it down to 7 1/2.
The moral of the story. Measure. Everything. First. Lesson learned. :)
Melinda Mantilla (not verified)
Sat, 10/09/2010 - 03:00
Do you all think it would be
Do you all think it would be possible to add a shelf in the cube? Is there a way to do it without affecting the outer cosmetics of the cube?
McKay (not verified)
Tue, 10/12/2010 - 06:48
I agree with Niki! Measure
I agree with Niki! Measure and measure again! I made three and used one sheet of birch for the faces and doors, they were a little too wide because I cut them to 1x8, rather than the finished measurement on the plans. Make sure to read through the whole plans before you let your excitement take over. :-)
These were still really easy to make! And the Kreg joining system is amazing!
We move often and I never wanted to invest in a big storage unit that would take up a big wall - these are perfect! I can arrange a big wall of them if I want or distribute them throughout the house! I will definitely be making more! And now that I know how they work, I might try making a few bigger ones...

Marie (not verified)
Thu, 10/14/2010 - 08:21
i've been looking at your
i've been looking at your website for DAYS now. you have inspired me! with my husband deploying very soon, i've been wondering what to do to keep busy (other than chasing the 2 munchkins around all day...), and after days of looking at the different projects/plans and wondering if i would be capable of doing this i've decided i'll never know until i try! so i'm going to make these boxes my first project before the deployment (so i can get some help from the hubby). i want to make a set for each of the kids' rooms. i'm very excited to start! you are a truly creative and inspiring woman!
Niki (not verified)
Sun, 10/17/2010 - 20:17
Melinda, you could easily add
Melinda, you could easily add a shelf. If you have the Kreg, I'd do it just like the top. Depending upon the cutout you use for the handles on the doors, you'd probably want to position the shelf so it wouldn't show through the opening.
Desi (not verified)
Tue, 11/16/2010 - 10:52
I'm sold. :) I'm sitting
I'm sold. :)
I'm sitting here, pen in hand, and drawing out my new living room, that I can (and will!) make for less than $100 at a time, with designer looking pieces. YEA!
My living room is just so SMALL (12x10!) that I had despaired of ever being able to find furniture that's functional, has TONS of hidden storage, and will leave enough floor room AND have enough seating for my family of eight (+ the houseful of guests constantly in and out!) so I'd almost resigned myself to yucky furniture without any design before about 2 hours ago! Now I have hope!
On my list: the sofa (definitely! I've got to either figure a way to put arms on it or sweet talk my DH into letting me keep it without arms like I like), the Tryed Console Table, the Tryed Coffee Table (of course, made a little smaller so it will fit!), the 'mudroom' (smaller, again), and three of these cubes made into a bench! ::BIG GRIN:: It's ambitious but I'm excited!
Thanks so much for these!!
Donna (not verified)
Mon, 11/22/2010 - 16:09
My only concern with these
My only concern with these would be moving them with their contents inside. I guess one could carry it with the doors near one's body so they don't come open if the contents get jostled inside and push outward against the doors.
If you leave off the doors and put hand holds on the front and top of the sides, you could carry the box with its open end pointing up as well as out. Could make carrying them to the moving truck easier. (-:
Ana White (not verified)
Mon, 11/22/2010 - 22:20
Donna, the drawer is
Donna, the drawer is completely free of the crib, and is easy to open/close. It's great for storage, by my daughter uses it as a trundle for her other baby doll.
Stacking Cubes… (not verified)
Tue, 01/04/2011 - 17:55
[...]
[...] http://ana-white.com/2010/09/stacking-cubes.html to do. ana white, stacking cubes [...]
Jess (not verified)
Wed, 01/05/2011 - 06:40
I am thinking of making these
I am thinking of making these but decreasing the size of the depth by half so I can use them for my movies. Do you think that they will still stand or would they become top heavy?
Makin' Birdhou… (not verified)
Thu, 01/06/2011 - 06:11
[...]
[...] http://ana-white.com/2010/09/stacking-cubes.html 06 Jan This entry was written by admin, posted on January 6, 2011 at 11:11 AM, filed under Ideas, Projects. Bookmark the permalink. Follow any comments here with the RSS feed for this post. Post a comment or leave a trackback: Trackback URL. View EXIF Data Browse Older: Antique USPS box This is a good idea for a mailbox except make it out of wood? http://item.mobileweb.ebay.com/viewitem?itemId=190429164013 [...]