


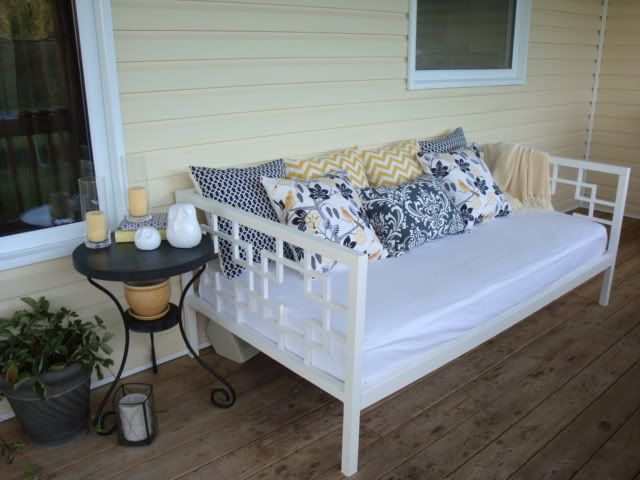
A beautiful modern daybed plan, posted by one of our readers. Also special thanks to mairanellis for sharing her photos!
Every time I visit our Community, I find myself inspired, connected, and generally, a little bit smarter. On a recent visit to our Community, I found myself VERY inspired and TONS smarter, special thanks to the brilliance and resourcefulness of one of our readers, Jrsmrs.
Fifty bucks. Yeah, this is the reason I did not get an iPhone for my birthday. Because I'd rather have ten daybeds like this one than an iPhone.
I was quite happy with a handmade card from Grace and some help with housework from the Ram. And all the lovely, caring, genuine well wishes from you!
What about you? Would you rather have amazing furniture on the cheap, or expensive electronics?
And special thanks to JRSMRS, you too can have this daybed. Here is her post:
Ok, so here's my attempt at a plan to show how I made this bed. Hopefully it's clear enough to understand, but if not, just ask. Ana, I'm sure you'd be able to make up a better one, so if you're so inclined, have at it!
FYI, These are very crude drawings, and are not anywhere close to scale!
So this picture shows the dimensions of the arms, which was the part I did first using 2x2s:

Just try and keep things square while first screwing in the top of the arm to each leg. Then screw in the bottom cross-support.
Then what I did was lay the finished arm on level ground (or a table), and fit all the decorative pieces in to place. You do have the option of having the pieces float in the middle of the 2x2 arm pieces (so that there is even spacing on each side of the 11/16"), however I liked the look better- and it was easier- to just lay them right on the ground within the arm, so that they are flush with one side of the arm (which would be the underside that lay on the ground while I was working, and which I then used as the inside of the arm). The decorative pieces I used were 11/16" square, but if you decide to use a different size, that of course will change the measurements. This pic shows all the measurements I used :
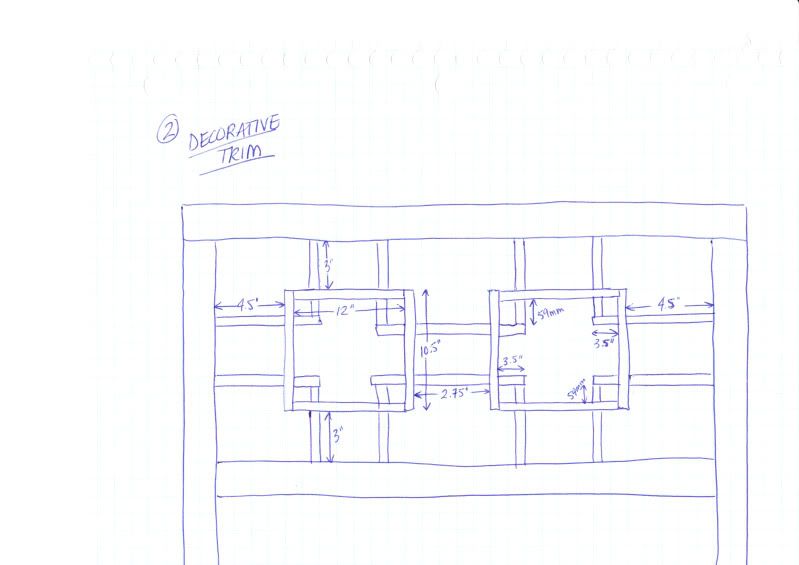
As you can see, my squares were not perfectly spaced, as the outside horizontal pieces are 4.5" while the horizontal pieces that separate the 2 squares are only 2.75" so feel free to mess around with the measurements if you want everything perfectly even.
So in order to secure all the pieces, I first nailed/screwed the ones in place as shown here:
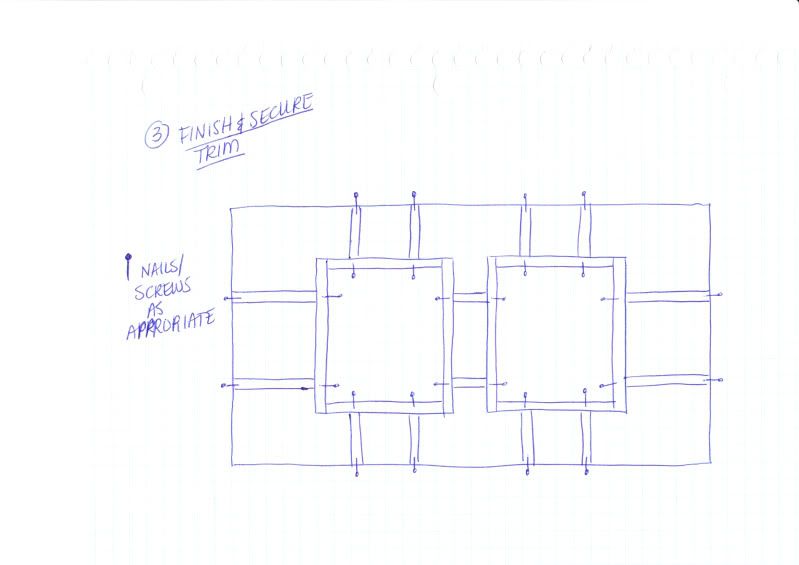
Then to fit in the remaining little L-shaped pieces (59mm x 3.5") that fit within the squares, I simply made each L individually by nailing them together and then toe-nailing them (with added wood glue) into the squares. Of course if you have fancy equipment, I'm sure there's an easier way, but as I said, I've got just the basics at the moment.
Finally, when the arm is complete, finish the bed by screwing on the front and back pieces labeled A/B/C here:
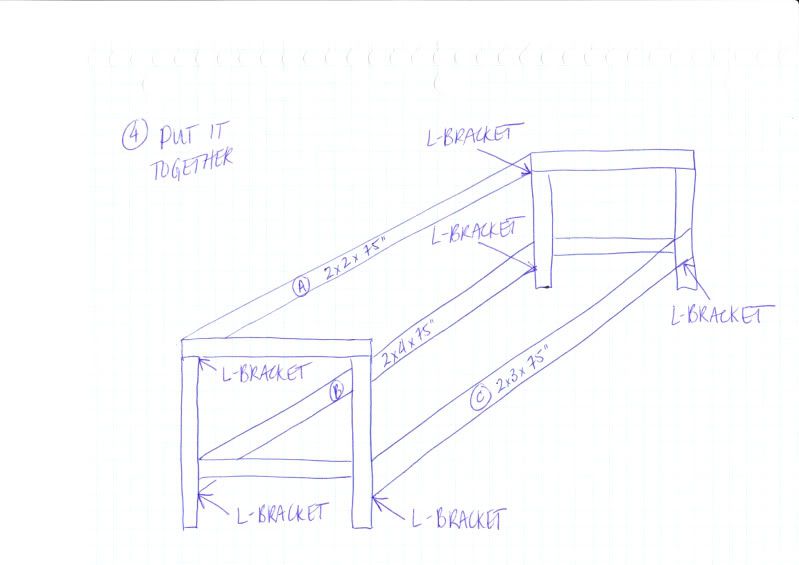
I both screwed each piece into the arm and added 1" L-brackets that I got from HD for extra stability. You can see from the pic where I placed them underneath each front and back piece.
As you can see from picture #1, I set the 38.5" bottom arm supports 10.5" up from the ground, so when placing the B and C pieces, I lined them up so the tops of them were flush with the tops of the bottom 2x2s on the arms.
Not shown in the pics, you then need a thin piece of wood to screw onto the inside of each of B and C pieces which will act as a support for your slats that hold up the mattress. I actually had an old twin sized Ikea bed that I took apart for its slats and slat supports, so that was easy enough. If not, any piece of wood 2x2 or smaller would work fine. You will obviously need two of them, and they will each be about 73" long and screwed onto the inside of B and C, 1.5-2.5" (depending on the size of the support you use) below the top of them, so they will allow room for the slats to be concealed and the mattress will sit nicely just below the top of the front piece. If you don't have ready-made slats like I did, several pieces of 1x2 or 3 wood cut to 38" will fit nicely within the front and back pieces B and C, while still sitting on top of the slat supports.
Also, between back pieces A and B, I cut about 6 or 7 16.5" pieces of 2x4 to screw in to act as vertical back rest supports.
After everything was done, I sanded the whole thing really quickly just to get rid of any burrs, filled in nail/screw holes and caulked all the points where the decorative pieces meet eachother just so it would look nice and uniform. Then a few coats of white paint and I was done!
Whew, so hopefully that wasn't too confusing, but if there are any questions, of if I forgot anything, just let me know!
Preparation
See plan
See plan.
Comments
Loni (not verified)
Mon, 10/04/2010 - 00:19
Beautiful! Absolutely
Beautiful! Absolutely Beautiful!
Jonel (not verified)
Mon, 10/04/2010 - 04:04
OMG...I love this daybed and
OMG...I love this daybed and got so excited to see it since I wanted to recreate it for my sun room...I must have it! Thank you, thank you, thank you!
Tara @ Tara Be… (not verified)
Mon, 10/04/2010 - 16:48
This looks just like the
This looks just like the Young House Love daybed!
JennyNicole (not verified)
Fri, 10/08/2010 - 14:13
Ana did you end up getting
Ana did you end up getting your IPhone?
If not please e-mail me jennynicole@me.com I may be able to help you solve that problem ;)
Minnie (not verified)
Mon, 10/11/2010 - 02:22
Just a quick note from a
Just a quick note from a first time poster; thanks for the work that you put into this blog! I for one appreciate it very much.
Wendy (not verified)
Mon, 10/11/2010 - 04:05
It's beautiful, but I might
It's beautiful, but I might be missing something. Her post doesn't really include any instructions as far as I can tell. Inspirational, but I have no idea how to go about it. And it would be perfect for my daughter's room.
Wendy (not verified)
Mon, 10/11/2010 - 11:52
Nevermind! I scrolled around
Nevermind! I scrolled around and found it. Thanks.
Jen (not verified)
Sat, 12/25/2010 - 16:07
Love this daybed & this blog!
Love this daybed & this blog! Thanks!
Kirsten (not verified)
Mon, 12/27/2010 - 05:30
I would LOVE to make this
I would LOVE to make this into a queen-sized bed with a headboard and footboard rather than the arms...any ideas?
ThweattFamily
Thu, 04/28/2011 - 16:08
Shopping list
Where is the shopping list for this bed? Am I missing something??
Liz Liv (not verified)
Tue, 05/03/2011 - 19:36
slats?
I've scrolled through this and can't seem to find out what the mattress is actually sitting on! Are there slats? I would love to make this, my Mom comes next week and needs to sleep on something!
Guest (not verified)
Sun, 08/14/2011 - 18:08
Plans???
To those that have located the shopping list/plans...where did you find it? I have visited this page a few times and have not found them yet? HELP PLEASE!!! Thank you!
Guest (not verified)
Thu, 12/01/2011 - 14:47
Plans/shopping list? Where ARE you??
I'm also looking for the plans/shopping list! I need to put my husband to work to make this for our daughter!
claydowling
Thu, 12/01/2011 - 19:57
The plans
The article is the plan. As for a materials list, look over the plan and read the article to see what you'll need. It's slow the first time you do it, and you'll get it wrong, but it's okay, for your first project the materials list won't be right anyway. You'll make some mistakes and need more of something.
Don't fret that there's stuff you don't understand. Your first project is a learning experience. You'll make mistakes, figure out what you did wrong, and the next time you'll avoid some of those mistakes.
One of the things you'll get good at is looking at a piece of furniture and figuring out how much material it's going to take, as well as how to build it yourself.
Sidny (not verified)
Sun, 09/30/2012 - 22:59
Window Daybeds
Is there by any chance that you are willing to sell one of these beds? If so please contact me at Sidny_Dance@hotmail.com
Thank you!
JennyY (not verified)
Sun, 12/09/2012 - 14:54
suggestions for queen size modification
Hi,
I love this bed! Do you have any suggestions for us as we modify it to a queen size (80"x60")?
Thanks!
Jenny
DavidM.
Sun, 02/03/2013 - 12:15
Is there any way i could buy
Is there any way i could buy this bed from you? If there is please email me at davidsdforsale@gmail.com. Please respond soon, i am trying to finish my daughters room and she has been looking for this bed.