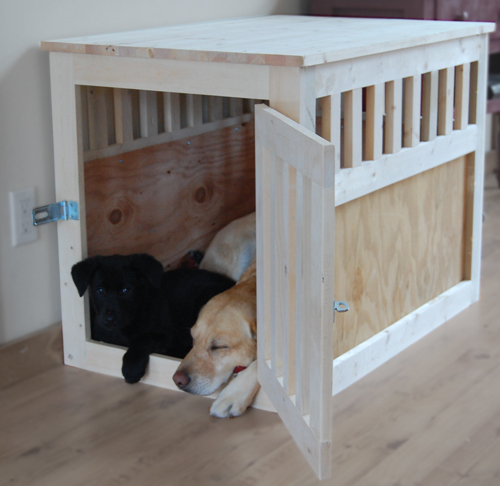


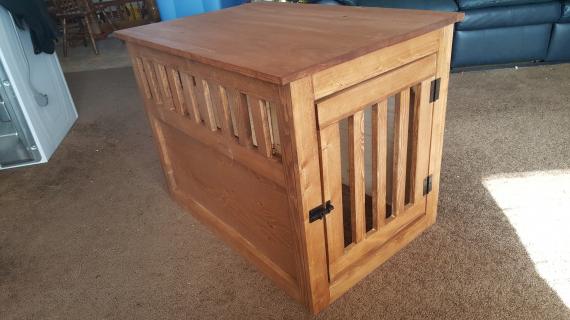
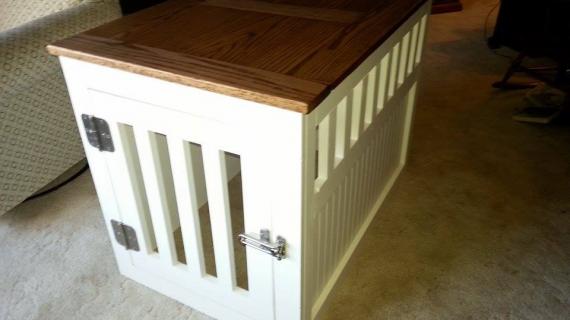
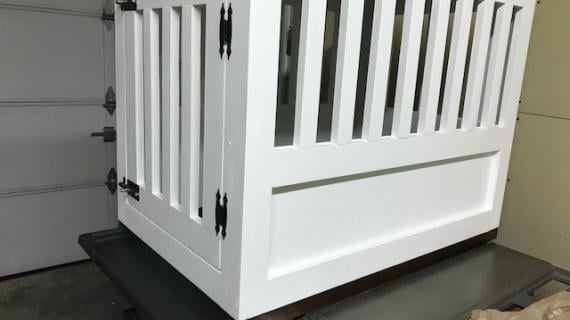
Build your own wood pet kennel with our free step by step woodworking plans.
Preparation
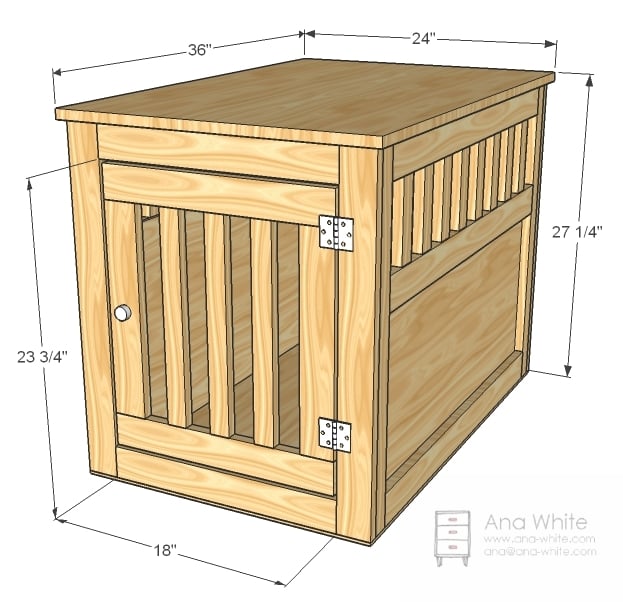
- 1 – 24″ x 36″ Pine Project Panel or 3/4″ plywood or MDF
- 5 – 1×3 Boards, 8′ Long
- 1 – sheet of 1/4″ plywood
- 4 – 1×2 Boards, 8′ Long
- 1 – set of hinges
- 1 – latch
- 1 1/4″ pocket hole screws
- wood glue
- 3/4" brad nails
- 21 – 1×2 @ 6″ (Rails)
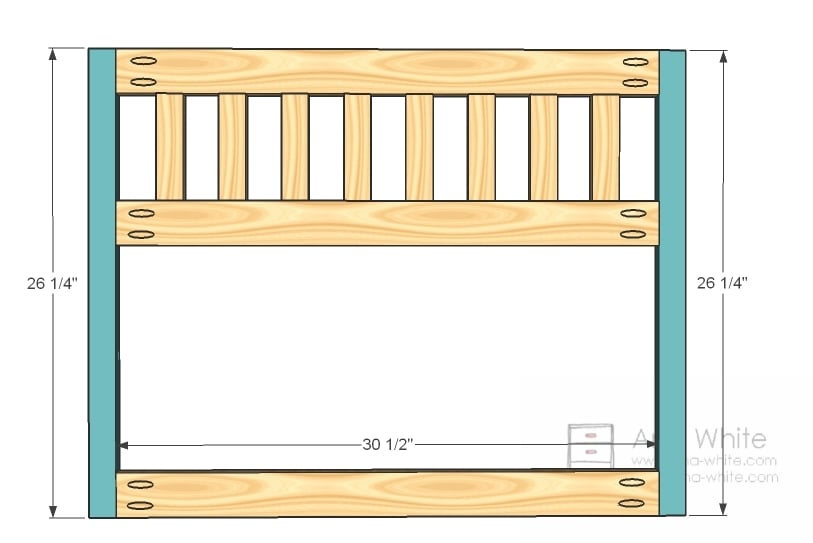
- 6 – 1×3 @ 30 1/2″ (Side Boards)
- 4 – 1×2 @ 26 1/4″ (Side Legs)
- 4 – 1×3 @ 26 1/4″ (End Legs)
- 1 – 1/4″ Plywood @ 17 3/4″ x 33 1/2″
- 1 – 1/4″ Plywood @ 17 3/4″ x 21″
- 5 – 1×3 @ 18″ (Door Frame and Back Boards)
- 2 – 1×3 @ 17 1/2″ (Door Top and bottom)
- 2 – 1×2 @ 15 3/4″ (Door Sides)
- 3 – 1×2 @ 15 3/4″ (Door Rails)


For long term durability and more professional results, I recommend using a pocket hole joinery system for wood joints. Here is a video with tips for using a pocket hole jig:
Instructions
Step 1

Build Side Railings
Build the side railings as shown above. Use 1 1/4″ pocket hole screws and glue.
Step 2
Sides
Finish building the sides as shown above. Use 1 1/4″ pocket hole screws and glue.
Step 3

Plywood Sides
Add the plywood to the sides as shown above. Use 3/4" brad nails and wood glue to attach.
Step 4
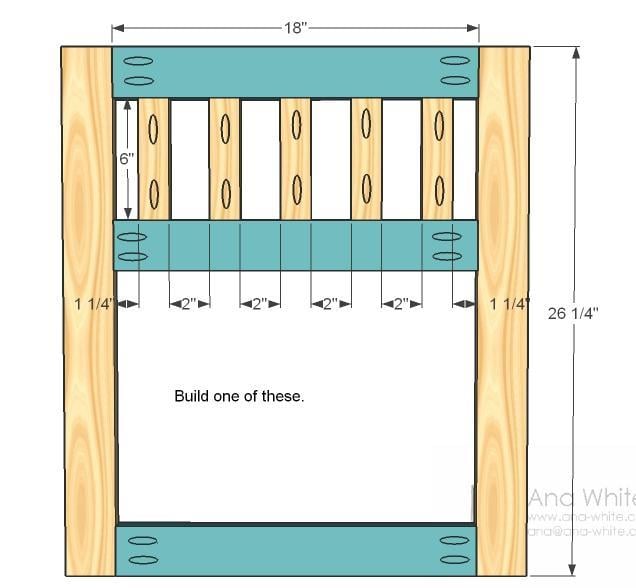
End
Build the end as shown above. Use 1 1/4″ pocket hole screws and glue.
Step 5

Attach with 3/4" brad nails and wood glue.
Step 6

Door
The door should be a piece of cake. Just mark and screw together with 1 1/4″ pocket hole screws and glue.
Step 7
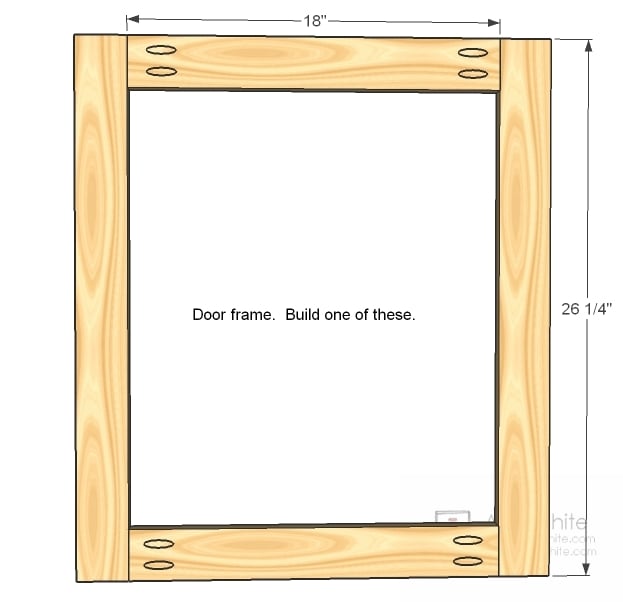
Door Frame
Build the door frame with 1 1/4″ pocket hole screws and glue.
Step 8
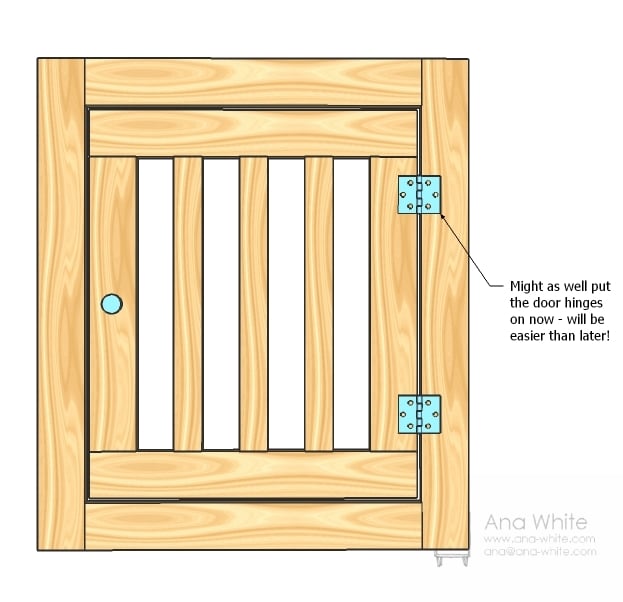
Door Hinges
Why not add the hinges while it’s easy? We did, and the hinges were much easier to install this way. I also installed the latch.
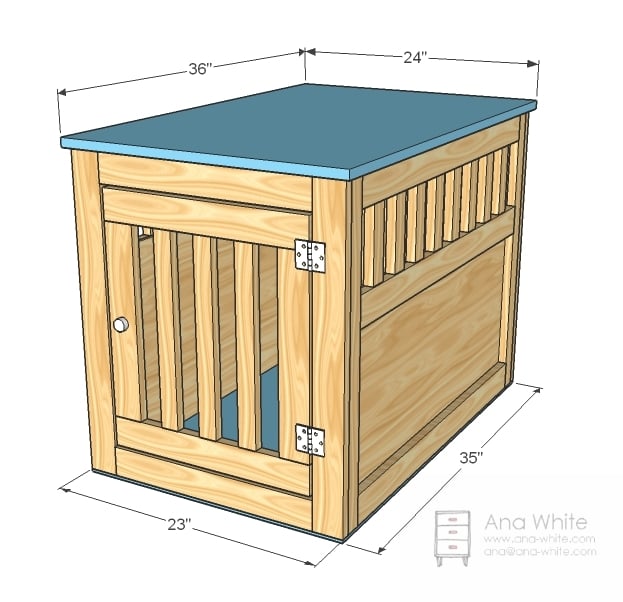
Step 9

Assembly
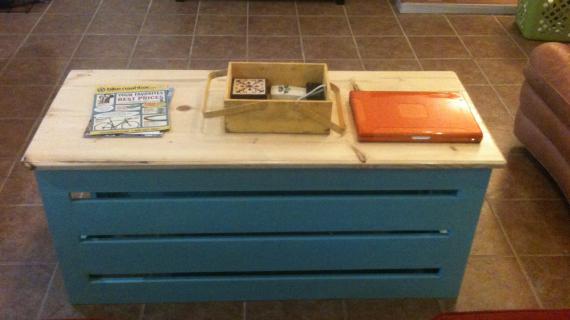
So you have really just built four walls. Now assemble the walls! I highly recommend finishing the walls separately first – then you can easily assemble and reassemble the crate as needed. Another idea – use corner brackets to screw the walls together from the inside. Then you can break the crate down to flat pieces for storage and travel. I filled all the pocket holes with wood filler three times and let dry. Then sanded with 120 grit sandpaper. Still need to paint
Step 10
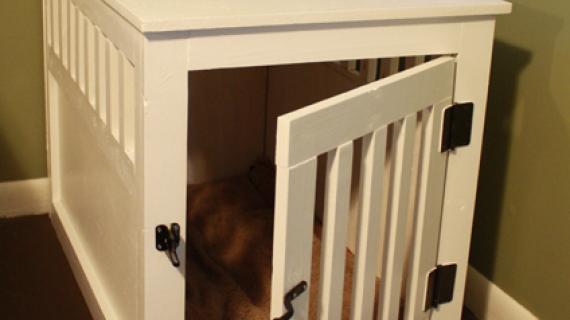
Top and Bottom
Screw the project panel to the top. We choose to leave the bottom off (our girls are house broken) but you could use some of the leftover 1/4″ plywood to make a bottom for the kennel. Simply line with plexiglass for a waterproof bottom.


Comments
Cherilyn (not verified)
Tue, 10/19/2010 - 09:38
I like this idea under a kids
I like this idea under a kids bed....for the kids to play jail our house or something. =)
Mark Heywood (not verified)
Tue, 10/19/2010 - 13:29
Love it!!! My lil Dakota
Love it!!! My lil Dakota (half Yorkie Half Chihuahua) called a Chorkie would LOVE it!! She love's to hide in her pen. You really make some nice projects. Thanks for posting the "how to" instruction's. Keep up the great work, we love to see your new projects.
Mark & Joan
Julie (not verified)
Sat, 10/23/2010 - 11:29
Oopsie - there's a typo in
Oopsie - there's a typo in the cut list! It says you only need 1 1/4″ Plywood @ 17 3/4″ x 33 1/2″, but I'm half way through my build and realized I need 2...back to the store I guess :-/
In reply to Oopsie - there's a typo in by Julie (not verified)
brooklyns_mama
Sun, 03/20/2011 - 11:23
So, 5 million comments later
I saw that, and was like, huh? theres three sides but we only need 2 pieces? And a million comments down, here you are, pointing it out. Thank you! I'm sorry you had to go back to the store!
Julie (not verified)
Sat, 10/23/2010 - 17:40
One other small mistake -
One other small mistake - instead of:
2 – 1×2 @ 15 3/4″ (Door Sides)
3 – 1×2 @ 15 3/4″ (Door Rails)
You need 2 - 1x3 15 3/4 and 3 - 1x2 12 3/4
Not a big deal - if you followed the shopping list you should have some 1x3 left over. I figured out how to use the leftover plywood so I didn't have to go to the store for more - yay!
I just made this and it's awesome!! I bought slightly nicer plywood because I'm planning on staining instead of painting, but it's an awesome piece. This is my first Ana White project and there were some stressful moments, but I'm so proud of the outcome! I think the most stressful part was going to Lowe's to buy wood!
My total cost was $88.72 for all wood, hardware, etc. but like I said I bought more expensive stuff that I thought/hope might be better to stain. I also bought a kreg jig jr ($40) and a few other one time cost things.
Julie (not verified)
Sat, 10/23/2010 - 18:01
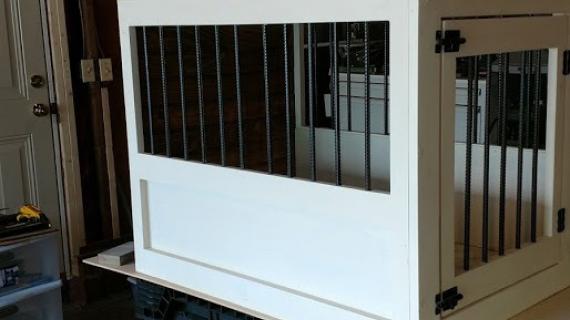
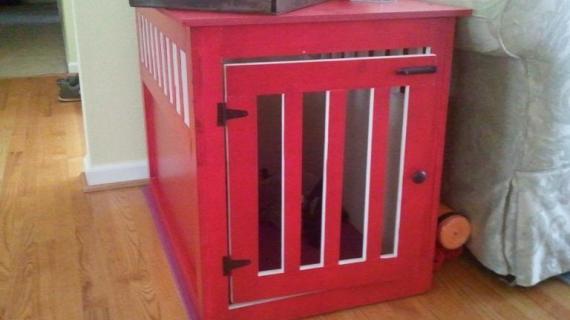
Pics - still needs to be
Pics - still needs to be stained, and the roof isn't actually "on" because I ran out of brackets.

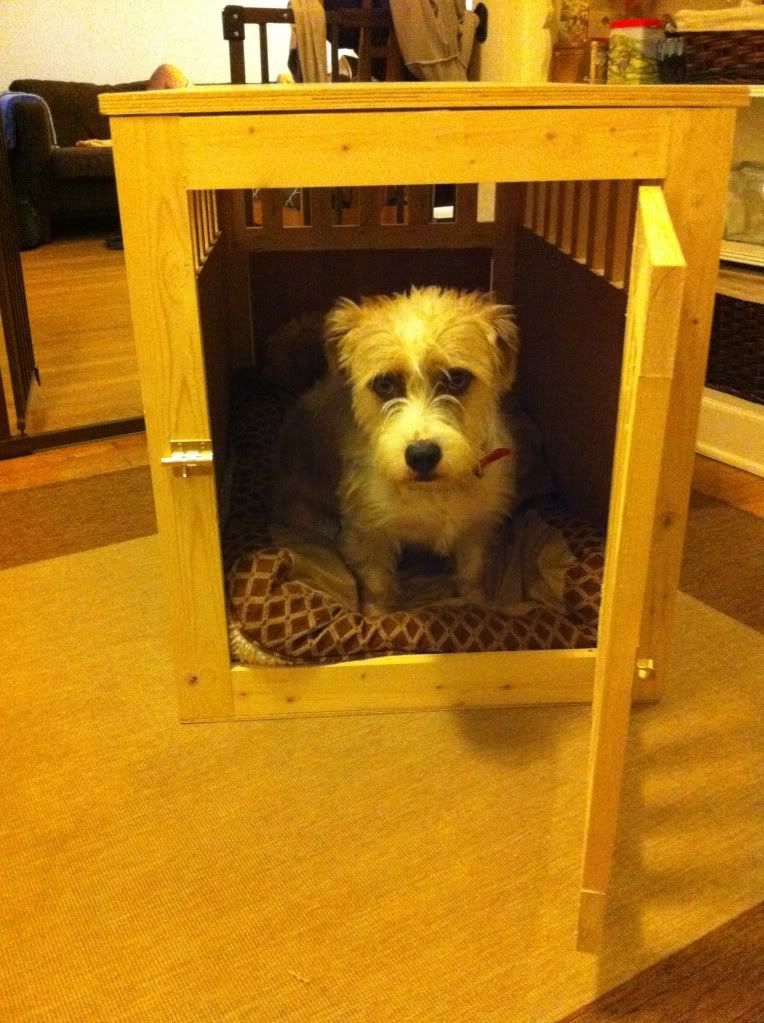
there's 2 dogs in there...one is being camera shy :-) They are 35 lbs and 16 lbs and they fit snugly in the crate. I'm using this to replace a standard wire crate that was 30x21x24 - this one seems a bit smaller because of the thickness of the wood.
Amy E. (not verified)
Tue, 10/26/2010 - 07:16
i'm glad you posted this
i'm glad you posted this before it was finished Ana! with the bare wood you can actually see the features more clearly. if it was all black, it would have been so difficult to tell just how beautiful this piece is (like all your work!).
the only problem i see: now you're making me want a dog!
Ashley (not verified)
Thu, 10/28/2010 - 09:38
I love this I have been
I love this I have been wanting one of these for my cocker spanial. Do you think there is a way to make it so you can take the slats out of the door so the dog can go in and out at night or when you are at home in the day. my dog just likes going in there to sleep sometimes.
Ambie (not verified)
Sat, 10/30/2010 - 09:05
I love this! I want to make
I love this! I want to make this into a 2 story condo for my spoiled little dog Howie (10lbs) he is my world... Maybe putting in a little ramp to the 2nd story instead of steps. Also I would love to make the top so that it is on hinges and can either be locked or open.
Thanks Ana for all the wonderful ideas! You are amazing and inspiring!
Angela (not verified)
Fri, 11/05/2010 - 19:25
Great, now I will have to
Great, now I will have to decide what I want to try first....a headboard or a dog crate....We've got a Husky who could really do with a heavier crate. She can almost toss the one from Walmart on its side if she's upset enough...lol. Gonna have to look into some options for painted versus non-painted. So glad you shared before it was done though.
Amanda (not verified)
Mon, 11/15/2010 - 10:43
we need new Avery pics! I bet
we need new Avery pics! I bet she's much bigger now!
Lesley (not verified)
Tue, 11/16/2010 - 12:45
@julie: dogs are denning
@julie: dogs are denning animals, and most dogs love the feeling of being enclosed and hidden in a safe spot that is just for them. The wire crates seem less claustrophobic for US, but every dog I have known loves an enclosed crate just as well :-)
Karin (not verified)
Wed, 11/17/2010 - 09:46
I am thinking of making this
I am thinking of making this to house the cat's litter box. Maybe make the slats wide enough so that cats can get in, but not the dogs.
Zoey (not verified)
Sat, 11/20/2010 - 20:27
wow this is SO awesome!!!
wow this is SO awesome!!! This looks way much better than those ugly wire crates!! Do you you make a plan to make a BIGGER crate for 2 Great Danes?? I want that to be my first project!!! Love your BLOG!!
Zoey (not verified)
Sat, 11/20/2010 - 20:30
excuse my typo!! I meant to
excuse my typo!! I meant to say do you have a plan to make a BIGGER Crate??
Amanda (not verified)
Wed, 11/24/2010 - 11:37
This is so brilliant. And I
This is so brilliant. And I love Karin's idea of using this to house the kitty litter box as well!
keegan davis (not verified)
Wed, 11/24/2010 - 20:08
I was just wondering how you
I was just wondering how you were able to hide the pocket holes so well. I use wood putty but some times the head of the screw sticks out and cant seem to get them hidden, any tips?
Michelle (not verified)
Fri, 12/03/2010 - 11:12
Every time i look at this on
Every time i look at this on the plan catalog I think that is my dog in the picture, I always think to myself "How did Ana get a picture of my dog?" HAHAHA!!
Ana White (not verified)
Sun, 12/05/2010 - 21:21
Zoey, I definitely could, but
Zoey, I definitely could, but this crate is HUGE - my 4 year old, her 7 year old cousin and 2 year old cousin all fit inside it easily!
lorieann (not verified)
Sun, 12/05/2010 - 21:47
this is exactly what i have
this is exactly what i have been wanting to make. except I have a little pom who only weighs in at 9 pounds so this one would be way to big. Do you have plans for this in a smaller size? maybe 22x22X22
Leslie (not verified)
Wed, 01/05/2011 - 07:37
I came over to your site from
I came over to your site from YHL after viewing the floating shelves y'all made. I have been to your site before, but I haven't really "taken it all in." So I was poking around, getting some ideas for patio chairs and a storage bench, when I came across THIS!! I want to scream from excitement, but I'm at work, and I'm pretty sure everyone will think I'm crazy if I do so. (hehe)
My fiance and I were just planning on buying one of these this weekend for our Siberian Husky. Grand Total: $350!! Thank you a million times over! I can't wait to get started. I'll be sure to post pictures!
Ana White (not verified)
Thu, 01/06/2011 - 23:26
Leslie, the dog kennel is one
Leslie, the dog kennel is one of my fav pieces in my home! Good luck! Ana
christy (not verified)
Wed, 01/26/2011 - 16:12
Ana, did you ever paint this
Ana, did you ever paint this black? Are there pics somewhere?
Janet (not verified)
Fri, 02/04/2011 - 05:49
Julie you have a mistake in
Julie you have a mistake in your corrections.
We followed your corrections and our 3 door rails ended up too short.
Luckily we have enough wood to cut new door rails.
The correction to Annas Plans should be
2 - 1x3 @ 15 3/4 (door sides)
The door rails was correct in Anna's plans it should be 3 - 1x2 @ 15 3/4
That would make the sides and the rails the same length which they need to be.
This is our first project and my first time doing pocket holes. I did have some issues which I will post when I put up pictures. Before I move onto anymore projects I want to know why I had those issues.
Should be finished by Monday.
Thanks Anna & Julie
Janet (not verified)
Fri, 02/04/2011 - 05:55
Julie, Anna's measurement
Julie,
Anna's measurement for the door rails was correct it should be
3 - 1x2 @ 15 3/4
The only correction to her plan is for the door sides to use 1x3 not 1x2.
We are having the issue of the wood splitting when we drill in the pocket screws. What are we doing wrong?
Janet (not verified)
Sat, 02/05/2011 - 11:22
Sorry for the double
Sorry for the double comments. I thought I didn't send the first one. Still working on my dog house. I can't wait for my girls to move in it.
Dee (not verified)
Tue, 02/22/2011 - 08:41
Would anyone know what the
Would anyone know what the dimensions should be if I wanted to make a bigger one? We have retrievers that use 36" crates and larger. This one would be a bit small for them.
Melanie (not verified)
Fri, 02/25/2011 - 15:24
Hello everyone, These crates
Hello everyone,
These crates are beautiful, Ana is there a plan for a smaller crate? I have a 3 pound chihuahua and her crate is a metal 13x22 I would love to build her a wooden one still tall enough to act as an end table. Any suggestions? Thank you for your time.
In reply to Hello everyone, These crates by Melanie (not verified)
kmhanrahan
Sun, 06/23/2013 - 15:01
Smaller Kennel
Hi, Melanie. Did you have any luck getting plans for a smaller crate? I'm looking for one about medium size.
Clare (not verified)
Mon, 03/14/2011 - 08:55
Thank you! We needed this!
Wow, I am SO happy to see this post! My husband and I have a 55 lb dog and currently his wire crate is in the corner of our very small office. I want to redo our office but dont want the ugly wire crate in there. I think this would be perfect! Totally cute and functional. And it looks fairly easy to do!
Guest (not verified)
Sun, 04/17/2011 - 15:17
This happened to me too. We
This happened to me too. We don't have a saw so we got our cuts made at Home Depot and my husband went to do it for me. When he got them home and I started to build, there was a side missing. Good thing we had the extra so I could cut another piece with my poor little hand saw.
Daniele (not verified)
Sun, 07/24/2011 - 05:42
Please do plan for a crate cover!
@Ana White, I love your crate so much, but I think my dog might chew on the wood. Would you be able to put a plan for a large crate cover that could slide over a metal crate?
Like this:
Thanks!!!
angiemicn
Sun, 07/24/2011 - 05:54
chewing
I have five golden retrievers so I really need a way to get them not to chew. I have added a splash of brown Listerine on my polishing rag...spray your wood with whatever cleaner you use, then wipe it down with the Listerine rag...really works, dogs hate the taste of it. No more chewing. Tip from their vet.
Also increased their activity and made up a ton of chews from braided old jeans.
Charlie14515 (not verified)
Mon, 08/01/2011 - 08:07
Can't wait to start
I stumbled across this website when I was searching for kennel plans. I kind of got distracted by all the wonderful plans and can't decide what I'll do first. I definitely can't wait to get this done though and get the wire crate out of our living room. We have an unusually large lab and his current crate has a door on the side and one on the end (which is great for all the rearranging I do) so I plan to make a minor adjustment to still have that option. Will definitely post pics when it gets done.
Kat (not verified)
Thu, 08/04/2011 - 14:56
Please create plans for a cover for a wire dog crate.
I have the same concern as Daniele. I want to assure that my dog won't chew on her crate, so I'd love it if you made plans for a similar style crate with an open front. Preferably something that would enable me to pull tray on the floor of the crate forward for cleaning.
Tina T. (not verified)
Fri, 03/23/2012 - 21:45
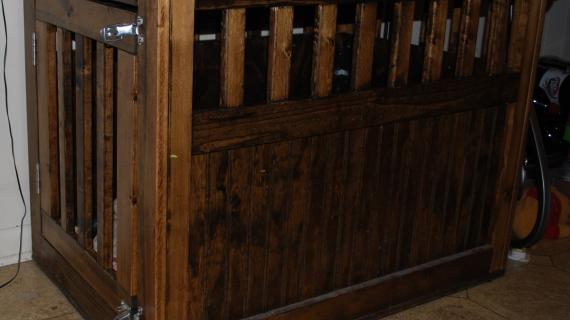
I made it a little bit
I made it a little bit bigger, tiled the inside, stained the wood a beautiful chocolate color, and built a small shelf to hold the food/water dishes. The tiles make it a breeze to clean... just take it outside a hose it out then dry it with a towel.
Guest (not verified)
Sun, 03/25/2012 - 16:03
Just an idea since we've been looking for it...
Anyone have plans for a dog bed/night stand in one? Our dogs love to be in the room with us all night, but there's no way we can sleep with them on the bed!!! Help!
April F (not verified)
Tue, 07/03/2012 - 19:47
Very easy, but a couple notes on the plans...
I just made two of these, to serve as nightstands. Right now, I use two of my show crates for this task, and it's a pain to take them down and re-load them for each dog show. I first saw these in a Skymall catalog, and totally drooled over them!
Two notes on the plans, though:
1. The cut list has an error. 1 – 1/4″ Plywood @ 17 3/4″ x 33 1/2″ needs to be TWO, not one, as the crate has two sides. I didn't discover this until after I had assembled the first two walls, and had nothing for the second crate. I needed to dip into my scrap pile for one of the sides.
2. Don't make the same mistake I made on steps 3 and 5. The images don't show the pocket holes, so it's implied by the drawing that the plywood goes on the outside, or finished side. But look at the image--it actually goes on the inside. I didn't realize my mistake until the "leave 1 inch" note on step 5. Now I have some interesting edges that I'll probably need to trim out. Making a prototype would have been a wise step to avoid this issue, but I skipped that step. My mistake!
Because I'm a huge fan of the look of old barn wood, I used the Classic Grey staining technique used in the wall jewelry box project. I adore the look! 1 quart was just barely enough for one coat on both sides for two crates, though. I prefer this over paint--claw scratches will look natural, as the surface is already aged in appearance. I purposefully did not build the doors--they aren't structural, and I want these two crates to be full access. If I need containment, I'll bring in my show crates.
These crates are my second project from this site, and I'm using 4, maybe 5, total in a master suite remodel. Thank you thank you thank you!
absorbing_life
Wed, 07/11/2012 - 15:52
Can't wait to try it!
We have two large dogs that are crated separately and this is a great way to be rid of those plastic crates for good! I am a bit concerned about chewing but they don't chew their crate now so hopefully they won't start. Very inexpensive way to add charm to our living space!
Ash (not verified)
Thu, 10/04/2012 - 14:28
dog crate
I would love to build this dog crate this weekend. Do you have measurements for a XL size? Something like 54L x 35H x 36H ? Thanks.
In reply to dog crate by Ash (not verified)
kmhanrahan
Sun, 06/23/2013 - 14:56
Different Size
I'm curious whether you got measurements for the XL size kennel. I'm looking for just the opposite: plans for a Med size.
Tammy Kristin (not verified)
Sun, 11/25/2012 - 14:12
Kreg Jig Jr?
I absolutely cannot wait to make this kennel... One question, though. Would a Kreg Jig Jr work for this project? I want to make this so much that i'm willing to spend the $100 for the standard one, but I'd like to get away with just getting the Jr. if possible.
Tmtiemann
Sat, 06/22/2013 - 08:07
Kreg jig mini?
Hi Tammy,
I'd like to make this kennel as well and was wondering if you ever got a reply about which kreg jig you could use and if you were able to use a kreg jig mini or junior. Please let me know of your findings! :)
Thanks,
Theresa
AmandaLynn (not verified)
Mon, 12/31/2012 - 13:29
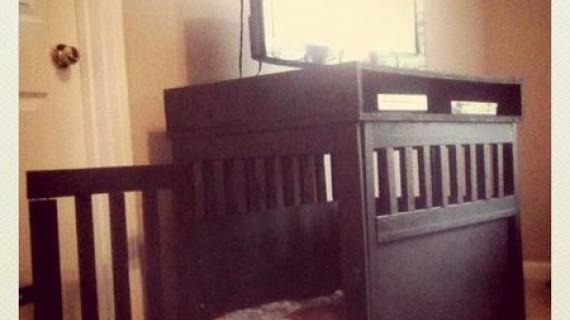
We built this dog crate!
We built this dog crate! Well.... let me re-phrase... I gave the directions to my husband and he built it. It took him 4 days.... because he REFUSED to follow the directions... because he KNEW what he was doing. Mine doesn't look as nice as yours... BUT when he leaves for work on the 2nd (His job is in SC, but the rest of us are living in New Jersey for 6 more months).... I'm going to fix it. The top is just plywood right now (he stained it)... but I'll be getting the 24" x 36" project board, so it actually looks like a table instead of a box. We used rubber spray (like what they coat the inside of truck beds with) for the inside bottom and sides up until the rales and calked the edges so that if there were any accidents, it would be easy clean up. If only men followed directions!!!!!! I'll be doing the woodworking projects myself from now on.... to include overseeing (very closely) the building of our first house. Wish me luck!
Tammi (not verified)
Sat, 01/19/2013 - 09:19
Puppy Crate!
LOVE this! We have a larger dog that stays out all the time, but are bringing a new puppy home in February and we'll crate her for the first few years at least. I do NOT want to haul out that old, ugly wire crate! Our new puppy will top out around 20-25 lbs; is this crate too big for her? What size dog did you have in mind when you designed this? I'm wondering if we need to alter it, and if so how we could do that. We have several projects in our house from your site, and I can't wait to add this one! :)
connie249
Thu, 01/24/2013 - 19:25
Portable Crate
I'm really want to make this crate portable. I found bed rail brackets to use for the sides. I figured strong magnet brackets should work for the top. I'll Just use a waterproof blanket for the floor. Has anyone tried this?
Blair
Fri, 03/29/2013 - 05:54
Pet Kennel End Table
My dogs would chew right through those slats. I'll try it will chicken wire in those ventilated areas. Or perhaps I'll make it 3 sided only and large enough to slide a crate inside. Very attractive and love the detailed plans. You rock, girl!
kmhanrahan
Fri, 07/05/2013 - 12:11
Medium Size??
I love the design of this kennel (Nice work, Ana!) but it's way too big for my pup. Has anyone scaled down the plans for a medium kennel? If so, I'll be your new best friend.
I ended up recalculating the dimensions myself, ending up with a very nice 18 X 24 X 28 kennel/end table (with a lamp!) I can't see how to post a photo here, but I bragged about it on Ana's brag posts. You can find it under dog kennel.
jacceleny
Wed, 10/09/2013 - 22:36
Help!
Hi Ana, Do you have any tips for people that may not own all of those power tools you listed? I don't use them enough to buy them but this project is a MUST for me! Help!
skingy1
Mon, 10/21/2013 - 06:59
Smaller Crate plan?
I would like to know if there are plans for a smaller crate. I would like to make one myself as my first project. I don't know how to reduce the size of Anna's design plan and I don't want to risk making a guess! I would like it to be a little narrower and perhaps a little lower because I am going to be having mini Dachshund in it so it doesn't need to be huge. Can anyone help me on my first project? I hope so! Please email me at [email protected] thanks so much!