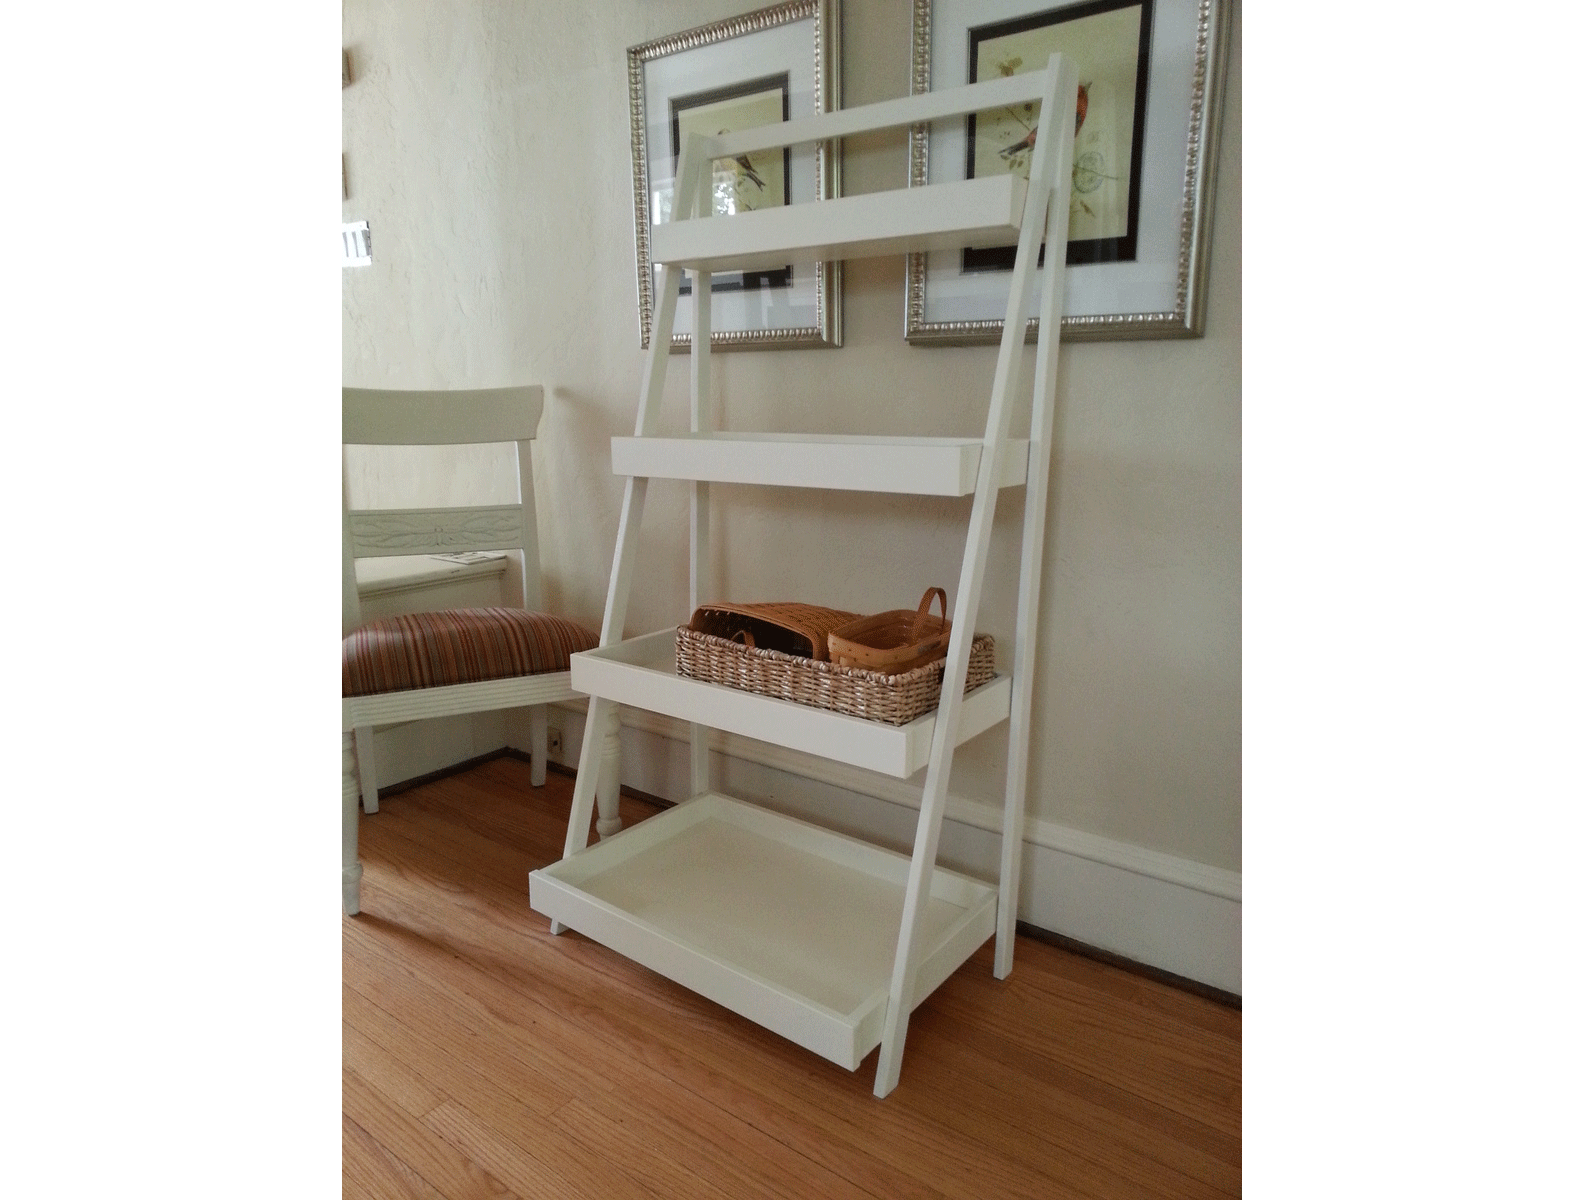


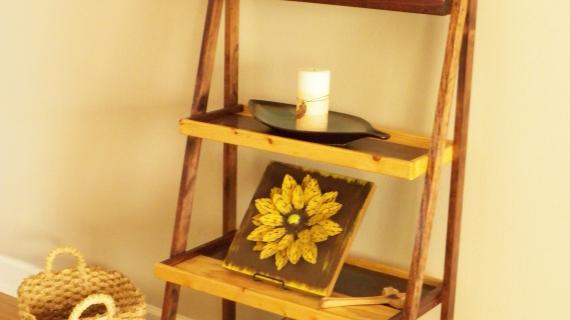
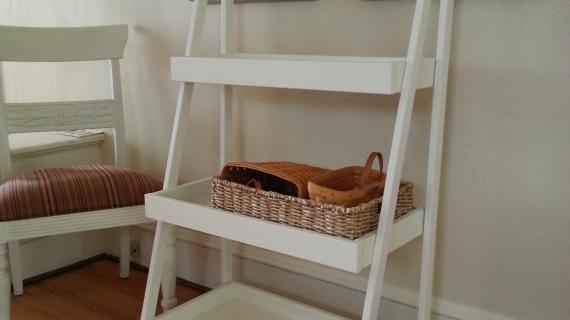
Build your own ladder shelf with free plans from Ana-White.com
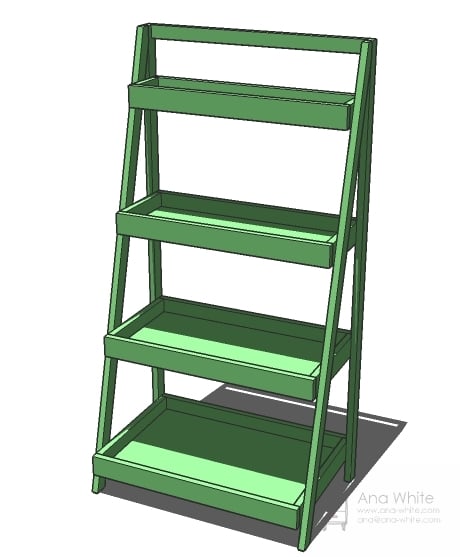
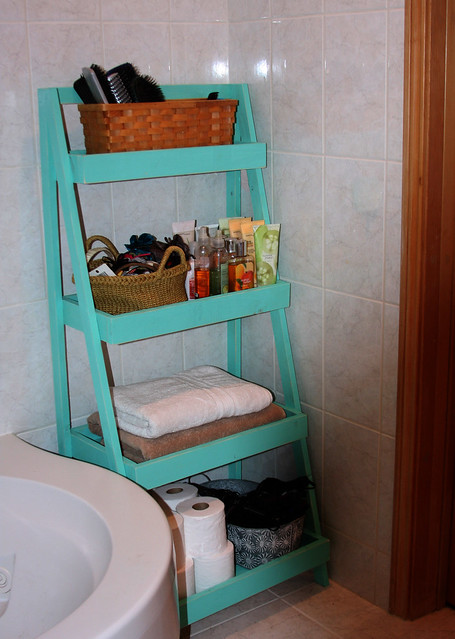
This plan is for a free standing storage tower, with varying size shelves, good for different size objects, in narrower spaces or for tiered organization. We love it in bathrooms, entryways, kids rooms and more!
Preparation
1 – 24" x 48" 3/4" thick plywood panel, prefer hardwood plywood (ie Purebond)
4 – 1×2 boards, 8 feet long
4 – 1×3 boards, 8 feet long
2" and 1-1/4" brad nails (can also use pocket holes or screws, the brad nails are the simplest and easiest, but not the strongest)
Wood Glue
Finishing Supplies
2 – 1×2 @ 55 3/8″ (Front Legs, ends cut at 15 degrees off square)
2 – 1×2 @ 53 1/2″ (Back Legs)
8 – 1×3 @ 25 1/2″ (Fronts and Backs of shelves)
1 – 1×2 @ 25 1/2″ (Top)
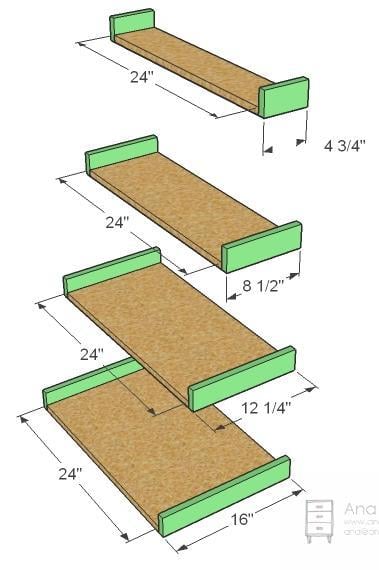
1 – 24″ x 4 3/4″ (Top Shelf cut from 24″ wide shelf)*
2 – 1×3 @ 4 3/4″ (Top Shelf Side Trim)
1 – 24″ x 8 1/2″ (Second Shelf)*
2 – 1×3 @ 8 1/2″ (Second Shelf Trim)
1 – 24″ x 12 1/4″ (Third Shelf)*
2 – 1×3 @ 12 1/4″ (Third Shelf Trim)
1 – 24″ x 16″ (Bottom Shelf)*
2 – 1×3 @ 16″ (Bottom Shelf Trim)
* Cut the 3/4" thick plywood panel into two pieces, each 24" x 24" using a table saw or circular saw. Then from there, cut the pieces into the shelf bottom sections with a table saw or circular saw. Cut largest pieces first to make sure you can fit all your cuts on the materials.


For the instruction for the smaller width tower, please visit my post on HGTV here.
Instructions
Step 1

Legs Cut the legs as directed in the cut list. See step 2 for cutting the top corner of the front legs.
Step 2
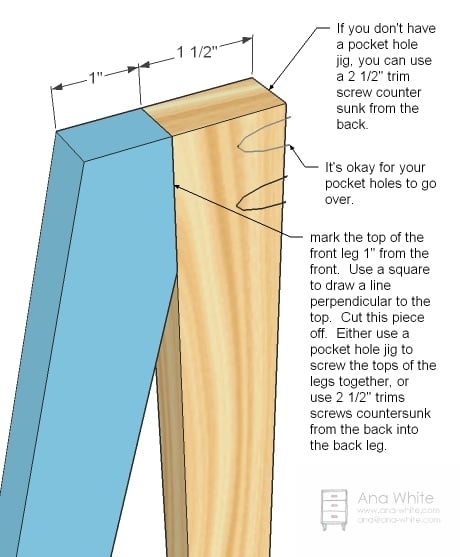
Tops of Legs
Cut the top of the front legs as shown. Join the front leg to the back leg with screws and glue. I used pocket hole screws, but a 2" trim screw or brad nail and glue from the back does the trick too. This joint will be reinforced in later steps.
Step 3

Top
Now attach the top to the legs as shown above. Again, I used pocket holes, but 2 1/2″ trim screws would do the trick. I layed the whole thing on it’s back on the garage floor to make things easier. Set the whole thing aside.
Step 4
Shelf Sides
Measure and cut the side trim for the shelves. Attach with 1-1/4" brad nails and glue.
Step 5

Measure and cut the trim for the sides of the shelves. Attach with glue and 1-1/4" brad nails. Make sure you also attach 1x3s together at corners.
Step 6
Assembly
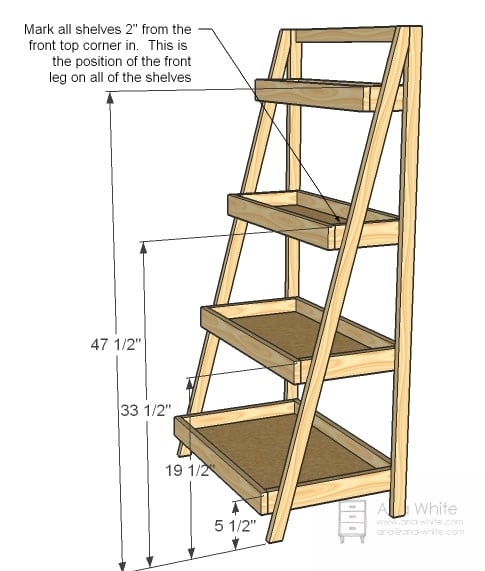
Take time to carefully prepare by cleaning your workspace free of sawdust. Now measure the legs and mark the shelf locations, as shown in the diagram above. Then mark each of the shelves 2″ in from the top front corners. This is the point where the shelves meet the marks you made on the legs. Lay the legs with the back down on the floor. Then start with the bottom shelf, screwing through the legs into the side trim for the bottom shelf with 1 1/4″ screws. Then work your way up. Check all the shelves and back legs for level – I did have to adjust mine.


Comments
Leah (not verified)
Sun, 10/24/2010 - 19:16
Perfect! I loved the bakery
Perfect! I loved the bakery wall shelf thingy, but we have a very smal area to fill. Thanks! =)
michelle (not verified)
Sun, 10/24/2010 - 19:17
I am soooooo making that.
I am soooooo making that. Have been looking for something for a small-ish spot and now I found it. Thanks Ana.....I will post a pic when I make it. :)
Katrina klauer (not verified)
Mon, 10/25/2010 - 02:41
What are the chances of
What are the chances of Sending one down my way. lol THat is great I can't wait to see about making one for myself.. I love the coral color of it.
Barrett (not verified)
Mon, 10/25/2010 - 02:44
Thanks Anna... I think one or
Thanks Anna... I think one or two of these could be useful to fill a spot in my workshop, especially since they're free standing. A couple casters on the bottom would be a great addition!
Mary Anne (not verified)
Mon, 10/25/2010 - 02:50
Ana, first of all, is there
Ana, first of all, is there nothing you can't do? Secondly, I see these posts from you talking about HGTV and some other things you're involved in, but where do I find more details? Are you going to be on an HGTV show or something? Not only do I love your plans, I love to follow where your career is taking you! I love it when good things happen to good people!
virginia (not verified)
Mon, 10/25/2010 - 03:10
GReat job Ana! It looks so
GReat job Ana! It looks so fun and easy!
Jessie (Bites … (not verified)
Mon, 10/25/2010 - 03:12
This one seems like a great
This one seems like a great first project for me, what do you think? It's so cute and would look awesome in my bathroom! I actually prefer the slightly wider shelves of this plan. Thanks Ana!
Julie (not verified)
Mon, 10/25/2010 - 04:55
Wow, this looks like it could
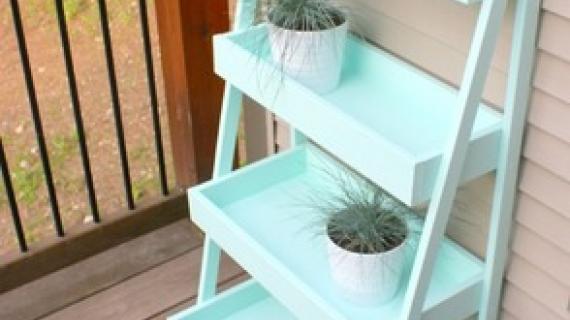
Wow, this looks like it could be really cool out on the deck to hold plants like herbs and other potted goodies... mmmm the possibilities!
Robin E. (not verified)
Mon, 10/25/2010 - 05:14
Did you come into my hall
Did you come into my hall bathroom and see that I have an empty spot right next to the counter that is PERFECT for this project, a spot that I was at a loss for what to put there? This is soooooo on my to-do list now and down here on the Mexican border the weather has finally become cool enough for such projects.
Nan Tovar (not verified)
Mon, 10/25/2010 - 10:18
Ooohhhhh, I can see one of
Ooohhhhh, I can see one of these on each side of my bed! Thanks, Ana!
I would also like to know how to get to your HGTV items, and better yet, see you in action :)
Tsu Dho Nimh (not verified)
Mon, 10/25/2010 - 11:25
Maybe a second project? The
Maybe a second project? The angled cuts can be tricky.
Tsu Dho Nimh (not verified)
Mon, 10/25/2010 - 11:27
I can definitely see this
I can definitely see this made of redwood and exterior grade materials as a patio piece.
Or ... fill the compartments with padding and call it a cat storage unit.
Vanessa Fuson (not verified)
Mon, 10/25/2010 - 13:46
I think this would be great
I think this would be great for my front room/office to store all books!! It's hard to find space for a full time mom & college student's things when you have little ones taking over!!
kate @ www.bro… (not verified)
Mon, 10/25/2010 - 14:51
I love this and have just he
I love this and have just he spot for it in my bathroom. Now the courage to build it...
Theresa (not verified)
Mon, 10/25/2010 - 16:03
I love this one. This has so
I love this one. This has so many uses. Thanks Ana.
Sarah (not verified)
Thu, 10/28/2010 - 13:32
Seems you can find some of
Seems you can find some of Ana's work for HGTV on a google search of Ana White HGTV, but if you are on HGTV's site and search it doesn't bring you to all of her posts....here is one I found_http://www.hgtv.com/kitchens/reclaimed-wood-wall-shelves/index.html
Melissa (not verified)
Thu, 10/28/2010 - 17:08
This reminds me a bit of the
This reminds me a bit of the high chair I have been dying for! Please make it for us!
http://www.onestepahead.com/popup/zoom.jsp?productId=536833&imageDir=en…
:)
Melissa (not verified)
Thu, 10/28/2010 - 17:10
http://products.onestepahead.

Melissa M (not verified)
Wed, 11/03/2010 - 14:51
So awesome! I really want to
So awesome! I really want to make the smaller one... Are the plans up on HGTV? The HGTV site is really hard to search. Can you let us know when they go up and where Ana? Thanks!!
Ana White (not verified)
Mon, 11/08/2010 - 15:44
From
From Danielle

Kristen (not verified)
Fri, 11/19/2010 - 00:01
Hi everyone Im confident with
Hi everyone
Im confident with power tools - but Im terrible with wood - can someone tell me what type of wood I should buy to make this - I am searching on our local hardware store for the above wood (pine panel or 1/4 plywood etc)... but Im too unco to figure out what Im meant to be buying for (just so I can budget the project).
This is the website for the local hardware store - can someone tell me what type of wood I should be getting??
Hope thats okay Ana... I just thought it might be easier the someone trying to explain it in more detail and me still not knowing what to get. Feel free to remove my comment if this is not okay!
Lauren (not verified)
Fri, 12/03/2010 - 09:28
Hi, Ana. I've been
Hi, Ana.
I've been puttering around your site looking for ideas for a tiny bit of extra nursery storage, and something like this could definitely work...
Quick question, though -- If I make a shorter version of this (like, changing table height), how does it affect the cut angles on the legs? Does it affect the angles?
As always, thank you so much for your creativity, plans, and inspiration. This is seriously becoming my "go to" blog for the house. :)
NichyB (not verified)
Tue, 12/21/2010 - 06:57
Has this posted to HGTV yet?
Has this posted to HGTV yet? I couldn't find it on their site and I'd really like the plans for the smaller one.
tallmich (not verified)
Sun, 01/02/2011 - 17:47
I found the link to the plans
I found the link to the plans on HGTV.com:
http://www.hgtv.com/bathrooms/build-a-storage-ladder/index.html
tallmich (not verified)
Sun, 01/02/2011 - 17:48
I just realized that I could
I just realized that I could reply directly to your comment. Here's the link if you haven't found it yet.
http://www.hgtv.com/bathrooms/build-a-storage-ladder/index.html
Tasha (not verified)
Mon, 01/10/2011 - 13:31
This was so easy to build,
This was so easy to build, and even had enough scrap wood on hand to do it. Took me less than an hour to build it. I love having more storage. Thanks Ana!!
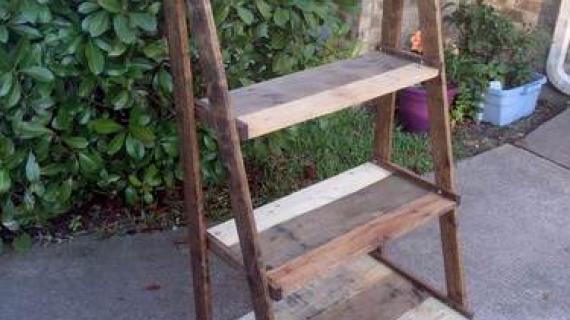
http://eightmuddyfeet.blogspot.com/2011/01/ladder-shelf.html
SingleMomThriving
Tue, 05/17/2011 - 17:01
Exactly What I Was Looking for....
I have been looking for something I could put on the covered patio to hold pool towels, sunscreen and swim goggles and this fits the bill perfectly.
I found the original plan on HGTV website, but was very confused by the materials list on that site.... so I found your link and found exactly the information that I needed.
I have a weekend project and I am so excited. I will let you know how it goes!
I'm so glad that I found you.
cmsake
Wed, 05/18/2011 - 18:24
I am so making this for the
I am so making this for the hall bath.
Guest (not verified)
Thu, 03/15/2012 - 19:29
HGTV Messed up instructions!!
I can't believe no one else has said this...I followed the link you posted, and the cut lengths that HGTV gives and the quantities of wood are wrong!
They took your shelf and made it 12" wide instead of 24", which I actually like. My space is small and the smaller size is great, but they told me to cut 8 - 24" long pieces for the front and back of the shelves. I ended up buying way too much of those pieces and now I have nothing I can do with them because I wasted a bunch of time cutting them. By the way are they 1 x 3 or 1 x 4? Because they say 2 different things in the instructions. And lastly they tell you to only by 1 - 1x2. So I had to go back to the store and get more. Because 2 - 6 ft lengths of wood doesn't make all 4 legs.
I love your design, but could they have messed up the plan any more? I don't think so.
Heather Sitton (not verified)
Wed, 10/17/2012 - 08:43
HGTV plans incorrect
Yes, I was just looking at that too! The HGTV plans for the smaller shelf are incorrect for the materials and cut list. It appears as though the larger shelf was mixed up with the smaller shelf. Ana, maybe you can correct it for them. I figured it out in the mean time. The diagrams are correct though.
If anyone's interesetd in the corrections (smaller shelf):
Materials--- 1x2 6ft (4) legs, 1x3 8ft (2) trim
Cut list--- 1x3 cut 13 1/2" long (8), not 25 1/2"
Cut list--- 1x2 cut 13 1/2" long (1), not 25 1/2"
I'm starting today! Looks fun! This will be perfect for my small bathrooom. Thank you, Ana.
Best Kratom (not verified)
Thu, 01/03/2013 - 21:26
I'm making one as we speak
I actually found a pic searching google images and I'm pretty sure it's from here. Thanks for the great post. ;)
Regards,
Gage
Guest - Chris (not verified)
Sun, 01/20/2013 - 20:19
26" trim piece or 25-1/2" trim piece
The cust list shows "1 – 1×2 @ 25 1/2″ (Top)", but Step 3 shows a 26" trim piece connecting the legs, I believe the 25 1/2" piece to be the correct dimension, since a 26" piece is not in the cut list.
Did anyone else catch that ?
In reply to 26" trim piece or 25-1/2" trim piece by Guest - Chris (not verified)
benjaminrogers
Mon, 03/07/2016 - 07:58
Yes, but if you check the
Yes, but if you check the width of the shelves (24 + 3/4 + 3/4) it'll be 25 1/2.
Andreasaunders2
Tue, 11/25/2014 - 06:41
Can you help me make it talle
Ana,
I absolutely love this, but I need it at least one more level taller! Can you tell me what changes you would do? I know the front and back legs would be longer, but does that change any cuts? And what size would you make that bottom piece? 18 inches?
thanks!
Andrea Saunders
snuzal
Sun, 01/03/2016 - 01:34
I just came to see if anyone
I just came to see if anyone had ntoiced just how badly the HGTV plans are. Totally stuffed up. They've kept a lot of cut measurements from the full size, for the smaller sized plans. Ridiculous. Im making the small one now, after making the large one a few months ago.
benjaminrogers
Mon, 03/07/2016 - 07:56
Front Leg Measurement
Ana,
On the front leg measurement of 55 3/8, I'm assuming this is a long end to short end since the ends are 15 degrees and parallel. Is this correct?
Thanks,
Ben
BrookeKithcart
Fri, 07/31/2020 - 08:03
Smaller Version of This Shelf!
I would love to build the smaller shelf but the HGTV website the plans are incorrect, it says its smaller but its the same measurements as above and the materials list is also wrong; any help would be appreciated!