

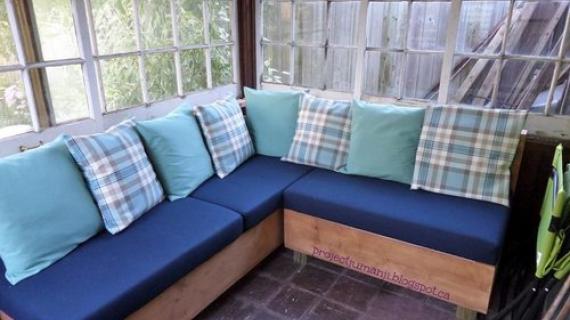
A sofa that you can build with a fold out seat perfect for storing extra pillows and blankets. Based off a sleeping pad foam cushion, so seating surface doubles as a guest bed.

If you would have asked me even a few months ago about building your own sofa, I would have said, it's not worth it. Considering the high cost of foam (upwards of $50 a yard) and the cost of fabric (at least $10 a yard for an upholstery weight) I just couldn't see the economics of building your own sofa.
But then I walked past a pile of foam camping pads at a store we have in Alaska called Fred Meyer (owned by Kroger and is kind of a superstore) that were 30" wide, 72" long, and 3 1/2" deep. And the foam came in soft, medium and firm weights . . . for just $20! Instantly, the wheels were turning in my head.
Then when my sister Esther mentioned that she didn't have a sofa, and she couldn't find one that was inexpensive, square, and with storage, I was drawing up plans within minutes. My sister Lydia (we've reupholstered quite a few sofa's together, but never actually built one from scratch) was visiting, and she was just as excited as me. So we got to work.
And you all know how much I love using paint drop cloths for fabric. So with some 2x4s, 2x6s, some 2x10s, some 1/4" plywood and alot of worn out pillows and stuffed animals, my sister Lydia and I built a couch in less than 24 hours for about $120.

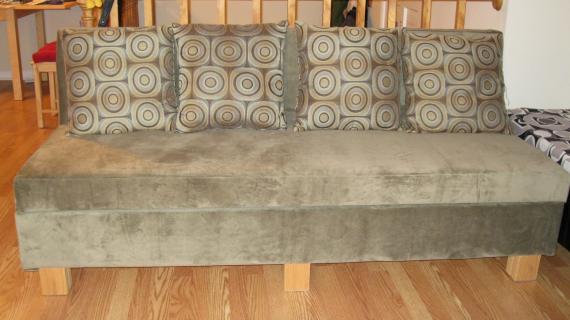
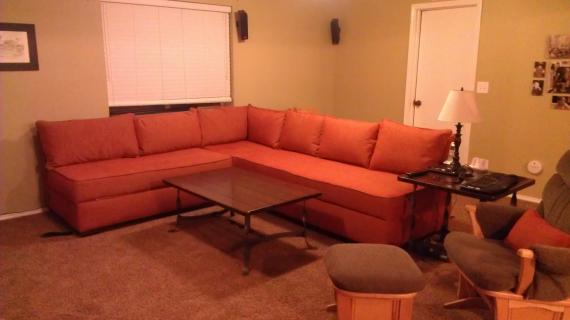
And by the time we were done, both Lydia and I were making plans to build our own sofas. Also pictured reclaimed wood carts.

And I just might . . .

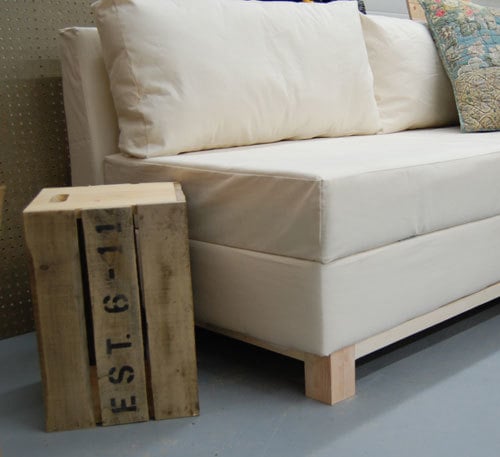
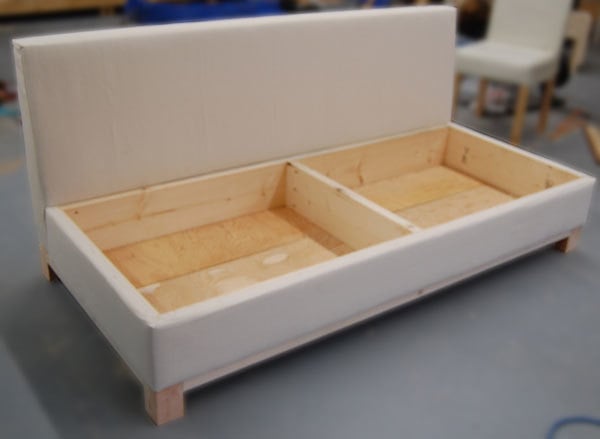
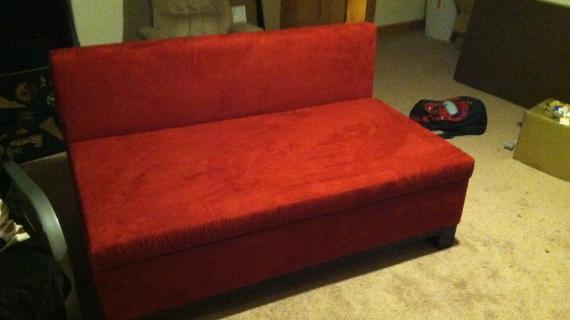
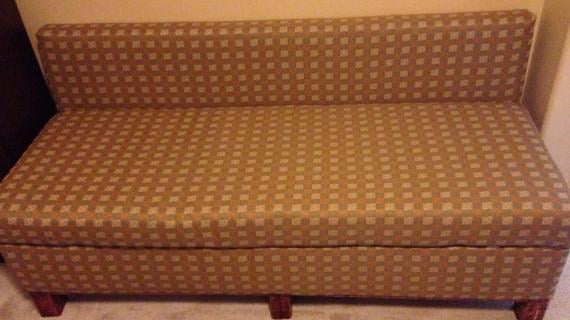
Nice clean square design that is so popular right now. Notice the 2x4 feet. Please don't notice my messy garage, I was afraid to bring this one inside . . . my sister might not every get her sofa back! Also, the deep cushions are perfect for sleeping on.
It is after all made from a standard camping pad. And did anyone notice the little hinges on the front seams?

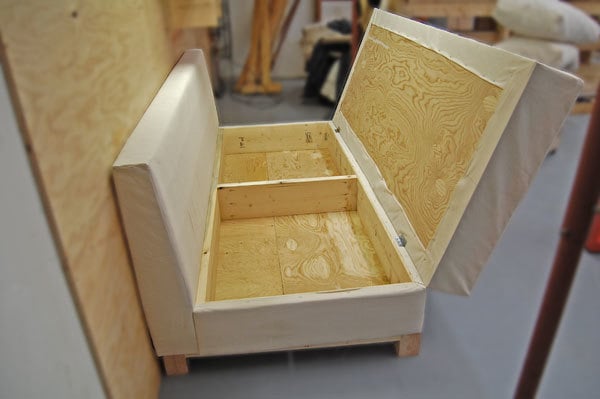
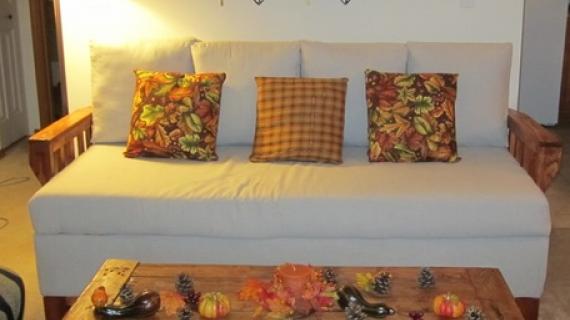
Big enough to sleep on and with built in storage for the bedding too! This is my favorite part of this sofa. You could build it for your office and use it as a reading sofa, then when guests are over, flip open the seat and get your bedding out. Not shown here, but I did add straps to keep the seat from hinging all the way open and also straps that tuck in the seam behind the seat for easily pulling the seat up. Just used an old dog leash.

Ready to build your own? You can do this.
Preparation
1 – 30″ x 72″ x 3 1/2″ Foam Camping Pad or Cushion
1 – 9×12 Paint Drop Cloth
6 yards upholstery batting
2 20 oz bags of pillow stuffing
2 1/2 yards of burlap
staples
3″ screws or 2″ pocket hole screws
1 1/4″ screws
wood glue
spray adhesive
2 – 2×4
2 – 2×6
2 – 2×2
4×4 (You only need about 2 feet for the sofa legs)
1 – 12′ AND 1-8′ 2×10
2 – sheets of 1/4″ plywood
1 – 2×4 @ 72″
1 – 2×6 @ 72″
4 – 2×6 @ 24″ (Tapered as shown in step 1)
3 – 2×4 @ 22″
1 – 1/4″ Plywood @ 17 5/8″ x 72″
2 – 1/4″ Plywood @ 72″ x 30″ (Top and Bottom of Seat)
2 – 2×10 @ 72″
3 – 2×10 @ 27″
2 – 2×2 @ 65″
2 – 2×2 @ 28 1/2″
4 – 4×4 @ 5″ (Sofa Feet)


Instructions
Step 1

Back
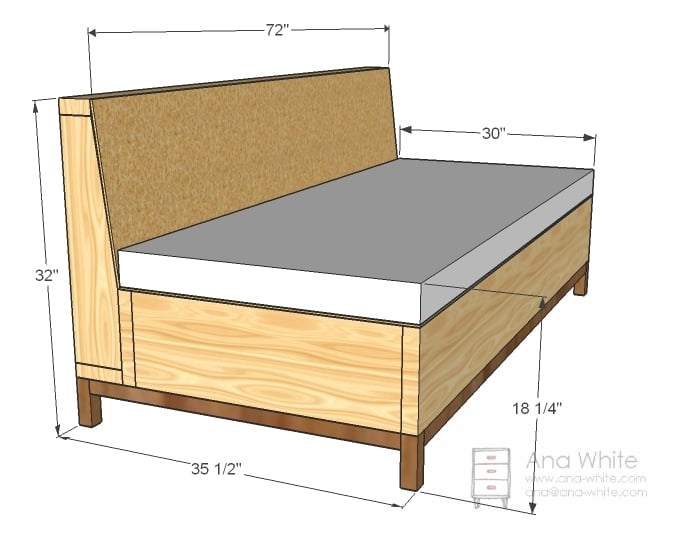
Screw the back together with 3″ screws or 2″ pocket hole screws as shown above. Use glue and adjust for square.
Step 2

Back
Now attach the 1/4″ plywood to the back with 1 1/4″ screws and glue as shown above.
Step 3

Back Batting
Now wrap the back that is not covered in plywood with the burlap and staple in place on the bottom edge. The burlap should be tight. Then use spray adhesive to glue the batting to the back as shown above. Read the direction on the can of the spray adhesive for the best adhesion.
Step 4

Side Batting
Now glue pieces to the ends with the spray adhesive and then trim to fit as shown above. Set the back aside.
Step 5
Step 6
Slipcover
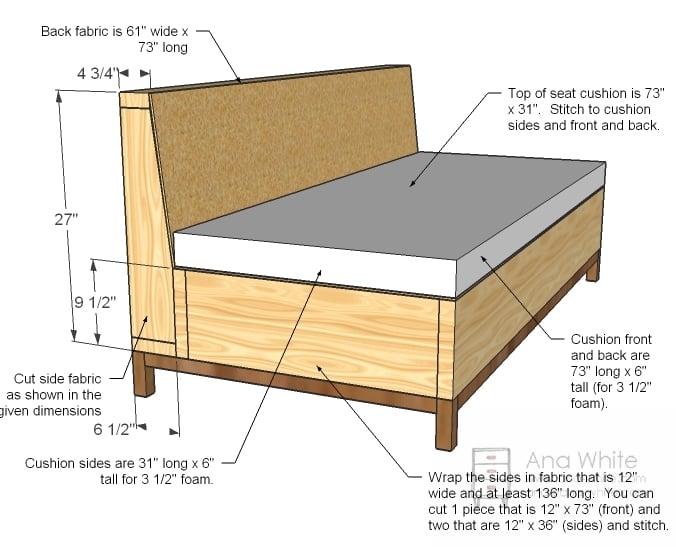
Use the spray adhesive to attach the foam pad to the remaining piece of plywood. Then use the spray adhesive to attach batting to the foam on the top, front and sides. Cut a piece of fabric 73″ long x 31″ wide. Cut two pieces 31″ long x 6″ wide, and two at 73″ long and 6″ wide. Sew together to create a box cushion (see this post for details on sewing). Place the cushion slipcover over top of the foam and staple the slip cover raw edges to the underside of the plywood, hiding edges. This is shown below.
Step 7
That one should be easy. Now cut strips of fabric as shown in the diagram above (step 6) and sew together and staple in place around the sides and front of the sofa. Should be easy to do. Turn edges under to hide raw seams.
Now the back was the most difficult part – certainly not impossible, but I thought was the most difficult part of sewing. To make this part easier, you could simply not put a taper in the back side of the sofa, and all your cuts are square. Anyway, cut out the side and back pieces and stitch together, and fit over the back. Turn under and staple to the underside of the legs. Reference the diagram in step 6 for exact measurements.
Step 8

Base
Build the base as shown above. Don’t worry about the 2x2s not being strong enough – their is no support required here (it’s all in the 2x10s). The 2×2 aprons are to keep the fabric tucked under and to give you something to screw your feet too. Paint or stain your base. If you choose to use 2x4s for the legs, remember, this does change the dimensions of the legs, and adjust the 2×2 cuts accordingly.
Step 9
Assembly
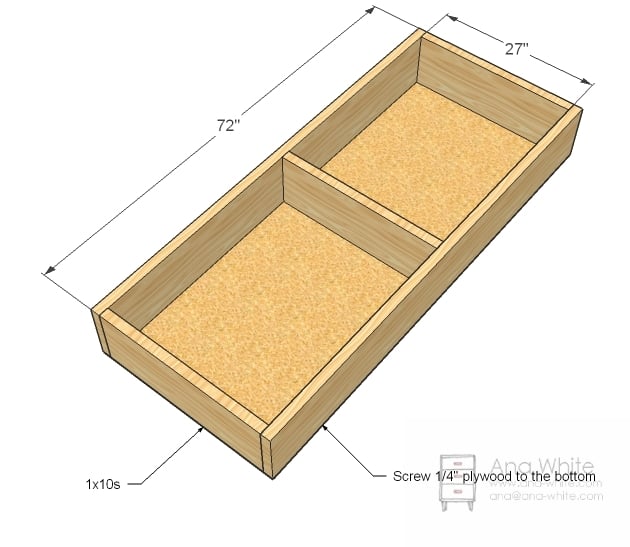
Assembly will be easy. Start by screwing the storage box to the back, through the 2×10 back boards into the supports in the back of the sofa. Use the 3″ screws. Then flip over and screw the base to the sofa underside with 3″ screws. Flip it back over and attach the cushion with hinges. Support the hinges with a strap to keep the cushion from collapsing all the way forward.
Step 10
Pillows
The pillows I sewed for this sofa are square box cushions measuring 36″ wide x 4″ deep x 18″ tall. Cut four pieces of fabric 37″ wide x 19″, four pieces 19″ x 5″ and four pieces 37″ x 5″. Stitch with right sides together, creating a box, but leaving an opening to insert foam. Stuff with loose stuffing. Hand stitch open seam closed.

Comments
MICHELLE (not verified)
Sun, 11/14/2010 - 21:46
OMG I need a new couch and
OMG I need a new couch and this may be the way to go... I'm thinking og two in the shape of a L would be perfect.... HMMMM
Danylle @ Nana… (not verified)
Sun, 11/14/2010 - 21:50
I love this! I will be
I love this! I will be hitting Fred Meyer for some foam. Thanks for all you do!
Mollie (not verified)
Sun, 11/14/2010 - 21:55
I've always wanted to build a
I've always wanted to build a couch because it's been really hard to find furiture that fits into my awkwardly shaped living room. No one really makes "apartment" sized sectionals, and that's definitely what I need for my tiny house.
Guest (not verified)
Wed, 04/06/2011 - 05:13
ikea
ikea has awesome stuff for small spaces. we just recently relocated from a 2500 sqft home to a 986 apartment and i was very pleased to find that ikea has just about everything you need to decorate, even small sectionals at super affordable prices. though, with ana you get to have fun building and you could even build the stuff at ikea for far less. happy building.
Julie (not verified)
Sun, 11/14/2010 - 21:55
LOVE IT!!!
LOVE IT!!!
Andy W. (not verified)
Sun, 11/14/2010 - 21:58
I love this. I stumbled
I love this. I stumbled across your site a few days ago and now I want to go out and start building things. Keep posting the great plans!
laura lehman (not verified)
Sun, 11/14/2010 - 22:00
When I was upholstering my
When I was upholstering my enlarged version of your toddler bed I said to my husband..." I should build us a new couch"....We started discussing that it was just a wood frame with padding. Thanks for the plans! The storage part is ingenious and I'll be running off to Freddies tomorrow.....We have them here in Oregon!
Allison (not verified)
Sun, 11/14/2010 - 22:31
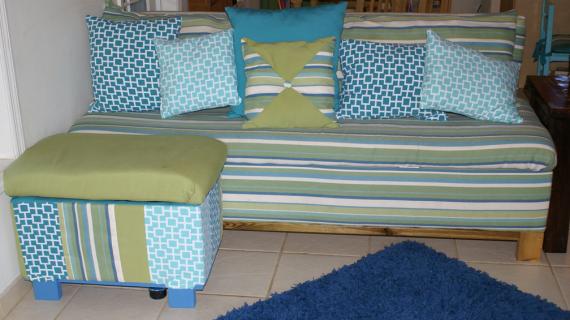
And if you want you can add a
And if you want you can add a little extra materials and make a matching ottoman! WITH STORAGE TOO!! What a fun idea.
Krista @ The D… (not verified)
Sun, 11/14/2010 - 22:57
This is great! You could easy
This is great! You could easy modify things for a nice little sectional. Great plans!
Satakieli (not verified)
Sun, 11/14/2010 - 23:27
This is perfect! I'd been
This is perfect! I'd been waiting for a sofa plan and was beginning to consider just turning one of your outdoor chair plans into a sofa... but this is exactly what I need! thank you!
Shawn (not verified)
Mon, 11/15/2010 - 01:50
Thank you so much Ana my
Thank you so much Ana my teenage son wants a sofa for his room,this looks perfect,great forsleepover guests too!!! Love all your plans
Toni (not verified)
Mon, 11/15/2010 - 02:04
This is wonderful. I can
This is wonderful. I can easily see this turning into a sectional! Can you please esign the corner section?
Angel s. (not verified)
Mon, 11/15/2010 - 02:07
So clever and modern looking!
So clever and modern looking! Too bad I am running out of space to put things. Thanks for sharing your amazing plans!
Peggy (not verified)
Mon, 11/15/2010 - 02:13
So stinkin' smart!!!
So stinkin' smart!!!
N. (not verified)
Mon, 11/15/2010 - 02:27
Wow! Is there anything you
Wow! Is there anything you can't do?? I love this - going to send the plans over to my husband to see what he thinks!
Erica (not verified)
Mon, 11/15/2010 - 02:44
This is soooo awesome!!!!! I
This is soooo awesome!!!!! I was wondering if you could show us how to build arms on either side of the sofa? My hubby likes your plans, but wants arms...thank you so much Ana, you are amazing!!!
Hugs
Cheramie (not verified)
Mon, 11/15/2010 - 02:48
Nice job, Ana!!! I'm saving
Nice job, Ana!!! I'm saving this plan to build in my daughter's room in the future! She is normally in our room, and her crib doesn't really work as a guest bed very well. We would use it as a reading place when a bed isn't needed. LOVE IT!!!
And just an idea, I believe the drop cloths are cotton, so you could dye them any color you wanted to!!! I'm thinking chocolate brown. :)
Jennifer Eisenhart (not verified)
Mon, 11/15/2010 - 03:07
This is awesome!!! I have an
This is awesome!!! I have an entire set of replacement sofa cushions for my sectional - they are all taking up room in my garage because I didn't know what to do with them. I'll be using your plans to make my son a sofa for his theater room. Perfect timing! Thank you! Thank you! Thank you!
Michaela @ The… (not verified)
Mon, 11/15/2010 - 03:13
You never cease to amaze me.
You never cease to amaze me. Just when I think you have done it all - you go one further. This is completely impressive. I have a mattress downstairs in the garden room sitting on some wood scrap (serves as an office sofa). There's a LONG winter coming and it's time to get on something more attractive!
Hopelessly devoted...
xo M
Jaime (not verified)
Mon, 11/15/2010 - 03:32
you NEVER cease to amaze me!
you NEVER cease to amaze me!
Kate (not verified)
Mon, 11/15/2010 - 04:09
Wonderful! Though I'm
Wonderful!
Though I'm jealous of those camping pads you found, I've been going through camping sections of stores for quite a while and have never seen such thick or cheap pads as you found, nor would any of the ones I've seen hold up to being in a couch (they were all very thin, squishy, and expensive).
Leah (not verified)
Mon, 11/15/2010 - 04:26
Wonderful! A
Wonderful!
A suggestion...my store-bought couch has batting wraped around the foam in the cushions. That might tighten up the seat pad and make it even more professional.
Laree @ Ever H… (not verified)
Mon, 11/15/2010 - 04:28
Amazing. A. MAZE. ING!!!!
Amazing. A. MAZE. ING!!!! Jaw dropping wonderful!
Amanda H. (not verified)
Mon, 11/15/2010 - 04:49
Love it! When my daughter
Love it! When my daughter gets a bigger bedroom, this will be on a build list for sure! It would be perfect as she hits the teen years! I could also see this transitioning to a college dorm room with ease.
Jennifer (not verified)
Mon, 11/15/2010 - 05:02
I HEART this ANA!! I agree
I HEART this ANA!! I agree we need the corner piece to make a sectional! Even if the build cost for the sectional is $350 or even $400 with lumber and fabric it's still WAAAAAAAY cheaper than sectionals that start at $900 without storage! Love it love it! Thanks for all you do, you're such an inspiration!
Jennifer
Jeannine (not verified)
Mon, 11/15/2010 - 05:19
Thanks for the plans, I plan
Thanks for the plans, I plan to build these for our basement!!! I also have 2 suggestions for readers building their own...
- Ebay is a great place to find the foam, but shop around and know what you are buying - prices can vary greatly - we made our own temprapedic mattress from 2 types of foam bought on ebay - queen size less than $200 - as opposed to almost $2000 for name brand.
- New bed pillows work great for the back pillows. Depending upon the length of the couch (I didn't look that closely), either queen sized or king sized pillows would probably work, or even make 3 instead of 2 and use standard size. A standard sized pillow at W-mart or other discount stores are under $4. The other nice thing about using regular pillows is that you can take them out and wash the pillow cover, and could even was the pillow itself separately (following mfg directions) if needed. Unstuffing a fiber filled pillow is a pain, and buying fiberfill can be expensive. You could even go all out and get down/feather pillows!
Jeannine (not verified)
Mon, 11/15/2010 - 05:23
JC penny also has the foam
JC penny also has the foam mattresses for a reasonable price - not $20, but reasonable...
http://www3.jcpenney.com/jcp/X6.aspx?GrpTyp=STY&ItemID=184134e&Ntt=foam…
Shellei (not verified)
Mon, 11/15/2010 - 06:04
Oh! you've been teasing me
Oh! you've been teasing me with this couch for days! it looks great and is def. on my list. I had a similar idea to the above poster about the upholstered toddler bed. I"d like to make this L shaped and with arms. I bet the plans for the back could be fitted to make some arms, with enough cushions they could be straight and still be comfortable.
Amanda (not verified)
Mon, 11/15/2010 - 06:21
Love these plans though I'm
Love these plans though I'm not in a couch needing mode. My college age kids might love it though. We don't have a Fred Meyer where we live but I know our local JoAnn's often has foam 50% which is when I buy it to redo ottoman's that I refurbish from the thrift store. Also our local thrift store sells new mattresses for $80 for a twin. Just an idea for those who need to build a coach. Just love your site Ana. Thanks for all the ingenious ideas.
Amanda (not verified)
Mon, 11/15/2010 - 06:23
Oh I forgot, drop cloths are
Oh I forgot, drop cloths are cotton but wash them first to remove all the sizing. Then you can dye them easily. Also Kool-Aid works as a great dye and is very inexpensive if you like wild colors.
AKMama (not verified)
Mon, 11/15/2010 - 06:34
What firmness did you select
What firmness did you select for the foam on the couch you made Ana?
Heather (not verified)
Mon, 11/15/2010 - 07:11
A dream come true! Really,
A dream come true! Really, truly. I have been eying the Karlstad sofas from Ikea for too long and this is almost there (save for the arms). Love it!
Farah (not verified)
Mon, 11/15/2010 - 07:26
Looks amazing! Do you think
Looks amazing! Do you think it's easier to build this sofa or reupholster one? I'm not handy at all, haven't built anything OR sewed anything on that big of a scale (as far as reupholstering), so either one seems hard to me, but I AM going to do one or the other!
Jim Goepel (not verified)
Mon, 11/15/2010 - 07:40
Ana, This is a great plan!
Ana,
This is a great plan! I was wondering if, instead of using the base as storage, you could make this into a futon-esque kind if arrangement that converts from a nice, comfy couch to a nice, wide bed by just folding out the second side. You'd need feet for support, but I wonder if you couldn't hide them inside the pillows that go along the back, or make them removable, with the holes/attachment points hidden by the pillows.
Ana White (not verified)
Mon, 11/15/2010 - 07:55
Really good idea here. What
Really good idea here. What I would do is do a double cushion, with no seam along the front, but each cushion individually upholstered so it could flip open. Then put the front apron on wheels so it pulls out and supports the cushions. Hmmm . . . maybe a plan?
Ana White (not verified)
Mon, 11/15/2010 - 07:57
There are so many smart
There are so many smart people out there! King pillows would work great, as this sofa is 72" wide and a king is 78" wide! Thanks for commenting. Ana
Ana White (not verified)
Mon, 11/15/2010 - 07:59
Leah, I think I did add this
Leah, I think I did add this to the plan, we did wrap the top cushion in batting, spray glued to the seat cushion. My sister wanted a very square look, but adding more batting or higher loft batting will achieve this look. Thanks so much for mentioning this. Ana
Ana White (not verified)
Mon, 11/15/2010 - 08:04
Farah, I've reupholstered
Farah, I've reupholstered before, and it can be easy, if you have a very square sofa that is in great condition. My experience? Building was much easier. Much much easier. Reupholstering can be so tricky!
Ana White (not verified)
Mon, 11/15/2010 - 08:05
My sister wanted firm, so we
My sister wanted firm, so we went firm . . . and this sofa is FIRM. I would go medium.
Ana White (not verified)
Mon, 11/15/2010 - 08:05
LOL at the Koolaid!
LOL at the Koolaid!
Micha (not verified)
Mon, 11/15/2010 - 08:26
Thank you for showing us that
Thank you for showing us that there is nothing we can't build if we put our mind to it! This is a fantastic project and I've got it earmarked for our son's new bedroom if we close on our new home sometime soon! Thank you so much for all of your hard work!
Veronica (not verified)
Mon, 11/15/2010 - 09:23
This is neat, however, with
This is neat, however, with any storage compartment you need to drill air holes into that storage area...just like you would a toy box. If a child were to become trapped in that small area, the nifty storage area could potentially become fatal.
Rachel (not verified)
Mon, 11/15/2010 - 10:38
Wow, camping pads?! Amazing.
Wow, camping pads?! Amazing. We plan to build the chunky leg bed with an upholstered headboard but I was concerned about the cost of the foam for our headboard and for some other upholstery projects I have in mind. Not anymore! Thanks for the ingenious plan:).
Lacy (not verified)
Mon, 11/15/2010 - 10:48
Love the storage!!!!
Love the storage!!!!
Caren (not verified)
Mon, 11/15/2010 - 10:57
Do you know what brand the
Do you know what brand the foam pads you found are? We don't have a Fred Meyer but I'd like to try and find them somewhere else.
nancy (not verified)
Mon, 11/15/2010 - 11:28
WOW, THANK YOU, THANK YOU! ;)
WOW, THANK YOU, THANK YOU! ;)
Lisa (not verified)
Mon, 11/15/2010 - 11:57
When I saw the snippet from a
When I saw the snippet from a few posts ago, I thought maybe that was a Twin sized mattress... "Standard" (YMMV) twin size is 39x75. Your camping mattresses are 30x72, so my hopes are dashed. :-( I have a spare twin mattress, so I was hoping.
HammerTime (not verified)
Mon, 11/15/2010 - 14:09
Brilliant, as always! I need
Brilliant, as always! I need to quit my job so I can make all the things on my list! :-)
Ang (not verified)
Mon, 11/15/2010 - 14:19
Yes, please! Something like
Yes, please! Something like that would be exactly what my husband wants for his office!
Jessica W (not verified)
Mon, 11/15/2010 - 16:15
A comment on the new-ish site
A comment on the new-ish site design: I dislike it. I feel like you've reoriented it to be about yourself, and NOT the furniture/designs that I come here for. If I feel this way, I know someone else does as well. It just rubs me wrong.
On a more positive note, this is an awesome plan. The boy and I have been skirting around the idea of a custom couch for a while (for now we have a twin mattress up on a couch-height platform). My best friend has already asked me to help her build one/two of them once she moves here (since I've got the tools and the previous experience). I may do it, and I may build myself a couple too. So bravo for a new plan not kid oriented.