


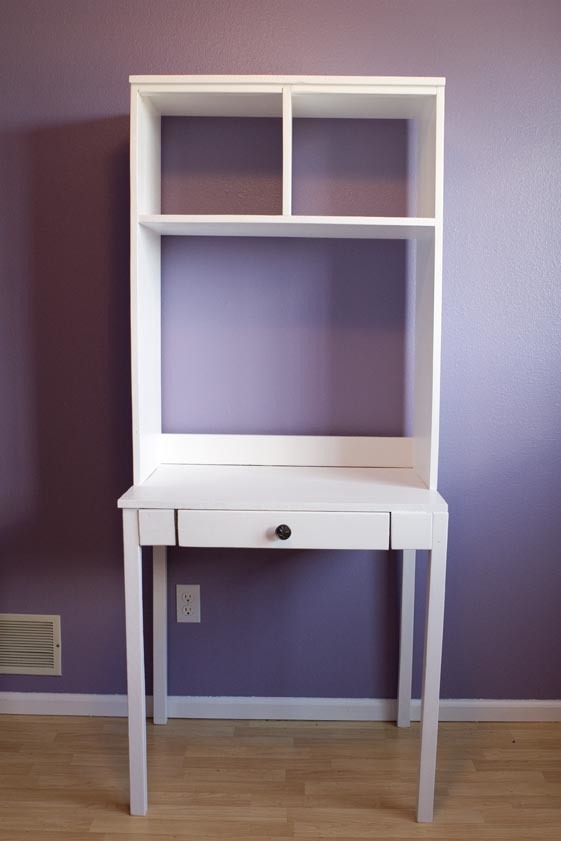
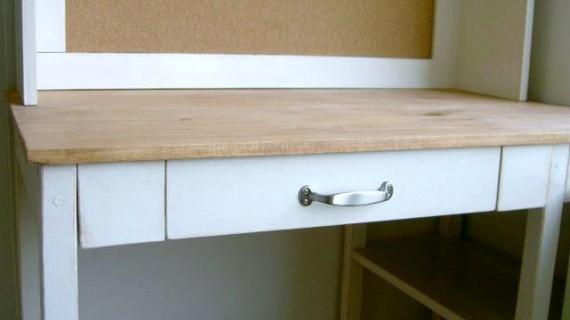
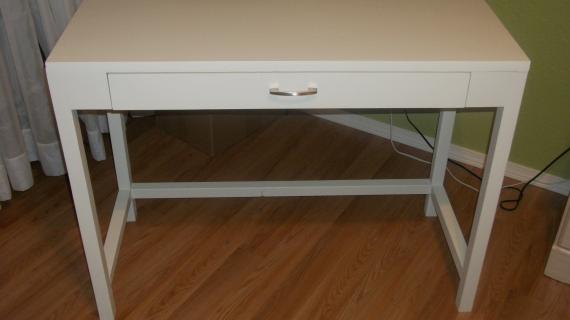
A desk for our Cubby Collection! Special thanks to Hatchet for the beautiful photos!

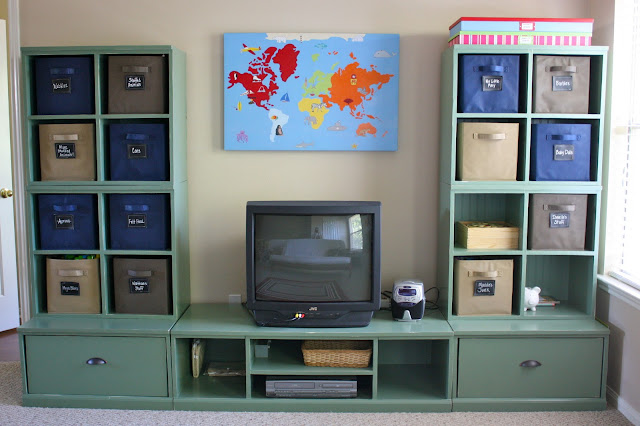
I've been wanting to go back and revisit some of our most popular plans and add to the collections. Take our Cubby Wall System. It's been built, and my jaw drops still, every time I see one of your photos.
From Robin

From Stephanie

From Elaine

From Angela

From Marie
And from Ralna

Ralna's photo is of both our Cubby Collection of Plans and our Classic Collection of Plans for the desk. Her photo made me think we should add a plan for the Cubby Collection for a desk.
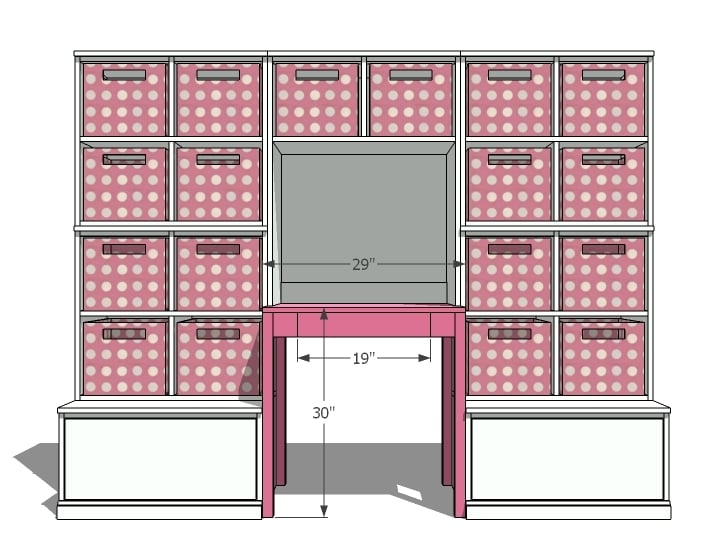
And here it is, the matching desk and hutch combo for the Cubby Collection. You can see the entire collection and access the plans for the towers here.
Today, we'll do the desk.
Preparation
For the Desk:
Scrap 1/4" plywood for drawer bottom
3/4" plywood for top
1 - 1x4 @ 8 feet long
1 - 2x4 @ 8 feet long
2 - 2x2 @ 8 feet long
Euro Style Drawer Slides (The cheapo white ones that mount on the bottom corners)
Knob or handle
For Hutch see in plan
1 - 1x4 @ 26"
2 - 1x4 @ 18 3/4"
2 - 2x4 @ 18"
1 - 3/4" Plywood @ 21" x 29"
2 - 1x4 @ 3 1/2"
4 - 2x2 @ 29 1/4"
Cut drawer to fit from 1x3s


Instructions
Step 1

Dimensions for just this plan.
Step 2
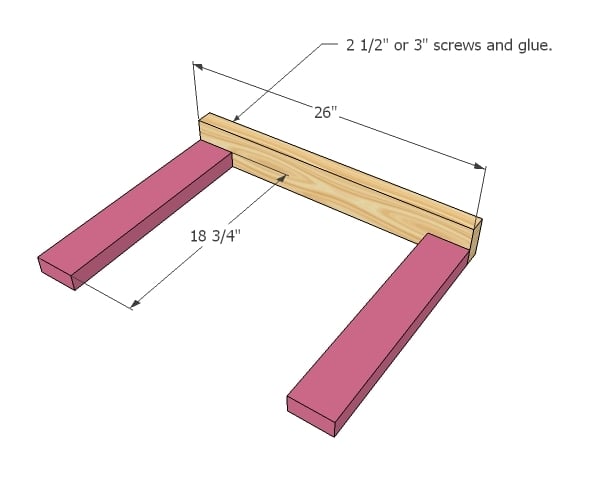
Back Aprons
Start by screwing the cleats to the back apron with glue and 2 1/2″ or 3″ screws. Predrill your screw holes to keep wood from splitting with a countersink bit.
Step 3
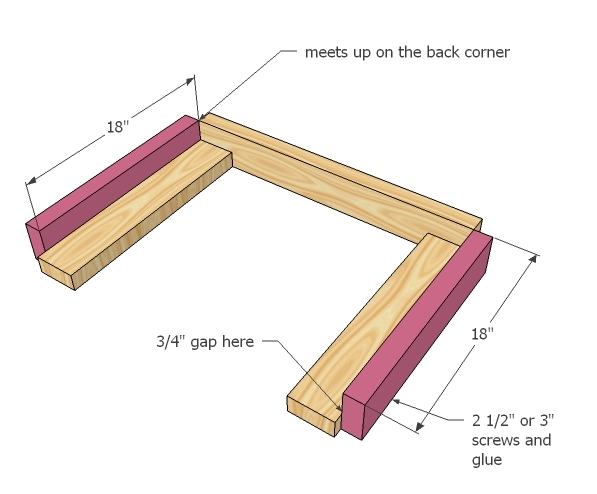
Side aprons
Now screw the side aprons to the cleats.
Step 4

Top
Glue the top to the frame, keeping back and side edges flush. Use 2″ screws to screw the cleats to the tabletop. You can finish the tabletop edges with iron on edge banding for a solid wood look, or use MDF for paint grade.
Step 5

Step 6
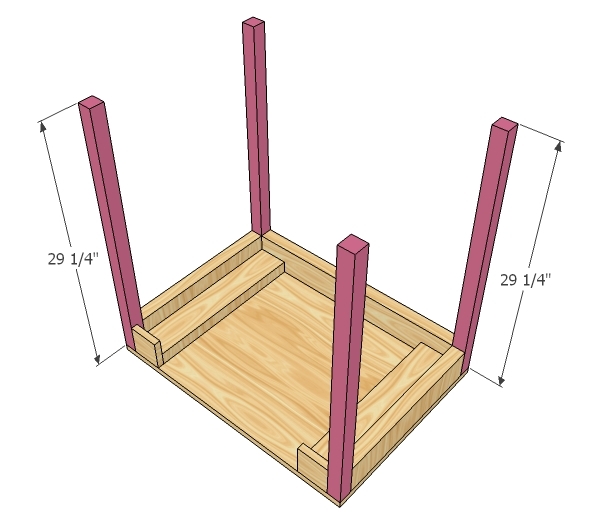
Legs
Now just add the legs with the 2 1/2″ or 3″ screws and glue. Now it’s time to do the drawer.
Step 7

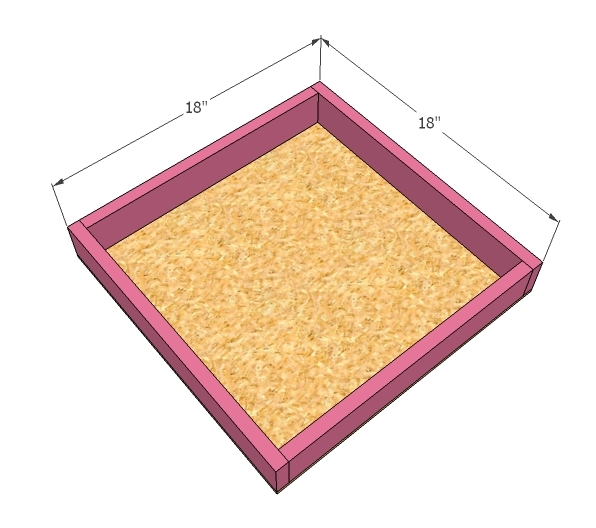
Drawer Box
Build the drawer box with 2″ screws and glue to fit the opening, leaving 1/2" gap on either side of the drawer for drawer slide allowance. Good time to add dividers if you would like. Dividers should be cut from the 1x3s and will add strength and functionality to the drawer.
Step 8
Drawer Bottom
Now add the drawer bottom with 2″ screws and glue.
Step 9
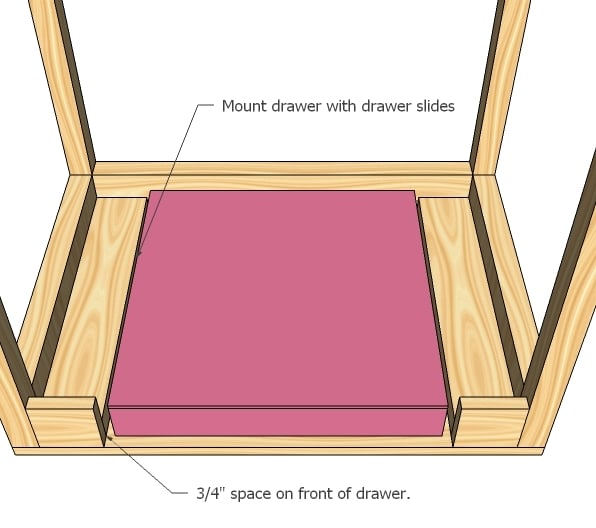
Mount Drawer
Mount the drawer into the desk. Notice how the drawer is inset 3/4″ from the front of the desk.
Step 10
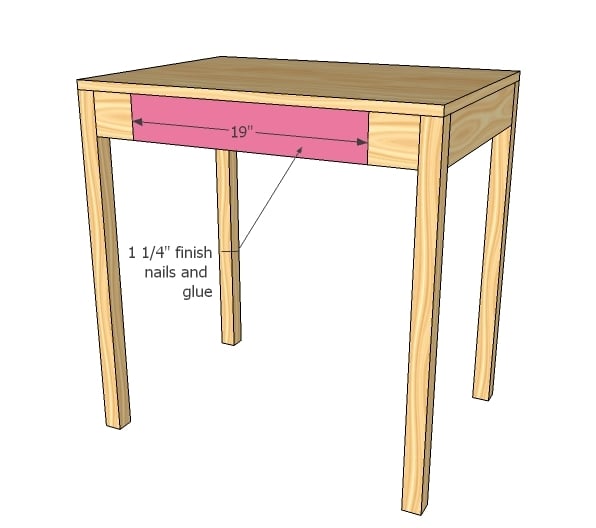
Drawer Face
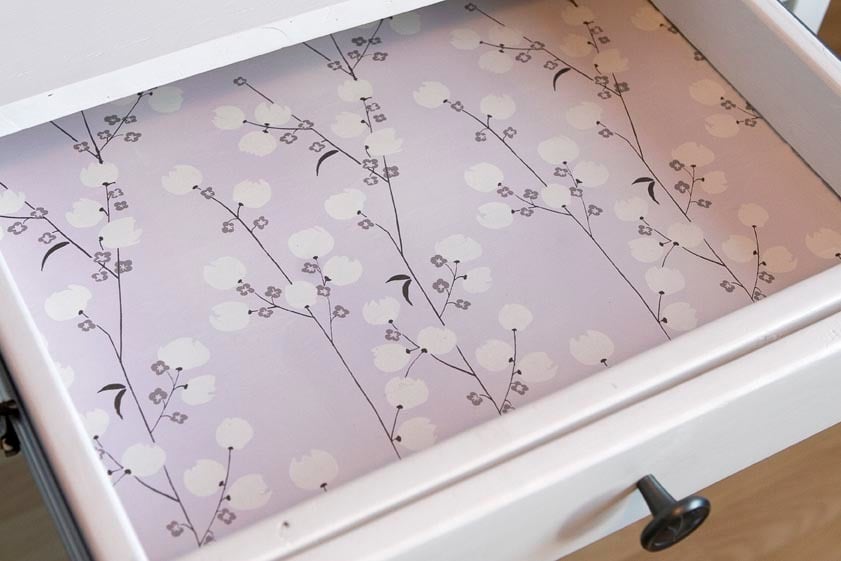
Now line the drawer face up with the drawer and nail on with finish nails and glue. Add knob or handle.
Step 11

Hutch
For the hutch, consult the cubby hutch plans for full instructions.
Comments
Tracie (not verified)
Wed, 11/03/2010 - 07:19
I love this desk! I want to
I love this desk! I want to make everything you show!!!

Amy (not verified)
Wed, 11/03/2010 - 07:58
Hi Ana! Thanks for another
Hi Ana! Thanks for another FABULOUS plan. I was just wondering how to tell the skill level on this plan. Is this a good one for a beginner?
Thanks!
Libby (not verified)
Wed, 11/03/2010 - 08:34
I made a pallet picnic table
I made a pallet picnic table w/ a 1 mo old strapped to me. I want to do this and two twin farm beds. I'm excited but to nervous to jump in.
Kaely (not verified)
Wed, 11/03/2010 - 14:46
Thank you! Thank you! Thank
Thank you! Thank you! Thank you!
Now I just need to find the time (sans toddler) to build it.
Jackie Solomon (not verified)
Fri, 11/05/2010 - 12:56
Hey Ana, I LOVE LOVE LOVE
Hey Ana, I LOVE LOVE LOVE your site. Thanks for the easy to follow plans! You've got me completely addicted. I've made quite a few projects so far, but all with dimensional lumer. Do you know if I can use the Kreg jig with MDF or will it split? Has anyone tried?
Jaime Costiglio (not verified)
Sat, 01/29/2011 - 12:34
Thanks again for the great
Thanks again for the great plans. I modified the size, added a lower shelf and open top shelf hutch. Love you Ana!
http://thatsmyletter.blogspot.com/2011/01/d-is-for-desk-2.html
Hatchet (not verified)
Thu, 03/03/2011 - 20:19
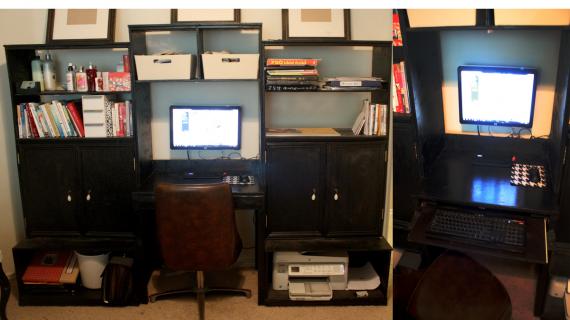
Thanks so much for the plans,
Thanks so much for the plans, Ana! My kid sister told me about your site and I've been racing through all of the plans and making my list. I've dragged my husband into creating a few things for me while I do the finishing work. Our 1st project was actually the $10 ledges, but this wall system is what we're working on now.
We just finished the desk and hutch and installed it in our daughter's room. She loves it! I'll link the picture below. Thanks again for all of your work and inspiration!
https://lh6.googleusercontent.com/-08F6JhU-LA8/TXAxRAkhDuI/AAAAAAAAGTw/…https://lh4.googleusercontent.com/-RVGmFpuERE0/TXAxRvRVaeI/AAAAAAAAGT4/…Ana White (not verified)
Fri, 03/04/2011 - 08:19
My real life reaction? "my
My real life reaction?
"my goodness, that is good!"
In reply to My real life reaction? "my by Ana White (not verified)
CreativeChaos
Fri, 05/24/2013 - 20:38
Help on this plan!
I need some help here. I followed this plan very closely, and the instructions and cut list say that the back board of the desk and inner cleats are 1x4's. However, when I assembled this, the back legs stick out 3/4" beyond the back board. The pictures make it seem like that piece should actually be a 2x4. Could that be? Also, the step that says to nail the inner cleats to the desk top with 2" screws results in the screws being 1/2" too long if those cleats and desk top are 3/4" each. (1x4 inner cleat and 3/4"desktop. So, should the back and inner cleats actually be 2x4's? I haven't gotten to the drawer step yet, but now I'm worried that the guides won't be low enough to mount the drawer if I used the 1x4 for the inner cleats.
SteveW
Sat, 12/05/2015 - 08:08
You are correct. DIMENSION UPDATES
In order to make this plan work like the images, You'll need to use 2x4s for the cleats, back and sides. Then the 2x2 legs will fit snugly within the space created for them in the corners.
In addition, I built the plan to exact (while using 2x4s) specs and the drawer actually has a gap of 1 1/2 inches in front of it NOT 3/4 as the plan says. This is because the cleat size says 18 3/4 not taking into account that once you add the 1x4 trim in front of the cleat you'll have a 1 1/2 inch gap for the drawer face to fit, not 3/4.
The drawer at 18"x18" should be 18"x18 3/4 to allow for a piece of 1x4 face trim for the drawer. I just built 2 of these side by side at the same time and both verify that...
I reinforced the legs with 2x2 cross members on the sides and back attached with Ana's favorite junior Kreg jig. Will post pics later...
Hatchet (not verified)
Sat, 03/05/2011 - 12:24
Thanks so much, Ana! I really
Thanks so much, Ana! I really do appreciate all of your work. I told my husband when I first started scouring your site that I'd chosen a hobby FOR him. Something that would get him off the computer. Fortunately for me he was game and the positive feedback he's been getting from friends and family has helped encourage him!
Here's a link to my daughter's bedroom, where the shelves are living. I linked to your site and I've gotten a few of my friends and cousins all wound up about building their own furniture, too!
http://1.bp.blogspot.com/-KKxIgVyaET0/TWRWnGPql0I/AAAAAAAAGTk/JF_OtDY-6…monkeygirl
Thu, 08/15/2013 - 09:32
plans PDF
HI Ana, I am a new member here and very excited to start building! Unfortunately I am not able to download these plans. Could you upload them again and see if that solves the problem?
Thanks!
ulwrj
Sat, 10/04/2014 - 04:02
Thanks for providing recent
Thanks for providing recent updates regarding the concern, I look forward to read more.