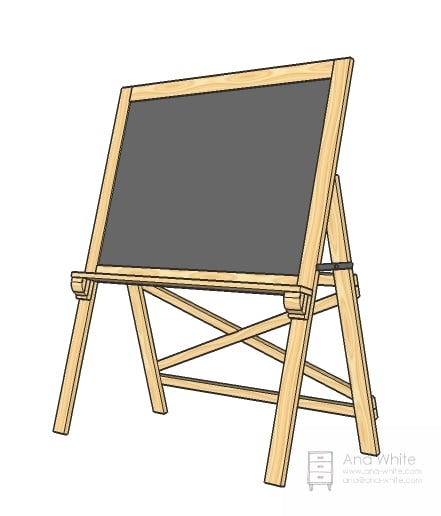


A large chalkboard, with cross bracing and a chalk ledge. Can be built to fold flat.
Thank you everyone for liking the Toddler Chalkboard Easel. I'm at heart a three year old, and when I see lots of likes, it really does make my day. Thank you.
As we get closer to the Holidays, my stress is definitely increasing. There are just so many plans I want to get out to you in time to build and gift. So today I am going to put the plans for the Schoolhouse Chalkboard up. It's big.
Preparation
- 4 -1×3 @ 8 feet long
- 2 – 1×2 @ 8 feet long
- 1 1/4″ pocket hole screws
- 1 1/4″ screws
- 3/4″ screws
- wood glue
- finishing supplies
- 1/2 sheet of 1/4″ thick hardboard (backside of paneling works great chalkboard paint
- 1 set of 2 1/2″ wide hinges (door hinges would work or industrial hinge)
- 1 set of hinge for lift tops toy boxes – the longer the better.
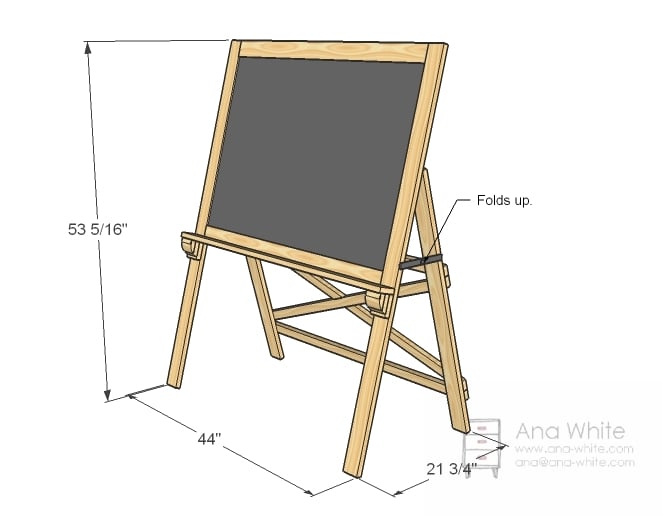
- 2 – 1×3 @ 39″ (Frame Top)
- 2 – 1×3 @ 55″ (Frame Sides)
- 1 – 1/4″ hardboard @ 44″ x 31 1/2″ (Chalkboard)
- 1 – 1×3 @ 44″ (Tray)
- 2 – 1×3 @ 39 1/4″ (back legs)
- 2 – 1×2 @ 44″ (horizontal back supports)
- 1 – 1×2 @ 46 3/4″ (first cross support – see diagram before cutting)
- 1 – 1×2 @ 48″ (second cross support – see diagram before cutting)


Instructions
Step 1

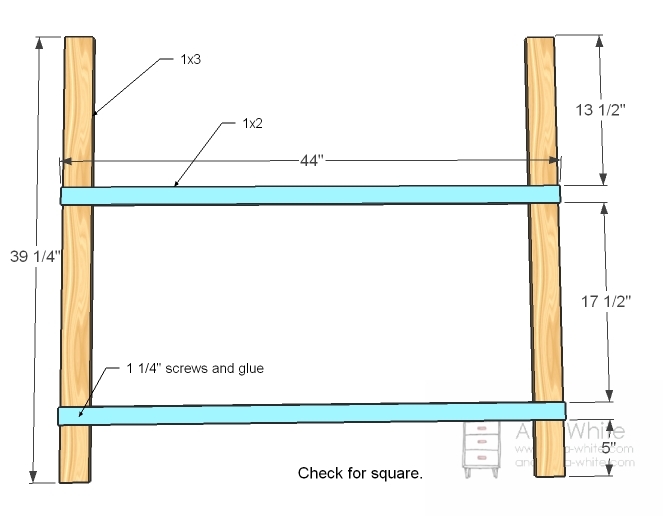
Build the Frame
Drill pocket holes in both ends of the horizontal frame boards. Build the frame.
Step 2
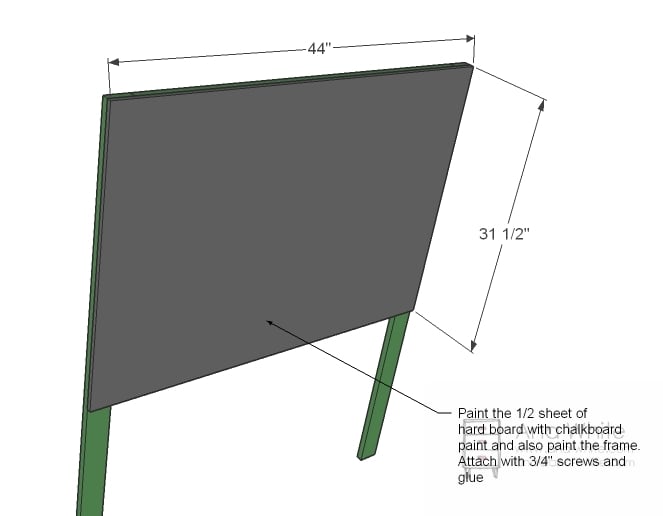
Chalkboard
After painting both the frame and the chalkboard, glue and screw the chalkboard to the frame using 3/4″ screws and glue.
Step 3
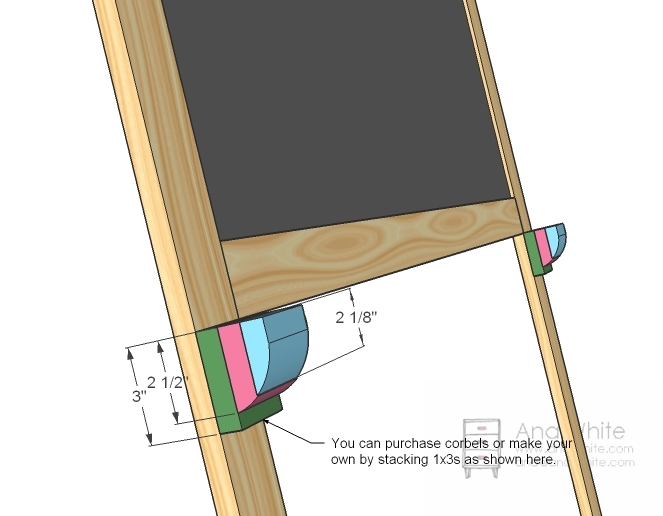
Corbels
Attach corbels, or make your own as shown above. Glue and screw or use finish nails to secure.
Step 4
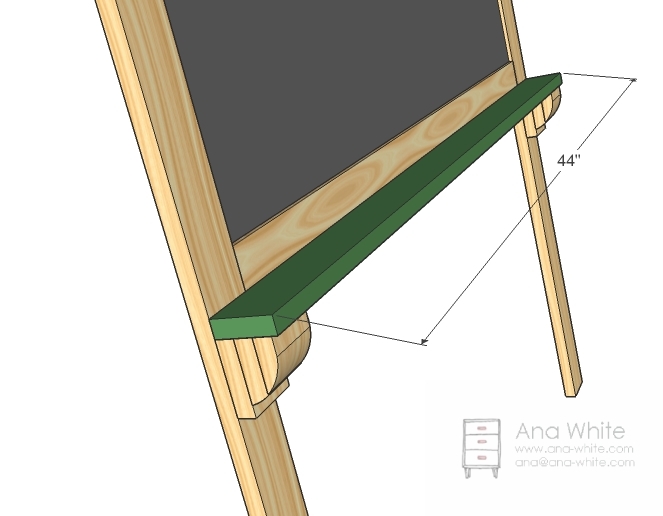
Tray
Now attach the tray to the corbels and screw through the back into the back side of the tray. Use 1 1/4″ screws and glue.
Step 5
Step 6

Cross Support
The easiest method is to lay the 1×2 over the back and mark. Cut with a jigsaw, then glue and screw in place with 1 1/4″ screw and glue.
Step 7
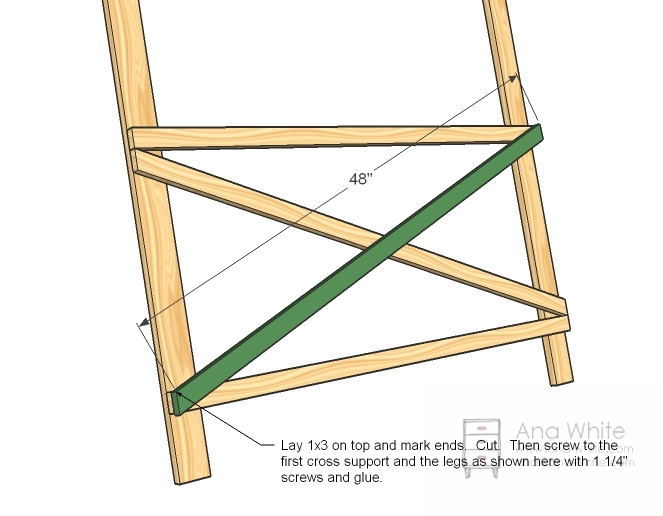
Top Cross Support
Now simply lay the top cross support on top, mark, cut and then glue and screw in plac
Step 8
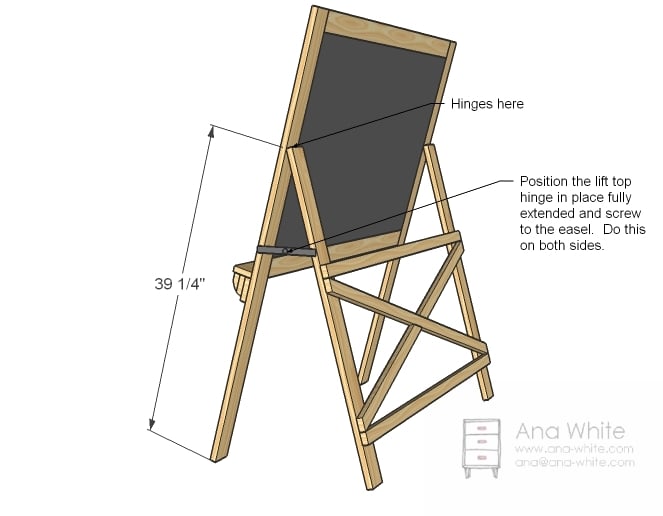
Assembly
Hinge the back to the front as shown in the diagram. Then prop the chalkboard up in the position that works for you. With lift top hinges fully extended, screw in place on both sides where the hinges fit (longer ones will add more support).
Comments
Rebecca (not verified)
Sat, 11/13/2010 - 11:50
Love this! We have weekly
Love this! We have weekly family lessons and this would be perfect!!! Not to mention all the fun the kiddos could have! Now to add it to my project list...
Cheramie (not verified)
Sat, 11/13/2010 - 11:52
Ana, you've done it again!
Ana, you've done it again! As a homeschooling Momma, I'm SO excited to see this plan! I'm looking forward to using it in our new school room!!! :) I love that I won' t have to have an entire wall help up with the board, but that it will be able to be pulled out and put away as needed. Thanks for another great plan!
Cheramie (not verified)
Sat, 11/13/2010 - 11:53
"held" up... ;)
"held" up... ;)
Brittany (not verified)
Sat, 11/13/2010 - 16:50
I was actually "shopping"
I was actually "shopping" around for something like this last night online! I couldn't believe it when I saw this today! Thanks so much, this is exactly what we needed! Hubby was thrilled when I told him we didn't have to spend $225 on a chalkboard..... :)
lt (not verified)
Sat, 11/13/2010 - 17:17
Love it, love it.
Love it, love it. Homeschooling mommas across the nation are horraying right now; myself included! We just finished the tryde coffee table for my dads 60th birthday. I can't wait to get my build on again with this project. Or a set of those cute four dollar chairs. Or your elementary table. Or the farmhouse bed. Well I'm sure you get the picture.
lt (not verified)
Sat, 11/13/2010 - 17:19
Oh and add some clips to the
Oh and add some clips to the top for those large sheets of easel paper. Two kids at the board at once, nice!
Kev (not verified)
Sat, 11/13/2010 - 23:55
You could use a bit of
You could use a bit of skirting to make up corbels [or baseboard I think you call it!]
Tiffany (not verified)
Sun, 11/14/2010 - 00:41
I'm with the other
I'm with the other homeschooling mommas! This is at the top of the list after we get all the Christmas presents done. Dry erase boards are banned from our house due to one son that has a marker obsession and too many ruined shirts, furniture, carpet.....
Just had a good laugh. You know you are getting older when you are excited about how awesome a chalkboard is going to be!
Mari (not verified)
Fri, 11/19/2010 - 04:06
Thank you, Ana. I started on
Thank you, Ana. I started on this yesterday. My church is using 60-year-old chalkboards in the Sunday school classrooms that have almost no chalkboard paint left on them and won't "hold" new paint and bits of the framing are so battered they can't be repaired/reaffixed anymore. The first one goes in my teen classroom. Then if I'm feeling generous I might make more for the other classes :-P
DotClark
Mon, 03/26/2012 - 05:59
CLICK TO CONTINUE READING
hello there
Calmly
Sat, 01/24/2015 - 16:43
Other options
Hi is there another way to attach the boards without a kreg jig?
Calmly
Sat, 01/24/2015 - 16:43
Other options
Hi is there another way to attach the boards without a kreg jig?
In reply to Other options by Calmly
Ana White
Mon, 01/26/2015 - 10:34
Hi, Another way would be to
Hi, Another way would be to purchase a metal mending plate or steel bracket for the back and use it to tie in the two boards. You could also glue and use dowels to join. The Kreg Jig is the easiest method for sure, but there are other means. Hope this helps!