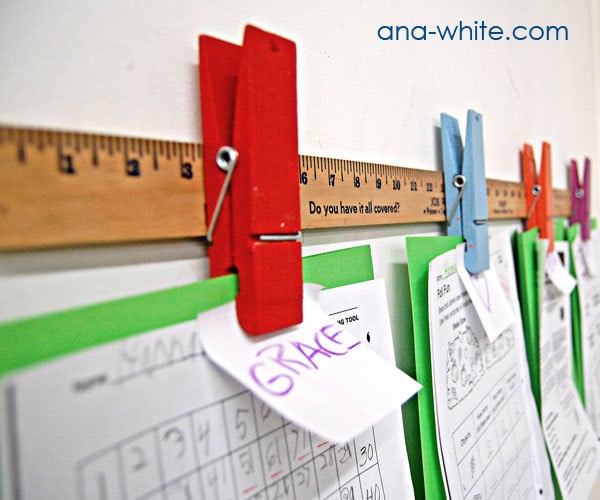


Display your children's artwork or even a chore list with this cute wall display system. Made from Jumbo clothespins and a wood yardstick.

So I have a story for you.
My sister Claudia is in town and Grace was showing her her room. And of course, Grace only has a toddler bed.

And Aunt Claudia asked where she was going to sleep, because Grace's bed is too small.
And Grace replied, with confidence, "Don't worry, I'll make another bed."
And Aunt Claudia said, "Won't that take a long time?"
And Grace said, "No, I promise, I can make another bed real fast."
Well, we didn't make a bed. But we did make this together.

And it was real fast.

And real cheap. You will need a yard stick. Ours came from the Lowe's paint counter and was eighty-nine cents.

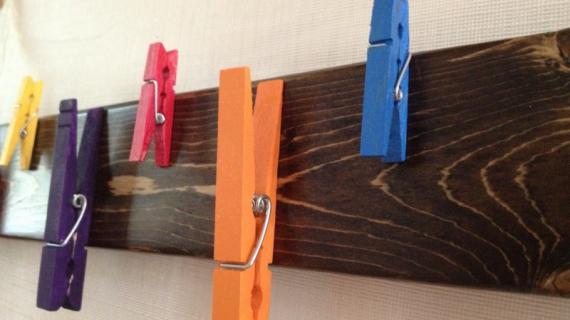
And four of these giant clothes pins. I got them on sale for three dollars for all four.

And some leftover paint. Acrylic paint in the tube works too.

This one is high gloss red from Valspar.

And this blue is a homemade oooops concoction. Add a little gray to the color to tone it down and balance the brights.

More ooops paint. Can't beat $1 per quart. Especially in premium paint.

And I wanted to show you this photo because this plum is green ooooops paint. Notice how the paint is thinner than the other colors (all single coats)? I'd pay for green paint, but this one doesn't have the same coverage as the other paints.

Now line out your clothes pins on the yardstick. Mark the locations. Flip the whole thing over.

And screw the yard stick to the clothespins with short screws (measure your clothespins and yardstick, I used 1/2" screws)

And then just screw the whole thing to the wall. I screwed mine to a stud in the wall, but you could also use drywall anchors.
Comments
Jeanne (not verified)
Mon, 11/01/2010 - 20:05
I Love this! I have 5 kids,
I Love this! I have 5 kids, and the younger ones are always making something. I would love to have a whole bunch of these!
Cindi (not verified)
Tue, 11/02/2010 - 01:48
Love the idea..now just to
Love the idea..now just to think of where it will go...hmm
Susan (not verified)
Tue, 11/02/2010 - 02:01
I wonder if a hot glue gun
I wonder if a hot glue gun would work instead of screws...or would it not be strong enough?
Guest (not verified)
Thu, 05/19/2011 - 14:03
I used a hot glue gun on mine
I used a hot glue gun on mine and it worked fine. I also painted the yard stick a navy blue and the clothes pins a bright grean. Between the Pins I painted white wooden stars and hot glued between. It looks great with my sons Toy Story room!
Mary Anne (not verified)
Tue, 11/02/2010 - 02:06
Love this! It's
Love this! It's self-measuring too!
I'd think your pre-drilling advice would be especially good here... wouldn't want to split the yardstick. Where did you find the huge clothespins?
Also love your creativity with the oops paints!
Megan (not verified)
Tue, 11/02/2010 - 02:26
Such a cute, simple idea! We
Such a cute, simple idea! We JUST got our son into school and he starts tomorrow, this will be awesome for his little bring-home projects!
Also, wudjya ever do about the bed situation? (lol!)
Darla (not verified)
Tue, 11/02/2010 - 03:16
If you use glue, just skip
If you use glue, just skip the paint on that spot. It'll stick better. I think I'd just use wood glue or gorilla glue though.
pat (not verified)
Tue, 11/02/2010 - 03:33
love this - great way to
love this - great way to corral those papers and so cute.
Kari@Ucreate (not verified)
Tue, 11/02/2010 - 04:45
Ana, THESE ARE FABULOUS!
Ana,
THESE ARE FABULOUS! Thanks so much for sharing!
I'll be linking!!
Rebecca (not verified)
Tue, 11/02/2010 - 04:49
I *love* this project. Soooo
I *love* this project. Soooo cute and I've been looking for a creative way to display the *many* coloring pages/drawings/craft projects that seem to multiply when I'm not looking. I think I've found my answer!
Nan Tovar (not verified)
Tue, 11/02/2010 - 04:53
@ Mary Anne---if you click on
@ Mary Anne---if you click on the giant clothespins, it will come up with Jo-Ann's.
What a great idea, Ana! Even better than your Clip Art rails.
Nan Tovar (not verified)
Tue, 11/02/2010 - 04:54
@ Mary Anne---if you click on
@ Mary Anne---if you click on the giant clothespins, it will come up with Jo-Ann's.
Ana--this is even better than the Clip Art rails, more colorful too
Amanda (not verified)
Tue, 11/02/2010 - 05:03
I think I will make a shorter
I think I will make a shorter version and attach heavy-duty magnets on the back! That way I can use it on the fridge! I never have enough clips on the fridge. Thanks for the idea!
Andrea (not verified)
Tue, 11/02/2010 - 05:17
We have something very
We have something very similar in our play room. Regular clothespins (about a dozen of them), painted red, on a piece of scrapwood painted yellow. The kids love having their artwork on display.
Lisa (not verified)
Tue, 11/02/2010 - 05:44
love, love, love this idea!
love, love, love this idea! I've been trying to come up with an idea to hang all my kids artwork. This is perfect! I'm seeing a while wall of these!
Tracie (not verified)
Tue, 11/02/2010 - 05:53
I love that project!!!!!
I love that project!!!!!

anna (not verified)
Tue, 11/02/2010 - 06:56
great project, I have the
great project, I have the perfect spot I can put it to hang up my girls' artwork!
Isabel Jenson (not verified)
Tue, 11/02/2010 - 07:49
I love love this! Im going to
I love love this! Im going to make several of these for my daugther's room! Ana, thank you for all you do, Heavenly Father bless you!
Megan (not verified)
Tue, 11/02/2010 - 10:02
ADORABLE! another design
ADORABLE! another design element to add to my play room plans! woo hoo!
yvonne (sydney… (not verified)
Tue, 11/02/2010 - 10:49
awesome & soooo simple !!!!
awesome & soooo simple !!!! you're a genius!!
emily* (not verified)
Tue, 11/02/2010 - 11:05
I tried a hot glue gun and
I tried a hot glue gun and seems to work just fine. Now after 6 months of little hands hanging and re-hanging art it may need another dab of glue, but so far it's great. I love finding projects where I have everything I need already lying around the house!
Ashley (not verified)
Tue, 11/02/2010 - 11:08
Will you explain this
Will you explain this comment? I've read and reread it a dozen times, and just can't figure it out.
"And I wanted to show you this photo because this plum is green ooooops paint. Notice how the paint is thinner than the other colors (all single coats)? I’d pay for green paint, but this one doesn’t have the same coverage as the other paints."
Julie (not verified)
Tue, 11/02/2010 - 12:17
This is so cute! I am an
This is so cute! I am an occupational therapist for a school district in Arkansas and this is a really great project for my kids. Thanks!
kate @ www.bro… (not verified)
Tue, 11/02/2010 - 13:12
Is there a way to hang these
Is there a way to hang these on windows?? Love the idea. Our playroom is just full of windows:)
Theresa (not verified)
Tue, 11/02/2010 - 14:15
I'm thinking that this might
I'm thinking that this might work for me with a few bills I keep loosing and have trouble keeping in order. Maybe in my sewing room where I need to hang a pattern and instructions while I sew. Thanks Ana, and its a fast project too!
Ana White (not verified)
Tue, 11/02/2010 - 16:07
suction cups!
suction cups!
Hilary (not verified)
Tue, 11/02/2010 - 19:16
Seriously cute!
Seriously cute!
jenn (not verified)
Wed, 11/03/2010 - 06:21
I'm gonna hit up lowes &
I'm gonna hit up lowes & joann's today... I've been wanting to make something just like that. thank you, as always, for the inspiration :)
Sunny (not verified)
Fri, 11/05/2010 - 05:49
I have an old yard stick that
I have an old yard stick that really isn't useful because it is curved but it has a beautiful patina. This would be the perfect project for my sewing corner.
Christy Panzarella (not verified)
Fri, 11/05/2010 - 09:36
Gorilla Wood Glue would
Gorilla Wood Glue would prolly work too. I just picked some up on sale at Harbor Freight!
Heather (not verified)
Fri, 11/05/2010 - 19:39
If you do the same thing, but
If you do the same thing, but turn the clothespins the other direction & hang the yardstick up vertically, this makes a good rack for baseball caps. I did those one year with the Fire Dept Auxiliary to sell at a fair.
Sunny (not verified)
Tue, 11/09/2010 - 19:07
I think by "green" she means
I think by "green" she means eco-friendly, low voc paint. It boggled my mind too how plum could be green LOL.
Ana White (not verified)
Tue, 11/09/2010 - 19:29
LOL! Sorry about that,
LOL! Sorry about that, Sunny, you are right.
Judy (not verified)
Thu, 11/11/2010 - 03:11
I LOVE this idea!!! I'm a
I LOVE this idea!!! I'm a teacher in an inner-city school and have a HUGE wall of block glass windows that I haven't been able to figure out how to hang the kids' work on.... yardsticks with clips, hung from suction cups are perfect!!! Thanks so much!
kimbowest (not verified)
Sun, 11/28/2010 - 10:15
I love love love this! I
I love love love this! I featured it on my blog today!!!
kimboscrafts.blogspot.com
Teresa (not verified)
Wed, 01/19/2011 - 08:58
I did this but I marked where
I did this but I marked where the clothes pins were going and painted a piece of scrap wood I had, I left the part where the clothes pins were going unpainted, painted the front and sides of the clothes pins and then just hot glued them to the other piece of wood.
Still together and works great!!
countrymomma (not verified)
Sat, 03/05/2011 - 18:38
This is just what I've been
This is just what I've been looking for. My four kids create an endless stream of artwork and I wanted a creative way to display it. And this is it! I'm definitely going to make this. Hope to make it to town tomorrow and get the supplies! Thanks Ana, this entire website is so cool! :-)
Chrystal
Tue, 05/24/2011 - 06:23
If I didn't want to screw into my wall
Do you think the double sided tape that holds hooks up to 50 pounds would work?
Char Haas (not verified)
Tue, 05/24/2011 - 07:40
No screw solution
If you don't want to put holes in the wall, I'd grab some of the "command" hooks by 3m, and use them in place of double stick tape. The adhesive will come cleanly off the wall. Follow the directions on the packaging, just apply the adhesive to the back of the ruler, rather than to the hooks! I've used these for years, and they hold well, except in high heat/humidity situations.
In reply to If I didn't want to screw into my wall by Chrystal
claydowling
Tue, 05/24/2011 - 08:49
Screw holes
One thing to keep in mind is that long-term, an adhesive is more problematic than a screw or nail hole. Over time the adhesive will either fail, or become one with the wall (typically over the course of 6-9 months). If that happens, the only way to deal with it is to gouge out the drywall and patch.
With a screw or nail hole, you can make it more secure by drilling or nailing into a stud (use a stud finder, they're cheap and useful). You can also pre-drill the hole, so that you pierce the surface in a controlled way and minimize the size of the hole. When it's ultimately time to take the ruler down, it's a couple minutes to fix with spackle or joint compound and a putty knife.
If you have real plaster walls, the situation is more complex. You must pre-drill nail or screw holes because the plaster will crack and the crack will spread, and the fix is tedious (and may require skills you don't have). The problems from the tape adhering are magnified as well.
Nikki Hayes (not verified)
Thu, 06/30/2011 - 09:39
What is the exact size on
What is the exact size on these clothespins? 6 inches, 9 inches, or bigger?
Dgidgi
Sat, 10/01/2011 - 15:18
Wow!!!!!
Adorable project, thank you so much for sharing... I made a version this afternoon and I just loved it...
Best regards all the way from Brasil
Cloe (not verified)
Thu, 10/06/2011 - 11:33
Help!
Ok, I took apart my clothes pins and painted them.... problem is, I can't figure out how to get them back together... any advice? - I feel like a dud!
Thanks for the great project this is perfect for my classroom.