
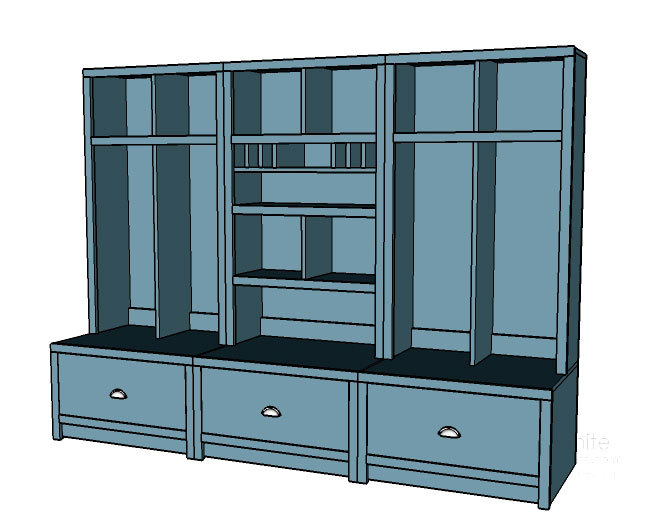

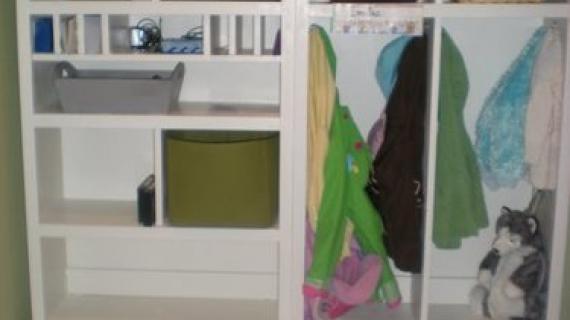
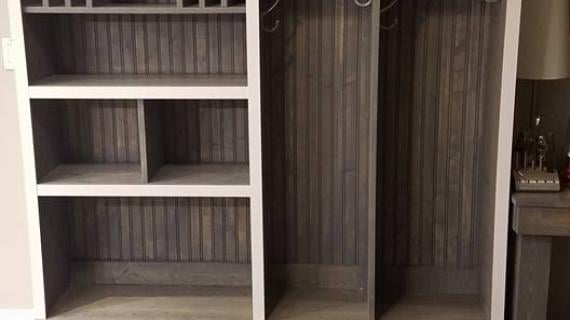
This hutch works with our Braden Collection and features four large cubbies, a mail sort shelf, and two large shelves.

Thank you Christine for sharing your amazing Blue Entryway Locker system on our Facebook Page and in our Photo Gallery.

I was so excited to see one of my favorite collections in a pretty blue, I just had to go and design the final piece to the collection.

You can see why I'm excited to revisit this collection. We'll be doing the center hutch, with the extra storage and mail sort today.

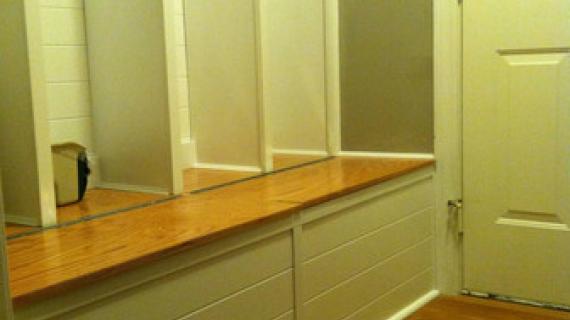
From another one of our amazing readers in white. There's also yellow! You will just have to visit the entire Braden Entryway collection here for all the plans.
Preparation
4 – 1x12s, 8 feet long
3 – 1x2s, 8 feet long
1/4″ Plywood, 1 sheet
1×4 30″ long
2″ Screws
Wood Glue
2″ finish Nails
1 1/4″ finish nails (for nailing the back on)
Wood filler and finishing supplies, including 120 grit sandpaper and paint and primer
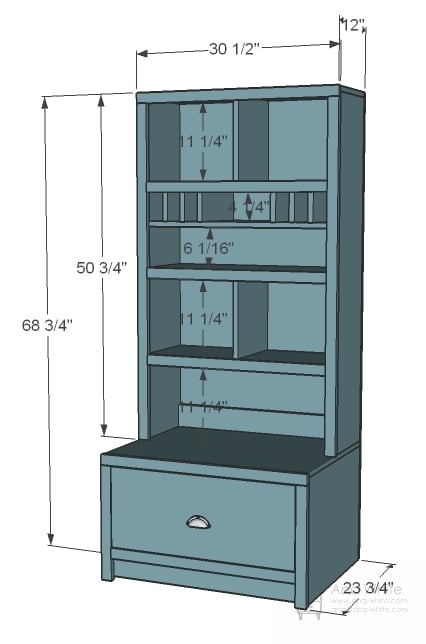
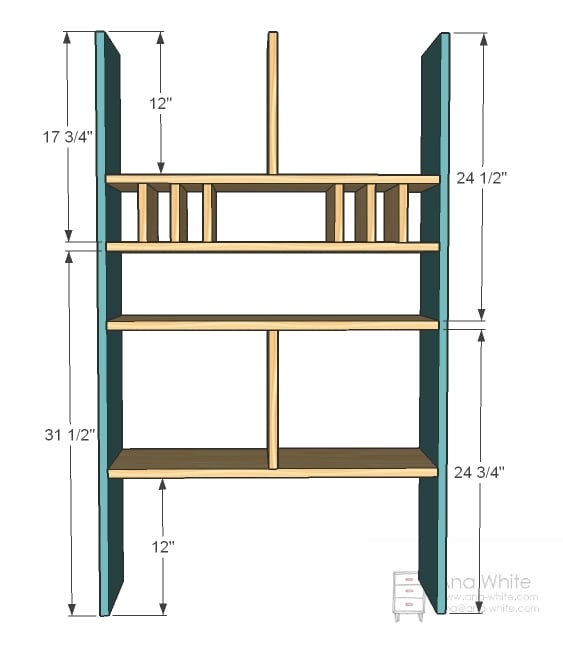
4 – 1×12 @ 28 1/2″ (Shelves)
2 – 1×12 @ 12″ (Cubby Dividers)
6 – 1×12 @ 5″ (Mail Sorters)
2 – 1×12 @ 50″ (Sides)
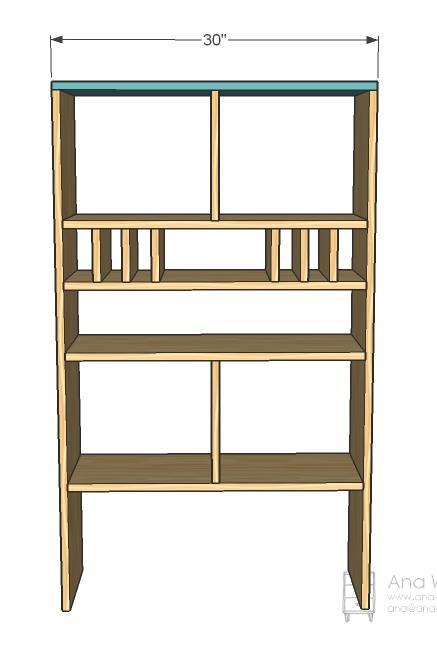
1 – 1×12 @ 30″ (Top)
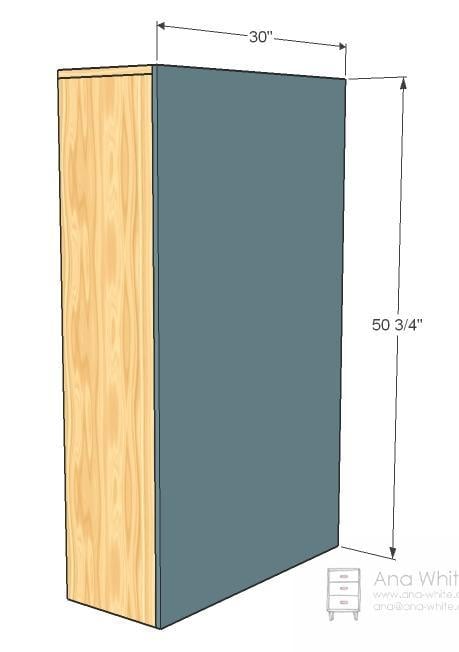
1 – 1/4″ Plywood @ 30″ x 50 3/4″ (Back)
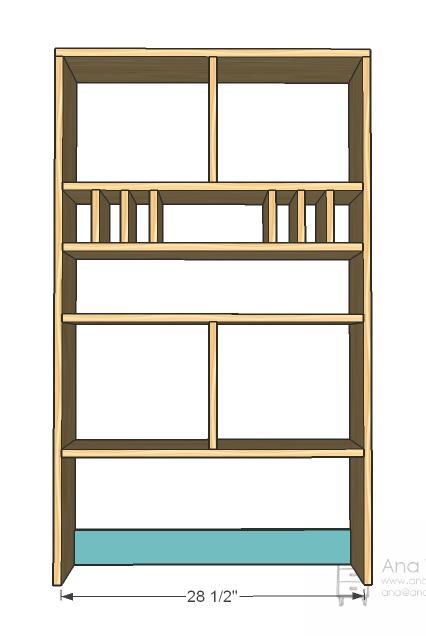
1 – 1×4 @ 28 1/2″ (Bottom Support)
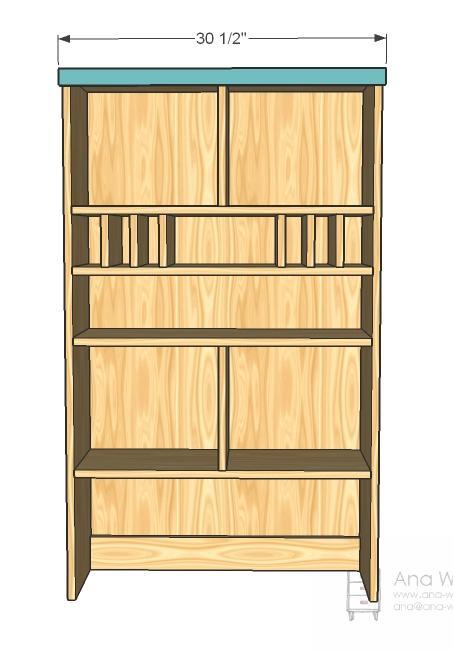
1 – 1×2 @ 30 1/2″ (Top Trim)
2 – 1×2 @ 49 1/4″ (Side Trim)
3 – 1×2 @ 27 1/2″ (Shelf Trim)


Instructions
Step 1
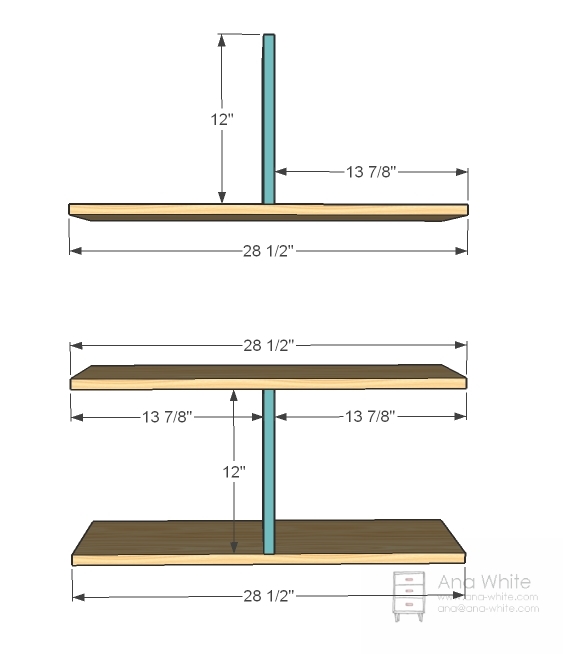
Cubby Dividers
Because of all the boards and the face framing and the back and the low use of this piece, you can use a nailer and 2″ nails to fasten. You can also use 2″ screws countersunk with glue or 1 1/4″ pocket hole screws. Measure and mark out all joints with a square before assembly.
Step 2
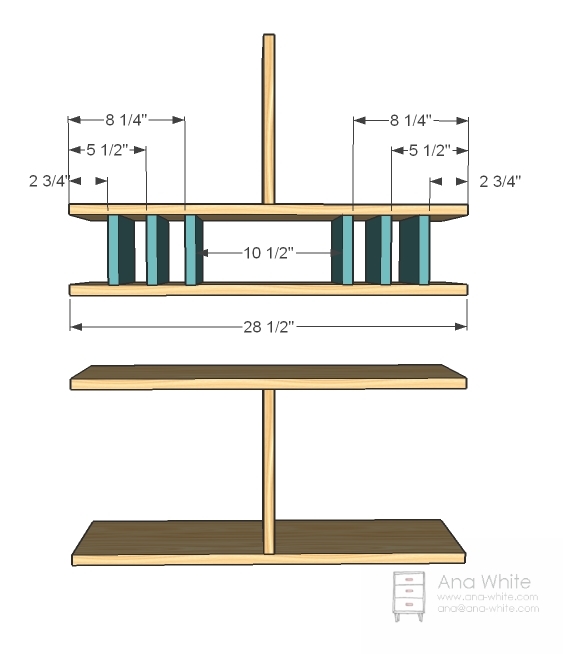
Mail Sorts
Now mark out the location of the mail sorts on the shelves. And then fasten the mail sorts to the shelves as shown above.
Step 3
Sides
Mark the joints for the sides on both the inside and outside (so you know where to line boards up and also where to start your fasteners). Apply glue and fasten the sides to the shelves as shown in the diagram.
Step 4
Top
Now attach the top to the sides and center cubby divider.
Step 5
Step 6
Back
Then tack the back on with glue and 1 1/4″ nails. Especially if you put everything together with your nailer, make sure you also fasten into shelves.
Step 7
Top Trim
Nail the top trim on with glue and 2″ finish nails. Keep top flush and outsides overhang by 1/4″ on each end.
Step 8
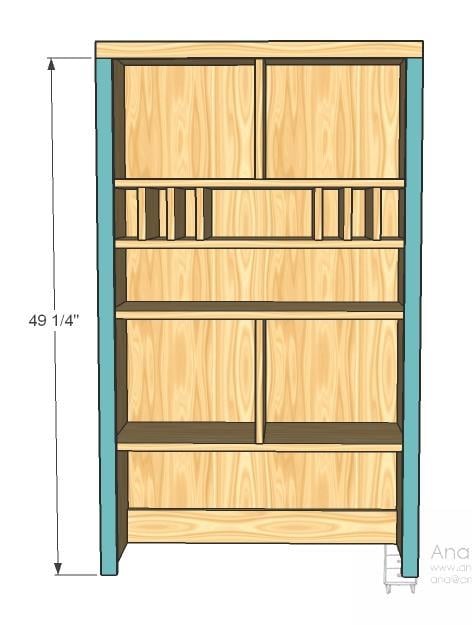
Side Trim
The side trim will also overhang the side by 1/4″. Use finish nails and glue to secure in place.
Step 9
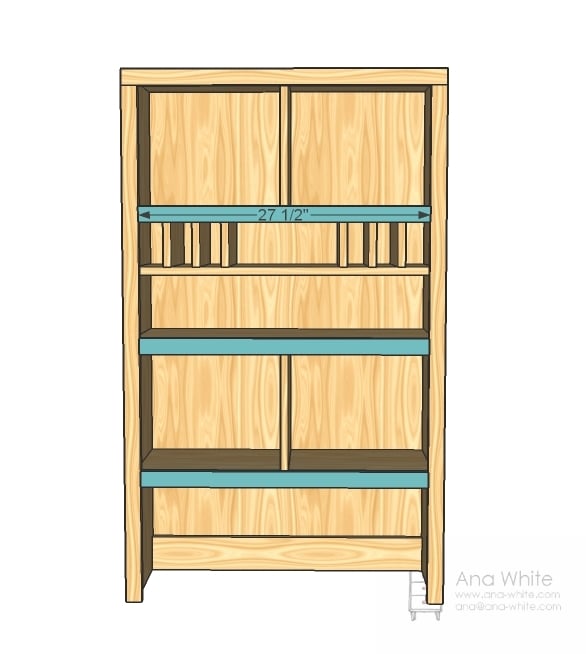
Shelf Trim
Finally, add the shelf trim as shown above. Keep tops flush. I also like to put a nail or predrilled screw through the edge of the side trim into the ends of the shelf trim, just to keep the joint nice and tight.
Step 10
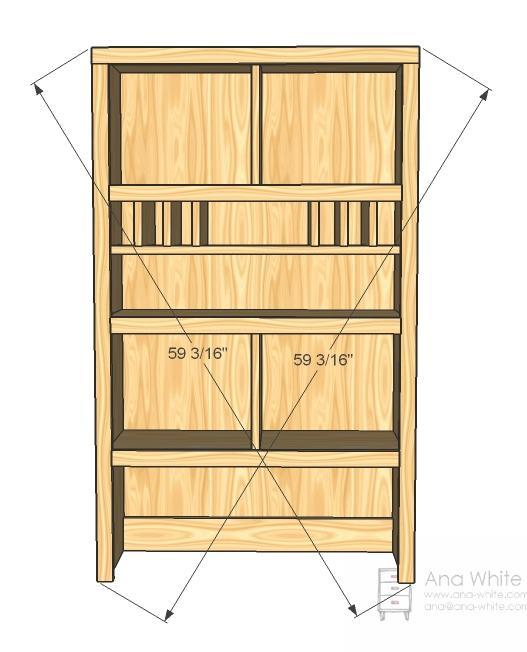
Squaring
One of the most important parts of building big projects – especially big projects where multiples are lined up – is building square. Measure diagonally and check to see if the measurements match. If not, from opposite corners of the longer measurement, push the two opposing corners together until the measurement matches.


Comments
Kari (not verified)
Wed, 12/22/2010 - 07:41
You are so incredible! This
You are so incredible! This has been on my list to make when we rearrange our office/mudroom. We have five in our family so I wasn't sure how we would use the sixth locker. You have made my day by just giving the idea of the mail sorter in there (another delimma I've been trying to solve). Wahoo! Thank you!
terri b in oregon (not verified)
Wed, 12/22/2010 - 07:52
Another fantastic piece! I
Another fantastic piece! I am poised to begin my building phase in January, I can't wait! Here's hoping you have a happy and enjoyable Christmas! Your site is the best site I visit and I can't wait to see your next creation!
Jami (not verified)
Wed, 12/22/2010 - 08:23
This is *exactly* what I've
This is *exactly* what I've been needing and I didn't even know it! Thank you!
AmyLynn (not verified)
Wed, 12/22/2010 - 08:28
Looks like a New Year's
Looks like a New Year's weekend project to me :)
Robyn (not verified)
Wed, 12/22/2010 - 09:10
Yay! I have been eyeing this
Yay! I have been eyeing this up for a while and wondering how I would do all the mail and stuff. Yay! Now to get my husband to help me start....Maybe after Christmas!
teri (not verified)
Wed, 12/22/2010 - 09:58
I so need this in place of
I so need this in place of the cheapo storage hutch i have by the front door...my mind is already buzzing with thoughts of "primitiving" it up with old wood and major distressing...this would be my husbands dream too...he's a storage/organizer/ADD/everythings gotta have a space kinda guy!! great plans and work!!
Ana White (not verified)
Wed, 12/22/2010 - 16:46
Thank you all! I'm so glad
Thank you all! I'm so glad you like this plan. What do you think of adding the door plans?
teri (not verified)
Wed, 12/22/2010 - 19:12
I personally would love
I personally would love it...an easy way to "hide" my clutter...should my husband overwhelm it with gadgetry!! Yet still leave me with the storage I need.
Tara (not verified)
Thu, 12/23/2010 - 06:00
I would love this with doors.
I would love this with doors. Have a very Merry Christmas, I think your site is the best!
April (not verified)
Thu, 12/23/2010 - 11:36
I am going to see if I can't
I am going to see if I can't work this plan into my budget. What a great idea and I have been wanting to do something with my entry way for a while! I'll have to modify the plan though to fit cowboy boots :D If I build it one section at a time I think this plan is totally doable!
Tiffany (not verified)
Mon, 01/03/2011 - 10:20
One question- I looked
One question- I looked through the other plans for this system as well, but can't find the "how should you secure the top locker part to the bottom shelf or drawer part" instructions. Am I missing something? Because this would be perfect for my entry :)
Margaret (not verified)
Thu, 01/06/2011 - 06:21
After searching all morning
After searching all morning for mudroom solutions, I came across your site through googling for the "world's best mudroom organizer". Your site if fabulous, not to mention empowering. For those of us out here who know we could build "it" if we just had a little direction, you have provided that direction in a precise as well as a creative way. Thank you so much for being out there. I will take this opportunity to build with my children and be back with pictures.
Ana White (not verified)
Mon, 01/10/2011 - 10:17
Tiffany, what I would do is
Tiffany, what I would do is two things:
1. Use a metal bracket (ask for "simpson strong ties" at Home Depot or Lowes, and look for a straight bracket that you can attach to the hutch and base) and screw the bracket to the base and hutch. Make sure you are screwing into more than just plywood - you want to actually get into the frame boards.
2. Tip Resistant Kit. You should be able to find a tip resistant kit at most any hardware store. It's simply a wire with two screws to keep the piece from tipping forward on someone. Make sure you follow the directions and attach to a stud in the wall behind the hutch and also to a frame board in the hutch.
Good luck. Sheila made this and it is stunning!
Christie Tully (not verified)
Sat, 08/20/2011 - 10:16
Freestanding option
Hi Ana, huge fan of yours and appreciate all your inspiration and help. wondering what your thoughts are on having this as a freestanding object, as opposed to being against a wall? Would it be safe? What would you suggest to put on the other side if you think it might tip over? We don't have a wall to put this against, but want to create a mud area by having this freestanding in our playroom and would love your thoughts, thank you!