


A little itty bitty bench for itty bitty guests. Features a tip resistant leg design, yet still narrow and space saving.

The day before our bitty guests were due to arrive at a very important birthday party, everything was ready. The streamers hung, the extra clutter hid in mom and dad's room, the cakes baked, and the frozen pizzas thawed . . . except we did not have a table or seating for our eight little guests under eight.
Good thing we have a saw plugged in at all times.

Just hours before the guest arrived, I built these benches and the table. The paint was barely dry as guests arrived. And we couldn't be more pleased with the results.

I spent more time thinking about how to make the bench narrow, but still tip resistant, than I spent building it. Problem #1 - how to keep preschoolers from tipping the entire bench backward, but without taking away the simplicity of the bench? Nothing a couple of five degree angles can't fix.

And a few coats of bubble gum pink paint. It's my old trick. Simple Design + Bold Paint = Wow.
Also pictured are the ten dollar ledges.

And what to do with two extra benches, in between Birthdays? How about storing all those new toys? Make sure you secure the benches to each other to keep from tipping forward. I would even secure it to the wall, especially if you have any climbers in the house. We do.
Preparation
1 – 4 foot long 1×8 (my bench) but you can also use a 1×10 or 1×12 for a wider seat
1 – 2×2, 6 feet long
2 – 1×3, 8 feet long
2″ screws
wood glue, wood filler and finishing supplies
1 – 1×8 @ 48″ (you can use the 1×10 or 1×12 here)
4 – 2×2 @ 13 3/4″ long, both ends cut at 5 degrees off square, parallel to each other
2 – 1×3 @ 4″ with both ends cut at 5 degrees off square, NOT parallel to each other (cut 2″ longer for a 1×10, 4″ longer for a 1×12)
2 – 1×3 @ 44″ (side aprons)


Instructions
Step 1

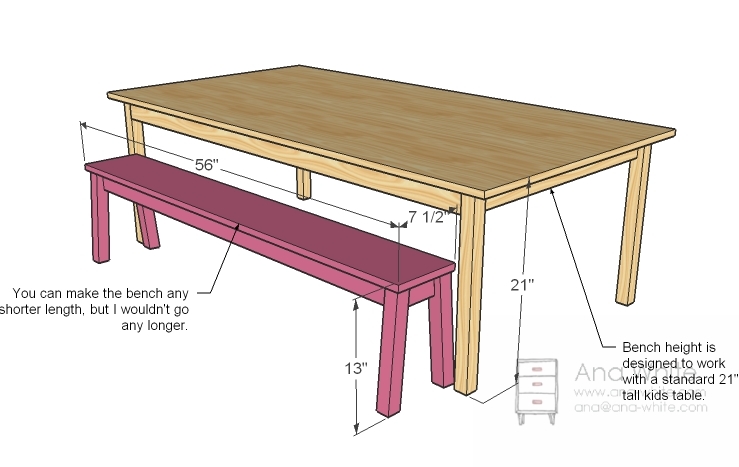
The bench shown in the photos is actually 56″ long, but I choose to make the plans only 48″ long to save everyone from buying a longer board. But you can easily modify the plans to a longer bench.
Step 2

Ends
Build the ends as shown above. Use glue and screws. You can use pocket hole screws or 2″ screws predrilled with a countersink bit from the outsides of the legs. Use 2 screws per leg per end apron.
Step 3

Front/Back Aprons
Now carefully add the front and back aprons to the ends with screws and glue. Keep the aprons square with the work surface, NOT inline with the legs. If you do, you won’t be able to put the top on straight.
Step 4

Top
Now simply lay the bench top, pretty side up, and line the aprons up on the underside. Trace the aprons onto the bench top. Measure and take note of the exact placement of the aprons. Then place the bench frame right side up and lay the bench top on top of the frame, pretty side up. Line up and then predrill holes through the traced lines and screw down. Somewhere in there, you need to apply glue to the tops of the aprons.

Comments
dptabrown (not verified)
Tue, 12/21/2010 - 00:52
LOVE these benches (and
LOVE these benches (and table)!
Where did you get this paint color??? OMGosh, it does make them POP! :)
Jaime (not verified)
Tue, 12/21/2010 - 00:56
Great plan Ana as usual. I
Great plan Ana as usual. I had the same dilemma when thinking about Christmas and where to put the kids and at what table so I brought the kids picnic table (built from your plans) inside.
http://thatsmyletter.blogspot.com/2010/12/k-is-for-kids-table.html
Now that you posted these plans the picnic table can go back outside where it belongs and I'll be making these benches - when the garage is warmer!
Thanks again.
Carol (not verified)
Tue, 12/21/2010 - 03:57
Thank you for all you do. The
Thank you for all you do. The little benches are just adorable, I would like to see those plans for the larger table. It's just what we could use around our house.
aSprinkling (not verified)
Tue, 12/21/2010 - 05:13
Ana, in all of your drawings
Ana, in all of your drawings of the bench one leg appears to be at a 90 degree angle. I didn't know if you noticed or if you would care to fix it. If not, just ignore this comment. :)
Christy (not verified)
Tue, 12/21/2010 - 05:58
Oh, please do post plans for
Oh, please do post plans for the table too! I love these benches. I've been waiting for just the right plans to make a kids farmhouse table for my sister in law, and this would be perfect!
Amy (not verified)
Tue, 12/21/2010 - 05:59
I love this idea! This little
I love this idea! This little table and bench would be a perfect addition to our house for when we have lots of little ones over. Do you think you'll post plans for the table as well? I know you said its just a larger version of the table you built for Clara. Beautiful, as usual! Thanks for always providing families with great, reasonable things - homemade.
Brenda Johnson (not verified)
Tue, 12/21/2010 - 06:18
After our family Christmas
After our family Christmas party of me renting chairs AGAIN. I have been thinking of how to make a very long, simple, cheap bench that I can make a few and just store until we need them. Which is probably about 10 times a year. But I am sooo sick of wasting my money on renting those darn chairs. So can you show me how to make this bench in BIG people size? (Ihad to rent 60 of those ugly chairs btw) :-)
allie (not verified)
Tue, 12/21/2010 - 06:23
all I can say is WOW.. you
all I can say is WOW.. you are so incredible talented! Yah, lets whip up some benches a few hours before the party!! :)
Love them!
Denise (not verified)
Tue, 12/21/2010 - 06:25
I adore this!!!! Such a great
I adore this!!!! Such a great project. And like you, when I saw them stacked, I was thinking, what great stacking shelves!! :)
Loving your new logo. Haven't been over in awhile- it looks awesome!
Cheryl (not verified)
Tue, 12/21/2010 - 06:58
Do you ever sleep? :)
Do you ever sleep? :)
Tabitha Brouhard (not verified)
Tue, 12/21/2010 - 07:24
I believe the leg is at an
I believe the leg is at an angle because it will keep little kids from tipping it over as easily. She didn't put the angle in the plan (please do so I can see what angle it is). Perhaps Anna just needs to add a little bit more info on the legs.
V (not verified)
Tue, 12/21/2010 - 08:42
She says it's all at 5 degree
She says it's all at 5 degree angles.
Tammy (not verified)
Tue, 12/21/2010 - 09:56
The 5 deg angle info is in
The 5 deg angle info is in the cutting of the legs.
Jen (not verified)
Tue, 12/21/2010 - 11:56
Love it and I would LOVE to
Love it and I would LOVE to see plans for the larger version of Clara's table. Thanks so much...Merry Christmas!
Rebecca (not verified)
Tue, 12/21/2010 - 14:44
Super love this and can't
Super love this and can't believe you built it the day of your little girl's birthday, talk about a super mom! And yes, please blog about the table! What a great addition to a play room!
Julie (not verified)
Wed, 12/22/2010 - 05:56
I would love the plans for
I would love the plans for the table! It would be perfect in my playroom. Thank you, thank you for all of these fantastic plans!
Jana (not verified)
Mon, 12/27/2010 - 06:50
I just wanted to let you know
I just wanted to let you know that your link to "all of the kid's tables and chairs" actually links to this post. You might want to update it!
:)
Jess (not verified)
Mon, 12/27/2010 - 11:41
Beautiful! I am bookmarking
Beautiful! I am bookmarking so many things on your site... I have to work up the nerve and actually get started :). Can I ask where you got the paper doll dresses? I think they are Disney princess dresses? I think that is such a beautiful idea and perfect for my daughter's room!
Tatiana Cochran (not verified)
Mon, 12/27/2010 - 18:56
I'd like to see table plans!
I'd like to see table plans!
Melissa M (not verified)
Tue, 11/15/2011 - 20:03
Pocket Screws
This is awesome....Going to build it for our co-op preschool...I already have the pieces cut, but what size pocket hole screws should I use???
Thanks!
Melissa