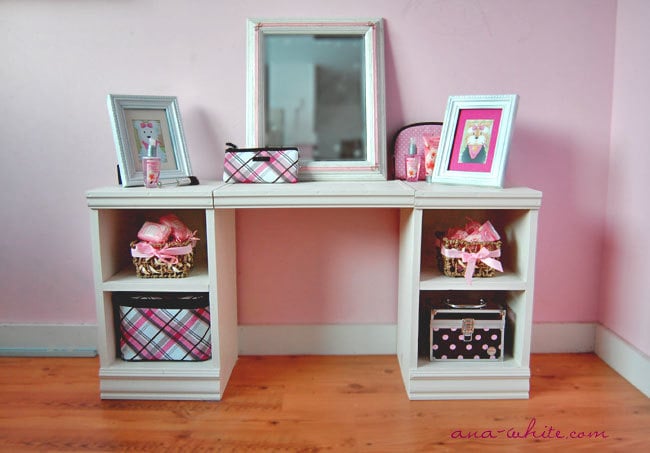


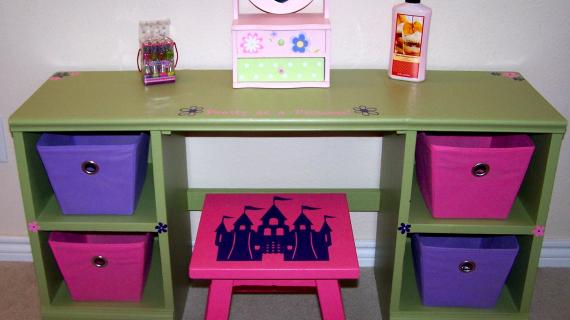
A play vanity that is both adorable and easy to build. Features four cubbies, large top surface.

I went to name this one the "toy vanity" and had to go back and change it.

Because this is the real deal. Just a little teenier. Like preschool/toddler sized. It's sized similar to Pottery Barn Kid's vanity and Kid Kraft's vanity.

As in I want to sit down and get the paint out of my hair, the sawdust off my forehead, and paint my nails with actual nail polish.

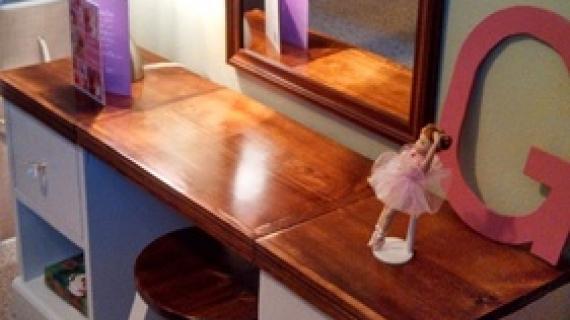
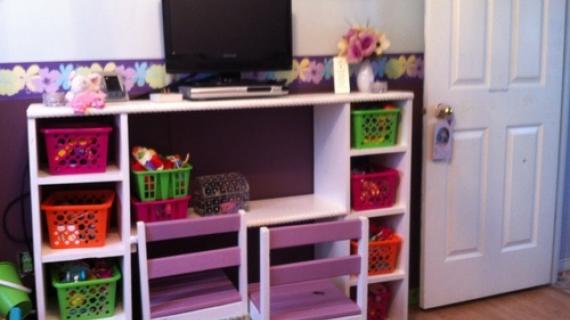
But also, these separate pieces can be used as nightstands, or as a desk for little boys. The pet photos are from a game on American Girl's online site. If your daughter hasn't been over there, there games and site are amazing, age appropriate, and really make you feel like $100 for a doll is so reasonable :) Considering how much you will save by making this vanity, you might just be able to splurge this season on a doll for your precious little girl. I spent about $20 on this vanity, using some scraps and leftover paint, but mostly new materials.
Preparation
2 – 1×12, 8 feet long
24″ of 3 1/4″ base moulding (go to orange, the let you buy just two feet of moulding instead of an entire stick)
24″ of 1x2s
48″ of 1 1/2″ moulding
2″ screws
1 1/4″ screws
1 1/4″ finish nails
1/4″ plywood or beadboard scraps for the back, 2 at least 11 1/2″ wide x 20 1/2″ tall
wood glue, filler, sandpaper and finishing supplies
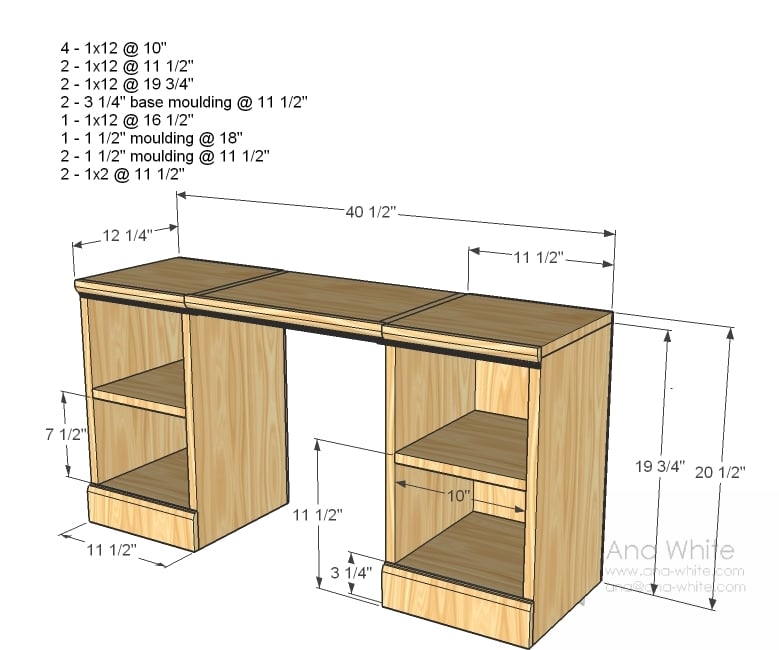
4 - 1x12 @ 10"
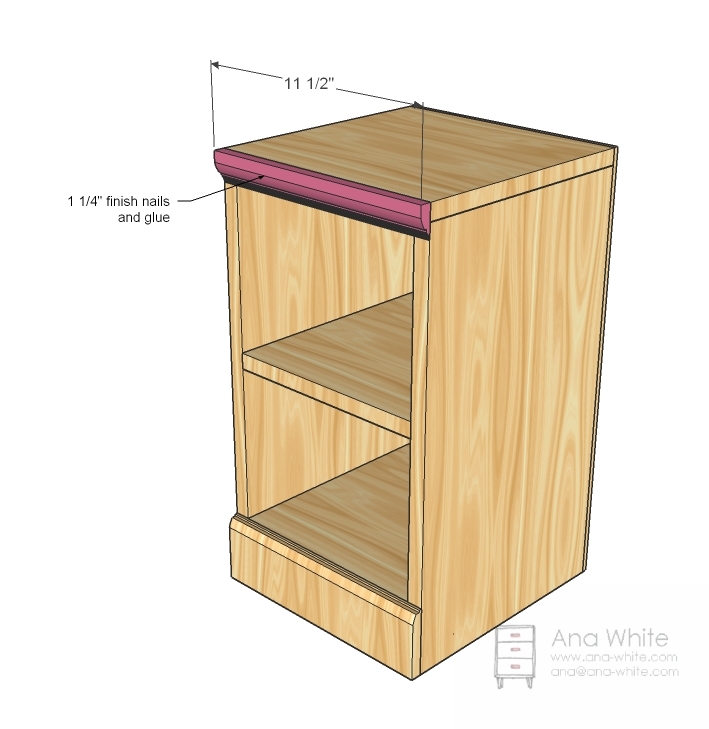
2 - 1x12 @ 11 1/2"
4 - 1x12 @ 19 3/4"
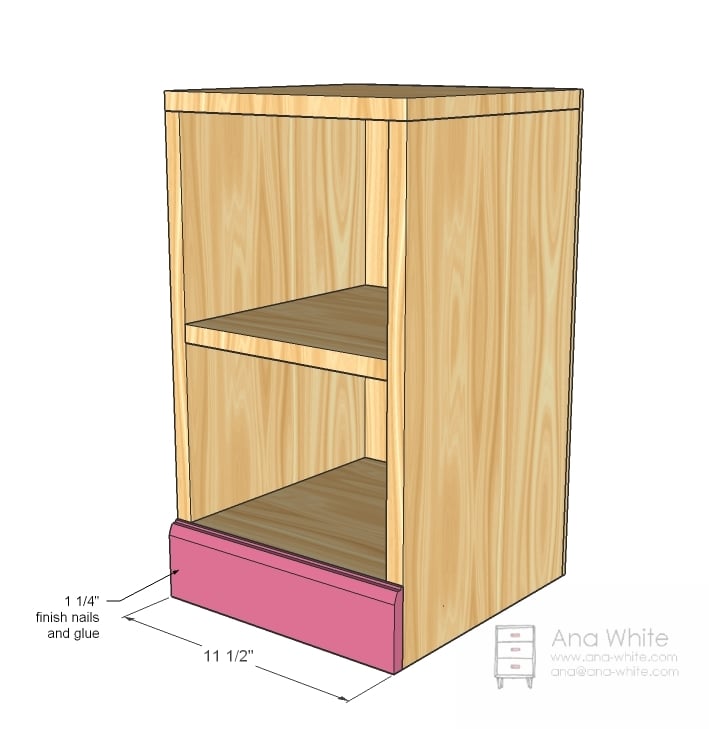
2 - 3 1/4" base moulding @ 11 1/2"
1 - 1x12 @ 16 1/2"
1 - 1 1/2" moulding @ 18"
2 - 1 1/2" moulding @ 11 1/2"
2 - 1x2 @ 11 1/2"


Instructions
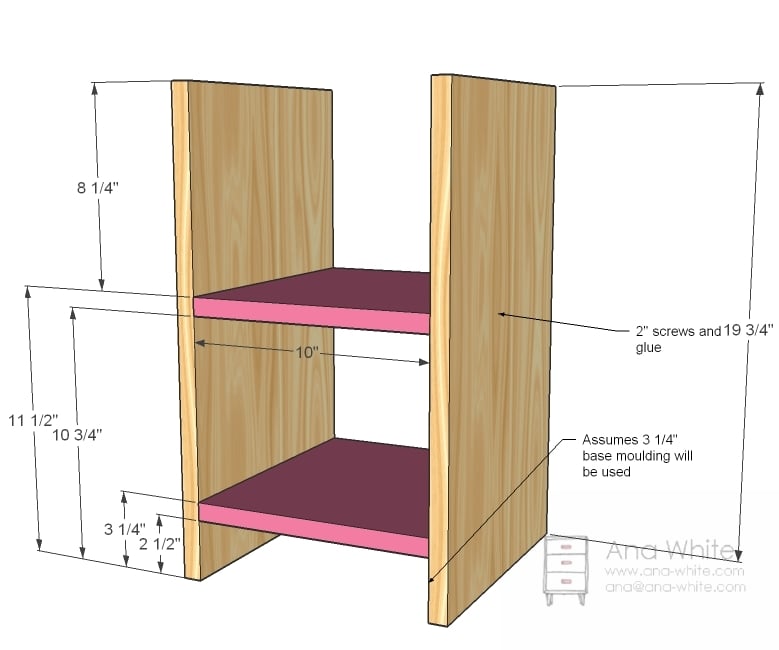
Step 1

Here are the dimensions for the “nightstands” perfect for a toddler bed or small bedroom or playroom. You will need to build two of these. This morning, I woke up, made coffee, went out and got some firewood and made fires in the garage and house, answered a few emails, was on a few calls, started building these about 10 am. By the time the Nate Berkus show was over, I was back inside (we’ve got a tv in the garage so I can watch Nate ) to let the wood filler dry, and cleaned house and cooked brunch. Then I went back out and sanded and put a coat of primer on. More cleaning, some more emails, a little work on the other not so fun stuff. Then a coat of paint. A little more work, a few pages of the Alphabet book, and then I could see the sun going down at about 2:00 PM and still slightly wet, hauled the vanity in and photographed it. Grace is almost four now, so she doesn’t need the constant attention of a toddler or baby, but I do pay for not entertaining her by cleaning up later! If you are set up and build fairly often, this is an easy afternoon project that you can finish in plenty of time for wrapping paper.
Step 2
Box
I started by marking the sides where the shelves go on the insides and outsides (so I know where the shelves go and where to screw. Then I predrilled holes and applied glue to the shelves and screwed it together with 2″ screws.
Step 3

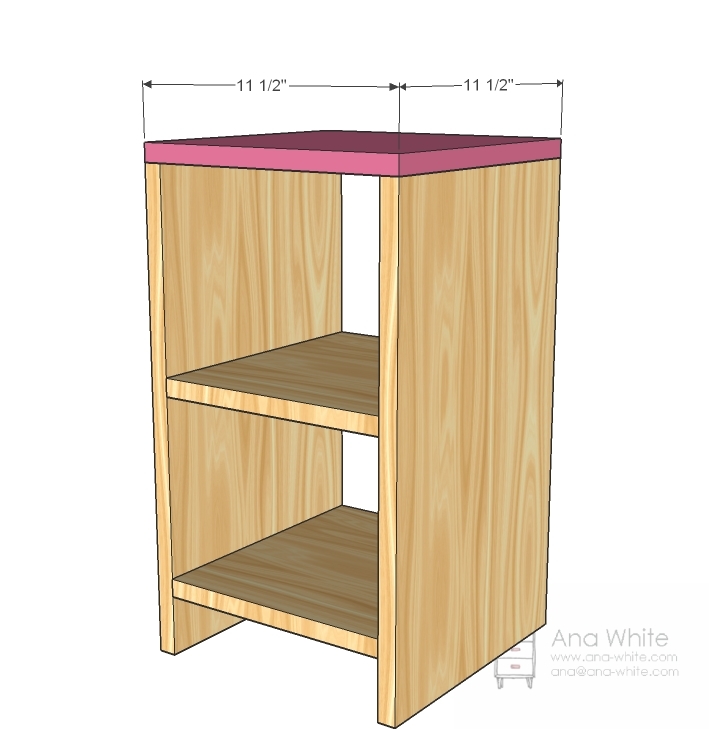
Top
The top is so easy, just predrill holes along the sides, and apply glue to the top of the sides and screw down with 2″ screws. Keep your outside edge
Step 4
Back
I cut my backs with a 10″ sliding compound miter saw by first cutting one side, then flipping it over and cutting the other.
Step 5
Step 6
Front Base Trim
Glue and nail it down.
Step 7
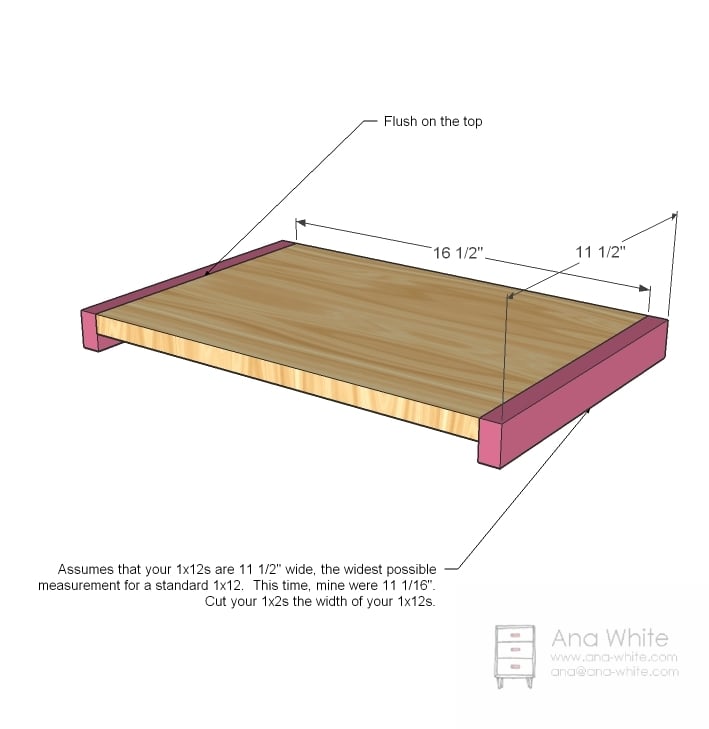
Tabletop
Simply predrill holes and screw the 1x2s to the sides of the 1x12s with 2″ screws and glue. Keep top flush.
Step 8
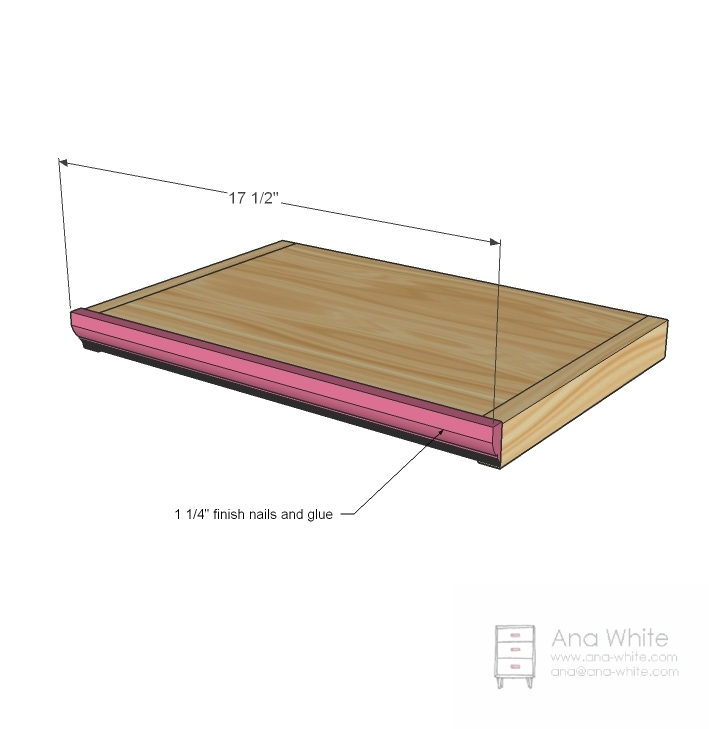
Front Trim
And then nail trim on with glue and 1 1/4″ finish nail
Step 9
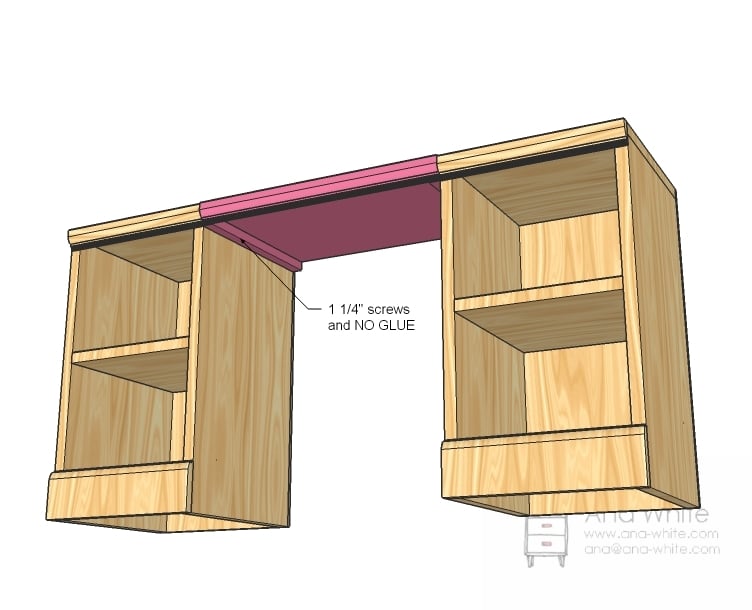
Assembly
Assembly is easy, but have someone give you a hand (Grace held it up while I screwed). It’s best to predrill holes in the 1x2s first, that way it’ll be easy to start your screws. Or just put it together upside down on the floor.


Comments
Niki (not verified)
Wed, 12/01/2010 - 20:37
BEAUTIFUL!!!
BEAUTIFUL!!!
Kristine (not verified)
Wed, 12/01/2010 - 21:18
Love it! Now I know what to
Love it! Now I know what to make my daughter for her 8th birthday in Feb. Thanks Ana, brilliant as usual!
Estela @ Weekly Bite (not verified)
Thu, 12/02/2010 - 01:05
Love this idea!! thanks for
Love this idea!! thanks for sharing!
Tracie (not verified)
Thu, 12/02/2010 - 03:00
Perfect! Love
Perfect! Love it!

Beth Owen (not verified)
Thu, 12/02/2010 - 03:04
Omigosh, I was doing my
Omigosh, I was doing my "Morning Ana" with Coffee, and my son glanced over at this and said "Wow, THAT looks nice!" He's five, and i think that both this AND the workbench from yesterday will soon be his! Just when I thought you couldn't possibly read my mind yet AGAIN...Thank you, Ana! <3
Heather (not verified)
Thu, 12/02/2010 - 03:17
Awwww, I love this! Wish
Awwww, I love this! Wish Shelby were smaller! Tho I've thought about doing this with some larger pieces on the site instead. She's 8 now and I know she's only getting bigger... :*(
Jen (not verified)
Thu, 12/02/2010 - 03:38
This is random. I've been
This is random. I've been totally wanting to build an adult-sized one of these to use as a craft table in my kitchen. Do you think the middle would be sturdy enough to support a sewing machine if I built it bigger? Just using some 1x16s (leftover from an old project) and increasing the dimensions?
Thanks!
Jen
orangesugar (not verified)
Thu, 12/02/2010 - 04:03
What kind of molding did you
What kind of molding did you use? Because my base molding doesn't look like that!
heather johnso… (not verified)
Thu, 12/02/2010 - 05:14
Oh boy. One more thing to
Oh boy. One more thing to add to our list of things to make! Hopefully we will be building the playhouse bed soon...can't wait to share the pics for that. I have all sorts of ideas for the embellishments! Thanks as always for great plans:)
Larry (woody) (not verified)
Thu, 12/02/2010 - 05:51
Great project for a granddad
Great project for a granddad like me for my one year old grand daughter in a year or two. Great work and really enjoy your wood working projects.
Nichelle (not verified)
Thu, 12/02/2010 - 05:57
What type of seat would you
What type of seat would you suggest? Anything from the plan catalog?
cheryl (not verified)
Thu, 12/02/2010 - 06:25
My teen-aged , full sized
My teen-aged , full sized daughter would love this too! Let me know if you size it for grown-ups! Thanks.
Kristen (not verified)
Thu, 12/02/2010 - 06:32
Awww... Now I wish I had a
Awww... Now I wish I had a little one at my house for whom to build this! (Somehow, I don't think my teenagers would appreciate it.)
Ana White (not verified)
Thu, 12/02/2010 - 07:50
coming soon :)
coming soon :)
Mel (not verified)
Thu, 12/02/2010 - 12:16
I'm on the same page with you
I'm on the same page with you today, mentally. :) I was just thinking how I could fit a vanity into my daughter's room without buying one of those cheap plastic ones.... thanks for another great idea.
Kate (not verified)
Thu, 12/02/2010 - 12:17
Hey Ana! I have 2 boys, but
Hey Ana! I have 2 boys, but sometimes your projects make me want to try for a girl;) This is adorable! I think I'm going to make Clara's Table and the stackable chairs. I asked a question on your comment form for Clara's Table post and was wondering if you could take a look at it. I want to make them soon, but need some info. first. Thanks so much. LOVE your website. Merry Christmas!
Michelle (not verified)
Thu, 12/02/2010 - 12:39
Ana, all these amazing plans,
Ana, all these amazing plans, and I'm NEVER going to get any housework or laundry done! Ha! My daughter will LOVE this!
Monica (not verified)
Thu, 12/02/2010 - 14:28
This is perfect for my DD! I
This is perfect for my DD! I can't wait to see her face when she comes downstairs Christmas morning. What color white are you using to paint??
Lisa (not verified)
Thu, 12/02/2010 - 15:06
I'm working on drawing up a
I'm working on drawing up a plan for a bigger version for my 8 yr old. Do you think 28"H X 18"D would work? I'm going to keep it around 40"L to fit the space in her room.
Lora (not verified)
Thu, 12/02/2010 - 15:38
DARLING!
DARLING!
Lisa (not verified)
Thu, 12/02/2010 - 17:04
So here is a rough plan I
So here is a rough plan I drew up for an older child. I'm hoping the dimensions work out.

Leanne (not verified)
Fri, 12/03/2010 - 13:53
this is adorable. I'm so
this is adorable. I'm so happy I found your site.
ahuvas (not verified)
Fri, 12/03/2010 - 18:43
Does anyone have any ideas
Does anyone have any ideas about how to turn the center piece into a flip top with a mirror mounted inside so it can be both a vanity unit and desk like in the link below?
http://s10.thisnext.com/media/largest_dimension/9CE06978.jpg
Could I build a narrow box with a flip top lid and screw it to both of the shelving unit?
Ana White (not verified)
Sun, 12/05/2010 - 20:46
One thing to be cautious of
One thing to be cautious of is not enough room for knees, but you would have about 24" - should be enough. I'm glad you are also scaling the size of the storage towers too to keep everything looking balanced. Should come out great! Ana
Rabecca (not verified)
Mon, 12/06/2010 - 00:55
what is the approx cost of
what is the approx cost of building this?
Juleen Kenney (not verified)
Mon, 12/06/2010 - 08:14
My suggestion/request is
My suggestion/request is this... is it possible to design this so that it could "grow" with your child by adding another level of shelves on the bottom?
LenaLoo (not verified)
Tue, 12/07/2010 - 18:01
Oh my stars, if my next child
Oh my stars, if my next child is not a girl I am going to adopt one, just so I can make her this beutiful little vanity!
Danielle (not verified)
Mon, 12/20/2010 - 20:48
I just built this for my
I just built this for my daughter for Christmas and it turn out super cute. I just had to add a couple more of the 1x12 - @19 3/4 to the cut list. Thank you so much for sharing all these plans for free. I just found out about your website about a month ago and I've built 6 items from it. Love it! I now have a new interest in furniture building. Thanks.
Liberty (not verified)
Tue, 07/05/2011 - 19:20
This will be great for my daughter and son!!!
I have been looking for something to use as a desk for my son and a dress up table for my daughter! Found my second project after doing my raised gardens!!!
jah145
Wed, 09/28/2011 - 07:44
What kind of wood?
Can anyone help me out please and let me know what kind of wood to use for this vanity?
Guest (not verified)
Thu, 01/19/2012 - 11:46
finishing
Do you finish all of the cut wood before you put it together or once it is all built?