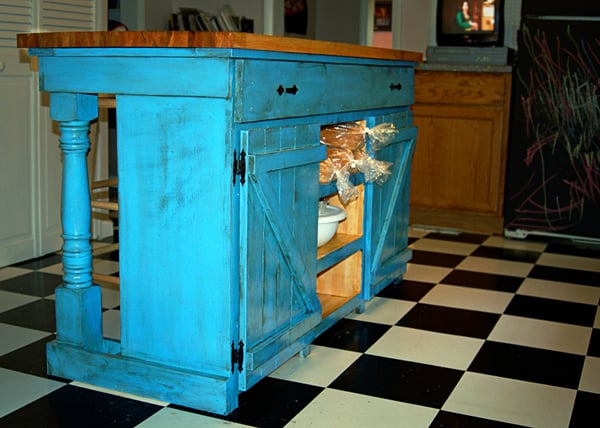


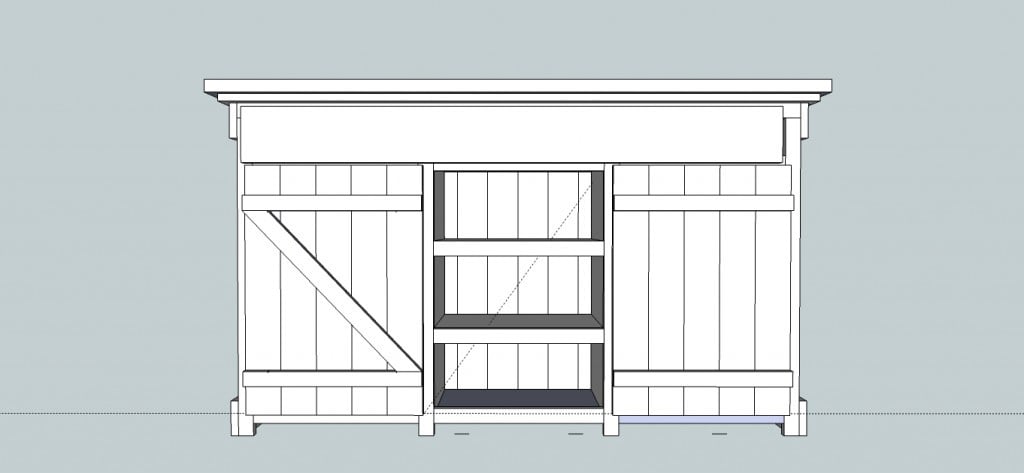
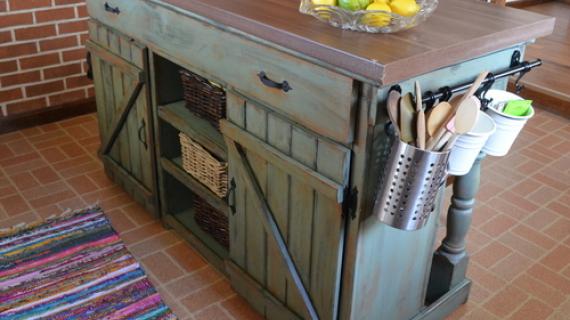
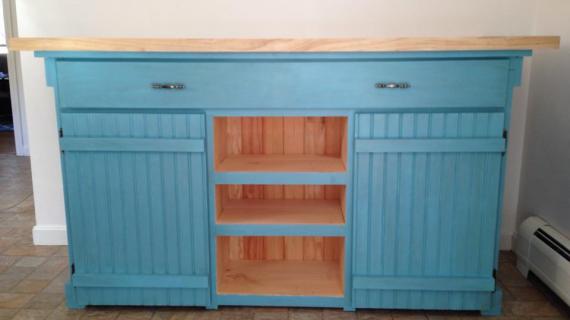
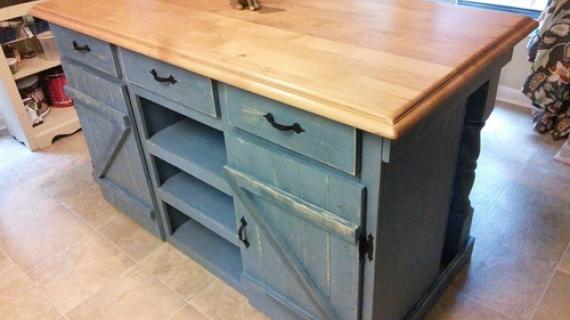
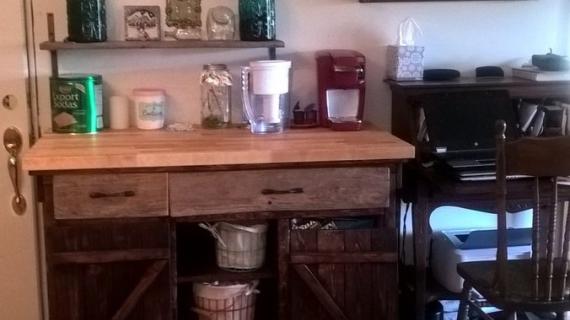
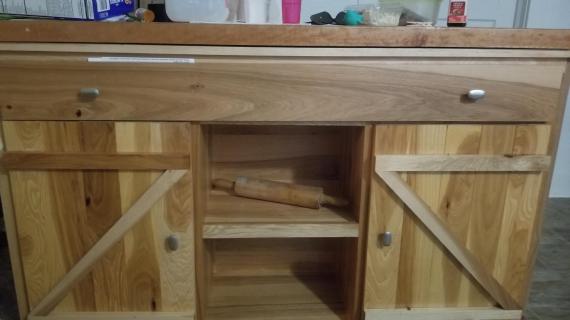
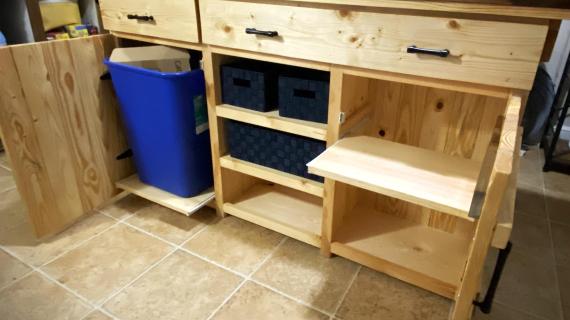
A farmhouse style island featuring a bar and two large cubboards with shelves, three shelves and a large drawer.
This was inspired because I hate chairs in my kitchen and I needed a place to store my silpats & rolling pins.
I would like to say that this is marked as advanced purely because of how many cuts you have to double check the measurements on. Seriously check them twice because all board widths are slightly different.
Preparation
(7) 1×4 16′ long
(1) 1×6 8′ long
(3) 1×12 16′ long
(7) 1×2 6′ long
(1) 4″ post 8′ long OR (2) turned stair banisters
(1) 2′x5′ butcher block
(2) Sets door hinges
whatever other hardware you want, I used 2 handles for the top drawer.
*Note purchasing already turned stair banisters will move this project up into the $200 range.*
16 – 1 x 4 @ 33.25″ Back slats
2 – 1 x 4 @ 56″ (measure first) Back trim
2 – 1 x 12 @ 33.25″ Sides
2 – 1 x 12 @ 54.5″ (Measure first) Top & bottom shelf
2 – 1 x 12 @ 25″ Shelf Dividers
2 – 1 x 12 @ 18″ Side Shelves
2 – 1 x 12 @ 17″ (measure first) Center Shelves
2 – 1 x 2 @ 31.75″ Front Side Trim
2 – 1 x 2 @ 27.75″ Center Front Trim
2 – 1 x 2 @ 16.5″ Side Shelf Trim
2 – 1 x 2 @ 17″ (Measure first) Center Shelf Trim
1 – 1 x 2 @ 56″ (Measure first) Drawer trim
4 – 1 x 4 @ 21″ Side trim
2 – 4 x 4 or Turned Stair banister @ 33.25″
1 – 1 x 4 @ 56″ (measure first) Back skirting
2 – 1 x 4 @ 5.5″ Leg support
2 – 1 x 4 @ 7.25″ Leg support
2 – 1 x 4 @ 59″ Top support
2 – 1 x 4 @ 16″ Side Top Support
1 – 1 x 2 @ 52″ (measure first) Center Top support
10 – 1 x 4 @ 25.5 Door slats
4 – 1 x 2 @ 17.5 (measure first) Door Trim
Optional, 2 – 1 x 2 @ measurement Door “Z” trim
1 – 1 x 12 @ 50″ Drawer bottom
1 – 1 x 4 @ 50″ Drawer back
2- 1 x 4 @ 12.25″ Drawer sides
1 1 x 6 @ 53.75″ (measure first) Drawer front


Instructions
Step 1

Lay Back slats side by side, keeping square.
Measure total distance across and adjust the back trim cut. Round up to the nearest 1/4″ if you have to.
Set aside, we will attach these later, to help keep everything square.
I recommended using wood screws to build the frame.
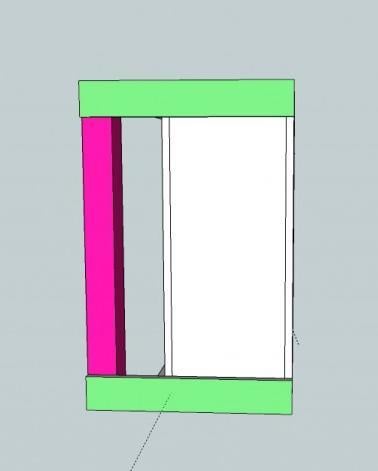
Mark 5.5″ from top and 1.25″ from bottom of Sides
Double check that the top & bottom shelf are cut 1.5″ less than the back trim.
Attach top shelf so that the top of the shelf is 5.5″ from the top of the side.
Attach bottom Shelf so that the bottom of the shelf is 1.25″ from the bottom of the side.
Attach Shelf Dividers to top and bottom shelf, 18″ from the side.
Measure Center space to double check center shelf cut.
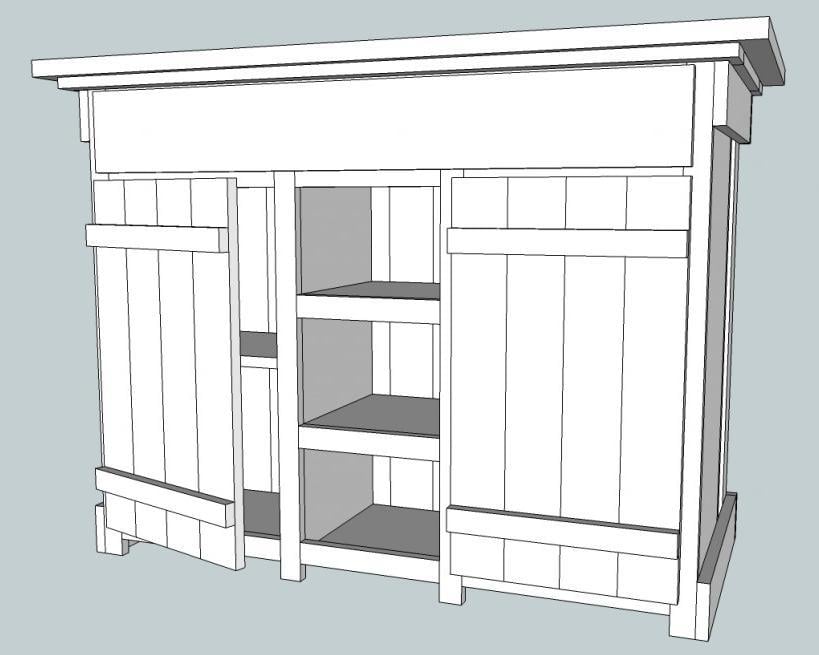
Insert and attach side shelves and center shelves as shown in the diagram.
* Note, When I built this , I left out one side shelf so that i could fit my garbage can inside. Feel free to position the shelves as needed*
Step 2
* note If you want to get a more rustic look sand down & shape vertical edges of slats before attaching them*
For the remainder of the instructions I recommend using a nail gun if you have it. Use nails that won’t show through on the other side.
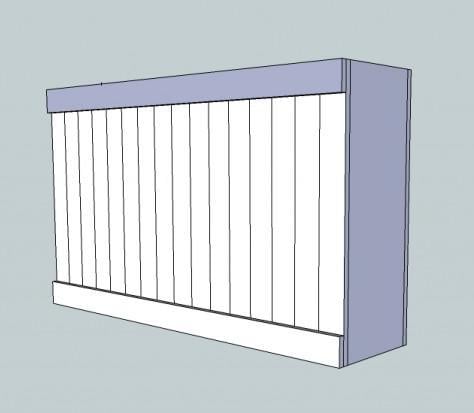
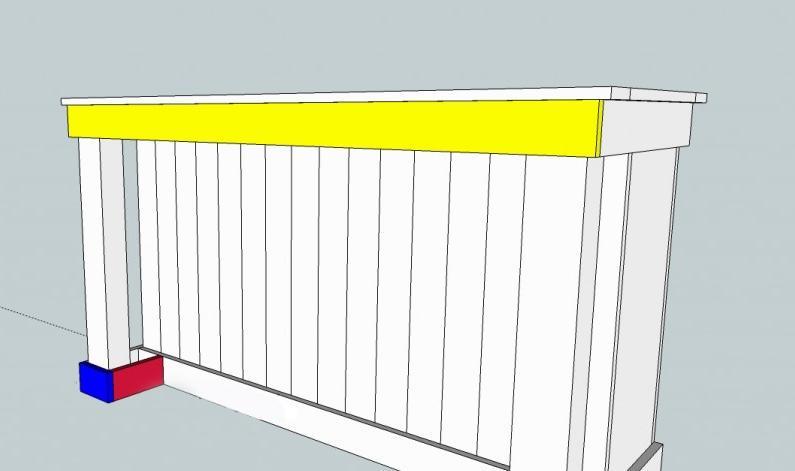
Now that the frame is constructed, attach the back slats and then attach the back trim.
Step 3

Next take the front Side trim and attach it so the edges are flush with the sides.
Attach the center front trim so that the inner edges are flush with the center shelves. There should be no trim hangover in the center shelves.
Step 4
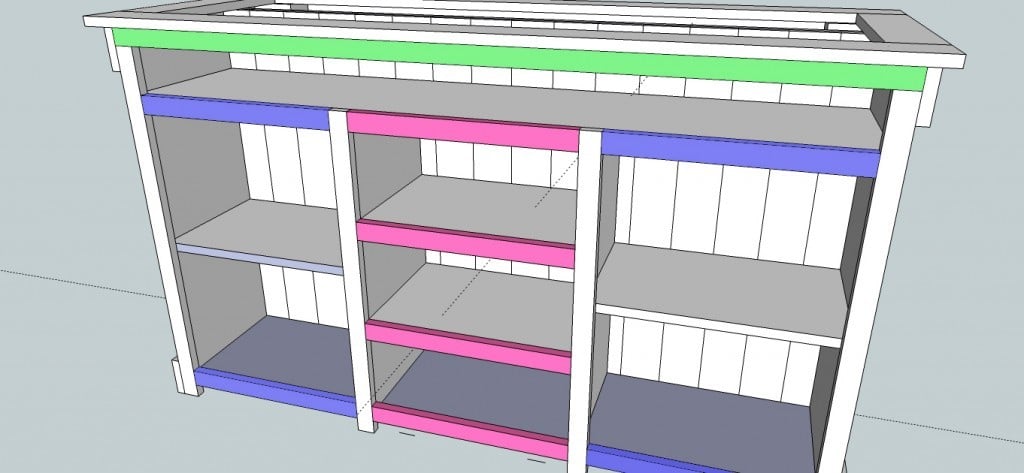
Attach top side shelf trims so that the top is flush with the upper side of the top shelf.
Attach bottom side shelf trim so that the bottom is flush with the lower side of the bottom shelf.
Measure space between center front trim to check the center shelf trim cut.
Attach upper most center trims so that the top of the trim is flush with the upper side of the center shelves.
Attach bottom most center trim so that the bottom is flush with the lower side of the bottom shelf.
Attach top trim so that it rests above the side trim, see diagram.
Step 5
Step 6
Double check distance between upper side trims and adjust back skirting cut. Attach back skirting in line with side trim.
For the leg supports, attach the 7.25″ long one to inside of posts or banisters, aligned with the floor. The edge touching the island will have to be glued.
The 5.5″ leg supports then attach to the ends of the posts or banister, align with side trim and inner leg support.
Step 7
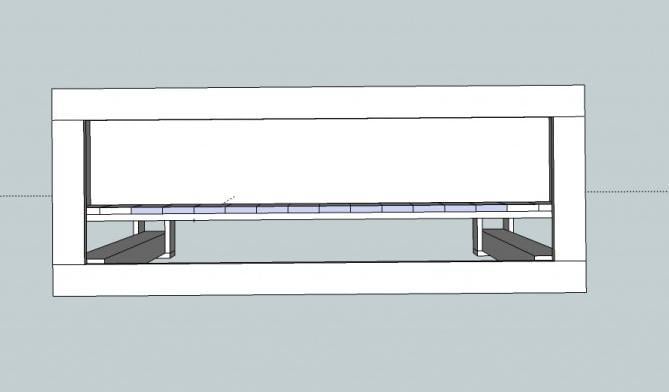
Center Top supports along front and back of island. Center Side Top Supports along Side Trim. Check to make sure everything is square and attach.
Inset Center top support along center (back slats) of island & attach.
Center Butcher Block & Attach. I used screws and drilled up from the top supports so that they didn’t show.
Step 8
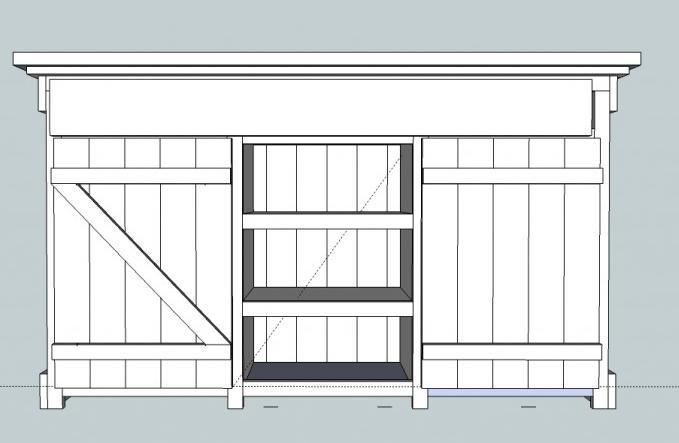
Island Doors:
Make 2
* note If you want to get a more rustic look sand down & shape vertical edges of slats before attaching them*
Lay door slats next to each other & measure to double check door trim measurement
Attach door trim 3 ” from top and bottom to door slats.
Optional “Z” trim
Take a 1×2 and cut one end at a 45 degree angle. Place it across the door slats, between the door trim and mark the other end. Cut at 45 degree angle and attach.
Step 9
Island Drawer:
Attach drawer back to drawer bottom so that the drawer back next to, not on top of the drawer bottom
Attach drawer sides
Double check drawer front measurement.
To attach the drawer front, set the drawer inside the island and mark where it should line up.
Attach drawer front
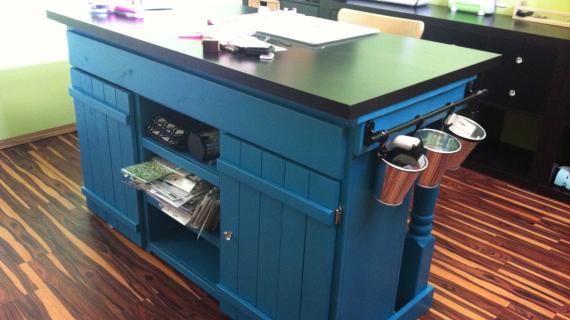
I used a deep cornflower blue (sorry exact name is forgotten) for my base, then sanded the edges down. I then put Minwax Ebony stain over the whole thing and wiped it off. This was a mistake, as stain never dries over paint. I would suggest if you want to get the same look use a glaze.
I finished everything up with 2 coats of polyurethane. (Which btw will seal in the stain just fine if you make a mistake like I did)


Comments
Ana White (not verified)
Fri, 01/07/2011 - 18:32
Leslie, you are just beyond
Leslie, you are just beyond amazing! I about fell out of my chair when I saw your island! Thank you so much for sharing your plan. I guess I better get used to being outbuilt AND outdesigned! You've got some serious talent!
Lorilyn (not verified)
Fri, 01/07/2011 - 18:49
I was JUST drawing up plans
I was JUST drawing up plans to do a built-in bathroom cupboard system and I wanted to do barnyard-esque rustic doors on it but wasn't exactly sure how I wanted to execute them. I love how you did yours and will totally and completely copy yours now. Thanks for the inspiration!
Lindsey (not verified)
Fri, 01/07/2011 - 18:53
So pretty! Giving me
So pretty! Giving me inspiration for the house we hope to buy this year!
Kim (not verified)
Fri, 01/07/2011 - 19:22
Looks great! Been looking for
Looks great! Been looking for an island plan that we could make. Do you think you could put wheels on it in order to keep it mobile?
Brook (not verified)
Fri, 01/07/2011 - 19:25
Love!! I may make this for
Love!! I may make this for my sewing room. It looks like it would be a perfect sewing/storage space!
Nina (not verified)
Fri, 01/07/2011 - 20:16
I am forever impressed by
I am forever impressed by your humility, Ana! No matter how awesomely talented you get, you always give other people more credit than you take for yourself....which of course, only adds to Ana Awesomeness!!!!!! haha
Samantha (not verified)
Fri, 01/07/2011 - 20:26
Love it! This is next after
Love it! This is next after my farmhouse bed!
Ana White (not verified)
Fri, 01/07/2011 - 22:32
You are too kind Nina, but
You are too kind Nina, but really, I'm just being honest! People are just so amazing!
Roberta (not verified)
Sat, 01/08/2011 - 02:36
Ana, how can this design be
Ana, how can this design be altered for a garage work bench?
Jen Shorey (not verified)
Sat, 01/08/2011 - 03:21
Beautiful! I really like the
Beautiful! I really like the finish! Thanks so much for sharing.
Leslie (not verified)
Sat, 01/08/2011 - 05:20
Thanks Ana, but i wouldn't
Thanks Ana, but i wouldn't have even thought to do this without your site here. It is such a HUGE inspiration for those of us who want nice furniture but can't afford the prices. I Love reading your plans and deciding which I want to integrate into my home. Thank you for starting this community.
joanne (not verified)
Sat, 01/08/2011 - 05:33
GREAT JOB!!! I would love to
GREAT JOB!!! I would love to see the other side of your island, I am thinking about this for a basement bar.
Ana, your site is so inspiring, I have always wanted to build furniture, and you have given me that extra push to do it! Thanks :)
Susan (not verified)
Sat, 01/08/2011 - 08:12
Thank you, Leslie! We are
Thank you, Leslie! We are buying a house and I think we'll want more counter, more storage and a tiny bit of seating (I hate chairs in the kitchen, too!). I love this design--especially the combination of closed and open storage.
farm-marm (not verified)
Sat, 01/08/2011 - 11:02
I was omgoshing when I saw
I was omgoshing when I saw this plan! My dd was laughing at me because I had barely got the site turned on when this popped up..she was saying "Gee, Mom! What'd that take? All of like 10 seconds before you found ANOTHER thing to get all excited over?! hehe! This is EXACTLY what I've been wanting in my kitchen. I'm so in love with blue paint as an accent color! I was wanting to make an island from reclaimed wood (we're in the process of adding on to our 70 + yo house and have been removing 1x4 (true to measurements!) siding (unpainted oak, can't hardly nail through..I swear it's petrified! ;) Anyhoo...We also have the turned posts from a stair removal....I'll post pics in a bit..I'm NOT allowed to start any projects til the addition is done :( But this WILL be the first! Thanks Leslie for the tutorial and thank you Ana for this awesome site!
Regina C (not verified)
Sat, 01/08/2011 - 11:53
These are fantastic plans,
These are fantastic plans, how exciting that everyone has a chance to contribute - I love this community vibe. Leslie, is that a chalkboard fridge I see in the background of the first photo?!
Carrie (not verified)
Sat, 01/08/2011 - 12:15
This is awesome!!
This is awesome!!
Heather I. (not verified)
Sat, 01/08/2011 - 13:26
BEAUTIFUL! I seriously love
BEAUTIFUL! I seriously love it. Makes me wish I had a spot for an island like that in my kitchen!
Leslie (not verified)
Sat, 01/08/2011 - 15:46
Yes, we fixed up our whole
Yes, we fixed up our whole kitchen this summer, and the fridge being painted with chalkboard paint was one of the first things to happen.
Rebecca (not verified)
Sun, 01/09/2011 - 07:49
did you make your own butcher
did you make your own butcher block, or buy it? Where and how much ? I need a top for an island I already purchased.....although I wish this had been posted 4 months ago. I would love to redo it with this one....but that isn't exactly practical right?
tmackfam (not verified)
Sun, 01/09/2011 - 12:48
AWESOME!!
AWESOME!!
Leslie (not verified)
Sun, 01/09/2011 - 13:49
I purchased the butcher block
I purchased the butcher block at a Menards, its a home improvement/ lumber store like Home depot or Lowes. It only came in the one size 2' x 5'. Really though i would think any lumber store would either carry some sort of butcher block in stock or at least be able to order one for you.
Misti Kallas (not verified)
Sun, 01/09/2011 - 19:20
Oh, snap! This baby rocks.
Oh, snap! This baby rocks. That color is AMAZING. Thanks for sharing.
Sarah (not verified)
Sun, 01/09/2011 - 19:41
Oh my goodness!!! I love
Oh my goodness!!! I love this, but I LOVE the finish! What color did you use on the base? And what additional techniques did you use?
Lisa (not verified)
Mon, 01/10/2011 - 18:32
Love this! What color
Love this! What color paint/stain did you use?
Joshua (not verified)
Wed, 01/12/2011 - 18:07
OMG!! My partner and I just
OMG!! My partner and I just got our first house together and are thinking up ideas for household furniture, ad-ons, and such ideas. While at work a customer told me about this site, and I'm just like WHOA!! Ana White, you're fabulous! Thank you so much.. Beats Martha Stuart's assortments and bundles. lol. Leslie, this is going to be perfect for our front room actually. I beleive I will use the inspiration, mostly, but critique it more suitable set as a bar for socializing and such get togethers. Will be posting soon, and thanks again Leslie, and Ana!! You rock! <3
Joanne (not verified)
Thu, 01/13/2011 - 14:39
I love this! I hope I can
I love this! I hope I can make one of these someday! I just recently found your site and it is really inspiring! Seeing all of these incredible projects with easy-to-follow instructions helps me see that I could totally make some of these things! It's not as hard as I think it is. Thank you so much for sharing your designs!
Jimmy (not verified)
Fri, 01/14/2011 - 16:15
I love it! Beautiful! I have
I love it! Beautiful! I have already, at the wifes pushing and prodding, resurfaced our kitchen cabinets with used pallet hardwood, and made a counter top of used 1 x 6 pallet wood. I will upload photo's soon. I love making things of used wood and am constantly looking for a new project. This may be the one. It will be the perfect addition to the new kitchen which is replacing my office/den!
Ana, my daughter stumbled across your site , looking for craft projects and then told me about it. I love it!
Erin (not verified)
Wed, 01/26/2011 - 10:07
Where did you get the turned
Where did you get the turned legs and how much did they cost you? I love this! I'm trying to build it with a 2' by 4' top. The 2' by 5' is just a little too big for my kitchen.
Jessica (not verified)
Wed, 02/23/2011 - 10:01
I absolutely adore this! I
I absolutely adore this! I just had to tell you! I am moving to a new house in a month and I was looking for ideas on an island. I love this and plan on making one for my new kitchen. Thanks so much for sharing.
~Jessica
katieg919
Tue, 04/05/2011 - 07:53
casters
Anyone know how to adjust the measurements to add casters to make it mobile but still keep it at counter height? Thanks!
Tsu Dho Nimh
Tue, 04/05/2011 - 09:06
Measure the casters
Casters vary in height ... measure the installed height of the casters and subtract it from the vertical measurements of the support posts and the side panels.
BTW, you will need some hefty casters. That island is going to be heavy.
katieg919
Wed, 04/06/2011 - 11:15
casters
Thank you!
Guest (not verified)
Mon, 04/11/2011 - 07:41
(No subject)
jenn06osu
Wed, 05/25/2011 - 11:16
What are the measurements of
What are the measurements of the middle cabinet, I want to shorten the length a bit for my kitchen. Thinking of shortening about 6in and making the middle part to hold wine. Is it possible. This will only be my 2nd build but I really need an island!! Also, would it be possible to tile the top instead of a butcher block?
I love this site!!
Mindy (not verified)
Mon, 07/11/2011 - 16:45
I am in LOVE
Oh Man. I just saw this, and I love it. I can't wait to re-do a kitchen and be able to make this (or have my husband help make it!
Carla Rubert (not verified)
Wed, 07/20/2011 - 19:16
Hi I'm new to your
Hi I'm new to your site/blog.... I love the kitchen island - fabulous! But I'm actually wondering if you could tell me about your floor.... Sorry if this has been discussed here before....I've wanted black and white checker board floor for as long as I can remember... and there's debate over which is more eco-friendly - real linoleum (now called marmoleum) or vct... any thoughts on this? What is yours? Thanks so much!!! :)
Adreinne (not verified)
Wed, 10/10/2012 - 21:28
nice blog
I love your blog so much, I wish I could have something like this. I love sharing about home decors and DIY home products or cleaning products. I have so many ideas what to put on my blog. I am just not a writer type of person. and I also heard you can earn from blogging, I wish i knew how
A.J. (not verified)
Fri, 12/07/2012 - 13:34
My daughter asked me to build
My daughter asked me to build her a breakfast bar/counter and I found these plans while searching the web. I like the design and emailed it to my daughter to get her opinion. She loves the design, but would rather have it made in a more modern design. I will make it for her but use birch plywood and boards instead of 1 x 4s. She doesn't care for the rustic painted design so I will probably use a clear finish on the birch wood for her breakfast bar.
LM Lloyd (not verified)
Fri, 01/18/2013 - 08:45
Wheels and Drawers
I love this Island. I'm going to be building it some time this year, but I was thinking about putting it on lockable wheels and adding drawers or a shelf space in place of the non-functionable drawer facade. I think I will also make a few shaker-style adjustments.
Any ideas for making these adjustments easier?
alliepyles
Tue, 03/26/2013 - 11:00
Finishing
Has anyone finished this island? Did you do the painting, staining, etc. in doors? It looks like it would be mighty heavy to move from outside or the basement :) First time builder here... new to the game. Really have NO idea what I"m doing.
H Case
Sun, 12/14/2014 - 12:43
turned stair bannister post
Hello, Am wanting to make this for my daughter for Christmas. Cannot find the posts like you used. Where did you get yours or anyone else who made this? Our local lumber is Lowe's, and they don't have anything close. Don't want to use 4x4 posts as they only carry treated, and I won't be able to paint it. Thanks in advance for any help you can give!
In reply to turned stair bannister post by H Case
Ana White
Sun, 12/14/2014 - 15:15
Take a look here for the
Take a look here for the turned legs https://www.osbornewood.com/
hillaryb
Mon, 09/09/2019 - 06:15
Alterations?
I'm not the best carpenter, but I've got some great helpers. Could this be made so the butcher block does hang over and I could a 2 small barstools? Would be thinking just move the legs back farther?
Nates1981
Wed, 02/16/2022 - 19:30
Help please
Hello. My wife loves the look of this and is making me build her one. Except for it will be hickory. I am hoping that maybe you did an instructional video of making this. If so where can I find it? Thank you.