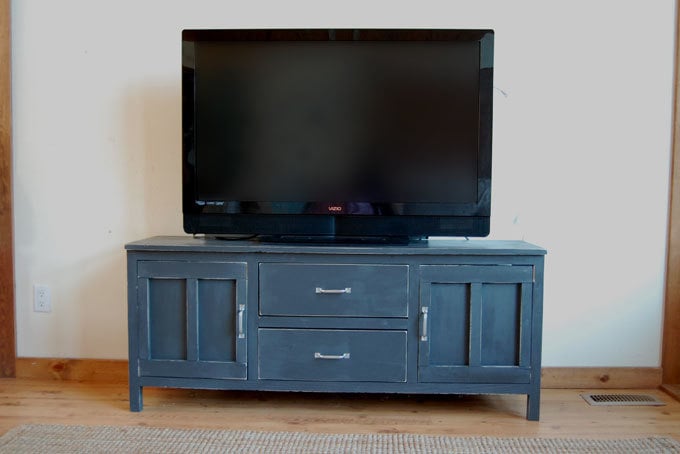


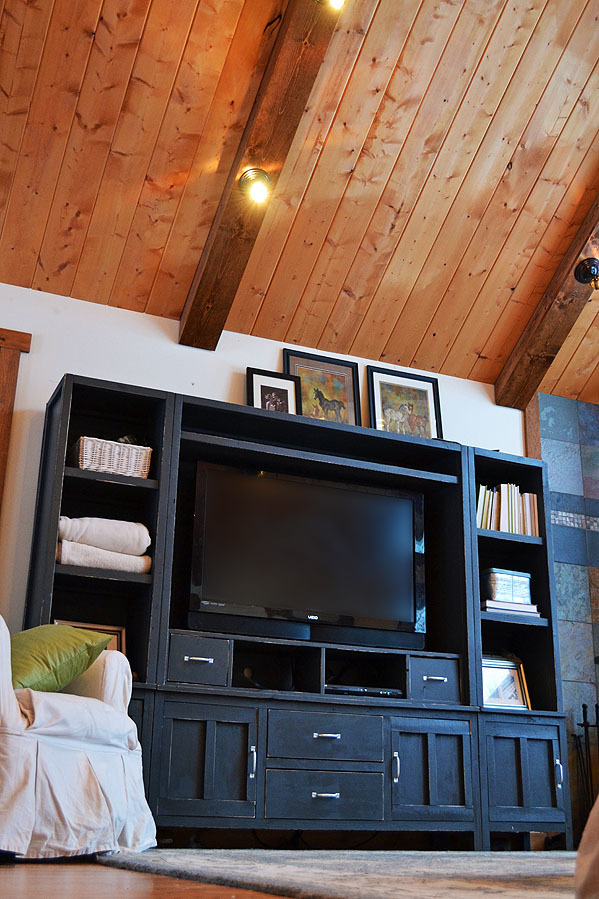
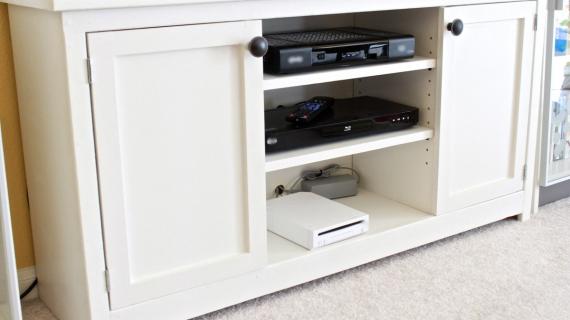
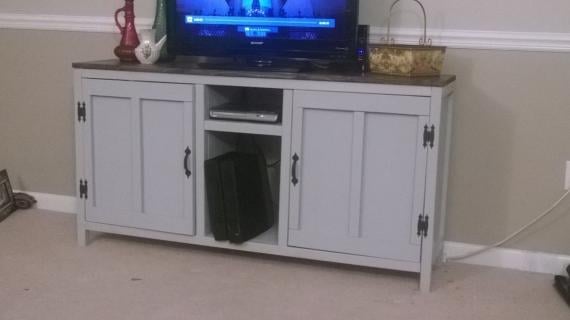
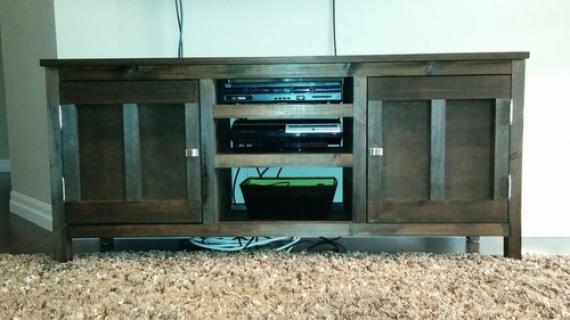
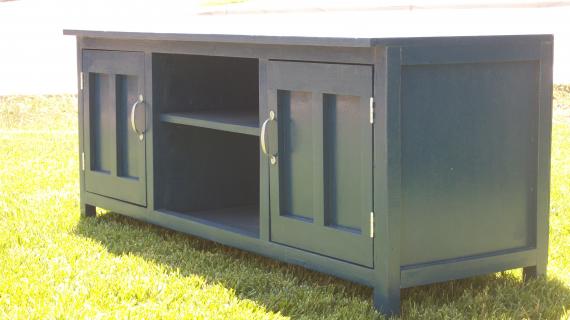
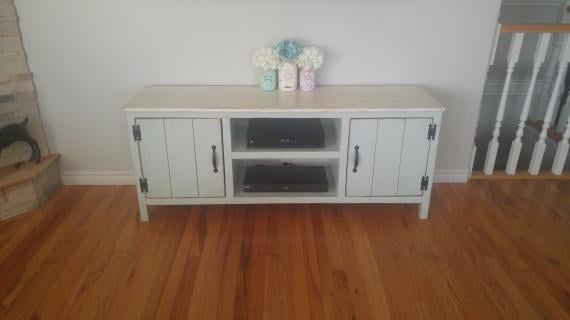
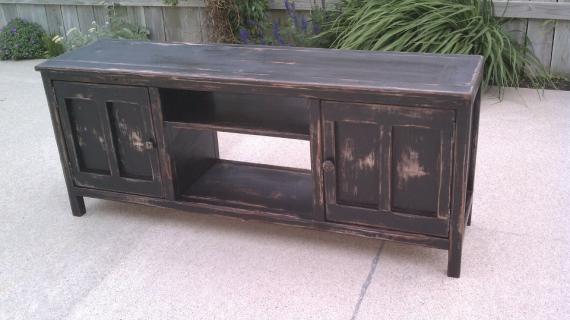
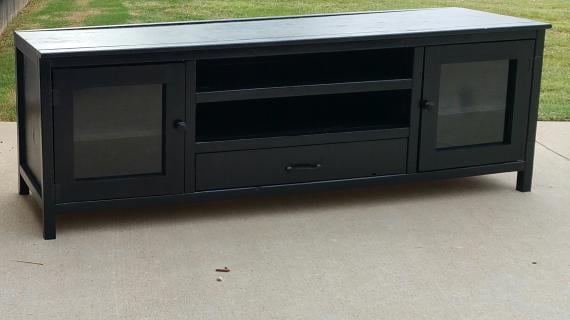
My Media Console. Features two cupboards with shelves and two large drawers. Raised design fits over air ducts and create the illusion of more space.

Preparation
3 – 1×12 @ 8 feet long
5 – 2×2 @ 8 feet long
2 – 1×3 @ 8 feet long 2 – 1×2 @ 8 feet long
1 – 1×8 @ 12 feet long 1/4″ plywood (for door backs and optionally the back of the media center)
2 1/2″ screws or pocket hole screws
finish nails (if you don’t use pocket hole screws)
Wood Glue
Finishing Supplies including paint and primer or stain
4 – knobs or handles
2 – 1×12 @ 19 1/2″ (Sides)
4 – 1×2 @ 11 1/2″ (cut to the width of your 1×12 – side trim)
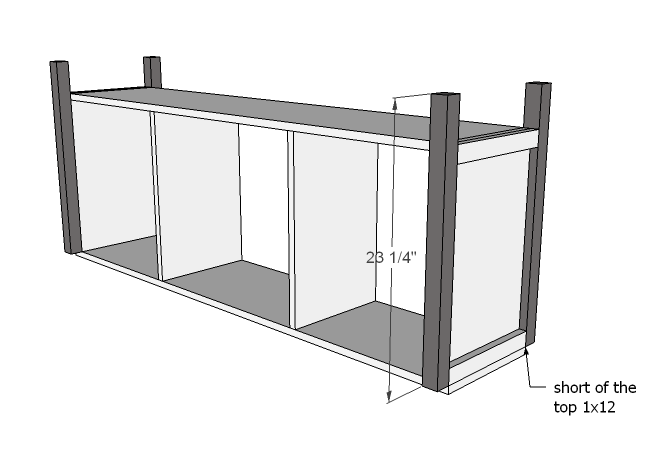
1 – 1×12 @ 57 1/2″ (Top)
2 – 1×12 @ 18 3/4″ (Center Partitions)
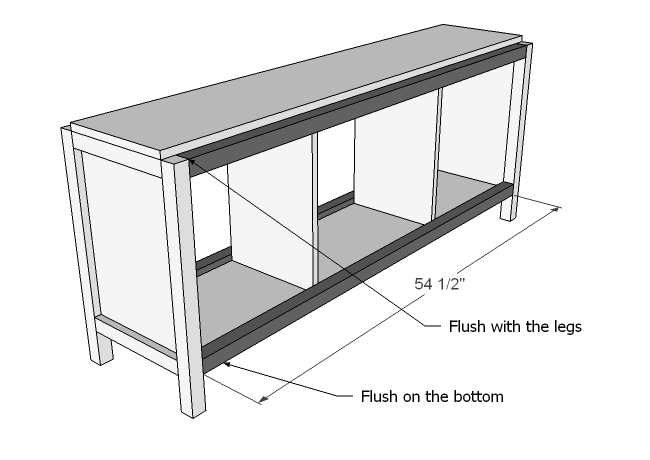
1 – 1×12 @ 54 1/2″ (Bottom of Box)
4 – 2×2 @ 23 1/4″ (Legs)
4 – 2×2 @ 54 1/2″ (Front/Back Trim)
1 – 1×2 @ 57 1/2″ (Top Trim, Back)
1 – 1×3 @ 57 1/2″ (Top Trim, Front)
4 – 2×2 @ 16 1/2″ (Drawer/Door Trim)
4 – 1×8 @ 20 1/4″ (Drawer Front/Back)
4 – 1×8 @ 11 1/2″ (Drawer Sides – cut to the width of your 1x12s)
2 – 1×12 @ 18 3/4″ (Drawer Bottom)
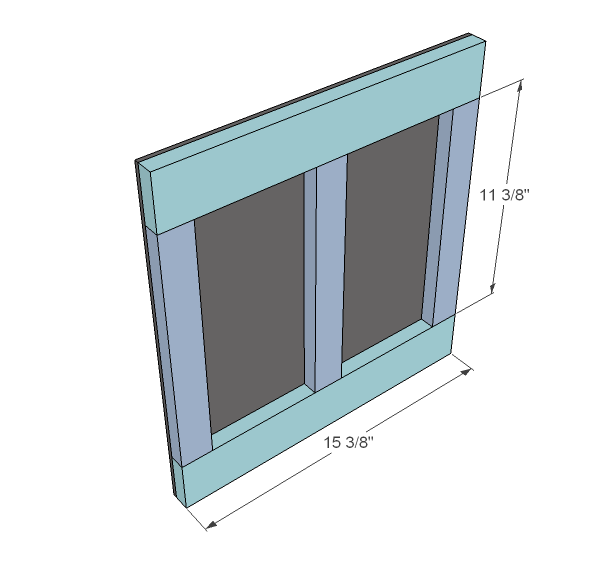
4 – 1×3 @ 15 3/8″ (Door Top/Bottom)
1 – 2×2 @ 20 1/2″ (Drawer Trim)
2 – 2×2 @ 13″ (Drawer Guides – 1×12 width + 1 1/2″)
2 – 1×2 @ 11 1/2″ (Cut to width of your 1×12 – bottom drawer guides)
6 – 1×2 @ 11 3/8″ (Door Sides/Trim)
1/4″ plywood @ 15 3/8″ x 16 1/4″ (Door Backs)


Instructions
Step 1
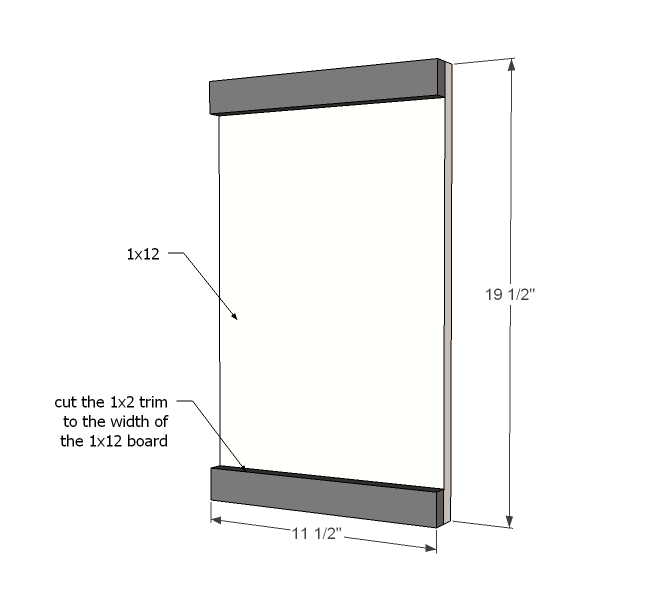
Side Trim
Attach the sides to the side trim as shown in the diagram. You will need to do two of these. I fastened mine from the inside to hide screw holes.
Step 2

Box
Build the box as shown above. I used pocket hole screws (1 1/4″ long), but you could use glue and coutnersunk screws or even nails (lots of glue) – just make sure your fasteners are 2″ long.
Step 3
Legs
Attach the legs to the box, flush to the inside of the box and the outside of the side trim. Use 2 1/2″ finish nails or screws and glue or pocket hole screws from the inside.
Step 4
Front/Back Trim
This should be an easy step, but will strengthen up your piece considerably. Fasten same as legs. Also fasten legs to trim.
Step 5

Step 6

Top Front and Back
Finish off the top front and back as shown above. If you have a pocket hole system, you will want to have holes predrilled in the top 1×12 to attach the trim. otherwise, wood glue and screws will work (it’s fully supported by the 2x2s).
Step 7

Drawers
Build your drawer as shown above. Use either pocket hole screws or 2″ screws and glue. You need two drawers.
Step 8

Drawer Guides
I like to adjust my drawer guides to a perfect fitting drawer. Begin by placing the bottom drawer guides in place. You may need to shim this one up 1/8″ so that the drawer face has an 1/8″ gap under it. Glue and use 1 1/4″ fasteners to keep in place (hold off on the glue until you are happy with the placement of both drawers). Then add the top drawer guides (not the trim yet) until you have approximately a 1/8″ gap to the top of the top drawer and the drawer is sliding smoothly. When you are happy with the top drawer, fit the center trim in place and adjust your drawers as necessary. The ultimate goal is an even gap around both drawers and smooth sliding drawers. TIP: Rub bottom edges of drawers and drawer guides with a cheapo candle to have super smooth sliding drawers. See below.
Step 9

Step 10
Drawers
I stole this drawer part from the bases/nightstands because it’s identical (intentional). Here goes: When you cut your boards, make sure you measure the exact opening of your door, and leave 1/8 gap for a tight fit, 1/4″ (total gap, so that’s 1/8″ all the way around) for a roomier door. If you have a pocket hole system, build the door frame as shown above. You can use a countersink bit or wood dowels to build the door frame too. Otherwise, glue and nail to the back plywood. Keep in mind the allowance need for your hinges. Depending on the type of hinge that you are using, you may need to cut the plywood out around the hinge.
This is an advanced project because there are alot of pieces, and if everything doesn’t come out square, your drawers/doors won’t work properly. Please don’t attempt as a first project. Happy Building!

Comments
Kev (not verified)
Mon, 01/24/2011 - 22:35
Really need to build this
Really need to build this one. Looks great!
Nicole (not verified)
Tue, 01/25/2011 - 03:15
I love your house, it's so
I love your house, it's so beautiful! I bet if you left Alaska for a bit you would miss the look of your house. Everytime I have left Alaska I have missed it, just not something you forget. A different world, but a beautiful one up there.
Nicole (not verified)
Tue, 01/25/2011 - 03:19
Ana, I love your house, it's
Ana, I love your house, it's so beautiful!
Nancy (not verified)
Tue, 01/25/2011 - 03:23
Not everyone needs to have
Not everyone needs to have white furniture. Your "plan B" turned out great!! Love it!
Jennifer (not verified)
Tue, 01/25/2011 - 03:37
Not only do I love this
Not only do I love this design I also adore it. Must work on developing my skills as a builder to do this one well.
Pam the Goatherd (not verified)
Tue, 01/25/2011 - 04:21
I'm married to a
I'm married to a rustic-loving guy, too! The way I have found to deal with this is to decorate our bedroom and the living room (where he spends the most time) with rustic, animal heads, dark paneling, earth tones. Then I have my sewing room where the walls are violet/pink with white trim. The curtains and linens are frilly and very light and airy. The furniture is white. We've been contentedly married for almost 17 years now, so my method must be working.
lorchick @ ON{… (not verified)
Tue, 01/25/2011 - 04:33
My husband has the opposite
My husband has the opposite problem as you... he wants rustic but it would just look out of place in our home! Some day we'll buy some property outside of town and go all-out with the Cottage Home look... for now, the white stuff just looks better.
lauralehman (not verified)
Tue, 01/25/2011 - 04:40
Totally understand......I
Totally understand......I live with a farmer on a (currently) big muddy farm....hard to have a non-farm like home. LOVE the blue/grey. It's the new black! I'm trying not to use black as much as it shows too much farm dust!
Sheela (not verified)
Tue, 01/25/2011 - 05:01
Ana, I'm so glad you didn't
Ana, I'm so glad you didn't paint all the wood white. I looked at the beautiful moulding around your gorgeous windows and knew it wouldn't look right being white. Your home is beautiful, and it fittingly reflects Alaska. I like white trim, and I have it in my house, but in your house, the wood looks beautiful. And slate is gorgeous too, so I'm glad you put the paintbrush away.
By the way, this plan looks great. But what did you do with the other media console you made that was painted plum?
Loni (not verified)
Tue, 01/25/2011 - 05:09
I've been waiting for this!
I've been waiting for this! Thank you thank you thank you!
Kristi (not verified)
Tue, 01/25/2011 - 05:20
Ana! Cute....I love this
Ana! Cute....I love this simple plan, and I may use this one in the future! Your house is BEAUTIFUL....so don't fret about it. Oh, by the way, DON'T get rid of your woodstove....it might come in handy someday! :) (I have one in my family room....takes up about 5 feet of wall....hmmmm.)
Natalie (not verified)
Tue, 01/25/2011 - 05:44
This is awesome, thank you so
This is awesome, thank you so much!! You know what is funny is that we are stationed in San Diego right now and after seeing picture of your home and reading your stories I told me husband the other day that it would be so cool if we got stationed in Alaska next. He said I would not make it, the SD weather has ruined me for life lol Can you believe that your website has not only inspired me to build but tempted me to give up 70 degree winters? Crazy, huh?
christy (not verified)
Tue, 01/25/2011 - 05:45
Ana, we all know how much I
Ana, we all know how much I love YHL, and you. And as much as white makes me go "oooohhhh", your house is amazing. You built it, and you are right. You live in rustic Alaska. Embrace it. I just said at dinner, could you imagine living like Ana, eating moose? My hubs, was like ... No. But that's wonderful. We all have different lifestyles, and design ideas. Be eclectic and embrace your home. If you need a YHL moment, why don't you make a video tour like sherry and john & post it to your journal? Or, spray paint some ceramic animals all white sherry style.
Mutti (not verified)
Tue, 01/25/2011 - 05:49
Bring on the salmon! That is
Bring on the salmon! That is almost reward enough! Thanks for sharing your talents with us.
Megan (not verified)
Tue, 01/25/2011 - 06:10
Ana, three months ago we
Ana, three months ago we moved from a modern townhouse in the middle of Seattle to a log house in the middle of nowhere. I feel ya. (my wood stove is backed w/ field stone and is massive- the hearth is about 12 feet. ) Here's to learning to embrace rustic.
Monique (not verified)
Tue, 01/25/2011 - 07:10
Ana, beautiful console and I
Ana, beautiful console and I love the paint color. White paint has its place but I love COLOR! I wish there were more folks who would be a little daring with color. Love the new look of your blog too! Thanks for all you do.
melker (not verified)
Tue, 01/25/2011 - 07:14
ana- think about how much
ana- think about how much better the distressed earth tones will tolerate children and dogs than the white.. that's what i tell myself when my husband says no to white... ;).. maybe ill have while when we retire.. but then i won't want to clean it. Thanks for the great plan!
Jenn Hoff (not verified)
Tue, 01/25/2011 - 07:46
Hi, Ana! I like Pam the
Hi, Ana! I like Pam the Goatherd's comment. My ex hated anything girly, so I just made my bathroom and guest room girly, since he never went in there. Then I would go in and just stare, and sometimes drool a little. :) It wasn't the reason we got divorced, don't worry. :)
Erin in AK (not verified)
Tue, 01/25/2011 - 08:32
Is he headed to Adak? Sounds
Is he headed to Adak? Sounds like it...
Melissa (not verified)
Tue, 01/25/2011 - 09:27
I remember reading once that
I remember reading once that you loved West Elm's blend of rustic and modern and I have to say that every time I see pieces from your home I think that you are blending both of those styles beautifully. I too am not a fan of rustic, but your home has lovely features that don't make it look too heavy and look like you live in a ski lodge. It is a good thing that you and your RAM can strike such a nice balance.
Laci Waner (not verified)
Tue, 01/25/2011 - 10:14
Don't get me wrong. I love
Don't get me wrong. I love me some John and Sherry, but I also LOVE the color on your site and throughout your home. Speaking of color...how did you finish this piece. I have been putting off finishing several pieces (and waiting to take photos until they're finished), and this would be PERFECT!!!!
Laci
ps. FYI, we live in a rent house where EVERY single thing is white (seriously) with black stained concrete floors; so I'm dying for color!!
Anne (not verified)
Tue, 01/25/2011 - 11:19
This post is so funny because
This post is so funny because my mom just went through that...she has a very dark living room (back of house without a lot of natural light) and has cranberry painted walls with wood trim, wood encased fireplace and wood wainscotting around the entire room. She finally after 20-some years just painted it white before Christmas. It looks AMAZING but took her a loooooooong time to work up the courage to do it!
Either way your house is awesome...white trim or wood trim :)
Melanie (not verified)
Tue, 01/25/2011 - 16:57
About 20 times a month I
About 20 times a month I think about just going for it and painting all of my trim white. And then I think of the work involved and the upkeep of keeping all of that trim/baseboards/doors white and I change my mind. Don't get me wrong. . . .I love the look, but I think if your colors and decor are right, the wood can look beautiful. I love your home and your color choices. Leave the wood how it is!!!
Nan Tovar (not verified)
Wed, 01/26/2011 - 05:13
Seriously love this
Seriously love this console!
Would it handle a 60" TV?
Probably have to extend it a bit, and then add some extra legs, maybe.
Jo at the Crea… (not verified)
Wed, 01/26/2011 - 17:43
I have begun to really like
I have begun to really like the rustic richness of stained wood. I too, live on a farm and therefore the upkeep on anything stark white would be waaayyy more that I have time for! Thanks so much for all the great plans. I hope to make many of them. Love the color of the media cabinet also.
Che (not verified)
Fri, 02/11/2011 - 02:19
Just a question about this
Just a question about this piece, since I am about to build it, is there no back on it? I don't see it in the plans or cut list.
Jaime @ thatsm… (not verified)
Sat, 02/12/2011 - 06:15
Built it thank you Ana! I
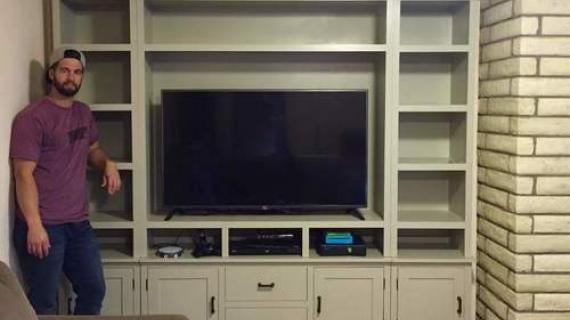
Built it thank you Ana! I modified the size (50 x 19 x 30) and changed out the drawers for shelves and added shelves behind the doors. Your are my sole source for furniture plans and I can't thank you enough for all that you do to provide us so-called-builders with awesome inspiration.
You can see my console here:
http://thatsmyletter.blogspot.com/2011/02/m-is-for-media.html
Lindsey (not verified)
Thu, 02/17/2011 - 10:02
I'm glad you didn't paint the
I'm glad you didn't paint the trim, I prefer the natural, contemporary, look of wood trim or floors with white walls.
I just moved from an historic Greek Revival in town (where everything was white and formal) to a newer, rustic, open floor plan, house in the country. It is an adjustment. At first I wanted to change everything, but now that I've lived in it a while, I recognize how cozy it is and the value of stained wood cabinets, floors, trim and doors when you have messy people and a big dog and scrubbing and touching up painted surfaces, isn't your favorite past time :)
We also live in an area where formal design just doesn't work. I'm reinventing my taste in both interior design and landscape design to work with our environment, rather than against it. I'm definitely starting to gravitate towards a more natural look, Earth tones, beige, gray, slate blue and green. I am often inspired by photos posted at remodelista.com.
birdsandsoap
Thu, 10/06/2011 - 12:17
I totally hear ya!
I am a lover of all things coastal. My dream home would be some cape-cod style home with cedar shakes and I probably would throw in a dutch gambrel roof. But that's me dreaming.
I have this thing that goes against the moral fiber of my being when it comes to decorating homes. With the exception of kid's rooms, themes contrary to climate are not allowed. That means, as much as I love objects reminiscent of the ocean, I have to live with the reality that I am in Idaho, not near a coast, and it's technically a high desert. That would be the exact opposite. Coastal cannot be part of my decorating repertoire (look at me using big words).
It kills me, and I mean KILLS ME to walk into a house that's so themed out you feel like you are in Disneyland. Prime example: Nautical theme in Idaho. There is no ocean here, not even close. Don't fill your living room with boat anchors, rope vases, and seashells; don't hang life preservers and lighthouse pictures on the walls. Please. I know you say, "but it's a bathroom, there's water in here." Well maybe you can get away with a couple starfish in a glass hurricane on the counter, but that's it. Don't cross that line, or people will be paying admission to see your freak-show living room.
The same goes for the architecture of a home. You can't style a Victorian home to look like a modern Prairie-Style home. You just can't. It's like punching the home in the face. It's a disgrace to the bones of the house. Like Lindsey said, work with your environment, not against it.
So gussy up your cabin in all of it's cabin glory! Enjoy the warmth of the wood and leather things up! Match your interior colors to the beautiful nature surrounding you and don't look back. It may not make the cover of "Coastal Living," but you may just find yourself featured in "Mountain Living."
And don't worry, the era of white sofas will soon fade too....all things in time. By then I will be recovering my white sofa right along with you. I've noticed that southwest/cowboy decor is getting popular again, which means cabin-style is right around the corner, haha. When all the bloggers are bringing rich tones back into their decor (remember hunter green?) you will have already beat them to the punch. Stay true to your home, it's not about the trends; you want classic, timeless design. That never goes out of style.
My convictions are so strong, I just might blog about this. haha. Glad I got that off of my chest.
kellIinwi (not verified)
Tue, 09/18/2012 - 19:22
Concealed Hinges
I'm trying to finish this build and really wanted to know what concealed hinges you used!! I REALLY want to enjoy this labor of love but am trying to find concealed hinges. I did find a pair for $20, that I think will work but I can't spend $40 on hinges.
Thank you I'm advance and I think you're amazingly talented!!!! :)
mrsg08
Mon, 09/24/2012 - 16:26
HELP!!!
We are trying to finish this build and bought what we thought were euro style hinges, but my husband installed them and there on the outside and it looks awful. So we've removed them and needless to say there will be a lot of wood filler used.
Can someone please help me with the type of hinges used and a link(so I can see what they look like) in this build? I really want to achieve the hidden flush doors as shown in the picture. Thanks so much!
Ana White
Mon, 09/24/2012 - 16:46
Hinges
Shame on me for not getting a tutorial out on these hinges yet. Here is photos and tips from shanty2chic http://www.shanty-2-chic.com/2012/08/anthropologie-for-less.html. Hope this helps and am making a big effort to put a library of tips/techniques videos together. Can't wait to see your console!
bock_the_builder
Sat, 05/04/2013 - 23:25
Not for Beginners!
When Ana says "Please don’t attempt as a first project", listen to Ana!! I did not read that disclaimer until I had already purchased all of my wood. I wish I had. Holy moly! This was a ton of cuts! I decided to forego the drawers for simple shelves (works better for our house) and added shelves to both of the cabinets for more storage. Hinges are tougher than I could have ever imagined, and my doors look like Al Capone took a machine gun, there's so many little drill holes in them, but the hinges finally went on. It's not the most beautiful piece in the world, but I did it, and just like in life, each mistake was a lesson--albeit, just like in life, some lessons are more expensive than others! I learned a lot from building this piece, and I thank Ana for empowering real people to build real pieces. The sky truly is the limit (if you start small, of course)!
go10ecvols
Thu, 08/01/2013 - 13:31
PDF Version
I'm trying to get the PDF version of this and get an invalid link error. Does anyone have the pdf available?
shelbymceachern
Sun, 10/27/2013 - 06:29
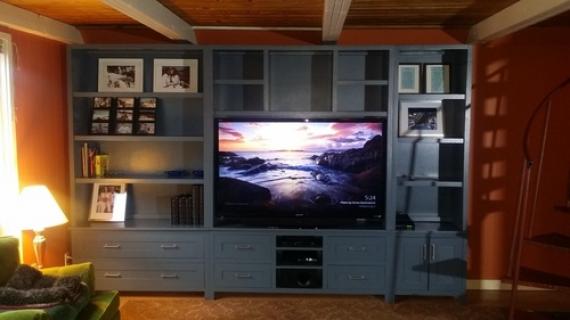
Whole Plans
Where can we find a plan for the whole unit? I really want to make the whole thing here and can not find any additional plans for this!!!
LOVE IT!
aklab
Tue, 04/15/2014 - 20:01
PDF plans
Help! I want to build this but the PDF link is broken. Any plans to replace the plans there?
hammerhead22
Fri, 06/20/2014 - 09:40
Cabinet doors
So, the materials list calls for 1 1/4" finish nails, and the cabinet door instructions say to fasten the frame to the back with glue and nails, but the thickness of the entire door (3/4" wood + 1/4" plywood) is only 1".
Am I missing something? Won't the nails go straight through the back (or front, in this case)?
justinkauai
Fri, 10/03/2014 - 03:45
SketchUp Plans
Any chance you could share the sketch up plans.
I would like to add another drawer and it would help tremendously to add it in sketch up.
BTW love you plans!
Thanks,
Justin
meme060504
Fri, 10/10/2014 - 08:58
PDF Plans
I see the PDF plans link is broken. Would like to build this and would like to have the plans to do this. Will this be fixed? Please let me know.
Thanks,
Mindy
J Charles
Fri, 01/09/2015 - 06:55
In progress
I started building one of these a couple weeks ago, but unfortunately, without a garage, I'm limited to building on my patio. It's been too cold/rainy/snowy to work on it recently. I'm anxious to get it finished so we can use our new TV. I made it taller than the plans, adding an additional drawer. Can't wait to finish and post pics.
meldawn723
Thu, 04/21/2016 - 08:58
What if I modify it?
Love this style. But need to modify about 15 inches longer and 6 inches taller. Anybody know if I would need to add stronger legs or maybe an additional one in the middle (which wouldn't look great) Thx!
darren_russinger
Thu, 02/15/2018 - 19:31
Step 2 Pocket Holes
In Step 2: Building the box, I'm trying to figure out the best locations for pocket hole screws. Maybe on either ends of the center partitions, the ends of the bottom (to fasten to the sides), and maybe the tops of the sides to fasten to the top?
Has anyone used pocket holes on this step?
Indywar2
Wed, 06/26/2019 - 12:30
Why is top in 3 pieces??
NIce plans.
I was wondering why there are three pieces of wood for the top instead of one.
Also, are people using solid lumber or plywood for the box sides? It seems there was a mention to use 11.5" because it saves plywood, but the material list seems to indicate solid lumber.
Thanks,
Rob