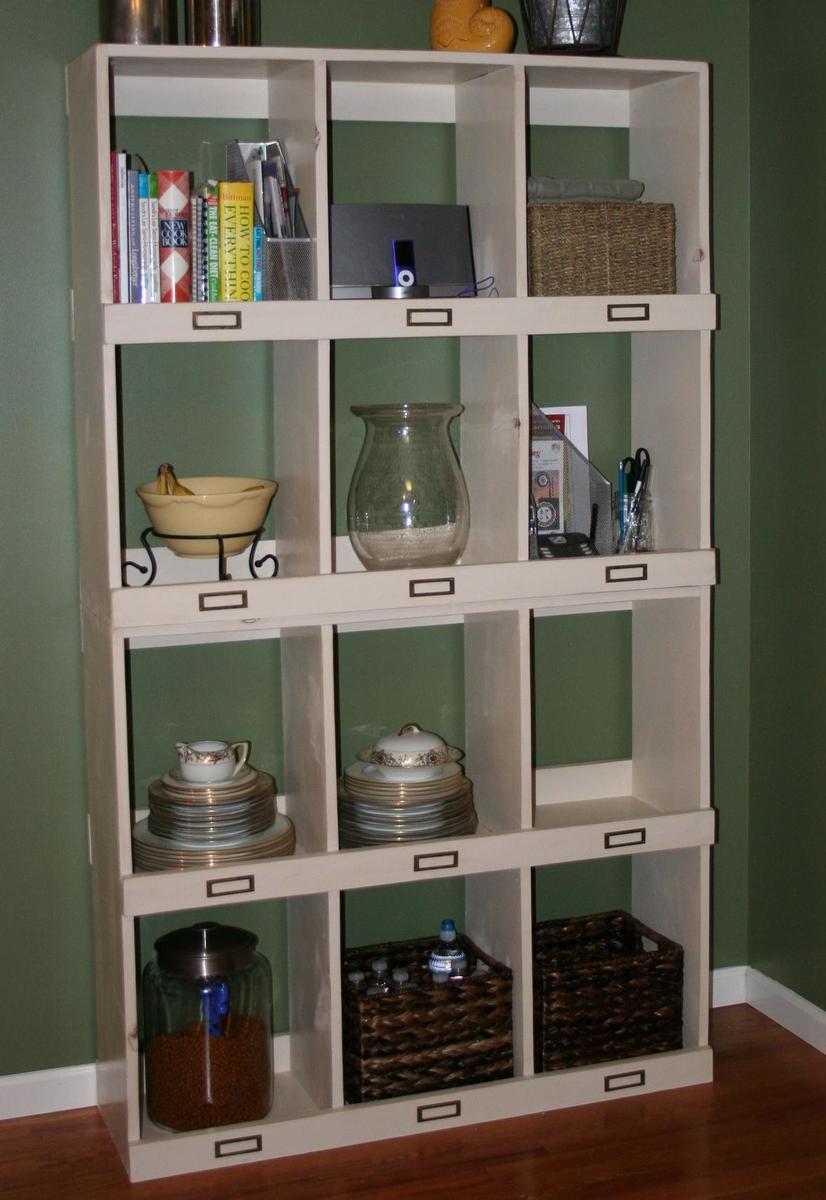


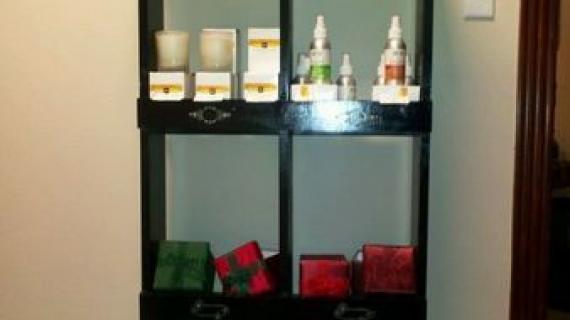
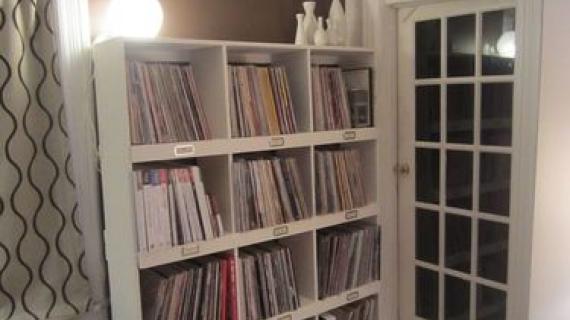
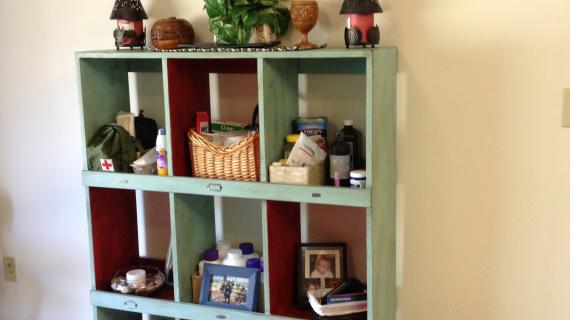
These simple General Store Cubbies are easy to build and feature six cubbies, each with front lips to keep contents in place. Special thanks to our readers for sharing their photos.
I'm using our new easy plan submission for to submit this plan that I designed and showed you how to design here. . This plan is inspired by Pottery Barn's Mitchell wall system, and looks so simple in the plan, but there's so much pottential. Think stacking like they did in General Stores. I'm suddenly wanting a wall full in distressed washed blue . . . You can see what Pottery Barn's does with their Mitchell storage cubbies here.

I'm using our new easy plan submission form to submit this plan that I designed and showed you how to design here. . This plan is inspired by Pottery Barn's Mitchell wall system, and looks so simple in the plan, but there's so much pottential. Think stacking like they did in General Stores. I'm suddenly wanting a wall full in distressed washed blue . . . You can see what Pottery Barn's does with their Mitchell storage cubbies here.
You can submit plans too! Just go here and follow the instructions.
Another thought . . . if you were to make the trim on the shelves wider, than you could use it as cubbies in a kids room. You know the kind . . . the kind that holds balls and kids can clean their own rooms with? The ledge would keep everything from spilling out!
Preparation
5 – 1×3 Pine Boards, 8 foot length
3 – 1×12 Pine Boards, 8 foot length
2″ Screws
2″ Finish Nails
Wood Glue and Finishing Supplies
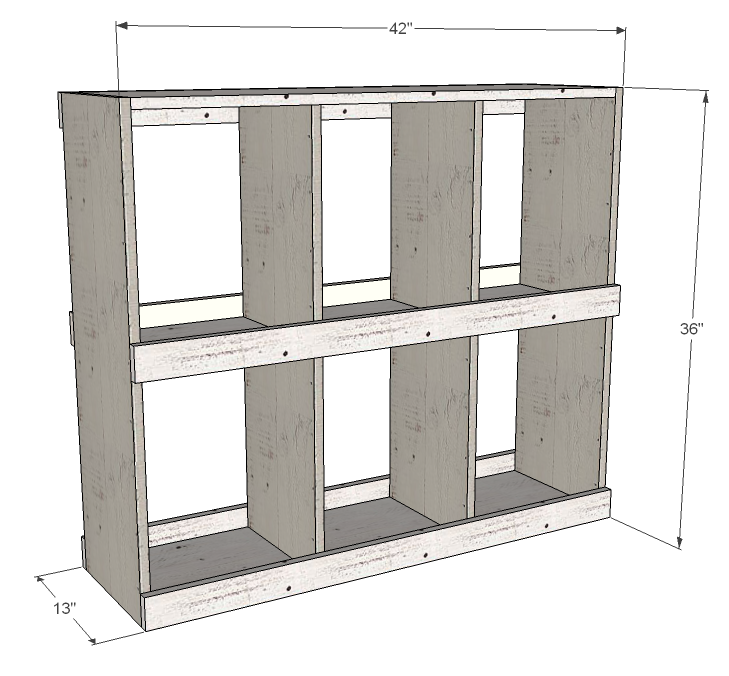
5 – 1×3 @ 42″ (Shelf Trim)
4 – 1×12 @ 16 7/8″(Cubby Dividers)
3 – 1×12 @ 40 1/2″ (Shelves)
2 – 1×12 @ 36″ (Sides)


Instructions
Step 1
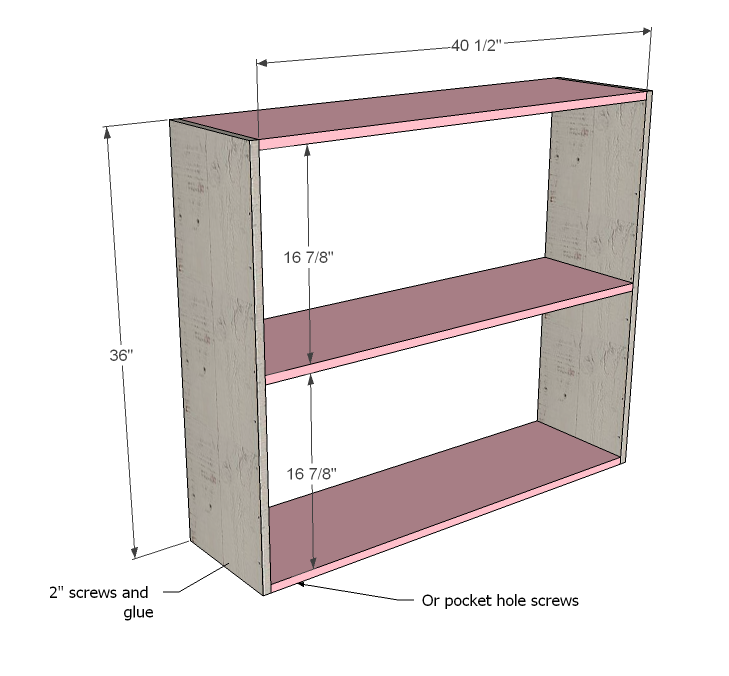
Start by building the box as shown in the diagram above. Use 2″ screws and glue or pocket hole screws.
Step 2
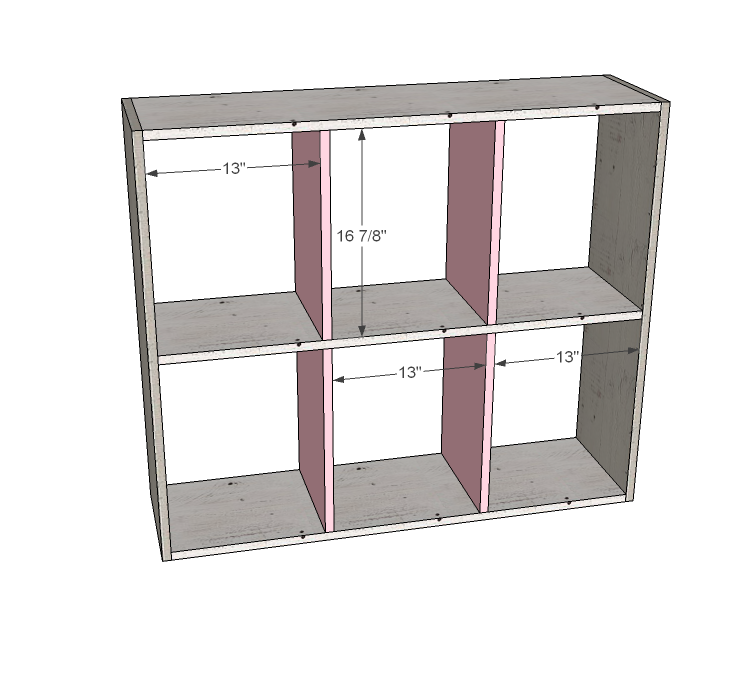
Add the cubby dividers. How I would do this is put the bottom dividers in fixed first. Then put the top dividers in, but you wont’ be able to fasten the bottom of the top dividers to the middle shelf. Don’t despair. Glue and let dry in place. I’ve got you covered
Step 3
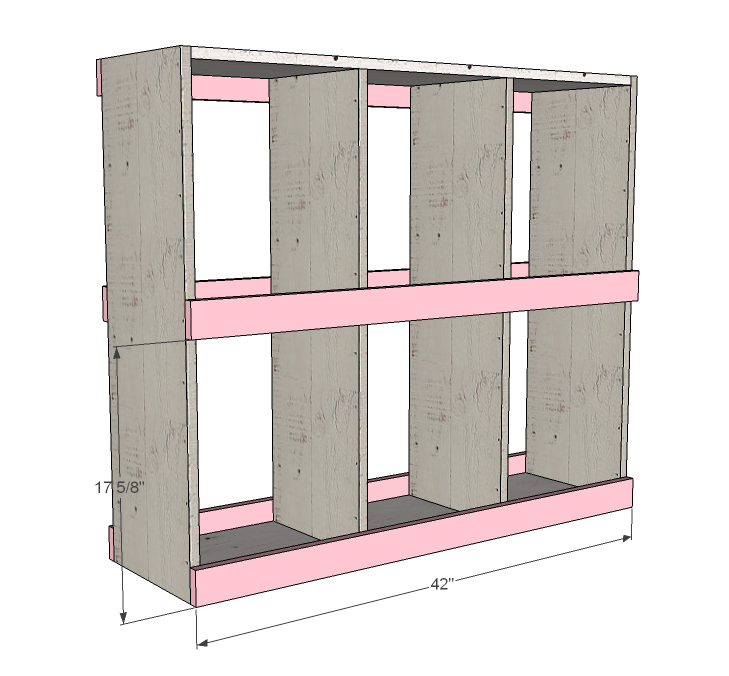
Use the trim boards to nail the bottom boards in place. Make sure you also nail the trim boards to the shelf and the sides. Add trim boards to the back. IMPORTANT: Adjust for square before attaching these boards, especially if you are stacking multiple cubbies.
Comments
melker (not verified)
Fri, 01/07/2011 - 11:24
I saw this in the catalog and
I saw this in the catalog and i
melker (not verified)
Fri, 01/07/2011 - 11:26
sorry my computer was being
sorry my computer was being funny....I saw this in the catalog and thought to myself... " Ana will make plans for this..". Thanks for your wonderful site, we love it!
Kathy (not verified)
Fri, 01/07/2011 - 12:54
Someone needs to find those
Someone needs to find those metal tag holders that are on the PB shelves! They MAKE the shelving!
Kathy (not verified)
Fri, 01/07/2011 - 12:57
Oh...I found
Oh...I found some:
http://www.thehardwarehut.com/cabinet_labels.php
maddbovine
Fri, 03/25/2011 - 10:38
check scrapbook supplies
I am thinking about taking my Expedit bookshelf and adding the labels to mimic this look in my kitchen. I checked out JoAnn online and they have thesehttp://www.joann.com/joann/catalog/productdetail.jsp?pageName=search&flag=true&PRODID=xprd1037188 which are $4.19 for 6. I am sure you could find something by looking at craft stores (with a coupon) or scrapbook stores.
Kathy (not verified)
Fri, 01/07/2011 - 12:59
The PB ones are $400!!!
The PB ones are $400!!! Wow...that's INSANE!
(Ok, I'll stop making comments!)
Jackaboomomof2 (not verified)
Fri, 01/07/2011 - 14:01
LOVE THIS!! I'm going to
LOVE THIS!! I'm going to need a couple of them stacked on top of each other in my scraproom :)
Kathy, Thank for the link to the metal tag holders, I am SOO ordering some!
Rebecca (not verified)
Fri, 01/07/2011 - 18:44
The hardware is also
The hardware is also available at Lee Valley Tools (and I think the prices are better).
http://www.leevalley.com/en/hardware/page.aspx?cat=3,43520&p=44199
Corky King (not verified)
Sat, 01/08/2011 - 03:10
Darnnit, Ana. I was going to
Darnnit, Ana. I was going to use an Ikea Expedit bookcase in my stamping / craft room to hold my papers. The cubbie size wasn't quite right, but I thought I would make do.
Now, I'm going to make this!
It's perfect. I can resize the cubbies to hold my paper organizers, and still have an open back so I can place it on the wall with the return vent.
Yippee!
Hilary (not verified)
Sat, 01/08/2011 - 07:25
Ana - Could something like
Ana - Could something like this be wall mounted? They only show it in photos stacked. If you wanted to wall mount, would you have to add a backing board to screw into the studs? I am dying for built in shelving without bases but am having trouble modifying plans accordingly. I've checked out some of the hutch plans but the wall mounting part trips me up every time.
Annalea (not verified)
Sat, 01/08/2011 - 15:09
I <3 Lee Valley. Their stuff
I <3 Lee Valley. Their stuff is top-notch, with very reasonable prices.
Annalea (not verified)
Sat, 01/08/2011 - 15:11
This is awesome. And, it
This is awesome. And, it would be SUPER-easy to customize the depth (I'm thinking some 10" deep ones for yarn storage/display).
You've done it again!
Ana White (not verified)
Mon, 01/10/2011 - 09:37
Hillary, there is absolutely
Hillary, there is absolutely no reason why not! Simply screw through the back boards into a stud in the wall. Just make sure you are hitting a stud (rather at least four studs). What a fabulous idea!
Lynn in Canada (not verified)
Tue, 01/11/2011 - 14:55
omigosh, YARN storage, yes!
omigosh, YARN storage, yes!
Also, I want a smaller version for my kitchen above the counter for little things - kinda like the PB Cubby unit that mimics the ones in old hotels that would hold mail and keys...I
Lee Valley is the best for service, gonna get the shelf thingies from them.
Jeannine (not verified)
Wed, 01/12/2011 - 10:55
We are making these this
We are making these this week, and just found this great buy on the label holders and thought I would share!
http://www.woodworkingparts.com/categories/Card-Holders/
EG (not verified)
Sat, 01/15/2011 - 10:14
Re. the shopping list,
Re. the shopping list, wouldn't you need only 3 3x1 boards? The total once cut is 5 42", and you can get 2 42" cuts out of each 8' board.
So,
Board one: 2 - 42"
Board two: 2 - 42"
Board three: 1 - 42"
Cody (not verified)
Wed, 01/26/2011 - 13:30
Hi, Anna (and everyone
Hi, Anna (and everyone else)!
I was looking to get into a new hobby such as furniture building, and this looks like a perfect starter project. The only piece of furniture I desperately need, is one that will hold my media consoles, and store the media software (video games/dvds).
This looks perfect, however since I am a guy, I was wondering if I could go about using pine, and painting it black? Or would that look tacky?
Anyways, great site, and you've created another prospective furniture hobbyist. :)
Katie (not verified)
Fri, 01/28/2011 - 06:18
I was thinking the same thing
I was thinking the same thing about the 1x3s.
Jeannine (not verified)
Fri, 01/28/2011 - 17:45
We just made 2 and painted
We just made 2 and painted them a satin finish black and distressed the edges - they look great - will post pics when room is done. Hung them on the wall in our new office. Couldn't be happier with the color, plans and how they turned out! Thanks Ana!
Corky King (not verified)
Wed, 02/09/2011 - 09:39
Jeannine... I LOVE YOU! I
Jeannine... I LOVE YOU! I have been looking for inexpensive label holders with pulls to use on another project! You just saved me a lot of money, and more than a few brain cells! Thank you for this link!
John Miller (not verified)
Tue, 03/22/2011 - 13:12
try inexpensive plastic bins
Plastic bins are available from many on line retail sites. Great for small storage plus you can move them to your craft table for easy access.
jennbenn6
Thu, 03/24/2011 - 16:24
RE: Shopping list
The shopping list is backward it should be 3 1X3's and 5 1X12's
I can't wait to build this for my fabric- I'm going to have a whole wall of theseunits to store it all.
Thanks Ana for posting these plans.
Kay (not verified)
Wed, 06/08/2011 - 07:40
General Store Cubbies
Ana you mentioned distressed blue wash finish for this project. How do you do that?