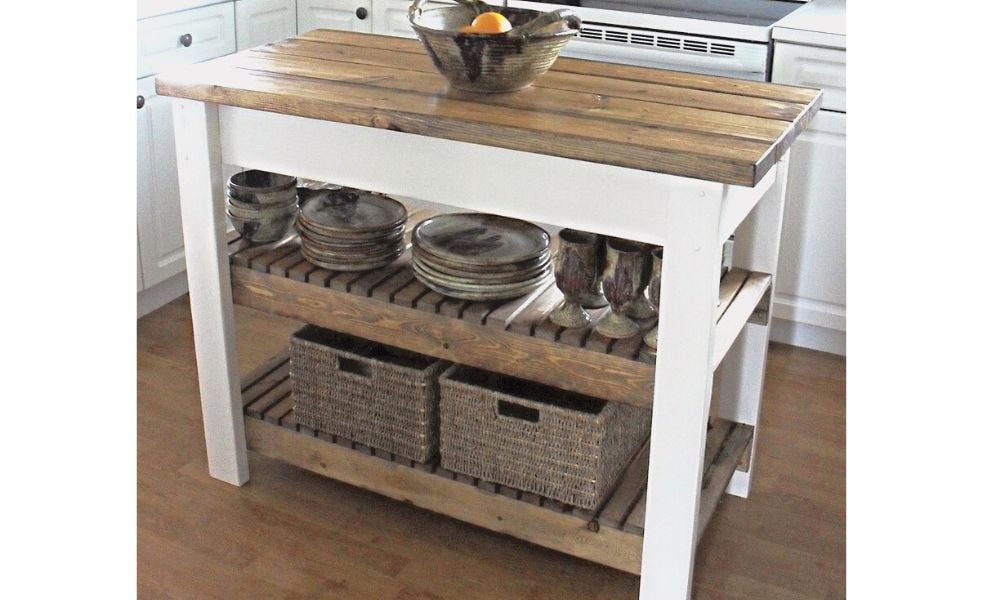


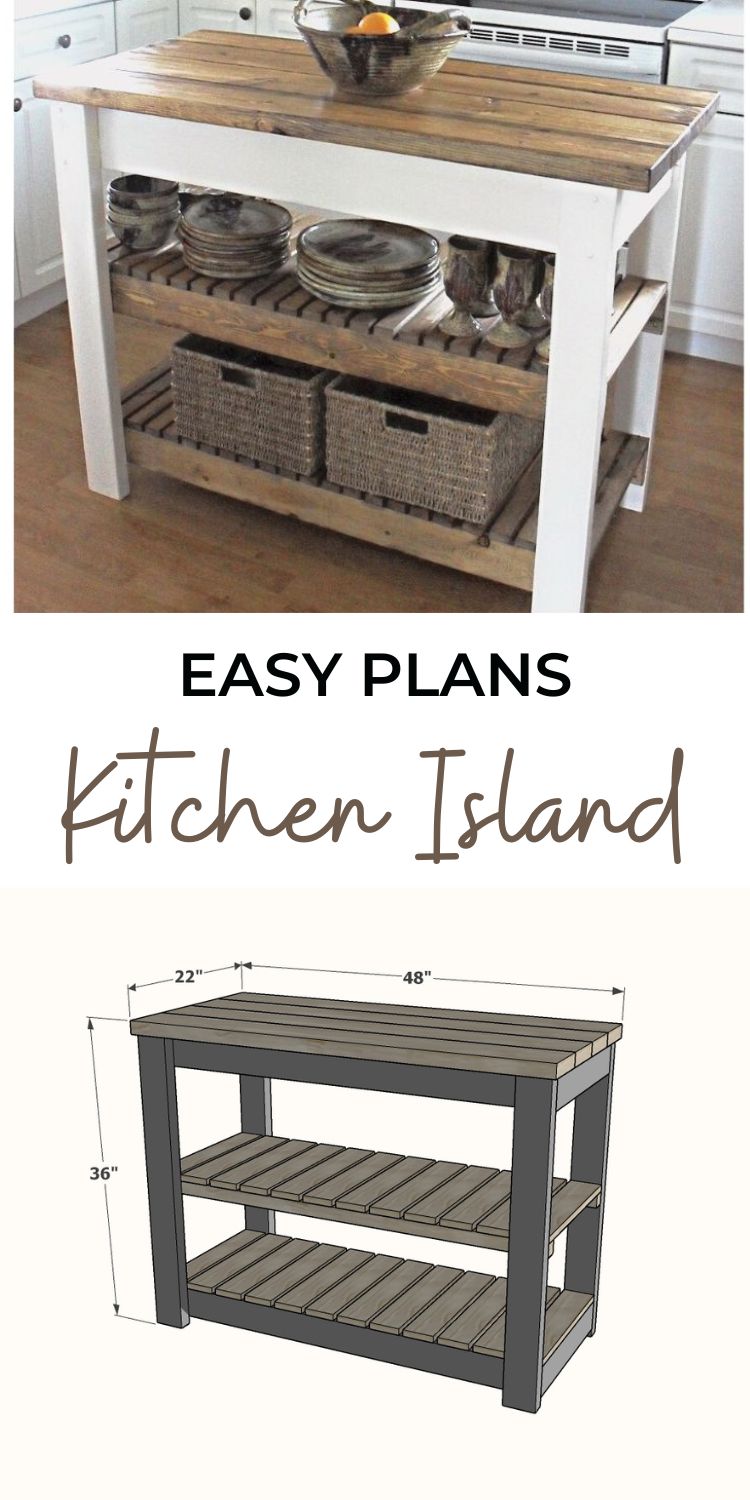
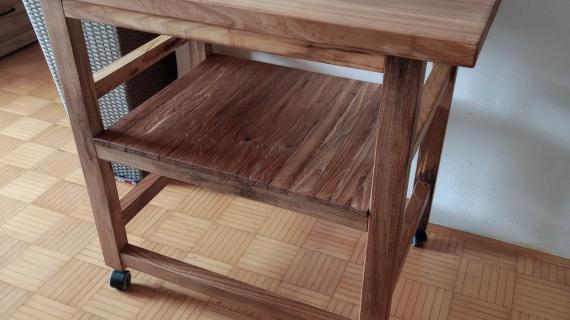
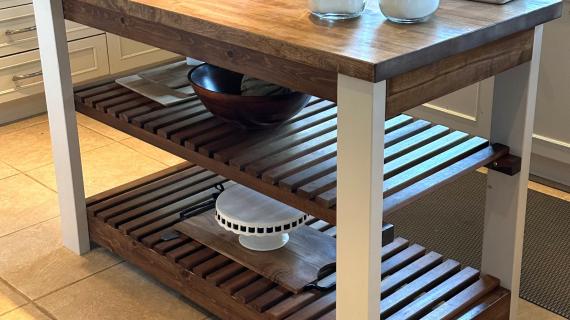
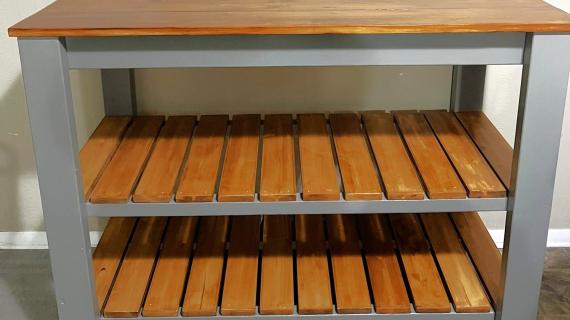
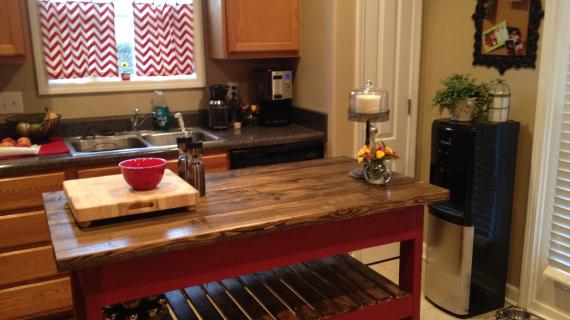
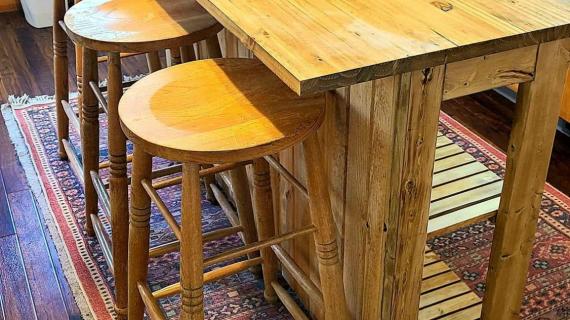
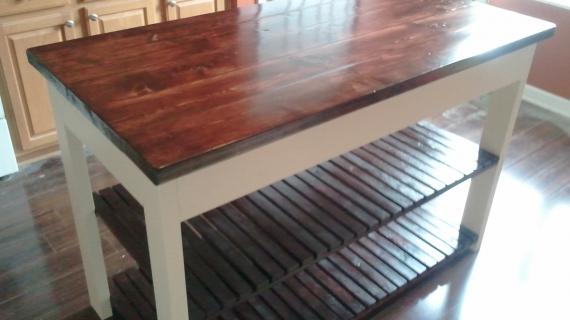
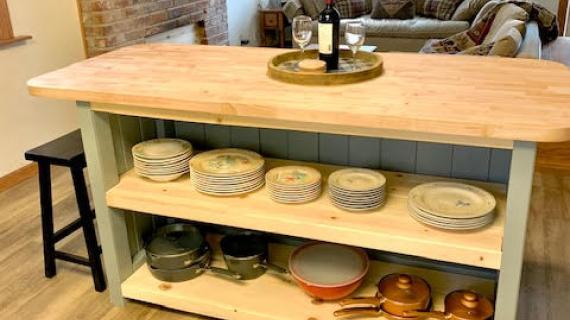
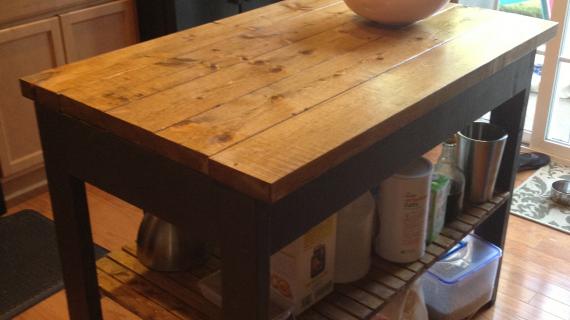
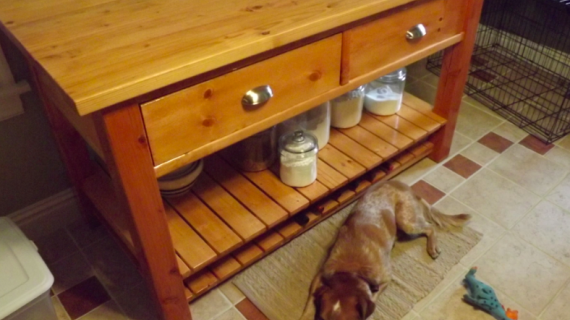
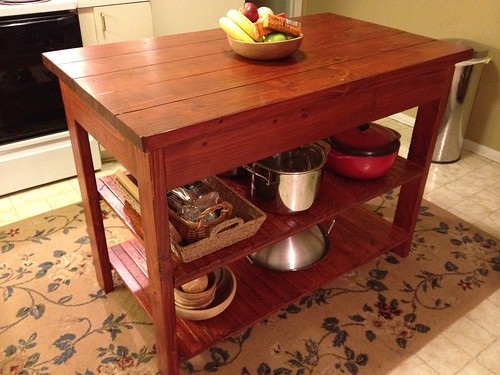
An easy to build solid wood kitchen island, featuring two large shelves and a good sized wood work surface. Free step by step plans from Ana-White.com
Preparation
- 2 - 2x6 @ 8 feet long (can also use 1x6 for a smoother tabletop)
- 5 - 2x4 @ 8 feet long
- 1 - 2x2 @ 8 feet long
- 5 - 1x4 @ 8 feet long
- 2-1/2" long screws (Kreg screws for pocket holes, or star bit self tapping construction screws for no Kreg Jig)
- 1-1/4" brad nails
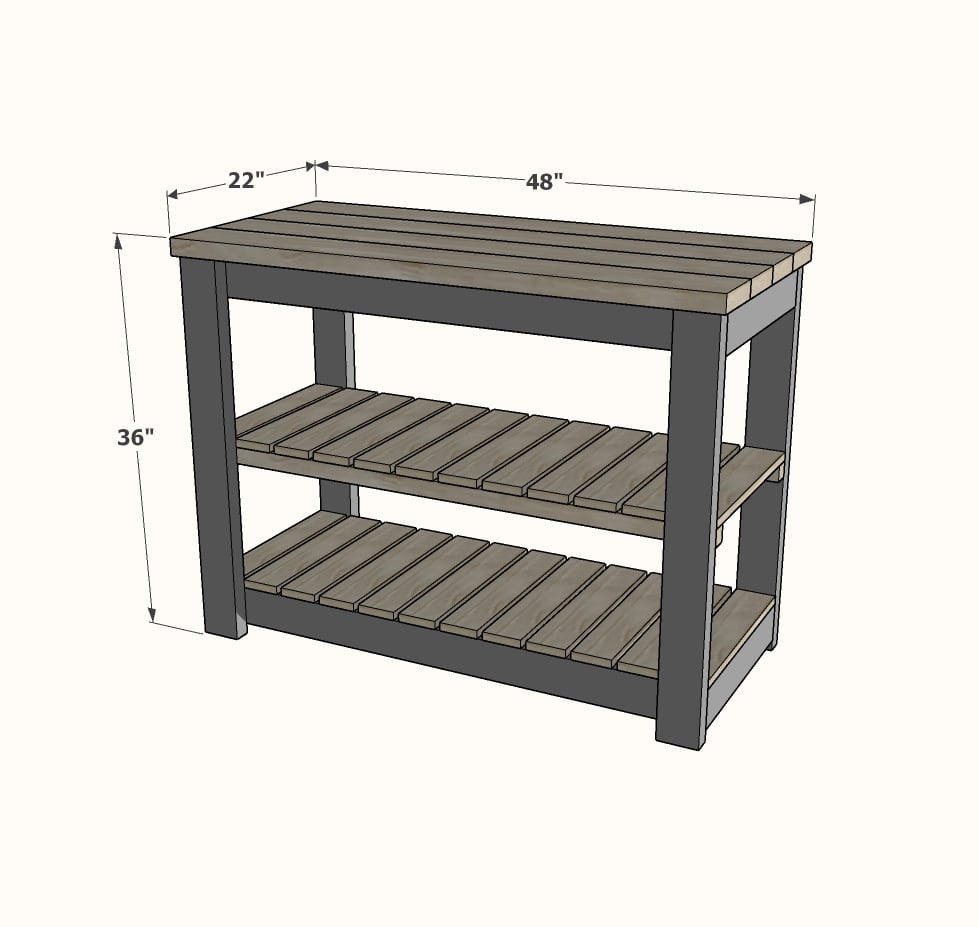
- 4 - 2x4 @ 44" - frame
- 4 - 2x4 @ 18" - frame
- 4 - 2x4 @ 34-1/2" - legs
- 2 - 2x2 @ 47" - shelf supports
- 24 - 1x4 @ 18" - shelf slats
- 4 - 2x6 @ 48" - tabletop
- 3 - 2x4 @ 15" - tabletop supports
Precise cuts are very important to the success of this project.
I recommend a compound miter saw or similar fixed saw for all cuts.


Choose good boards by making sure they are straight, minimal knots/splits and cracks.
Sand boards first with 120 grit sandpaper.
For a more refined kitchen island, use a Kreg Jig for assembly, with 2-1/2" pocket hole screws.
You can also use 2-1/2" star bit screws for assembly, but there will be exposed screw holes that you can fill with wood filler.
Using 1x6s for the top boards will result in a smoother top. A 2x6 top will appear more rustic.
Instructions
Step 1
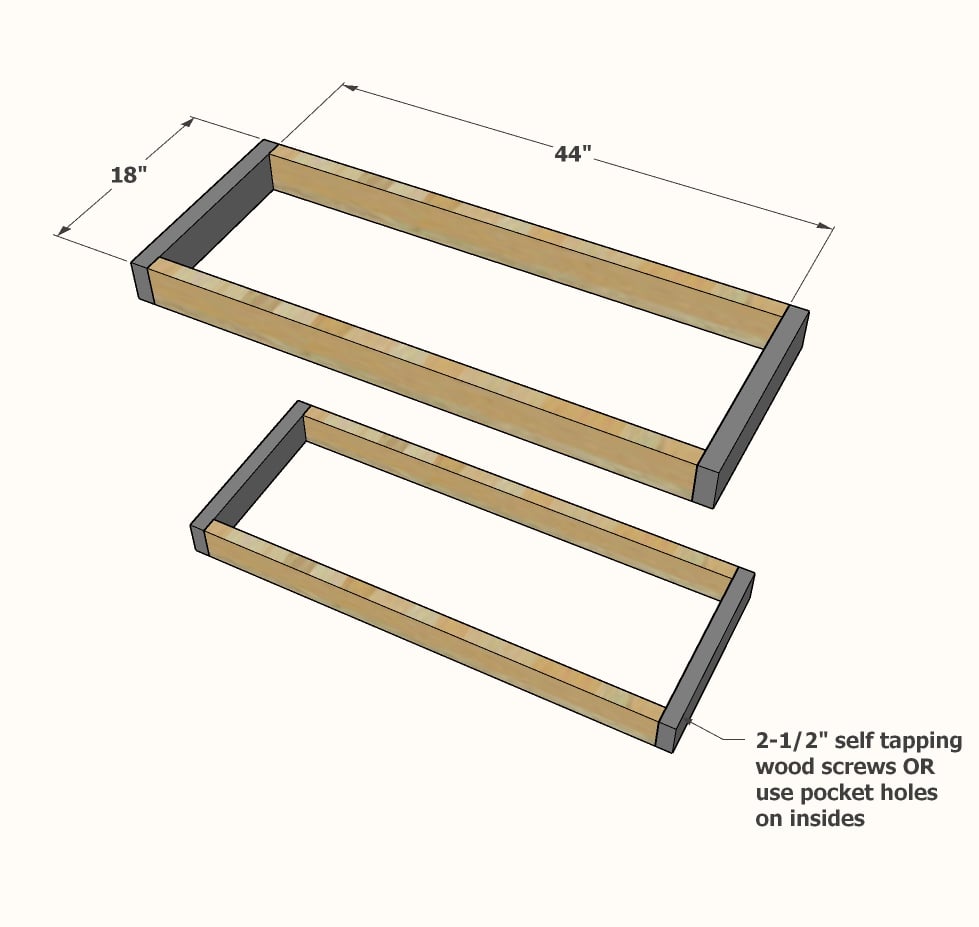
Build two frames, either with pocket holes or with the 2-1/2" self tapping star bit screws.
Adjust the frame to square by taking opposite diagonals, and adjusting until the opposite diagonal measurements match.
TIP: You can add the boards from step 5 now to help keep the frames square.
Step 2
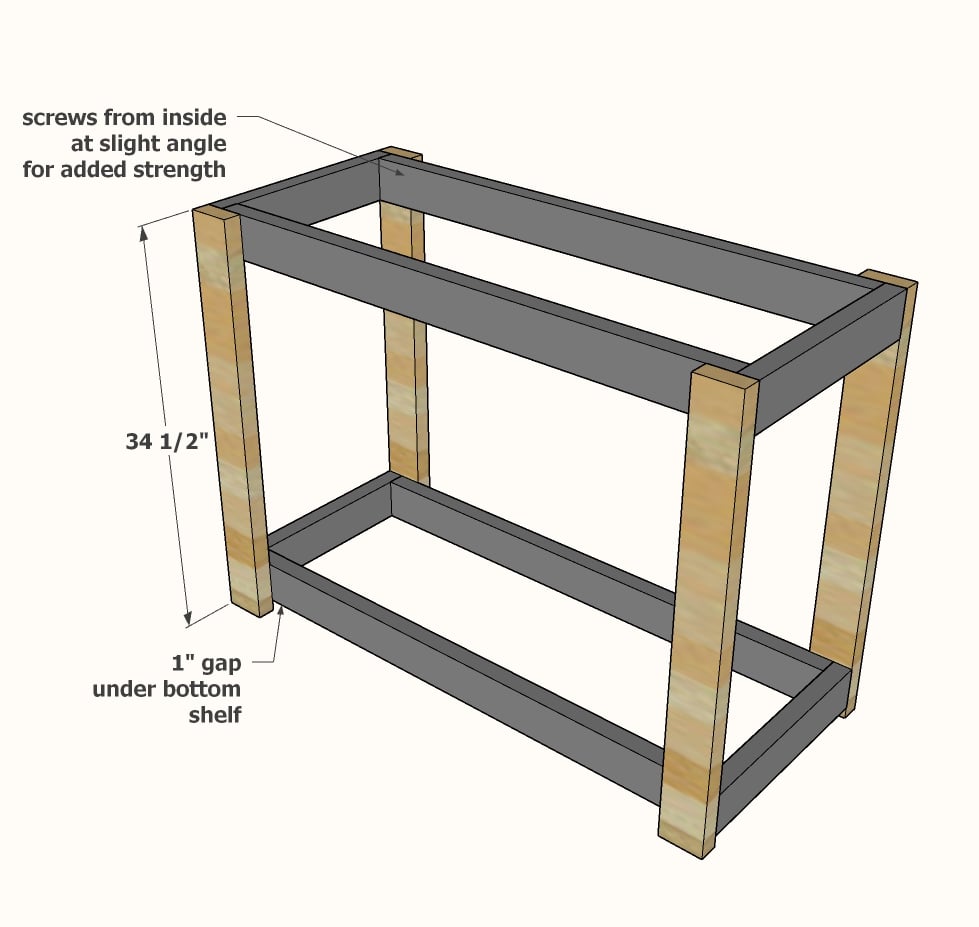
Add the legs by attaching from the inside with 2-1/2" long screws.
Kreg Jig users can simply use the Kreg screws to attach.
Attach at a slight angle - this creates a better structural joint.
Step 3
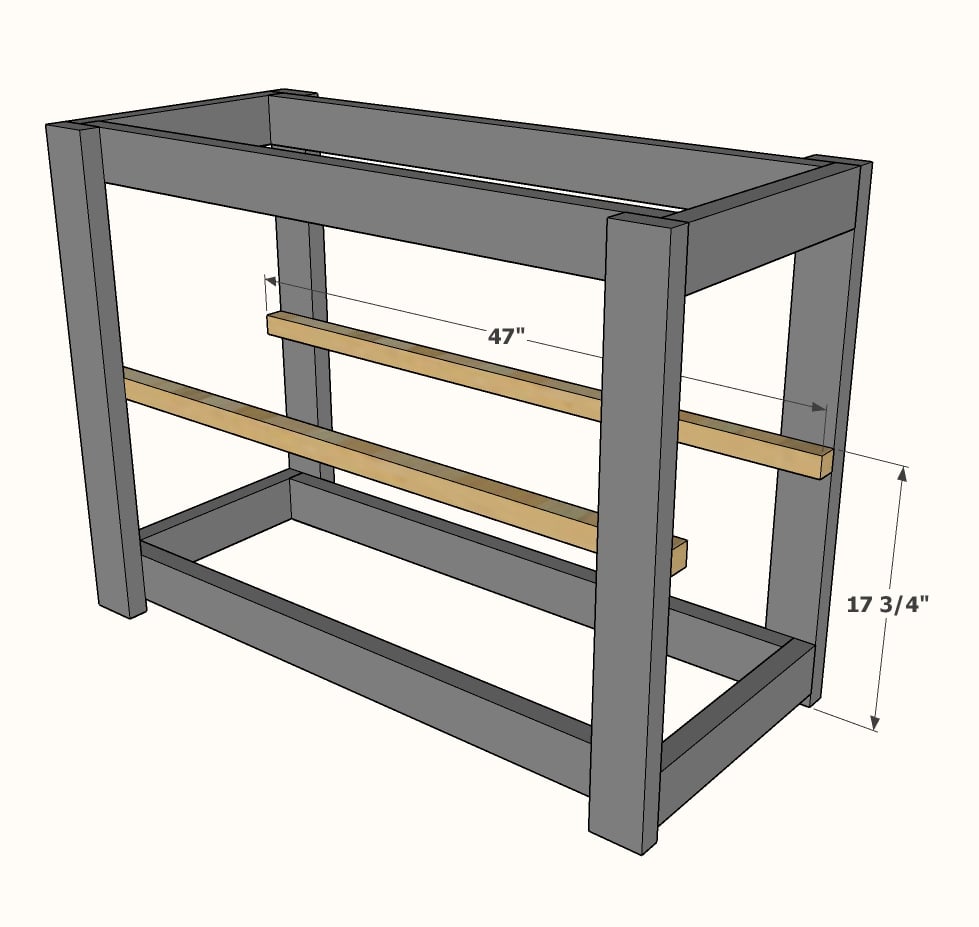
Measure and mark the placement of the 2x2s and attach with 2-1/2" screw (yes, you can use Kreg screws here too)
Step 4

Shelf slats
Prefinish the slat boards before cutting, so you only have to touch up the ends on final finish.
Lay out the slats so gaps are similar in width.
Nail and glue to the frame boards.
You can use other materials for the slats, like 1x3s, 1x2, or even 1x6s or 1x8 etc.
Step 5
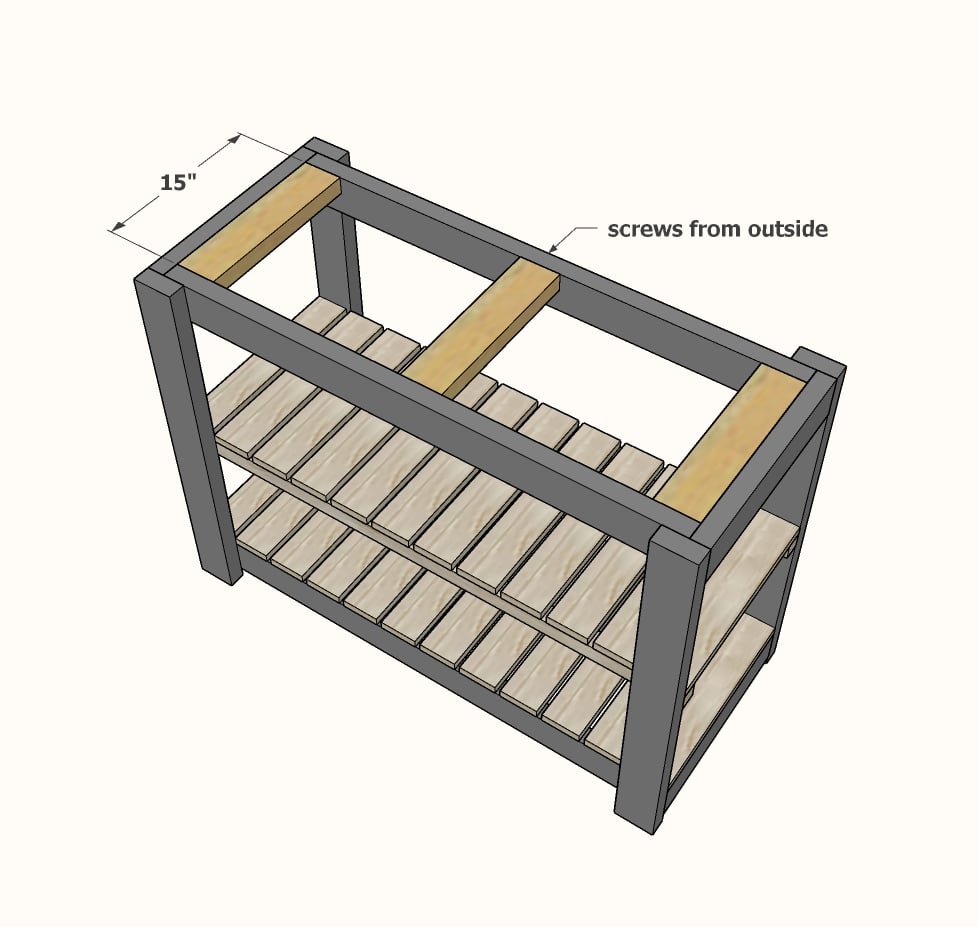
Top supports
These top boards will help give lateral support to the island, and also an attachment point for the tabletop.
Attach from inside with pocket holes facing upward if using a Kreg Jig.
Otherwise, screw from outsides.
Step 6
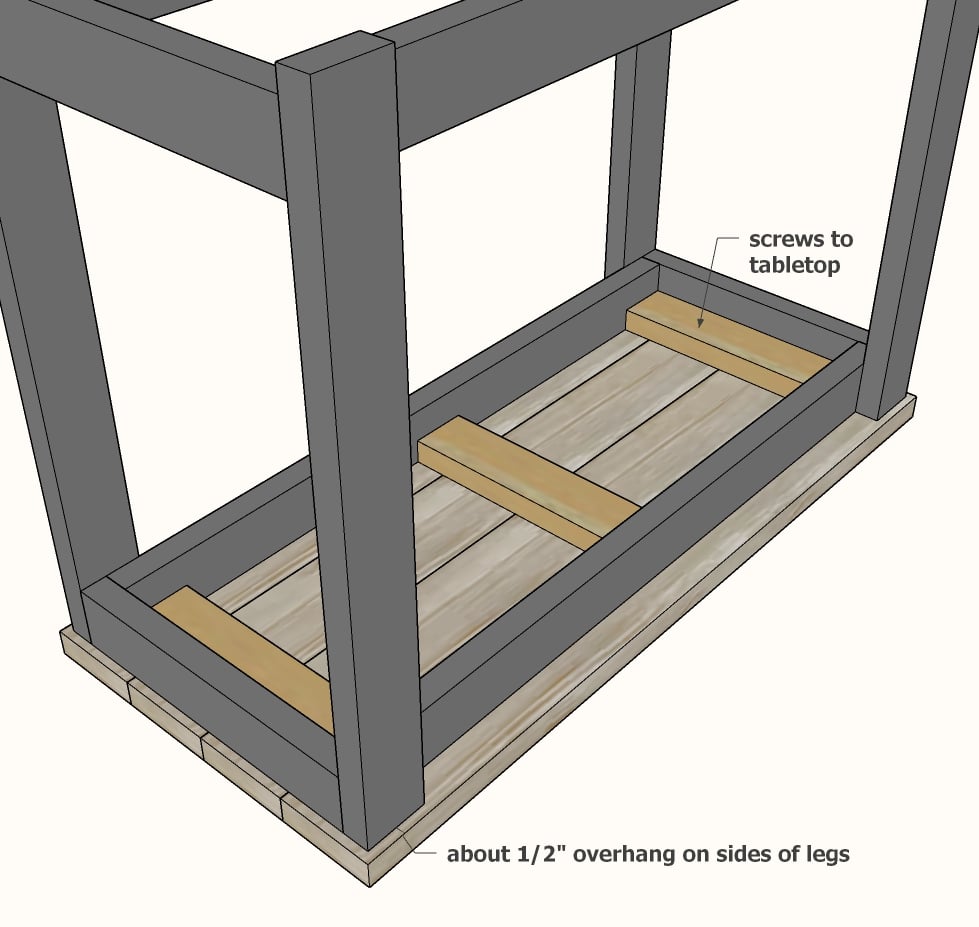
Tabletop
For the best top, build the top first with a Kreg Jig.
Then attach from underneath with 2-1/2" screws.

Comments
Heather (not verified)
Sat, 02/12/2011 - 01:46
Jen - Excited to see your
Jen - Excited to see your plan over here! You did an amazing job :)
Jenny (not verified)
Sat, 02/12/2011 - 02:08
Thanks for posting my plans
Thanks for posting my plans Ana!
Domesticjenny.blogspot.com
maternalNEST (not verified)
Sat, 02/12/2011 - 03:18
Love it! Great job! I really
Love it! Great job! I really appreciate you making up the plans without drawers... I want to make Michaela's Island, but I am so intimidated by drawers. Thanks! I will be making this one.
P.S. Great color choice!
Alli (not verified)
Sat, 02/12/2011 - 05:06
I have been wanting something
I have been wanting something EXACTLY like this in my kitchen forever, but didn't know where to start with the plans. Thank you!
Brooklyns_Mama (not verified)
Sat, 02/12/2011 - 08:20
This is gorgeous.
This is gorgeous.
Ana White (not verified)
Sat, 02/12/2011 - 10:35
Thanks Jenny for posting!
Thanks Jenny for posting! This is awesome!
Ana White (not verified)
Sat, 02/12/2011 - 10:37
Thanks Jenny, just added your
Thanks Jenny, just added your link, and will fix the form so that blog links can get embedded into posts.
Jayme C. (not verified)
Sat, 02/12/2011 - 11:07
Oh this is so what I dream of
Oh this is so what I dream of having someday! Beautiful work. Thanks for sharing. :)
Andrea (not verified)
Sat, 02/12/2011 - 14:34
I really like how you put
I really like how you put white marks where the holes should be drilled. I have a pocket hole jig, but I haven't used it for real yet because I just can't figure out where exactly I should put the holes and it makes me nervous. Having placement marked really helps! I hope others think about including little marks, as well. Beautiful piece that you built. I can't wait to check out your blog. Andrea
Jenny (not verified)
Mon, 02/14/2011 - 07:53
Thanks Ana for posting them!
Thanks Ana for posting them! Hopefully I'll have more to share soon!
Jamie Dafoe (not verified)
Mon, 02/14/2011 - 11:18
This is great! On a side
This is great! On a side note what color paint is that on the wall? I love it!
Andrea (not verified)
Mon, 02/14/2011 - 11:29
What was your approximate
What was your approximate cost for this? Hubby needs to see numbers before I can talk him into either of us trying our hand at all these awesome projects!
ashley04samantha
Fri, 07/08/2011 - 14:22
Can't wait to build it!
This is perfect!!
I'm moving into an apartment with a small kitchen that lacks counter and cabinet space -- but having only one set of pans and one set of dishes, this is the perfect storage for those things!
Guest (not verified)
Sat, 12/31/2011 - 10:33
The island turned out GORGEOUS!
I'm so proud of what my dad accomplished using this plan. We had to shorten it a little and I had him raise the bottom shelf to accommodate my BIG feet...but I think it looks wonderful!
Guest (not verified)
Tue, 01/31/2012 - 10:08
The only suggestion that I
The only suggestion that I have so far is that I don't see the "cuts" for the counter top in the cut list? I had the guy at the mega hardware store do my cuts for me (I wasn't ready to buy the circular saw just yet). Anyway we guessed on the length so we will se how it goes when I assemble it tomorrow!
Guest (not verified)
Thu, 03/08/2012 - 10:06
I was so excited to start on
I was so excited to start on this. Bought all my wood. Oh how I love buying wood. I feel like a kid in a candy store :) But then I had the same question about the cutting list for the top then I guessed about it and hopefully guessed correct. But then I was legs and found that I had more boards than I needed for that. Then I found that I don't have enough 1x2's for the shelves if they are cut at 24 1/2. Since I'm a measure twice, cut once kinda girl, I've been back and forth reading the directions trying to find if maybe I read it wrong but I keep seeing the same thing. So, back to get 5 more 1x2's so that it all fits. I'll be using the leftover pieces to make a smaller version for a friend.
Nikki M
Sun, 11/17/2013 - 19:40
You're right, you only need
You're right, you only need two 8' 2x4s. I think that must be a mistake.
Nikki M
Sun, 11/17/2013 - 19:40
You're right, you only need
You're right, you only need two 8' 2x4s. I think that must be a mistake.
Marci (not verified)
Tue, 07/17/2012 - 20:37
Countertop Cuts?
I did not see the length noted on the 5-2x6's used for the top. I would love to make this! Could you please let us know how long to cut those boards? Thanks a million for a beautiful, doable project!
Jeff (not verified)
Sun, 09/02/2012 - 02:59
2x6 lengths
The length of the 2x6's that make up the top of the island are whatever length you wish the island to be. The author refers to the island width (length) as 54", so the 2x6's would be 54" long. This would leave a 1" overhang on both ends.
Janettx (not verified)
Mon, 11/05/2012 - 06:52
questions
If the island is 54 in length, 27 in width, and 36 inches tall, why does the cut list tell you to cut the legs at 34 inches. If the top is 54 inches the top pieces would be cut at 54 inches however if the width of the piece is 27 inches why are the side supports cut at 17 inches that is a 5 inch overhang on each side, is this correct?
Janettx (not verified)
Mon, 11/05/2012 - 06:54
questions
If the island is 54 in length, 27 in width, and 36 inches tall, why does the cut list tell you to cut the legs at 34 inches. If the top is 54 inches the top pieces would be cut at 54 inches however if the width of the piece is 27 inches why are the side supports cut at 17 inches that is a 5 inch overhang on each side, is this correct?
EJP (not verified)
Sun, 11/18/2012 - 13:30
The wood is 2" thick. Does
The wood is 2" thick. Does that answer your question? For instance, 34" height plus thickness of top equals 36" high. Same with side supports, plus thickness of legs, etc.
Nikki M
Sun, 11/17/2013 - 19:43
Too many 2x4s on the list!
This is a great project! I made mine one 2x6 wider, adding 5 1/2 inches to everything. However, you will only need two 8' 2x4s for the project. The list seems to be wrong.
Nikki M
Sun, 11/17/2013 - 19:44
Too many 2x4s on the list!
This is a great project! I made mine one 2x6 wider, adding 5 1/2 inches to everything. However, you will only need two 8' 2x4s for the project. The list seems to be wrong.
RudiRubio
Mon, 04/21/2014 - 21:55
Food falls into the gaps.
I made this island a few months back and my husband and I love it. The only problem we have been having with it is that food always gets stuck in the small gaps between the 2x6s that make the counter top. Has anyone else had this problem and come up with a solution or have any ideas??
kitchenmama
Wed, 07/16/2014 - 11:54
slight (lazy) adjustment on mine but LOVE IT
I saw that people were having issues with the top catching crumbs so I bought a premade wood countertop to use instead. It's PERFECT and I'm OBSESSED with the island. It's still a DIY project but I just used a countertop by someone who actually knows how to make a wood counter top.
I got mine here (and literally created an account on this site just to share this b/c you guys always help me so much):
https://store.craft-art.com/product-category/diy-butcher-block-wood-cou…
randy.smith
Wed, 05/20/2015 - 10:35
Kitchen island fix
The crumb thing. I have a more elegant fix than a laminate top. Take your existing plans but when building the top use glue and bar clamps to reduce the spaces between the wood. Let stand in clamps overnight and the next day if you have a planner you can plane the top of the table. Even if you don't just fill in the cracks with wood putty skimming all excess off. Sand and stain and put a polyurethane finish over the stain. No crack. Wife made pizza dough on it the other night.
By the way I have also made an entertainment center from these plans. Just shorten the legs and adjust the shelves.
Design4life
Mon, 02/15/2016 - 17:35
Is there more detailed pic plans?
Just not seeing or getting it, esp. pic above step 7. I have no idea what that is. Is there kitchen plans with true plans (pic w dimensons)? Sorry just not seeing it in this plans instructions.
Texasmom1994
Mon, 02/08/2021 - 05:57
Great project! Very easy.
My husband and I built this over the weekend and I love it!! It was so easy!! A few things I would do differently so I wanted to share. First, most of you have noted that the shopping/cut lists are a bit off. 4 extra 2x4s on the shopping list and not enough 1x2s, you may need 18. There is nothing on the cut list to indicate how long the table top boards should be cut. I went with 54" since the diagram showed that as the overall length. In hindsight I would have probably cut them at 58 for a little more overhang. Also, I tried to use a little math to figure out the spacing between the shelving slats but I was a bit off. I ended up cutting 3/4 inch spacers and used that to space them. I did 11 from one side then 11 from the other to make sure any wrong spacing was in the center, and it was off a bit. I only put 23 slats on each shelf. I would also have used a 2x4 instead of a 1x4 for the shelf supports, they are a little flimsy. I also would have stained before putting it together as the slats are a pain to stain!! Overall, great project that I enjoyed. Would highly recommend. I cant wait to get it finished and in the kitchen!