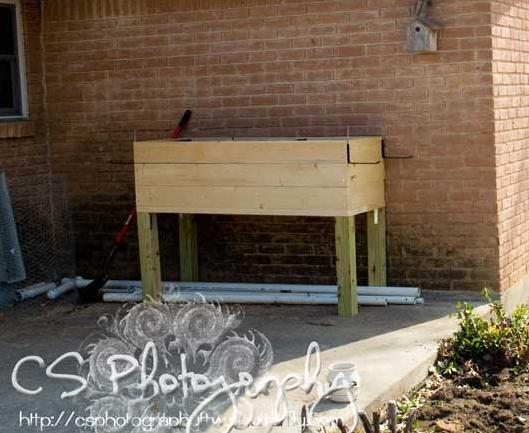


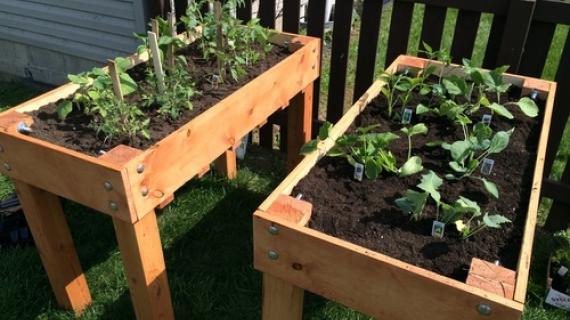
An elevated planter box for gardens.
Last year, our garden was all in-ground and was infested by stink bugs and vine borer beetles! this year, we're trying these elevated planter boxes!

Plan By:Tina Shaw
Blog Link:http://christinashaw.com
Last year, our garden was all in-ground and was infested by stink bugs and vine borer beetles! this year, we're trying these elevated planter boxes!
Skill Level: Beginner
Estimated Cost: $50-$100
Preparation
- 4 – 2×6 @ 16 feet long (untreated lumber for health of vegetation; I used pine) $9.30 each=$37.20
- 1 – 4×4 @ 8 feet long (I used treated cedar to last longer) $6.97 each
- 40 – 2″ wood screws (I used 14#) $5.58 box/25 x2=$11.16 24
- metal strap-ties (16 straight to attach the box walls together; 8 bent to a 90-degree angle to use as support to attach legs to box base) $0.88 each=$21.12
- Screws or finish nails to attach the strap-ties
- Wood glue $5.47
- Total Cost = $81.92 (as of 2/12/2011)
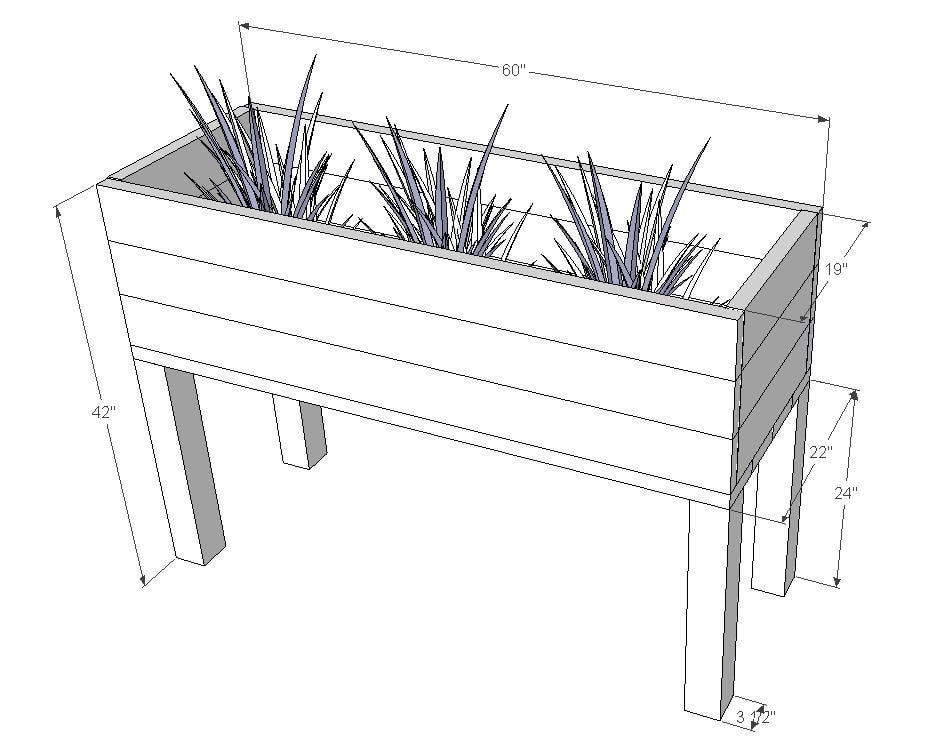
10 – 2×6 @ 60″ (box base & wall sides)
6 – 2×6 @ 19″ (box end walls)
4 – 4×4 @ 24″ (legs)


Instructions
Step 1
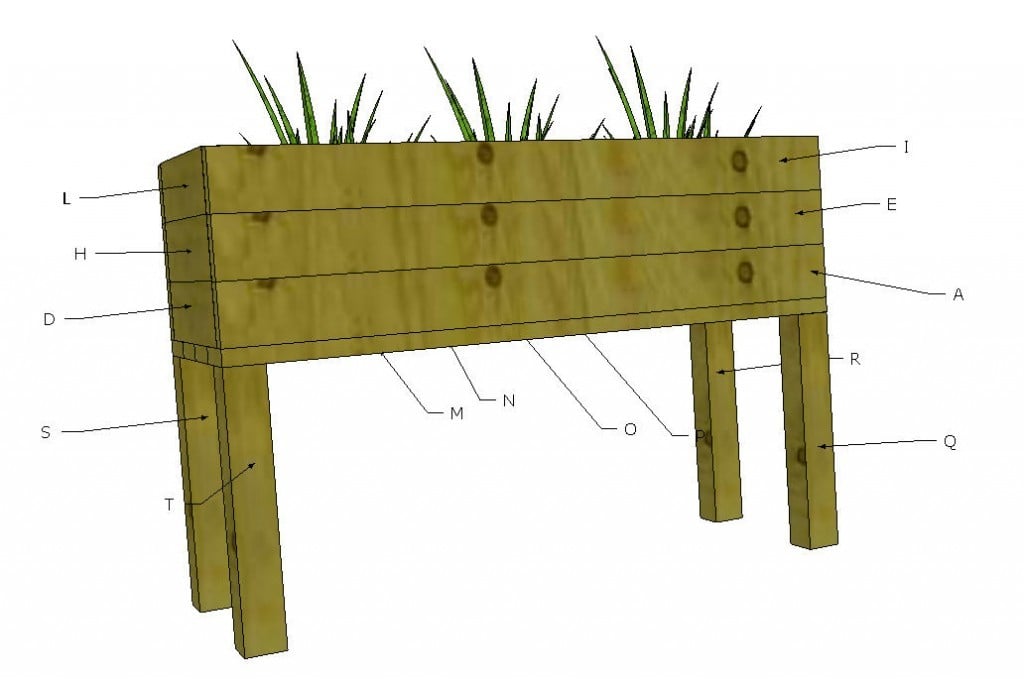
Drill two holes for screws on one end of A (2×6 @ 60”). We spaced ours at ¾” from the end and 1 ½” from the sides. Set one B (2×6 @ 19”) at a 90-degree angle lining up the ends of A & B; screw one 2” wood screw into each hole, forming an L-shape. Repeat on C & D, E & F, G & H, I & J, and K & L, so that each side has and piece on it.
Step 2
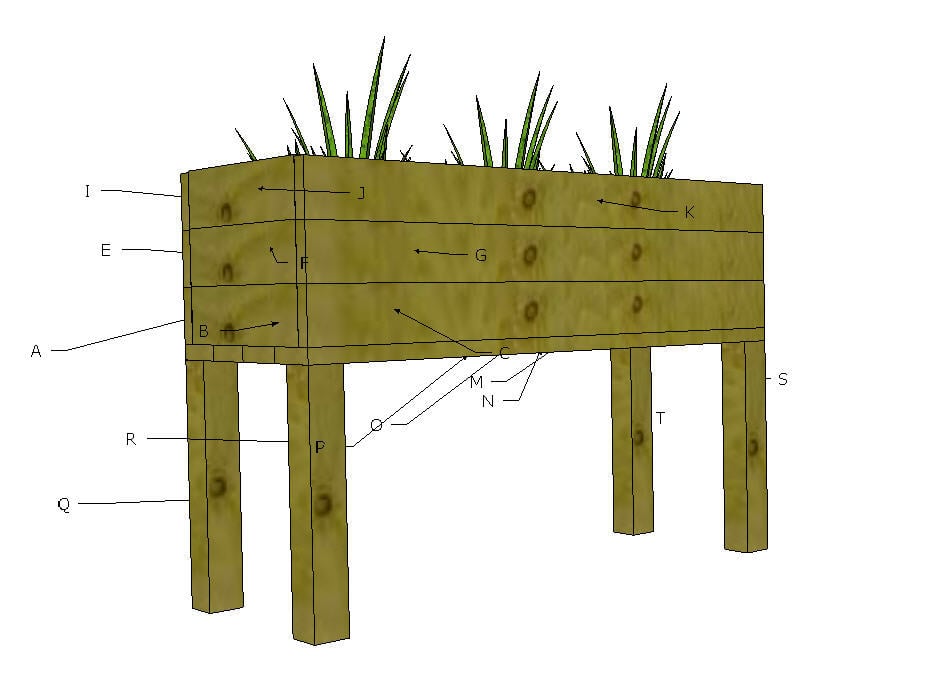
Connect the A/B piece to the C/D piece drilling two more holes and using two wood screws so that the two L-shapes become a box. Repeat for E/F and G/H and for I/J and K/L. You will have three 22”x60” boxes when done and should have used six 2×6 @ 60” and six 2×6 @ 19” pieces.
Step 3
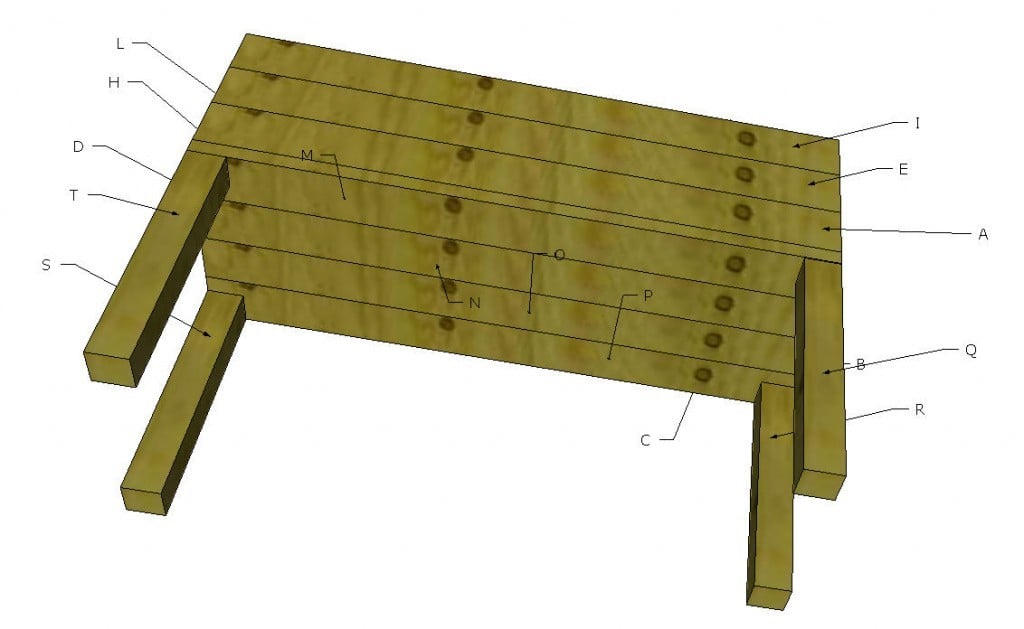
On one of the boxes, line up four 2×6 @ 60” (box base, M, N, O & P) pieces side by side. Drill two holes in each piece from the bottom piece into the box end piece. Repeat for all four boards so that one of the three boxes has a solid base.
Flip the box over so the base is facing the ground. Wedge each leg (Q, R, S & T) under the base or prop one side up so you can attach one leg or lay the box on a side; use a helper! Line up one 4×4 @ 24” on the end and side of the base and drill a hole through the base into the leg and use one wood screw to attach the leg to the base. Use two bent strapties, one on each side of the leg that touches the base, and additional screws and/or nails to attach the straptie. Repeat for each leg, for a total of 8 strapties. Flip unit over so that it is standing on its legs. You should now have a base box on legs.
You will now attach the two remaining box walls to the base. Apply a layer of wood glue to the top of the box wall on the base unit. Using 8 straight strapties on each box wall, attach one straptie from the base box wall to the loose box wall with screws and/or nails on each end, near each corner. Repeat for
We’re leaving the box untreated so as not to harm any vegetation that will be growing in it. You can use treated lumber on the legs for durability. I also add the disclaimer that I am NOT a woodworker or designer so use at your own risk!
Comments
Melicious (not verified)
Mon, 02/14/2011 - 11:12
Awesome! I'm working up the
Awesome! I'm working up the confidence to build something after I build some shelves... and I think this is that something. They would be perfect on my balcony. Thank you for the inspiration and plans! I'll post pics once my balcony transformsation is complete!
Shannon (not verified)
Tue, 02/15/2011 - 05:18
I love this planter but I
I love this planter but I think I would make mine much shorter!
AmyLynn (not verified)
Tue, 02/15/2011 - 07:45
How great would this be in
How great would this be in cedar for an herb garden in my sunroom? Just in case you were wondering, I'm thinking it would be very great!
Jenn Hoff (not verified)
Tue, 02/15/2011 - 10:21
This is great! I saw
This is great! I saw something similar on Martha Stewart last year and have been gearing up to try to build something like this. You did a great job! I wonder if might be a good idea to have some slats at the bottom so when it rains it doesn't pool up inside the planter.
Good luck with your planting!
biz_kid1 (not verified)
Wed, 02/16/2011 - 05:43
@Shannon, definitely adjust
@Shannon, definitely adjust the size of it for what works for your area. We need 5' long and probably about 8 of them for our area!
@Amy, we used the cedar for the legs...would like cedar for the box, too, but it costs more and we were unsure how well this would work. So, we're going to see how the pine holds up this year and consider the cedar as we need to rebuild/replace the box!
@Jenn, my husband said the same thing about the slats, but I think it will be OK. I guess we can drill some holes if we have an issue with the water pooling in it, but we live in Texas, so I'm guessing it won't be a problem.
NOTE: Plan modification: use 16 straight strap ties on the interior pieces to hold the boards together and get 8 l-shaped strap ties (?) or brackets for the legs PLUS sturdier/longer screws! We're almost done with ours and this is what we have noticed, so far! Will post pictures when done.
Thanks for the comments!
Annie (not verified)
Wed, 02/16/2011 - 06:33
I made those last summer,
I made those last summer, they are great and it's easy to maintain a nice garden! I will make on with untreated wood this summer for a vegetable garden... What i suggest to everyone that will do this project is to cover the bottom and espiecially the sides of the box with the fabric that prevent weeds from growing... because a sunlight went through the cracks between the woods last year and weeds started to grow between the cracks... Voilà!
James Reeves (not verified)
Sat, 02/19/2011 - 01:42
Great Job, l like the bulk
Great Job, l like the bulk look very popular planter, found plans for very simular planter in a landscapping book l have.
They used 2 x 2's in the corners and for slats or solid bottom, drilling a hole just big enough for water to drain out is all that matters, many people drill holes on a slant at bottom edges where sides meet floor and a few in each end where ends meet floor important to slant them.
In the bottom my book calls for a couple inches of gravel to keep soil out of drain holes.
As for cedar verses pine l think both can look nice depending on personal preferences main thing if uising pine is the finish and sealer, just a few thoughts.
But u did an excellent job
James Ontario, Canada
JoyofBaking
Wed, 04/13/2011 - 16:59
Thank you for this! I've
Thank you for this! I've been hoping to build something like this very soon for our garden. I will use this plan, thanks so much!
Guest (not verified)
Sun, 04/17/2011 - 22:10
Can't Wait
I've never built anything before and am excited to try this.
Joe (not verified)
Tue, 05/15/2012 - 05:04
Mods Question
Would like to make this for our Patio out of cedar.But need it to be 8' long.Would you recommend adding 2 more 4x4 posts for support? Its for a Vegetable garden and just worried about the weight of the soil.Thank you.