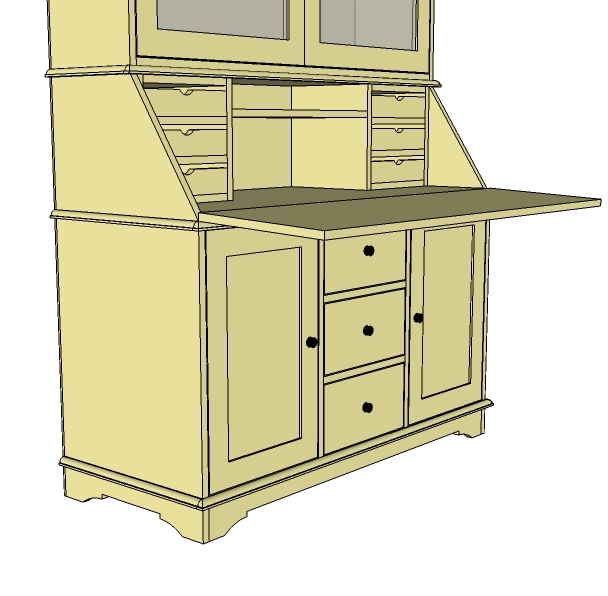


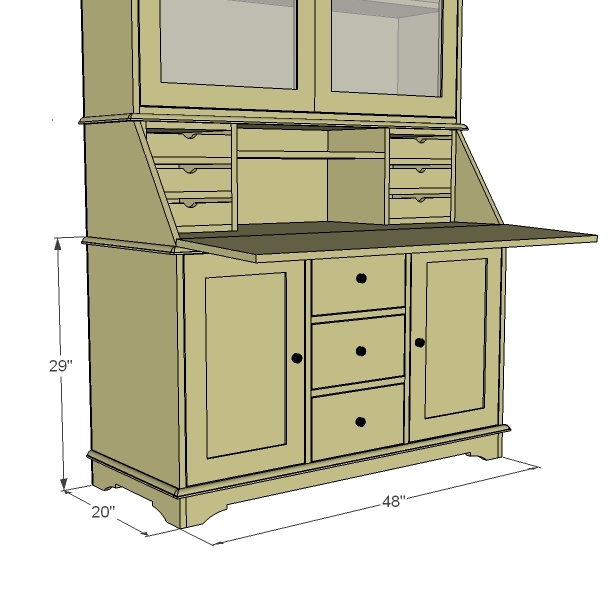
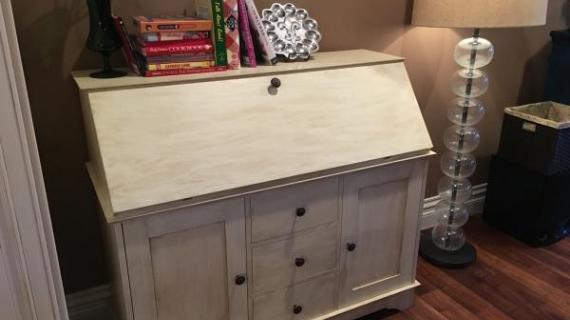
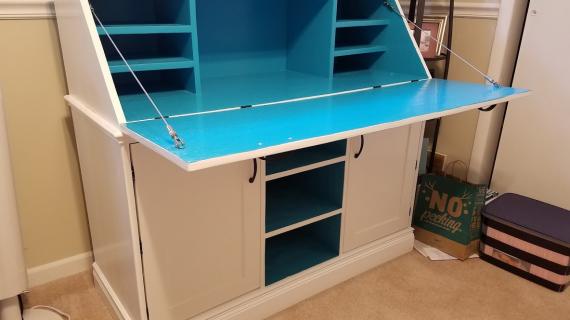
The base for the Grant collection. Features three drawers and two doors, decorative footer, and is useable without the hutches.
Finally, today, I got to go out to the garage and make some sawdust. And I'm so excited to share with you my next project . . . but the paint is still drying. So in the meantime, I thought I would take on what I do believe is the longest standing plan request . . .
 This project is quite a big one, both time and size wise, so we'll break it into steps. Also, that enables someone who might just want the base as a baby changing table or buffet to build that plan,
 or someone who wants just the base and secretary hutch (under a window perhaps?) to combine those plans,

and then of course, someone who wants the whole piece to have at it . . . piece by piece.
 This is an advanced plan, so please don't tackle this project as your first project. It's not so much that you can't build this, it's more a problem of precision. The larger a project is and the more pieces that work together, the more precise you have to be. For example, let's say your base is just slightly off square, and your secretary hutch a tad crooked in the opposite direction. . . when you go to put the two not perfect pieces together, you are going to have noticeable problems. So be cautious about tackling a big project with lots of pieces until you are confident in your ability to build with precision.
Preparation
2 – 3/4″ Plywood or MDF @ 4×8 Sheets
1 – 1×4 @ 4 feet long
1 – 1/4″ plywood @ 4×4 Sheet
2 – 3/4″ Wide Moulding @ 8 feet long
2″ Screws (Drywall for MDF) or 1 1/4″ Pocket Hole Screws
1 1/4″ Finish Nails
Wood Glue
Wood Filler
3 – Sets of 18″ Drawer Slides
2 – Sets of Hinges
5 Knobs
Finishing Supplies
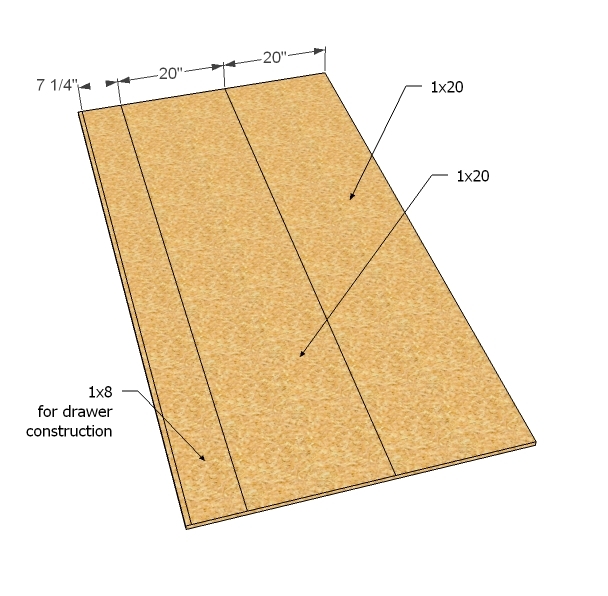
2 – 1×20 @ 24″ (Divider Sides)
2 – 1×20 @ 14″ (Drawer Box)
1 – 1×20 @ 46 1/2″ (Bottom Shelf)
1 – 1×20 @ 48″ (Top)
2 – 1×20 @ 29″ (Sides)
1 – 1×4 @ 46 1/2″
1 – 1/4″ plywood @ 48″ x 29″ (Back)
Moulding, Door and Drawer cuts are located within the instructions as you should build to fit.


Instructions
Step 1
2 – 1×20 @ 24″ (Divider Sides)
2 – 1×20 @ 14″ (Drawer Box)
1 – 1×20 @ 46 1/2″ (Bottom Shelf)
1 – 1×20 @ 48″ (Top)
2 – 1×20 @ 29″ (Sides)
1 – 1×4 @ 46 1/2″
1 – 1/4″ plywood @ 48″ x 29″ (Back)
Moulding, Door and Drawer cuts are located within the instructions as you should build to fit.
Step 2

Center Drawer Divider
Adding shelves to your center cubbies does add weight to the piece, and isn’t entirely necessary, but if you have the boards (and we do because you have to buy 2 sheets of plywood/MDF) it can add structure and stability and give you a better aligned drawer box.
Step 3

Top and Bottom Shelf
Carefully mark out the top and bottom shelf as shown above and attach the center divider to the top and bottom. Use 2″ screws and glue or 1 1/4″ pocket hole screws and glue.
Step 4

Sides Cutout
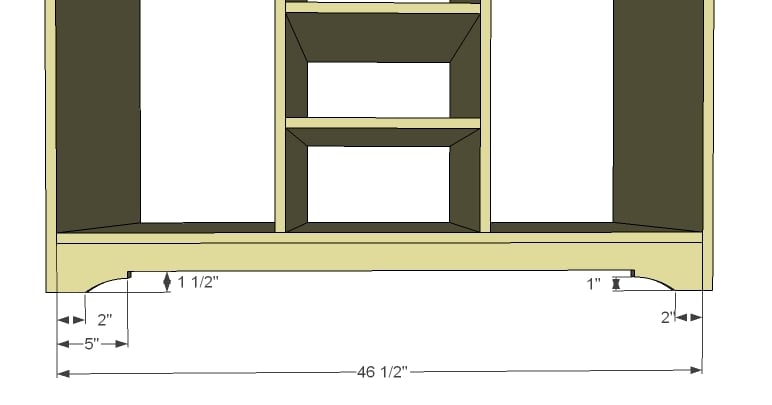
Mark the sides as shown above and carefully cut out with a jigsaw. Make sure the sides. Note that the sides are different than the front footer cutout.
Step 5

Step 6
Front Footer
Attach the front footer to the bottom, inset as shown above. Mark and cut out (I would cut in place – if you are confident of your jigsaw skills – because you won’t have to worry about clamping and such). You can use a nailer and 1 1/4″ or 2″ finish nails and glue here.
Step 7

Back
Attach the back with either 1 1/4″ screws or 1 1/4″ glue. It is important that you attach to the shelves and dividers to help keep the piece square. Be certain that your project is perfectly square at this point. You will only need to make one cut here.
Step 8
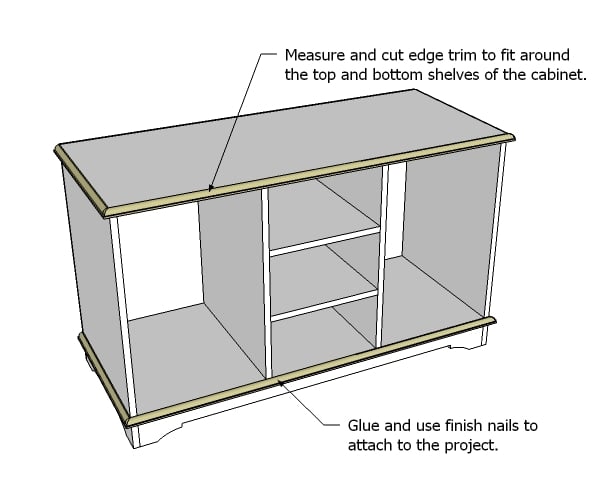
Moulding
You should cut your moulding to fit perfectly. What I do is start by getting the center piece (the one with both ends mitered at 45 degrees) right, then doing the sides to fit perfectly to the center. Sometimes I make a half dozen cuts before I’m satisfied with the fit. Check out my Mom’s Bed to see moulding in action and more details on choosing moulding.
Step 9

Doors
There are many ways that you can build doors. Because you will have some scrap 3/4″ plywood leftover, why not use it up on this project? Measure the door opening and cut a piece of the 1×20 3/4″ stock to fit the door opening, leaving approximately 1/8″ to 1/16″ gap around the door (you may need to adjust depending on the type of hinges that you use. When you are satisfied with the fit, cut 1/4″ plywood into 2 1/2″ wide strips (you’ll have some leftover from the back) and glue and clamp to the face of the door, making sure that the corners are securely clamped (TIP: Don’t clamp so tight that all the glue seeps out and you have nothing to glue the wood together with!). You will need to build two doors.
Step 10

Drawers
From the 3/4″ plywood strips cut at 7 1/4″, build the drawers. The bottoms of the drawers should be cut from leftover 1×20 stock from building the box, and will be inset to the sides (as in you will nail or screw through the sides into the drawer bottom). The above drawer is designed to work with standard drawer slides, but you should always measure the drawer box before constructing your drawer to be certain that you are leaving 1/2″ on either side of the drawer for drawer slide clearance (standard drawer slides require 1/2″ clearance on each side of the drawer). Also, I like NOT attach the face until the drawer is fully installed, so I can attach the face floating in the drawer box, with an equal gap around all sides.
Step 11

Finishing
Remove the doors and drawers and fill and exposed holes with wood filler. If you used plywood, fill exposed plywood edges with wood filler. Sand and apply edge banding to plywood edges (for a stain) or prime and paint as desired. Replace doors and drawers and add hardware.
Comments
Brooke (not verified)
Mon, 02/28/2011 - 09:21
Excellent! Thanks Ana!!!
Excellent! Thanks Ana!!!
Tanjia (not verified)
Mon, 02/28/2011 - 09:25
WOW! This is going to be so
WOW! This is going to be so perfect in our living room. So perfect that I might need to build 2. Now if only the snow would go away so I could get out my saw and spend my Home Depot gift card that I got for Christmas.
Viola (not verified)
Mon, 02/28/2011 - 10:08
Ana this unit is a beautiful
Ana this unit is a beautiful piece of furniture that will one day be a prized antique, and of course a wonderful piece of furniture to use and enjoy now!!! Thank you for such a classic piece....
Tara (not verified)
Mon, 02/28/2011 - 11:49
Thank you, this looks great!
Thank you, this looks great!
Beth S. (not verified)
Mon, 02/28/2011 - 11:51
I want to use the bottom
I want to use the bottom piece as a bathroom vanity in my kids bathroom. Would there be any reason I can't do that? Do I have to do any extra reinforcements? I plan to make it wider and would want to add double doors on both sides, but everything else the same. Love your plans!
Ana, I made a modified version of a storage bed with a bookcase headboard for my daughter and LOVE it. Thank you for motivating me!
Arya (not verified)
Mon, 02/28/2011 - 11:59
Yeah! I was trying to figure
Yeah! I was trying to figure out for myself how to do a "secretary hutch" with the angled sides to put on top of the file drawer base for our living room! Now all I have to do is modify measurements :) Thank you Ana, you are amazing!!
Carolyn (not verified)
Mon, 02/28/2011 - 12:16
Absolutely beautiful! Thank
Absolutely beautiful! Thank you Ana for the time you spend on all the wonderful plans you share with us. You are one totally awesome lady!
Wona (not verified)
Mon, 02/28/2011 - 17:40
Do you sell your plans? I
Do you sell your plans? I tried open and save in .pdf but it will not let me save so I thought maybe you sell these?
K (not verified)
Mon, 02/28/2011 - 17:42
I love this ! it reminds me
I love this ! it reminds me of the Benchwright Buffet from Pottery Barn!
kimber (not verified)
Mon, 02/28/2011 - 17:45
Love it! Just another great
Love it! Just another great project! Ana, you are amazing!
kimber
Sue (not verified)
Mon, 02/28/2011 - 18:03
I always look forward to
I always look forward to looking at your drawings even if I'm not interested in the project. I know I speak for MANY when I say what you do, and that you share it so freely with all of us, is amazing. I admire your humble manner while your talents overwhelm me. Blessings.
Val Payne (not verified)
Mon, 02/28/2011 - 18:33
Holy Wow! I need to start
Holy Wow! I need to start building and building and building some more. I need the practice so I can tackle this project!
Kevin M (not verified)
Mon, 02/28/2011 - 18:43
Thanks so much Ana, this is
Thanks so much Ana, this is the desk we've been waiting for. Beautiful.
Ana White (not verified)
Mon, 02/28/2011 - 18:58
Thank you to everyone for
Thank you to everyone for reading and waiting for this plan! I can't tell you how much your support means, and thank you especially to those of you who suggest plans so I can get a feel for what I need to draw up. I'll be blogging the remainder of the plans this week.
Silky (not verified)
Mon, 02/28/2011 - 22:33
Amazing! I just keep
Amazing!
I just keep adding plans to my to do list without having room for any more furniture. I secretely hope that my brother is going to propose to his girlfriend just that I get to build something.
Jenna (not verified)
Tue, 03/01/2011 - 10:02
real life pics? I'm so
real life pics? I'm so excited! i just wish I hadn't already bought my china cabinet!
Tracy Smith (not verified)
Wed, 03/02/2011 - 19:21
Ana provides her plans free
Ana provides her plans free of charge. You might want to try it with a different browser. I have noticed that if I use Google Chrome, it will sometimes not open certain things on this website. However, having said that, I did try it just now and this is what I did. Click on the link, when it opens in a new tab or window, right click within the page and then click Save As.. then you can save it where you want as a .pdf. Hope that helps! :-)
Christina (not verified)
Sat, 03/05/2011 - 08:34
Ana will you add the top to
Ana will you add the top to this, or just the fold down desk top?
Glenn (not verified)
Sun, 03/06/2011 - 08:30
Hi Ana - I love the plans!
Hi Ana - I love the plans! If your builders have some time i have a couple of suggestions. when using the 1x10 and 1x12 boards, they tend to want to bow after time. I know they are very easy to use but if you were to take 1x3 or 1x4 and clamp glue them together to make the desired width you get a much flatter and your bowing risk tend to fade away. its a bit of an advanced step but anybody that is eager to try will get flatter and non bowing service. With the boards being glued properly they will hold just as well if they were one solid piece. Just sharing and thanks. I did the hudson dresser will post pics soon.
Jody Ilgenfritz (not verified)
Sat, 09/29/2012 - 14:09
Plywood edges
This may be a dumb question but when using ply, how do you hide the cut edges so you don't see the different "plys" to get that real hardwood look? Do you recommend something like veneer edge banding or something?
Thanks, about to build this!
In reply to Plywood edges by Jody Ilgenfritz (not verified)
tracysmith
Tue, 10/02/2012 - 12:54
Plywood edges
You can also purchase preglued edge banding. Ask someone to help you if you can't find it. I've had to because they don't always seem to put it where you would think to look.
The edge banding comes in varying widths so choose one that is right for you and then make sure it's a little bigger than the piece you're gluing it to (you can easily trim off the excess with a razor blade or a special trimming tool that is used for that specifically).
It's pre glued so you just cut the length you need, use a clothes iron (preferably one you don't use on your clothes anymore or just be very careful not to get the glue on the bottom) at the setting it suggests and apply the iron directly to the banding with pressure. I've used it many times and it's wonderful stuff! I've stained it and painted it so either way it's a great way to dress up the plywood without having to change dimensions to account for other pieces of wood. :-)
Hope that helps, it's easy easy easy so don't be intimidated. :-)
bobgaivin
Sat, 09/29/2012 - 18:50
plywood edges-1 solution
I built 2 computer desks from 3/4" plywood. I went to the door & screen section of Home Depot and got some 3/4" wide wood strips used to hold down the screens on home made screen doors and windows. It is 1/4" thick. It has 2 slightly rounded over ends on 1 surface and square edges on the backside. It is super cheap and cuts easily.
I have also used iron on banding when working with that white coated melamine.
houquilter
Fri, 05/22/2015 - 12:35
This is exactly what I need!
I've been looking for a desk for my bedroom & this is perfect! I think I'll modify the storage to be file drawers, though.