

Roll this cute and functional CPU Cube cart under your desk to store CPU and other office items in style. Also could be used as an end table or even nightstand.
UPDATE: Check out this CPU cart built by Darla and her daughter and posted on our Facebook Page!!!
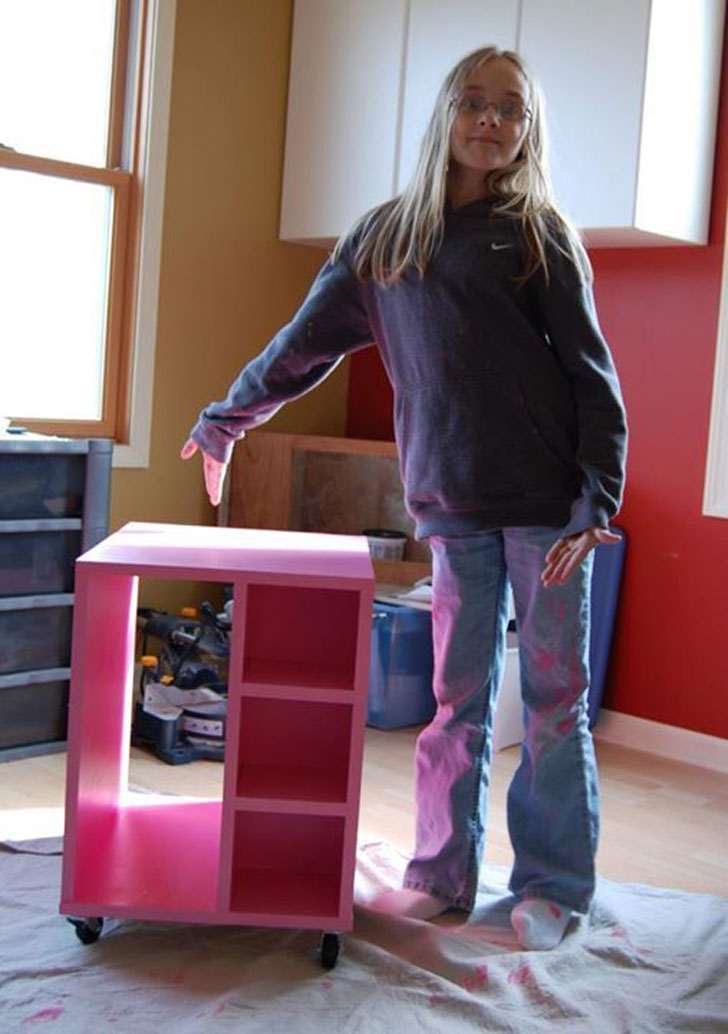
Love that pink!
Thank you to everyone who has been contributing posts and plans to our site. I've been a little extra busy of late, and I can't tell you how much I appreciate you sharing your work. I know the system we have in place is not user friendly for contributing (so sorry to those of you who submit brag posts or plans and they don't go through) and I am working long long long hours to create a system that we can all use with ease, and most importantly, spend less time trying to find the plans, and more time actually building them!
Like this plan, for example:

We are in the middle of putting an extra desk in my tiny office, and I'm thinking, how can I add more storage? I really wanted a cart that rolls under a floating desktop, and found tons of inspiration from Pottery Barn Teen's Stuff Your Stuff CPU Cart. But because of other not so fun stuff = less time to actually build :( sign, I didn't get a chance to build it.
But here is the equation that I like: better blog = more building time :) And that's why we are all here, right? Because we all love to make sawdust fly.
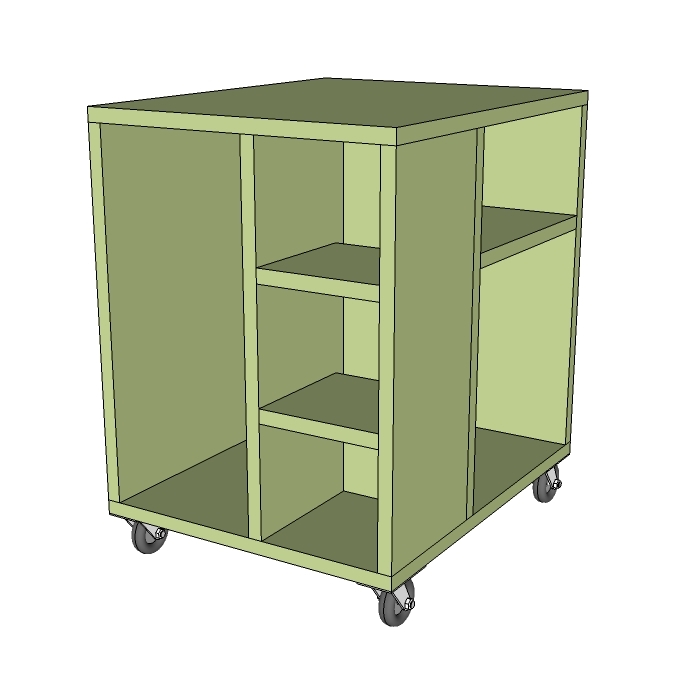
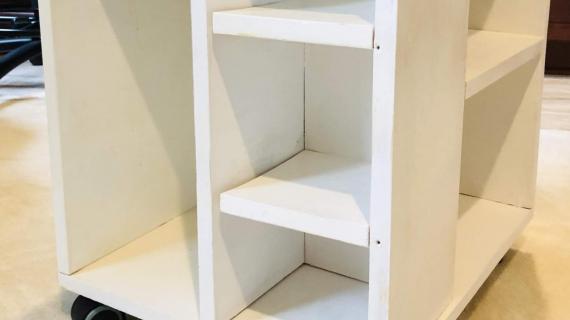
 Just wanted to give you a quick tour of this little guy, fondly called the CPU Cube Cart. It's really designed for the CPU, but you could put just about anything in there. I love how PB Teen puts Magazine Caddies in theirs. Cubbies are sized for DVDs and a printer could go on top.
 And there's more storage on this side too!
 Sorry, nothing on the back :( but you could put a cork board or magnet board there.
Preparation
1 – 1/2 Sheet of 3/4″ thick MDF or Plywood 1 – 1×8 @ 8 feet long 4 Caster Wheels 2″ screws or 1 1/4″ pocket hole screws wood glue wood filler paint and finishing supplies
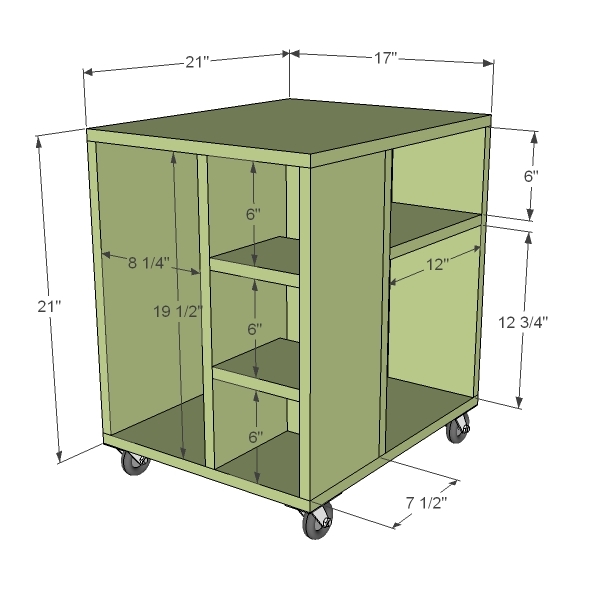
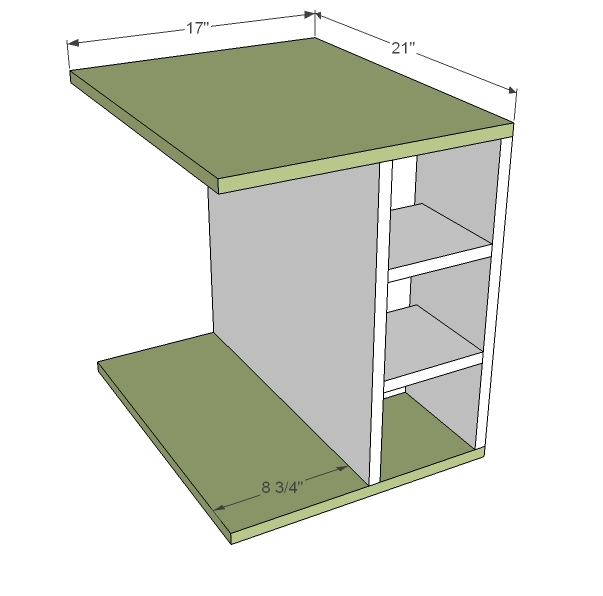
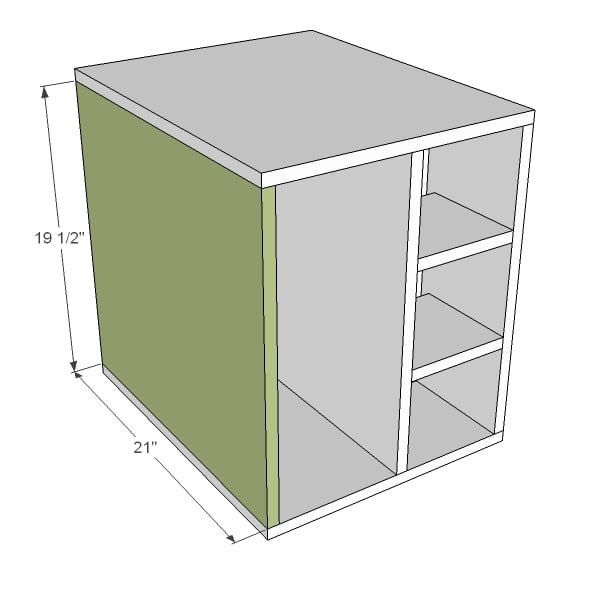
3 – 1×8 @ 19 1/2″ (Cubby Partitions) 2 – 1×8 @ 6 3/4″ (Cubby Shelves) 2 – 3/4″ plywood or MDF @ 19 1/4″ x 21″ (partitions and side) 1 – 1×8 @ 12″ (Long Shelf) 2 – 3/4″ plywood or MDF @ 17″ x 21″ (top and bottom)


Instructions
Step 1
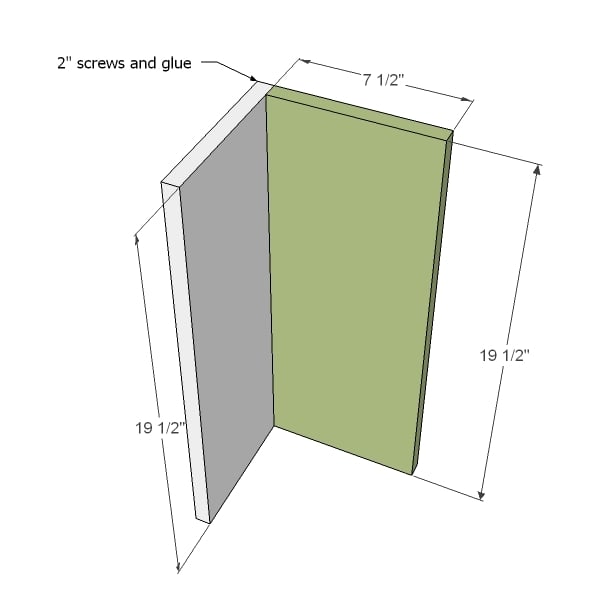
Screw 2 1x8s Together
Screw 2 of the 1×8 boards @ 19 1/2″ long together. Either use 2″ screws countersunk and glue or pocket hole screws.
Step 2
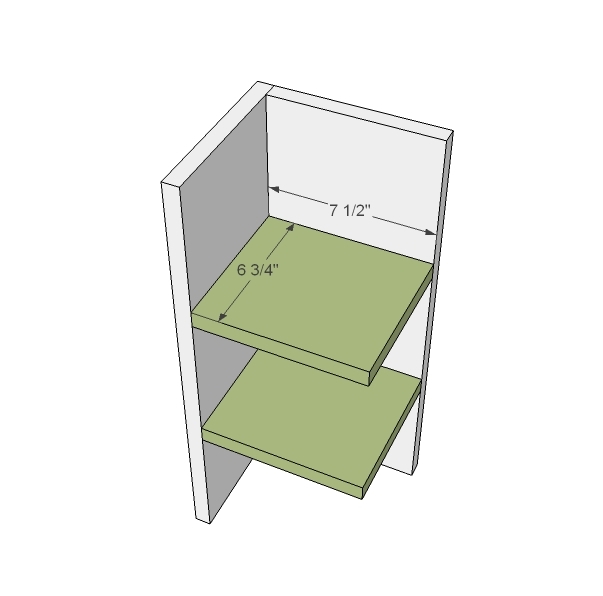
Cubby Shelves
Mark the boards from step 1 on the insides down and up 6″ from the bottom and top. Then place your shelves and screw in place.
Step 3
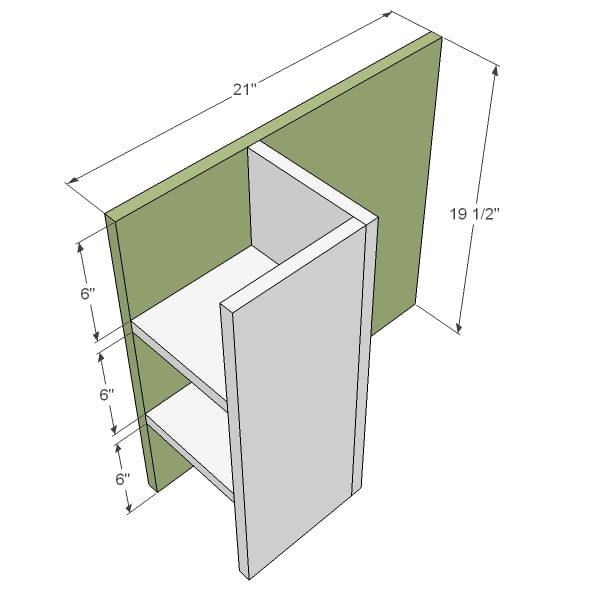
Center Partition
Attach the center partition to the cubbies as shown above.
Step 4
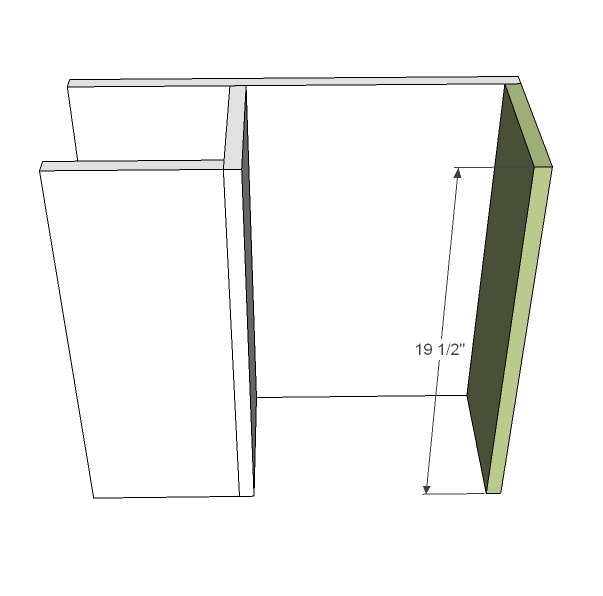
Back
And add the remaining 1×8 board to the back. Well, I take that back. There is one more . . .
Step 5
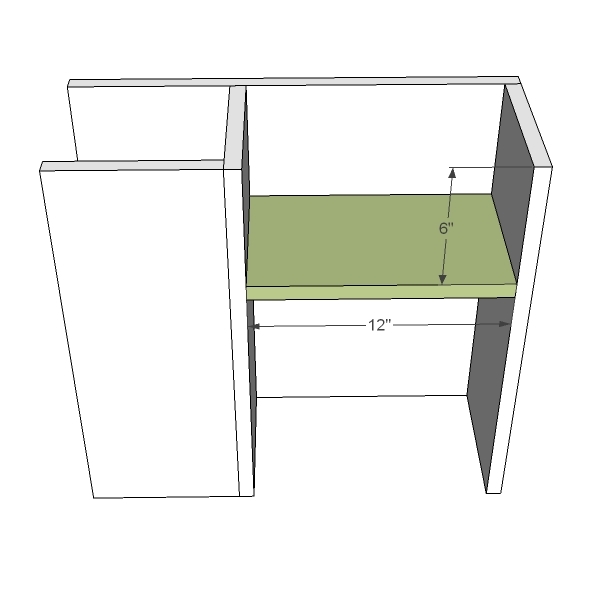
Step 6
Top and Bottom
Attach the top and bottom to the shelves as shown above. Keep flush to the shelf side.
Step 7
Final Side
Attach the last remaining side as shown above. Use glue and 2″ screws or 1 1/4″ pocket hole screws.
Step 8
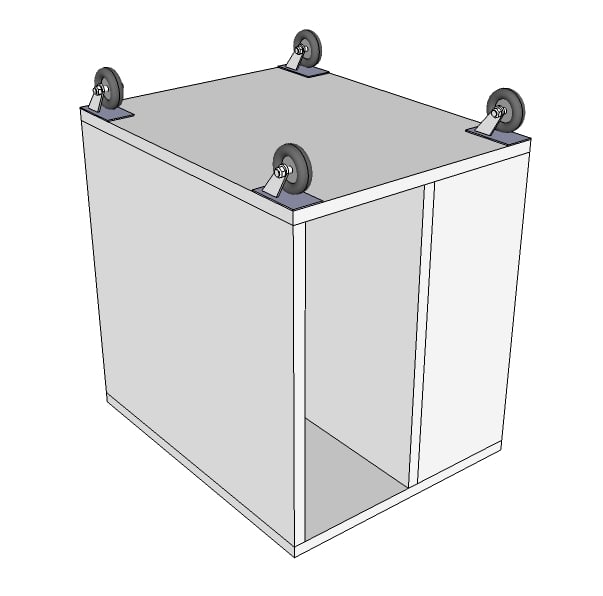
Caster Wheels
Finish with the caster wheels. If your wheels do not come with screws, you may need to purchase appropriately sized screws. Keep the screws under 3/4″ long to prevent your screws tips from poking out.
Fill all holes with wood filler. Let dry and sand and finish as desired.
BTW does anyone else think this could double as a modern style end table?
Comments
Tanjia (not verified)
Mon, 02/21/2011 - 21:28
I think this would make a
I think this would make a great side table! Good idea.
I hope you get all the non-building stuff done so you can get back to doing what you love. Thanks for the plans!
mamma_joy (not verified)
Mon, 02/21/2011 - 22:24
Seems like a good plan to
Seems like a good plan to tuck away for when we build the loft beds with desks below. I love anything that offers 'secret' storage!
cakelady (not verified)
Tue, 02/22/2011 - 03:49
I think this would be great
I think this would be great storage for homeschoolers and all our school stuff! Lovely!
I am still working on my farmhouse bed. It is coming along though.
kerry davis (not verified)
Tue, 02/22/2011 - 06:59
OMG - Ana, this is bumped to
OMG - Ana, this is bumped to the top of my to-do list! I am in love with it. Love the corkboard idea, or you could add little hooks to hang whatevers on! Oooh, or a magnetic surface, or white erase, or chalkboard.
Thanks so much for these plans & making them look so easy!!
XoXoXo
Jessica (not verified)
Tue, 02/22/2011 - 08:45
This is such a clever design,
This is such a clever design, Ana--thank you! With the casters, it'd be especially handy in small office spaces so it could be easily tucked away, and putting a cork board on the back panel is genius!
Rhonda Tomlinson (not verified)
Tue, 02/22/2011 - 10:57
HMMMMMM . . . with a bit of
HMMMMMM . . . with a bit of re-sizing this will work wonders for a Cricut storage unit!!! Can't wait!! Finally, everything in one place!!!
Now ... if warm weather would stay around for more than one day.
Ana, Thank You for all your wonderful designs. You are simply amazing!
Dbvaig (not verified)
Tue, 02/22/2011 - 12:45
This is an awesome design.
This is an awesome design.
I am a DJ, and plan on making this as an extension to my computer studio. With a few modifications and extra support, I bet it would be perfect for keeping my 12" vinyls out of sight when not in use!
Thanks to the poster!
Theresa (not verified)
Tue, 02/22/2011 - 15:24
This looks like something for
This looks like something for all the video game stuff too. And one for my sewing room and one for the garage and a mini bar and laundry room supplies. Thanks Ana. Great plan.
Lynn (not verified)
Thu, 02/24/2011 - 01:51
This is great, as always. I
This is great, as always. I will have to make one for my craft room for my cricut machine and accessories! One would be great in the kitches too for keeping all those small appliances. I could place them on top to use them and store them away underneath! Awesome.
Anita (not verified)
Thu, 02/24/2011 - 04:38
My hubby needs to build one
My hubby needs to build one for me! Love your blog! Come by to visit us sometime!
dingobeat
Sun, 05/08/2011 - 16:45
If using for a computer
This is my first post to this great site. I have been browsing the ideas for 2 days now .... not every minute, but he pages are open on my laptop for viewing when I take my coffee and meal breaks.
Anyway ... I just thought that I would mention .. If this consol is to be used to house a computer tower, a magnet as in a magnetic board used in the near vicinity to a computer is not deireable. It is possible that it can corrupt the data. It is not so bad these days with newer computers, but it can happen more easily to older comps. A magnet on a monitor can disrupt the colours too. Just thought I 'd mention this.
Ok, I'm back to my shop ... nothing good going on today, just trying to follow instructions on putting together my new Kreg precision router.
Why can't these things just arrive assembled. I am hopless at following these types of instructions. Urgh .... LOL
Have a good day, hopefully I 'll have my good day tomorrow.
Tsu Dho Nimh
Mon, 05/09/2011 - 05:13
Magnet board not harmful
"If this consol is to be used to house a computer tower, a magnet as in a magnetic board used in the near vicinity to a computer is not desireable. It is possible that it can corrupt the data."
Please do not spread outdated and inaccurate information.
www.pcworld.com/article/116572/busting_the_biggest_pc_myths.html
cobolhacker.com/2006/10/28/is-it-possible-to-erase-a-hard-drive-with-magnets/
A commercially available magnet clip, used on a magnet-holding message board on the outside of this console is not strong enough to corrupt data on your hard drive. It can't even hold a straight pin to the back side of the wood.
I've been using the side of my metal computer cases for a magnetic message board for years.
Only CRT monitors (the ones with tubes) are susceptible to magnets, and it has to be a very strong magnet, such as the sort used in the yoke of a CRT or radar. Flat-screen (LED or Plasma screens) are not produced by streams of charged particles and are not affected by magnets.
claydowling
Mon, 05/09/2011 - 06:17
Magnet boards
Aren't a risk. A magnet board is just a sheet of metal, and won't affect your computer at all. Now, I wouldn't recommend holding a floppy disk to the board with a magnet, but if you're using floppy disks still you have bigger problems than magnets.
Debi M (not verified)
Sat, 08/06/2011 - 19:42
Cube
Do you think this is big enough to put fold down leaf on it? I'm thinking of a portable cutting table. Any ideas?
darlasowders
Fri, 09/30/2011 - 07:22
I think you'd have to scale it way up.
It's only 19.5" tall without the casters. (Mine will be 1/4" shorter. :-))
There is a plan for a folding craft table that would probably be better.
darlasowders
Fri, 09/30/2011 - 07:11
I'm making this right now
There is a small error in the cutting list. The plywood pieces for the side and partition should be 19 1/2" x 21--not 19 1/4" x 21.
Otherwise, it is going well so far and my dd is excited to see it being built. (Partly because she's getting her older brother's hand-me-down computer :-))
Laura NYC
Tue, 07/16/2013 - 09:47
CPU cart
This little guy is just what I've been looking for. As we are a family living in pretty small quarters, I need something relatively small and mobile for my CPU on top of which I can place my scanner...something I can roll away under my desk when I'm not using the scanner. I figure I can mount a non-skid surface on top and/or edge it with some half-round molding or something similar to keep the scanner a little more secure. It seems like a nice project for a newbie builder like me. Thus far I've made friends with my miter saw and have become pretty good at coping and installing baseboard molding...onward and upward to creating freestanding structures!
pattiemelt
Sat, 08/13/2016 - 10:43
needs vents
Great design, but there's 1 design flaw if you plan to use this for a CPU that is running. It needs vents to allow air circulation. Heat is a killer for computers. This design doesn't have enough space for air to flow around a CPU so the heat will build up in it. Simple fix: cut a vent hole in the bottom and at least 1 in the side & back. You can cover the holes with a vent cover if you want for aesthetics. But a pretty desk is no excuse for overheating your computer.
Ridbig
Wed, 09/09/2020 - 19:33
Broken link
The link for the pdf file doesn't work!